
 GitHub에서 보기 GitHub에서 보기 |
이 Colab은 GAN(Generative Adversarial Network)을 기반으로 하는 TF-Hub 모듈의 사용 예를 보여줍니다. 이 모듈은 잠재 공간이라고 하는 N-차원 벡터에서 RGB 이미지로 매핑합니다.
두 가지 예가 제공됩니다.
- 잠재 공간에서 이미지로 매핑
- 대상 이미지를 고려하여 대상 이미지와 유사한 이미지를 생성하는 잠재 벡터를 찾기 위해 경사 하강 사용
선택적 전제 조건
- 하위 수준의 Tensorflow 개념에 익숙해야 합니다.
- Wikipedia에서 GAN(Generative Adversarial Network)을 확인합니다.
- Progressive GAN에 관한 논문을 참조합니다(Progressive Growing of GANs for Improved Quality, Stability, and Variation).
더 많은 모델
여기에서 이미지를 생성할 수 있는, tfhub.dev에서 현재 호스팅되는 모든 모델을 찾을 수 있습니다.
설정
# Install imageio for creating animations.pip -q install imageiopip -q install scikit-imagepip install git+https://github.com/tensorflow/docs
Imports and function definitions
from absl import logging

import imageio
import PIL.Image
import matplotlib.pyplot as plt
import numpy as np

import tensorflow as tf
tf.random.set_seed(0)

import tensorflow_hub as hub
from tensorflow_docs.vis import embed
import time

try:
  from google.colab import files
except ImportError:
  pass

from IPython import display
from skimage import transform

# We could retrieve this value from module.get_input_shapes() if we didn't know
# beforehand which module we will be using.
latent_dim = 512


# Interpolates between two vectors that are non-zero and don't both lie on a
# line going through origin. First normalizes v2 to have the same norm as v1.
# Then interpolates between the two vectors on the hypersphere.
def interpolate_hypersphere(v1, v2, num_steps):
  v1_norm = tf.norm(v1)
  v2_norm = tf.norm(v2)
  v2_normalized = v2 * (v1_norm / v2_norm)

  vectors = []
  for step in range(num_steps):
    interpolated = v1 + (v2_normalized - v1) * step / (num_steps - 1)
    interpolated_norm = tf.norm(interpolated)
    interpolated_normalized = interpolated * (v1_norm / interpolated_norm)
    vectors.append(interpolated_normalized)
  return tf.stack(vectors)

# Simple way to display an image.
def display_image(image):
  image = tf.constant(image)
  image = tf.image.convert_image_dtype(image, tf.uint8)
  return PIL.Image.fromarray(image.numpy())

# Given a set of images, show an animation.
def animate(images):
  images = np.array(images)
  converted_images = np.clip(images * 255, 0, 255).astype(np.uint8)
  imageio.mimsave('./animation.gif', converted_images)
  return embed.embed_file('./animation.gif')

logging.set_verbosity(logging.ERROR)
2022-12-14 21:52:25.866101: W tensorflow/compiler/xla/stream_executor/platform/default/dso_loader.cc:64] Could not load dynamic library 'libnvinfer.so.7'; dlerror: libnvinfer.so.7: cannot open shared object file: No such file or directory
2022-12-14 21:52:25.866225: W tensorflow/compiler/xla/stream_executor/platform/default/dso_loader.cc:64] Could not load dynamic library 'libnvinfer_plugin.so.7'; dlerror: libnvinfer_plugin.so.7: cannot open shared object file: No such file or directory
2022-12-14 21:52:25.866236: W tensorflow/compiler/tf2tensorrt/utils/py_utils.cc:38] TF-TRT Warning: Cannot dlopen some TensorRT libraries. If you would like to use Nvidia GPU with TensorRT, please make sure the missing libraries mentioned above are installed properly.
잠재 공간 보간
무작위 벡터
무작위로 초기화된 두 벡터 사이의 잠재 공간을 보간합니다. 사전 훈련된 Progressive GAN이 포함된 TF-Hub 모듈 progan-128을 사용합니다.
progan = hub.load("https://tfhub.dev/google/progan-128/1").signatures['default']
def interpolate_between_vectors():
  v1 = tf.random.normal([latent_dim])
  v2 = tf.random.normal([latent_dim])

  # Creates a tensor with 25 steps of interpolation between v1 and v2.
  vectors = interpolate_hypersphere(v1, v2, 50)

  # Uses module to generate images from the latent space.
  interpolated_images = progan(vectors)['default']

  return interpolated_images

interpolated_images = interpolate_between_vectors()
animate(interpolated_images)
잠재 공간에서 가장 가까운 벡터 찾기
대상 이미지를 수정합니다. 예를 들어, 모듈에서 생성된 이미지를 사용하거나 고유한 이미지를 업로드합니다.
image_from_module_space = True # @param { isTemplate:true, type:"boolean" }
def get_module_space_image():
vector = tf.random.normal([1, latent_dim])
images = progan(vector)['default'][0]
return images
def upload_image():
uploaded = files.upload()
image = imageio.imread(uploaded[list(uploaded.keys())[0]])
return transform.resize(image, [128, 128])
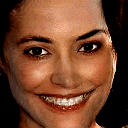
if image_from_module_space:
target_image = get_module_space_image()
else:
target_image = upload_image()
display_image(target_image)
대상 이미지와 잠재 공간 변수에 의해 생성된 이미지 사이의 손실 함수를 정의한 후, 경사 하강을 사용하여 손실을 최소화하는 변수 값을 찾을 수 있습니다.
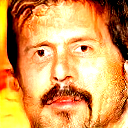
tf.random.set_seed(42)
initial_vector = tf.random.normal([1, latent_dim])
display_image(progan(initial_vector)['default'][0])

def find_closest_latent_vector(initial_vector, num_optimization_steps,
steps_per_image):
images = []
losses = []
vector = tf.Variable(initial_vector)
optimizer = tf.optimizers.Adam(learning_rate=0.01)
loss_fn = tf.losses.MeanAbsoluteError(reduction="sum")
for step in range(num_optimization_steps):
if (step % 100)==0:
print()
print('.', end='')
with tf.GradientTape() as tape:
image = progan(vector.read_value())['default'][0]
if (step % steps_per_image) == 0:
images.append(image.numpy())
target_image_difference = loss_fn(image, target_image[:,:,:3])
# The latent vectors were sampled from a normal distribution. We can get
# more realistic images if we regularize the length of the latent vector to
# the average length of vector from this distribution.
regularizer = tf.abs(tf.norm(vector) - np.sqrt(latent_dim))
loss = target_image_difference + regularizer
losses.append(loss.numpy())
grads = tape.gradient(loss, [vector])
optimizer.apply_gradients(zip(grads, [vector]))
return images, losses
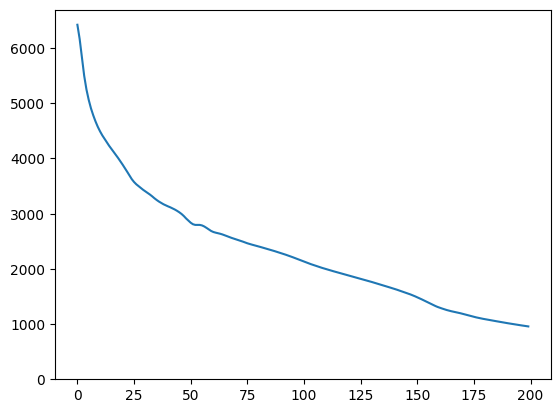
num_optimization_steps=200
steps_per_image=5
images, loss = find_closest_latent_vector(initial_vector, num_optimization_steps, steps_per_image)
....................................................................................................
....................................................................................................
plt.plot(loss)
plt.ylim([0,max(plt.ylim())])
(0.0, 6696.3002655029295)
animate(np.stack(images))

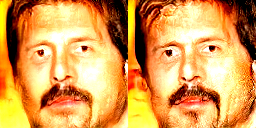
결과를 대상과 비교합니다.
display_image(np.concatenate([images[-1], target_image], axis=1))
위의 예를 이용한 추가 작업
이미지가 모듈 공간의 이미지인 경우, 하강이 빠르고 합리적인 샘플로 수렴합니다. 모듈 공간의 이미지가 아닌 이미지로 하강해 보세요. 이미지가 훈련 이미지 공간에 상당히 가까운 경우에만 하강이 수렴합니다.
하강이 더 빠르고 더 현실적인 이미지를 만드는 방법은? 다음을 시도해볼 수 있습니다.
- 이미지 차이에 대해 다른 손실을 사용합니다(예: 2차 방정식).
- 잠재 벡터에 다른 regularizer를 사용합니다.
- 여러 번의 실행 후에 무작위 벡터에서 초기화합니다.
- 기타