
การจัดหมวดหมู่รูปภาพเป็นการใช้การเรียนรู้ของเครื่องโดยทั่วไปเพื่อระบุว่ารูปภาพแสดงถึงอะไร ตัวอย่างเช่น เราอาจต้องการทราบว่าในภาพที่กำหนดมีสัตว์ประเภทใด งานในการทำนายว่ารูปภาพแสดงถึงอะไรเรียกว่า การจัดหมวดหมู่รูปภาพ ตัวแยกประเภทรูปภาพได้รับการฝึกฝนให้จดจำคลาสของรูปภาพต่างๆ ตัวอย่างเช่น แบบจำลองอาจได้รับการฝึกให้จดจำภาพถ่ายของสัตว์สามประเภทที่แตกต่างกัน ได้แก่ กระต่าย หนูแฮมสเตอร์ และสุนัข ดูภาพ รวมการจัดหมวดหมู่รูปภาพ สำหรับข้อมูลเพิ่มเติมเกี่ยวกับตัวแยกประเภทรูปภาพ
ใช้ Task Library ImageClassifier API เพื่อปรับใช้ตัวแยกประเภทรูปภาพแบบกำหนดเองหรือตัวแยกประเภทรูปภาพที่ได้รับการฝึกล่วงหน้าในแอปมือถือของคุณ
คุณสมบัติที่สำคัญของ ImageClassifier API
การประมวลผลภาพอินพุต รวมถึงการหมุน การปรับขนาด และการแปลงพื้นที่สี
ภูมิภาคที่สนใจของรูปภาพอินพุต
ป้ายชื่อสถานที่แผนที่
เกณฑ์คะแนนเพื่อกรองผลลัพธ์
ผลการจำแนกประเภท Top-k
ติดป้ายกำกับรายการที่อนุญาตและรายการที่ปฏิเสธ
โมเดลตัวแยกประเภทรูปภาพที่รองรับ
รับประกันว่าโมเดลต่อไปนี้จะเข้ากันได้กับ ImageClassifier API
โมเดลที่สร้างโดย TensorFlow Lite Model Maker สำหรับการจำแนกรูปภาพ
โมเดลการจัดหมวดหมู่รูปภาพที่ได้รับการฝึกล่วงหน้าบน TensorFlow Hub
โมเดลที่สร้างโดย AutoML Vision Edge Image Classification
โมเดลแบบกำหนดเองที่ตรงตาม ข้อกำหนดความเข้ากันได้ของโมเดล
เรียกใช้การอนุมานใน Java
ดู แอปอ้างอิง Image Classification สำหรับตัวอย่างวิธีใช้ ImageClassifier ในแอป Android
ขั้นตอนที่ 1: นำเข้าการพึ่งพา Gradle และการตั้งค่าอื่นๆ
คัดลอกไฟล์โมเดล .tflite ไปยังไดเร็กทอรีทรัพย์สินของโมดูล Android ที่จะเรียกใช้โมเดล ระบุว่าไม่ควรบีบอัดไฟล์ และเพิ่มไลบรารี TensorFlow Lite ลงในไฟล์ build.gradle ของโมดูล:
android {
    // Other settings

    // Specify tflite file should not be compressed for the app apk
    aaptOptions {
        noCompress "tflite"
    }
}

dependencies {
    // Other dependencies

    // Import the Task Vision Library dependency (NNAPI is included)
    implementation 'org.tensorflow:tensorflow-lite-task-vision'
    // Import the GPU delegate plugin Library for GPU inference
    implementation 'org.tensorflow:tensorflow-lite-gpu-delegate-plugin'
}
ขั้นตอนที่ 2: การใช้แบบจำลอง
// Initialization
ImageClassifierOptions options =
    ImageClassifierOptions.builder()
        .setBaseOptions(BaseOptions.builder().useGpu().build())
        .setMaxResults(1)
        .build();
ImageClassifier imageClassifier =
    ImageClassifier.createFromFileAndOptions(
        context, modelFile, options);

// Run inference
List<Classifications> results = imageClassifier.classify(image);
ดู ซอร์สโค้ดและ javadoc สำหรับตัวเลือกเพิ่มเติมในการกำหนดค่า ImageClassifier
เรียกใช้การอนุมานใน iOS
ขั้นตอนที่ 1: ติดตั้งการอ้างอิง
Task Library รองรับการติดตั้งโดยใช้ CocoaPods ตรวจสอบให้แน่ใจว่าติดตั้ง CocoaPods บนระบบของคุณแล้ว โปรดดู คู่มือการติดตั้ง CocoaPods สำหรับคำแนะนำ
โปรดดู คู่มือ CocoaPods สำหรับรายละเอียดเกี่ยวกับการเพิ่มพ็อดในโปรเจ็กต์ Xcode
เพิ่มพ็อด TensorFlowLiteTaskVision ใน Podfile
target 'MyAppWithTaskAPI' do
  use_frameworks!
  pod 'TensorFlowLiteTaskVision'
end
ตรวจสอบให้แน่ใจว่าโมเดล .tflite ที่คุณจะใช้ในการอนุมานมีอยู่ใน App Bundle ของคุณ
ขั้นตอนที่ 2: การใช้แบบจำลอง
สวิฟท์
// Imports
import TensorFlowLiteTaskVision

// Initialization
guard let modelPath = Bundle.main.path(forResource: "birds_V1",
                                            ofType: "tflite") else { return }

let options = ImageClassifierOptions(modelPath: modelPath)

// Configure any additional options:
// options.classificationOptions.maxResults = 3

let classifier = try ImageClassifier.classifier(options: options)

// Convert the input image to MLImage.
// There are other sources for MLImage. For more details, please see:
// https://developers.google.com/ml-kit/reference/ios/mlimage/api/reference/Classes/GMLImage
guard let image = UIImage (named: "sparrow.jpg"), let mlImage = MLImage(image: image) else { return }

// Run inference
let classificationResults = try classifier.classify(mlImage: mlImage)
วัตถุประสงค์ ค
// Imports
#import <TensorFlowLiteTaskVision/TensorFlowLiteTaskVision.h>

// Initialization
NSString *modelPath = [[NSBundle mainBundle] pathForResource:@"birds_V1" ofType:@"tflite"];

TFLImageClassifierOptions *options =
    [[TFLImageClassifierOptions alloc] initWithModelPath:modelPath];

// Configure any additional options:
// options.classificationOptions.maxResults = 3;

TFLImageClassifier *classifier = [TFLImageClassifier imageClassifierWithOptions:options
                                                                          error:nil];

// Convert the input image to MLImage.
UIImage *image = [UIImage imageNamed:@"sparrow.jpg"];

// There are other sources for GMLImage. For more details, please see:
// https://developers.google.com/ml-kit/reference/ios/mlimage/api/reference/Classes/GMLImage
GMLImage *gmlImage = [[GMLImage alloc] initWithImage:image];

// Run inference
TFLClassificationResult *classificationResult =
    [classifier classifyWithGMLImage:gmlImage error:nil];
ดู ซอร์สโค้ด สำหรับตัวเลือกเพิ่มเติมในการกำหนดค่า TFLImageClassifier
เรียกใช้การอนุมานใน Python
ขั้นตอนที่ 1: ติดตั้งแพ็คเกจ pip
pip install tflite-support
ขั้นตอนที่ 2: การใช้แบบจำลอง
# Imports
from tflite_support.task import vision
from tflite_support.task import core
from tflite_support.task import processor

# Initialization
base_options = core.BaseOptions(file_name=model_path)
classification_options = processor.ClassificationOptions(max_results=2)
options = vision.ImageClassifierOptions(base_options=base_options, classification_options=classification_options)
classifier = vision.ImageClassifier.create_from_options(options)

# Alternatively, you can create an image classifier in the following manner:
# classifier = vision.ImageClassifier.create_from_file(model_path)

# Run inference
image = vision.TensorImage.create_from_file(image_path)
classification_result = classifier.classify(image)
ดู ซอร์สโค้ด สำหรับตัวเลือกเพิ่มเติมในการกำหนดค่า ImageClassifier
เรียกใช้การอนุมานใน C ++
// Initialization
ImageClassifierOptions options;
options.mutable_base_options()->mutable_model_file()->set_file_name(model_path);
std::unique_ptr<ImageClassifier> image_classifier = ImageClassifier::CreateFromOptions(options).value();

// Create input frame_buffer from your inputs, `image_data` and `image_dimension`.
// See more information here: tensorflow_lite_support/cc/task/vision/utils/frame_buffer_common_utils.h

std::unique_ptr<FrameBuffer> frame_buffer = CreateFromRgbRawBuffer(
      image_data, image_dimension);

// Run inference
const ClassificationResult result = image_classifier->Classify(*frame_buffer).value();
ดู ซอร์สโค้ด สำหรับตัวเลือกเพิ่มเติมในการกำหนดค่า ImageClassifier
ตัวอย่างผลลัพธ์
นี่คือตัวอย่างผลการจำแนก ประเภทนก
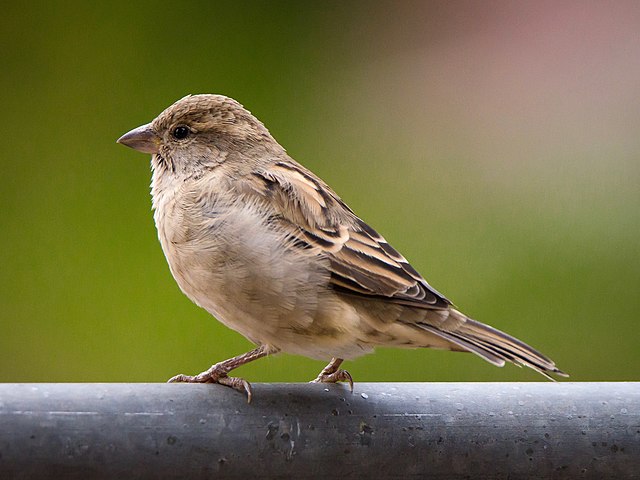
Results:
  Rank #0:
   index       : 671
   score       : 0.91406
   class name  : /m/01bwb9
   display name: Passer domesticus
  Rank #1:
   index       : 670
   score       : 0.00391
   class name  : /m/01bwbt
   display name: Passer montanus
  Rank #2:
   index       : 495
   score       : 0.00391
   class name  : /m/0bwm6m
   display name: Passer italiae
ลองใช้ เครื่องมือสาธิต CLI ง่ายๆ สำหรับ ImageClassifier ด้วยโมเดลและข้อมูลการทดสอบของคุณเอง
ข้อกำหนดความเข้ากันได้ของโมเดล
ImageClassifier API คาดว่าจะมีโมเดล TFLite พร้อมด้วย ข้อมูลเมตาของโมเดล TFLite ที่บังคับ ดูตัวอย่างการสร้างข้อมูลเมตาสำหรับตัวแยกประเภทรูปภาพโดยใช้ TensorFlow Lite Metadata Writer API
โมเดลตัวแยกประเภทรูปภาพที่เข้ากันได้ควรเป็นไปตามข้อกำหนดต่อไปนี้:
อินพุตอิมเมจเทนเซอร์ (kTfLiteUInt8/kTfLiteFloat32)
- อินพุตรูปภาพขนาด
[batch x height x width x channels] - ไม่รองรับการอนุมานแบบแบตช์ (
batchต้องเป็น 1) - รองรับเฉพาะอินพุต RGB (
channelsต้องเป็น 3) - หากประเภทเป็น kTfLiteFloat32 จำเป็นต้องแนบ NormalizationOptions กับข้อมูลเมตาเพื่อทำให้อินพุตเป็นมาตรฐาน
- อินพุตรูปภาพขนาด
เทนเซอร์คะแนนเอาท์พุต (kTfLiteUInt8/kTfLiteFloat32)
- มีคลาส
Nและ 2 หรือ 4 มิติ เช่น[1 x N]หรือ[1 x 1 x 1 x N] - การแมปป้ายกำกับเพิ่มเติม (แต่แนะนำ) เป็น AssociatedFile-s ที่มีประเภท TENSOR_AXIS_LABELS โดยมีหนึ่งป้ายกำกับต่อบรรทัด ดู ตัวอย่างไฟล์ป้ายกำกับ AssociatedFile แรกดังกล่าว (ถ้ามี) จะใช้ในการกรอก
label(ชื่อเป็นclass_nameใน C++) ของผลลัพธ์ ฟิลด์display_nameถูกกรอกจาก AssociatedFile (ถ้ามี) ซึ่งมีโลแคลตรงกับฟิลด์display_names_localeของImageClassifierOptionsที่ใช้ในเวลาสร้าง ("en" โดยค่าเริ่มต้น เช่น ภาษาอังกฤษ) หากไม่มีสิ่งใดเลย ระบบจะกรอกเฉพาะฟิลด์indexของผลลัพธ์เท่านั้น
- มีคลาส