
छवि खंडकर्ता यह अनुमान लगाते हैं कि छवि का प्रत्येक पिक्सेल एक निश्चित वर्ग से जुड़ा है या नहीं। यह ऑब्जेक्ट डिटेक्शन के विपरीत है, जो आयताकार क्षेत्रों में वस्तुओं का पता लगाता है, और छवि वर्गीकरण , जो समग्र छवि को वर्गीकृत करता है। छवि खंडकों के बारे में अधिक जानकारी के लिए छवि विभाजन अवलोकन देखें।
अपने कस्टम इमेज सेगमेंटर्स या पूर्व-प्रशिक्षित लोगों को अपने मोबाइल ऐप्स में तैनात करने के लिए टास्क लाइब्रेरी ImageSegmenter एपीआई का उपयोग करें।
ImageSegmenter API की मुख्य विशेषताएं
इनपुट इमेज प्रोसेसिंग, जिसमें रोटेशन, आकार बदलना और रंग स्थान रूपांतरण शामिल है।
मानचित्र स्थान को लेबल करें.
दो आउटपुट प्रकार, श्रेणी मास्क और आत्मविश्वास मास्क।
प्रदर्शन प्रयोजन के लिए रंगीन लेबल.
समर्थित छवि खंड मॉडल
निम्नलिखित मॉडलों को ImageSegmenter API के साथ संगत होने की गारंटी दी गई है।
कस्टम मॉडल जो मॉडल संगतता आवश्यकताओं को पूरा करते हैं।
जावा में अनुमान चलाएँ
एंड्रॉइड ऐप में ImageSegmenter का उपयोग कैसे करें के उदाहरण के लिए इमेज सेगमेंटेशन संदर्भ ऐप देखें।
चरण 1: ग्रैडल निर्भरता और अन्य सेटिंग्स आयात करें
.tflite मॉडल फ़ाइल को एंड्रॉइड मॉड्यूल की संपत्ति निर्देशिका में कॉपी करें जहां मॉडल चलाया जाएगा। निर्दिष्ट करें कि फ़ाइल को संपीड़ित नहीं किया जाना चाहिए, और मॉड्यूल की build.gradle फ़ाइल में TensorFlow Lite लाइब्रेरी जोड़ें:
android {
    // Other settings

    // Specify tflite file should not be compressed for the app apk
    aaptOptions {
        noCompress "tflite"
    }
}

dependencies {
    // Other dependencies

    // Import the Task Vision Library dependency (NNAPI is included)
    implementation 'org.tensorflow:tensorflow-lite-task-vision'
    // Import the GPU delegate plugin Library for GPU inference
    implementation 'org.tensorflow:tensorflow-lite-gpu-delegate-plugin'
}
चरण 2: मॉडल का उपयोग करना
// Initialization
ImageSegmenterOptions options =
    ImageSegmenterOptions.builder()
        .setBaseOptions(BaseOptions.builder().useGpu().build())
        .setOutputType(OutputType.CONFIDENCE_MASK)
        .build();
ImageSegmenter imageSegmenter =
    ImageSegmenter.createFromFileAndOptions(context, modelFile, options);

// Run inference
List<Segmentation> results = imageSegmenter.segment(image);
ImageSegmenter कॉन्फ़िगर करने के लिए अधिक विकल्पों के लिए स्रोत कोड और javadoc देखें।
आईओएस में अनुमान चलाएँ
चरण 1: निर्भरताएँ स्थापित करें
टास्क लाइब्रेरी CocoaPods का उपयोग करके इंस्टॉलेशन का समर्थन करती है। सुनिश्चित करें कि CocoaPods आपके सिस्टम पर स्थापित है। कृपया निर्देशों के लिए कोकोपोड्स इंस्टालेशन गाइड देखें।
Xcode प्रोजेक्ट में पॉड्स जोड़ने के विवरण के लिए कृपया CocoaPods गाइड देखें।
पॉडफाइल में TensorFlowLiteTaskVision पॉड जोड़ें।
target 'MyAppWithTaskAPI' do
  use_frameworks!
  pod 'TensorFlowLiteTaskVision'
end
सुनिश्चित करें कि आप अनुमान के लिए जिस .tflite मॉडल का उपयोग कर रहे हैं वह आपके ऐप बंडल में मौजूद है।
चरण 2: मॉडल का उपयोग करना
तीव्र
// Imports
import TensorFlowLiteTaskVision
// Initialization
guard let modelPath = Bundle.main.path(forResource: "deeplabv3",
ofType: "tflite") else { return }
let options = ImageSegmenterOptions(modelPath: modelPath)
// Configure any additional options:
// options.outputType = OutputType.confidenceMasks
let segmenter = try ImageSegmenter.segmenter(options: options)
// Convert the input image to MLImage.
// There are other sources for MLImage. For more details, please see:
// https://developers.google.com/ml-kit/reference/ios/mlimage/api/reference/Classes/GMLImage
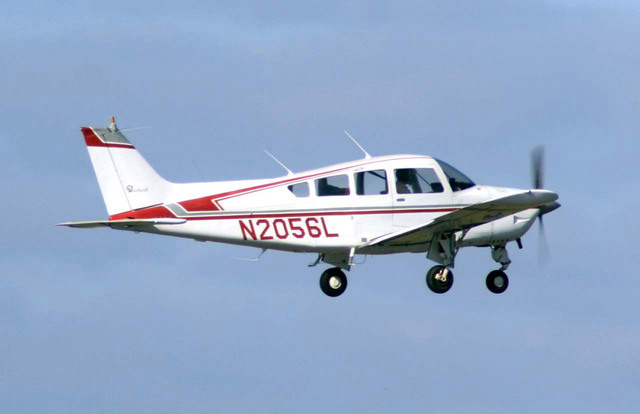
guard let image = UIImage (named: "plane.jpg"), let mlImage = MLImage(image: image) else { return }
// Run inference
let segmentationResult = try segmenter.segment(mlImage: mlImage)
उद्देश्य सी
// Imports
#import <TensorFlowLiteTaskVision/TensorFlowLiteTaskVision.h>

// Initialization
NSString *modelPath = [[NSBundle mainBundle] pathForResource:@"deeplabv3" ofType:@"tflite"];

TFLImageSegmenterOptions *options =
    [[TFLImageSegmenterOptions alloc] initWithModelPath:modelPath];

// Configure any additional options:
// options.outputType = TFLOutputTypeConfidenceMasks;

TFLImageSegmenter *segmenter = [TFLImageSegmenter imageSegmenterWithOptions:options
                                                                      error:nil];

// Convert the input image to MLImage.
UIImage *image = [UIImage imageNamed:@"plane.jpg"];

// There are other sources for GMLImage. For more details, please see:
// https://developers.google.com/ml-kit/reference/ios/mlimage/api/reference/Classes/GMLImage
GMLImage *gmlImage = [[GMLImage alloc] initWithImage:image];

// Run inference
TFLSegmentationResult *segmentationResult =
    [segmenter segmentWithGMLImage:gmlImage error:nil];
TFLImageSegmenter कॉन्फ़िगर करने के लिए अधिक विकल्पों के लिए स्रोत कोड देखें।
पायथन में अनुमान चलाएँ
चरण 1: पिप पैकेज स्थापित करें
pip install tflite-support
चरण 2: मॉडल का उपयोग करना
# Imports
from tflite_support.task import vision
from tflite_support.task import core
from tflite_support.task import processor

# Initialization
base_options = core.BaseOptions(file_name=model_path)
segmentation_options = processor.SegmentationOptions(
    output_type=processor.SegmentationOptions.output_type.CATEGORY_MASK)
options = vision.ImageSegmenterOptions(base_options=base_options, segmentation_options=segmentation_options)
segmenter = vision.ImageSegmenter.create_from_options(options)

# Alternatively, you can create an image segmenter in the following manner:
# segmenter = vision.ImageSegmenter.create_from_file(model_path)

# Run inference
image_file = vision.TensorImage.create_from_file(image_path)
segmentation_result = segmenter.segment(image_file)
ImageSegmenter कॉन्फ़िगर करने के लिए अधिक विकल्पों के लिए स्रोत कोड देखें।
C++ में अनुमान चलाएँ
// Initialization
ImageSegmenterOptions options;
options.mutable_base_options()->mutable_model_file()->set_file_name(model_path);
std::unique_ptr<ImageSegmenter> image_segmenter = ImageSegmenter::CreateFromOptions(options).value();

// Create input frame_buffer from your inputs, `image_data` and `image_dimension`.
// See more information here: tensorflow_lite_support/cc/task/vision/utils/frame_buffer_common_utils.h
std::unique_ptr<FrameBuffer> frame_buffer = CreateFromRgbRawBuffer(
      image_data, image_dimension);

// Run inference
const SegmentationResult result = image_segmenter->Segment(*frame_buffer).value();
ImageSegmenter कॉन्फ़िगर करने के लिए अधिक विकल्पों के लिए स्रोत कोड देखें।
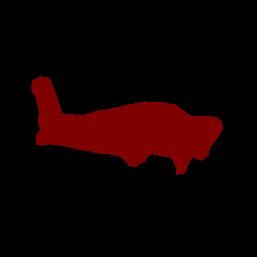
उदाहरण परिणाम
यहां Deeplab_v3 के विभाजन परिणामों का एक उदाहरण दिया गया है, जो TensorFlow हब पर उपलब्ध एक सामान्य विभाजन मॉडल है।
Color Legend:
 (r: 000, g: 000, b: 000):
  index       : 0
  class name  : background
 (r: 128, g: 000, b: 000):
  index       : 1
  class name  : aeroplane

# (omitting multiple lines for conciseness) ...

 (r: 128, g: 192, b: 000):
  index       : 19
  class name  : train
 (r: 000, g: 064, b: 128):
  index       : 20
  class name  : tv
Tip: use a color picker on the output PNG file to inspect the output mask with
this legend.
विभाजन श्रेणी मुखौटा इस तरह दिखना चाहिए:
अपने स्वयं के मॉडल और परीक्षण डेटा के साथ ImageSegmenter के लिए सरल सीएलआई डेमो टूल आज़माएं।
मॉडल अनुकूलता आवश्यकताएँ
ImageSegmenter API अनिवार्य TFLite मॉडल मेटाडेटा के साथ एक TFLite मॉडल की अपेक्षा करता है। TensorFlow Lite मेटाडेटा राइटर API का उपयोग करके छवि सेगमेंटर्स के लिए मेटाडेटा बनाने के उदाहरण देखें।
इनपुट छवि टेंसर (kTfLiteUInt8/kTfLiteFloat32)
- आकार का छवि इनपुट
[batch x height x width x channels] - बैच अनुमान समर्थित नहीं है (
batch1 होना आवश्यक है)। - केवल RGB इनपुट समर्थित हैं (
channels3 होना आवश्यक है)। - यदि प्रकार kTfLiteFloat32 है, तो इनपुट सामान्यीकरण के लिए मेटाडेटा में सामान्यीकरण विकल्प संलग्न करना आवश्यक है।
- आकार का छवि इनपुट
आउटपुट मास्क टेंसर: (kTfLiteUInt8/kTfLiteFloat32)
- आकार का टेंसर
[batch x mask_height x mask_width x num_classes], जहांbatch1 होना आवश्यक है,mask_widthऔरmask_heightमॉडल द्वारा निर्मित सेगमेंटेशन मास्क के आयाम हैं, औरnum_classesमॉडल द्वारा समर्थित वर्गों की संख्या है। - वैकल्पिक (लेकिन अनुशंसित) लेबल मानचित्र को TENSOR_AXIS_LABELS प्रकार के साथ एसोसिएटेडफाइल-एस के रूप में संलग्न किया जा सकता है, जिसमें प्रति पंक्ति एक लेबल होता है। ऐसी पहली एसोसिएटेड फ़ाइल (यदि कोई हो) का उपयोग परिणामों के
labelफ़ील्ड (C++ मेंclass_nameके रूप में नामित) को भरने के लिए किया जाता है।display_nameफ़ील्ड एसोसिएटेड फ़ाइल (यदि कोई हो) से भरी जाती है, जिसका स्थान निर्माण के समय उपयोग किए गएImageSegmenterOptionsकेdisplay_names_localeफ़ील्ड से मेल खाता है (डिफ़ॉल्ट रूप से "एन", यानी अंग्रेजी)। यदि इनमें से कोई भी उपलब्ध नहीं है, तो केवल परिणामों काindexफ़ील्ड भरा जाएगा।
- आकार का टेंसर