
ตัวแบ่งส่วนรูปภาพคาดการณ์ว่าแต่ละพิกเซลของรูปภาพเชื่อมโยงกับคลาสใดคลาสหนึ่งหรือไม่ ซึ่งตรงกันข้ามกับ การตรวจจับวัตถุ ซึ่งตรวจจับวัตถุในพื้นที่สี่เหลี่ยม และ การจัดหมวด หมู่รูปภาพ ซึ่งแยกประเภทรูปภาพโดยรวม ดูภาพ รวมการแบ่งส่วนรูปภาพ สำหรับข้อมูลเพิ่มเติมเกี่ยวกับการแบ่งส่วนรูปภาพ
ใช้ไลบรารีงาน ImageSegmenter API เพื่อปรับใช้ตัวแบ่งส่วนรูปภาพแบบกำหนดเองหรือส่วนที่ได้รับการฝึกล่วงหน้าในแอปมือถือของคุณ
คุณสมบัติหลักของ ImageSegmenter API
การประมวลผลภาพอินพุต รวมถึงการหมุน การปรับขนาด และการแปลงพื้นที่สี
ป้ายชื่อสถานที่แผนที่
เอาต์พุตสองประเภท ได้แก่ มาสก์หมวดหมู่และมาสก์ความมั่นใจ
ป้ายสีสำหรับตั้งโชว์
โมเดลตัวแบ่งส่วนรูปภาพที่รองรับ
รับประกันว่าโมเดลต่อไปนี้จะเข้ากันได้กับ ImageSegmenter API
โมเดลแบบกำหนดเองที่ตรงตาม ข้อกำหนดความเข้ากันได้ของโมเดล
เรียกใช้การอนุมานใน Java
ดู แอปอ้างอิงการแบ่งส่วนรูปภาพ เพื่อดูตัวอย่างวิธีใช้ ImageSegmenter ในแอป Android
ขั้นตอนที่ 1: นำเข้าการพึ่งพา Gradle และการตั้งค่าอื่นๆ
คัดลอกไฟล์โมเดล .tflite ไปยังไดเร็กทอรีทรัพย์สินของโมดูล Android ที่จะเรียกใช้โมเดล ระบุว่าไม่ควรบีบอัดไฟล์ และเพิ่มไลบรารี TensorFlow Lite ลงในไฟล์ build.gradle ของโมดูล:
android {
    // Other settings

    // Specify tflite file should not be compressed for the app apk
    aaptOptions {
        noCompress "tflite"
    }
}

dependencies {
    // Other dependencies

    // Import the Task Vision Library dependency (NNAPI is included)
    implementation 'org.tensorflow:tensorflow-lite-task-vision'
    // Import the GPU delegate plugin Library for GPU inference
    implementation 'org.tensorflow:tensorflow-lite-gpu-delegate-plugin'
}
ขั้นตอนที่ 2: การใช้แบบจำลอง
// Initialization
ImageSegmenterOptions options =
    ImageSegmenterOptions.builder()
        .setBaseOptions(BaseOptions.builder().useGpu().build())
        .setOutputType(OutputType.CONFIDENCE_MASK)
        .build();
ImageSegmenter imageSegmenter =
    ImageSegmenter.createFromFileAndOptions(context, modelFile, options);

// Run inference
List<Segmentation> results = imageSegmenter.segment(image);
ดู ซอร์สโค้ดและ javadoc สำหรับตัวเลือกเพิ่มเติมในการกำหนดค่า ImageSegmenter
เรียกใช้การอนุมานใน iOS
ขั้นตอนที่ 1: ติดตั้งการอ้างอิง
Task Library รองรับการติดตั้งโดยใช้ CocoaPods ตรวจสอบให้แน่ใจว่าติดตั้ง CocoaPods บนระบบของคุณแล้ว โปรดดู คู่มือการติดตั้ง CocoaPods สำหรับคำแนะนำ
โปรดดู คู่มือ CocoaPods สำหรับรายละเอียดเกี่ยวกับการเพิ่มพ็อดในโปรเจ็กต์ Xcode
เพิ่มพ็อด TensorFlowLiteTaskVision ใน Podfile
target 'MyAppWithTaskAPI' do
  use_frameworks!
  pod 'TensorFlowLiteTaskVision'
end
ตรวจสอบให้แน่ใจว่าโมเดล .tflite ที่คุณจะใช้ในการอนุมานมีอยู่ใน App Bundle ของคุณ
ขั้นตอนที่ 2: การใช้แบบจำลอง
สวิฟท์
// Imports
import TensorFlowLiteTaskVision
// Initialization
guard let modelPath = Bundle.main.path(forResource: "deeplabv3",
ofType: "tflite") else { return }
let options = ImageSegmenterOptions(modelPath: modelPath)
// Configure any additional options:
// options.outputType = OutputType.confidenceMasks
let segmenter = try ImageSegmenter.segmenter(options: options)
// Convert the input image to MLImage.
// There are other sources for MLImage. For more details, please see:
// https://developers.google.com/ml-kit/reference/ios/mlimage/api/reference/Classes/GMLImage
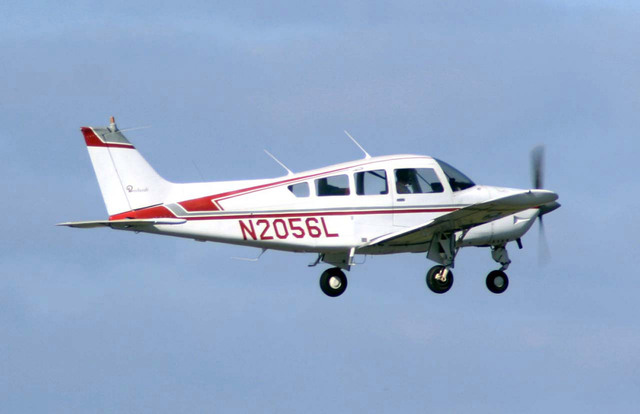
guard let image = UIImage (named: "plane.jpg"), let mlImage = MLImage(image: image) else { return }
// Run inference
let segmentationResult = try segmenter.segment(mlImage: mlImage)
วัตถุประสงค์ ค
// Imports
#import <TensorFlowLiteTaskVision/TensorFlowLiteTaskVision.h>

// Initialization
NSString *modelPath = [[NSBundle mainBundle] pathForResource:@"deeplabv3" ofType:@"tflite"];

TFLImageSegmenterOptions *options =
    [[TFLImageSegmenterOptions alloc] initWithModelPath:modelPath];

// Configure any additional options:
// options.outputType = TFLOutputTypeConfidenceMasks;

TFLImageSegmenter *segmenter = [TFLImageSegmenter imageSegmenterWithOptions:options
                                                                      error:nil];

// Convert the input image to MLImage.
UIImage *image = [UIImage imageNamed:@"plane.jpg"];

// There are other sources for GMLImage. For more details, please see:
// https://developers.google.com/ml-kit/reference/ios/mlimage/api/reference/Classes/GMLImage
GMLImage *gmlImage = [[GMLImage alloc] initWithImage:image];

// Run inference
TFLSegmentationResult *segmentationResult =
    [segmenter segmentWithGMLImage:gmlImage error:nil];
ดู ซอร์สโค้ด สำหรับตัวเลือกเพิ่มเติมในการกำหนดค่า TFLImageSegmenter
เรียกใช้การอนุมานใน Python
ขั้นตอนที่ 1: ติดตั้งแพ็คเกจ pip
pip install tflite-support
ขั้นตอนที่ 2: การใช้แบบจำลอง
# Imports
from tflite_support.task import vision
from tflite_support.task import core
from tflite_support.task import processor

# Initialization
base_options = core.BaseOptions(file_name=model_path)
segmentation_options = processor.SegmentationOptions(
    output_type=processor.SegmentationOptions.output_type.CATEGORY_MASK)
options = vision.ImageSegmenterOptions(base_options=base_options, segmentation_options=segmentation_options)
segmenter = vision.ImageSegmenter.create_from_options(options)

# Alternatively, you can create an image segmenter in the following manner:
# segmenter = vision.ImageSegmenter.create_from_file(model_path)

# Run inference
image_file = vision.TensorImage.create_from_file(image_path)
segmentation_result = segmenter.segment(image_file)
ดู ซอร์สโค้ด สำหรับตัวเลือกเพิ่มเติมในการกำหนดค่า ImageSegmenter
เรียกใช้การอนุมานใน C ++
// Initialization
ImageSegmenterOptions options;
options.mutable_base_options()->mutable_model_file()->set_file_name(model_path);
std::unique_ptr<ImageSegmenter> image_segmenter = ImageSegmenter::CreateFromOptions(options).value();

// Create input frame_buffer from your inputs, `image_data` and `image_dimension`.
// See more information here: tensorflow_lite_support/cc/task/vision/utils/frame_buffer_common_utils.h
std::unique_ptr<FrameBuffer> frame_buffer = CreateFromRgbRawBuffer(
      image_data, image_dimension);

// Run inference
const SegmentationResult result = image_segmenter->Segment(*frame_buffer).value();
ดู ซอร์สโค้ด สำหรับตัวเลือกเพิ่มเติมในการกำหนดค่า ImageSegmenter
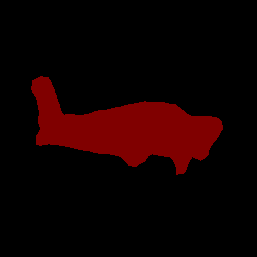
ตัวอย่างผลลัพธ์
นี่คือตัวอย่างผลลัพธ์การแบ่งเซ็กเมนต์ของ deeplab_v3 ซึ่งเป็นโมเดลการแบ่งเซ็กเมนต์ทั่วไปที่มีอยู่ใน TensorFlow Hub
Color Legend:
 (r: 000, g: 000, b: 000):
  index       : 0
  class name  : background
 (r: 128, g: 000, b: 000):
  index       : 1
  class name  : aeroplane

# (omitting multiple lines for conciseness) ...

 (r: 128, g: 192, b: 000):
  index       : 19
  class name  : train
 (r: 000, g: 064, b: 128):
  index       : 20
  class name  : tv
Tip: use a color picker on the output PNG file to inspect the output mask with
this legend.
หน้ากากหมวดหมู่การแบ่งส่วนควรมีลักษณะดังนี้:
ลองใช้ เครื่องมือสาธิต CLI ง่ายๆ สำหรับ ImageSegmenter ด้วยโมเดลและข้อมูลการทดสอบของคุณเอง
ข้อกำหนดความเข้ากันได้ของโมเดล
ImageSegmenter API คาดว่าจะมีโมเดล TFLite พร้อมด้วย ข้อมูลเมตาของโมเดล TFLite ที่บังคับ ดูตัวอย่างการสร้างข้อมูลเมตาสำหรับตัวแบ่งส่วนรูปภาพโดยใช้ TensorFlow Lite Metadata Writer API
อินพุตอิมเมจเทนเซอร์ (kTfLiteUInt8/kTfLiteFloat32)
- อินพุตรูปภาพขนาด
[batch x height x width x channels] - ไม่รองรับการอนุมานแบบแบตช์ (
batchต้องเป็น 1) - รองรับเฉพาะอินพุต RGB (
channelsต้องเป็น 3) - หากประเภทเป็น kTfLiteFloat32 จำเป็นต้องแนบ NormalizationOptions กับข้อมูลเมตาเพื่อทำให้อินพุตเป็นมาตรฐาน
- อินพุตรูปภาพขนาด
เทนเซอร์มาสก์เอาท์พุต: (kTfLiteUInt8/kTfLiteFloat32)
- เทนเซอร์ขนาด
[batch x mask_height x mask_width x num_classes]โดยที่batchช์ต้องเป็น 1,mask_widthและmask_heightคือขนาดของมาสก์การแบ่งส่วนที่สร้างโดยโมเดล และnum_classesคือจำนวนคลาสที่โมเดลรองรับ - สามารถแนบแผนผังป้ายกำกับเสริม (แต่แนะนำ) เป็น AssociatedFile-s ที่มีประเภท TENSOR_AXIS_LABELS โดยมีหนึ่งป้ายกำกับต่อบรรทัด AssociatedFile แรกดังกล่าว (ถ้ามี) จะใช้ในการกรอกฟิลด์ป้าย
label(ชื่อเป็นclass_nameใน C++) ของผลลัพธ์ ฟิลด์display_nameถูกกรอกจาก AssociatedFile (ถ้ามี) ซึ่งมีโลแคลตรงกับฟิลด์display_names_localeของImageSegmenterOptionsที่ใช้ในเวลาสร้าง ("en" ตามค่าเริ่มต้น เช่น ภาษาอังกฤษ) หากไม่มีสิ่งใดเลย ระบบจะกรอกเฉพาะฟิลด์indexของผลลัพธ์เท่านั้น
- เทนเซอร์ขนาด