
การใช้หน่วยประมวลผลกราฟิก (GPU) เพื่อรันโมเดล Machine Learning (ML) ของคุณสามารถปรับปรุงประสิทธิภาพของโมเดลและประสบการณ์ผู้ใช้ของแอปพลิเคชันที่เปิดใช้งาน ML ได้อย่างมาก บนอุปกรณ์ iOS คุณสามารถเปิดใช้งานการดำเนินการที่เร่งด้วย GPU สำหรับโมเดลของคุณโดยใช้ ไฟล์ . ผู้ร่วมประชุมทำหน้าที่เป็นไดรเวอร์ฮาร์ดแวร์สำหรับ TensorFlow Lite ซึ่งช่วยให้คุณสามารถรันโค้ดของโมเดลของคุณบนโปรเซสเซอร์ GPU
หน้านี้อธิบายวิธีเปิดใช้งานการเร่งความเร็ว GPU สำหรับรุ่น TensorFlow Lite ในแอป iOS หากต้องการข้อมูลเพิ่มเติมเกี่ยวกับการใช้ตัวแทน GPU สำหรับ TensorFlow Lite รวมถึงแนวทางปฏิบัติที่ดีที่สุดและเทคนิคขั้นสูง โปรดดูที่หน้า ตัวแทน GPU
ใช้ GPU กับ Interpreter API
TensorFlow Lite Interpreter API มอบชุด API วัตถุประสงค์ทั่วไปสำหรับการสร้างแอปพลิเคชันแมชชีนเลิร์นนิง คำแนะนำต่อไปนี้จะแนะนำคุณในการเพิ่มการรองรับ GPU ให้กับแอพ iOS คู่มือนี้จะถือว่าคุณมีแอป iOS ที่สามารถดำเนินการโมเดล ML ด้วย TensorFlow Lite ได้สำเร็จ
แก้ไข Podfile เพื่อรวมการรองรับ GPU
ตั้งแต่การเปิดตัว TensorFlow Lite 2.3.0 เป็นต้นไป ผู้แทน GPU จะถูกแยกออกจากพ็อดเพื่อลดขนาดไบนารี คุณสามารถรวมไว้ได้โดยการระบุข้อกำหนดย่อยสำหรับพ็อด TensorFlowLiteSwift :
pod 'TensorFlowLiteSwift/Metal', '~> 0.0.1-nightly',
หรือ
pod 'TensorFlowLiteSwift', '~> 0.0.1-nightly', :subspecs => ['Metal']
คุณยังสามารถใช้ TensorFlowLiteObjC หรือ TensorFlowLiteC ได้หากต้องการใช้ Objective-C ซึ่งพร้อมใช้งานสำหรับเวอร์ชัน 2.4.0 ขึ้นไป หรือ C API
เริ่มต้นและใช้ตัวแทน GPU
คุณสามารถใช้ตัวแทน GPU กับ TensorFlow Lite Interpreter API กับภาษาการเขียนโปรแกรมได้หลายภาษา แนะนำให้ใช้ Swift และ Objective-C แต่คุณสามารถใช้ C++ และ C ได้เช่นกัน จำเป็นต้องใช้ C หากคุณใช้ TensorFlow Lite เวอร์ชันเก่ากว่า 2.4 ตัวอย่างโค้ดต่อไปนี้จะสรุปวิธีการใช้ผู้รับมอบสิทธิ์กับแต่ละภาษาเหล่านี้
สวิฟท์
import TensorFlowLite

// Load model ...

// Initialize TensorFlow Lite interpreter with the GPU delegate.
let delegate = MetalDelegate()
if let interpreter = try Interpreter(modelPath: modelPath,
                                      delegates: [delegate]) {
  // Run inference ...
}
วัตถุประสงค์-C
// Import module when using CocoaPods with module support
@import TFLTensorFlowLite;

// Or import following headers manually
#import "tensorflow/lite/objc/apis/TFLMetalDelegate.h"
#import "tensorflow/lite/objc/apis/TFLTensorFlowLite.h"

// Initialize GPU delegate
TFLMetalDelegate* metalDelegate = [[TFLMetalDelegate alloc] init];

// Initialize interpreter with model path and GPU delegate
TFLInterpreterOptions* options = [[TFLInterpreterOptions alloc] init];
NSError* error = nil;
TFLInterpreter* interpreter = [[TFLInterpreter alloc]
                                initWithModelPath:modelPath
                                          options:options
                                        delegates:@[ metalDelegate ]
                                            error:&error];
if (error != nil) { /* Error handling... */ }

if (![interpreter allocateTensorsWithError:&error]) { /* Error handling... */ }
if (error != nil) { /* Error handling... */ }

// Run inference ...
ซี++
// Set up interpreter.
auto model = FlatBufferModel::BuildFromFile(model_path);
if (!model) return false;
tflite::ops::builtin::BuiltinOpResolver op_resolver;
std::unique_ptr<Interpreter> interpreter;
InterpreterBuilder(*model, op_resolver)(&interpreter);

// Prepare GPU delegate.
auto* delegate = TFLGpuDelegateCreate(/*default options=*/nullptr);
if (interpreter->ModifyGraphWithDelegate(delegate) != kTfLiteOk) return false;

// Run inference.
WriteToInputTensor(interpreter->typed_input_tensor<float>(0));
if (interpreter->Invoke() != kTfLiteOk) return false;
ReadFromOutputTensor(interpreter->typed_output_tensor<float>(0));

// Clean up.
TFLGpuDelegateDelete(delegate);
ซี (ก่อน 2.4.0)
#include "tensorflow/lite/c/c_api.h"
#include "tensorflow/lite/delegates/gpu/metal_delegate.h"

// Initialize model
TfLiteModel* model = TfLiteModelCreateFromFile(model_path);

// Initialize interpreter with GPU delegate
TfLiteInterpreterOptions* options = TfLiteInterpreterOptionsCreate();
TfLiteDelegate* delegate = TFLGPUDelegateCreate(nil);  // default config
TfLiteInterpreterOptionsAddDelegate(options, metal_delegate);
TfLiteInterpreter* interpreter = TfLiteInterpreterCreate(model, options);
TfLiteInterpreterOptionsDelete(options);

TfLiteInterpreterAllocateTensors(interpreter);

NSMutableData *input_data = [NSMutableData dataWithLength:input_size * sizeof(float)];
NSMutableData *output_data = [NSMutableData dataWithLength:output_size * sizeof(float)];
TfLiteTensor* input = TfLiteInterpreterGetInputTensor(interpreter, 0);
const TfLiteTensor* output = TfLiteInterpreterGetOutputTensor(interpreter, 0);

// Run inference
TfLiteTensorCopyFromBuffer(input, inputData.bytes, inputData.length);
TfLiteInterpreterInvoke(interpreter);
TfLiteTensorCopyToBuffer(output, outputData.mutableBytes, outputData.length);

// Clean up
TfLiteInterpreterDelete(interpreter);
TFLGpuDelegateDelete(metal_delegate);
TfLiteModelDelete(model);
บันทึกการใช้ภาษา GPU API
- TensorFlow Lite เวอร์ชันก่อน 2.4.0 สามารถใช้ C API สำหรับ Objective-C เท่านั้น
- C++ API จะใช้ได้เฉพาะเมื่อคุณใช้ bazel หรือสร้าง TensorFlow Lite ด้วยตัวเองเท่านั้น C++ API ไม่สามารถใช้กับ CocoaPods
- เมื่อใช้ TensorFlow Lite กับตัวแทน GPU ด้วย C++ ให้รับตัวแทน GPU ผ่านฟังก์ชัน
TFLGpuDelegateCreate()จากนั้นส่งต่อไปที่Interpreter::ModifyGraphWithDelegate()แทนที่จะเรียกInterpreter::AllocateTensors()
สร้างและทดสอบด้วยโหมดรีลีส
เปลี่ยนเป็นรุ่น Release ด้วยการตั้งค่า Metal API Accelerator ที่เหมาะสมเพื่อให้ได้ประสิทธิภาพที่ดีขึ้นและสำหรับการทดสอบขั้นสุดท้าย ส่วนนี้จะอธิบายวิธีเปิดใช้งานรุ่น Release และกำหนดการตั้งค่าสำหรับการเร่งความเร็ว Metal
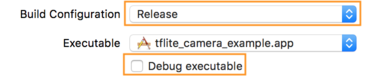
หากต้องการเปลี่ยนเป็นรุ่นรุ่น:
- แก้ไขการตั้งค่าบิลด์โดยเลือก ผลิตภัณฑ์ > โครงร่าง > แก้ไขโครงร่าง... จากนั้นเลือก เรียกใช้
- บนแท็บ ข้อมูล เปลี่ยน Build Configuration เป็น Release และยกเลิกการเลือก Debug executable
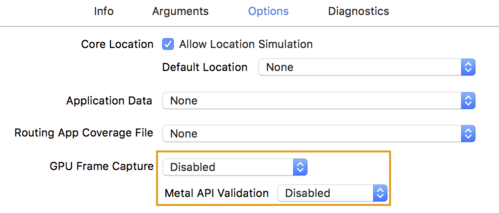
- คลิกแท็บ ตัวเลือก และเปลี่ยน GPU Frame Capture เป็น Disabled และ Metal API Validation เป็น Disabled
- ตรวจสอบให้แน่ใจว่าได้เลือกรุ่นเฉพาะรุ่นบนสถาปัตยกรรม 64 บิต ภายใต้ Project navigator > tflite_camera_example > PROJECT > your_project_name > Build Settings ตั้งค่า Build Active Architecture Only > Release เป็น Yes

รองรับ GPU ขั้นสูง
ส่วนนี้ครอบคลุมการใช้งานขั้นสูงของตัวแทน GPU สำหรับ iOS รวมถึงตัวเลือกการมอบหมาย บัฟเฟอร์อินพุตและเอาต์พุต และการใช้โมเดลเชิงปริมาณ
ตัวเลือกการมอบหมายสำหรับ iOS
ตัวสร้างสำหรับตัวแทน GPU ยอมรับ struct ของตัวเลือกใน Swift API , Objective-C API และ C API การส่งผ่าน nullptr (C API) หรือไม่ทำอะไรเลย (Objective-C และ Swift API) ไปยังตัวเริ่มต้นจะตั้งค่าตัวเลือกเริ่มต้น (ซึ่งอธิบายไว้ในตัวอย่างการใช้งานพื้นฐานด้านบน)
สวิฟท์
// THIS:
var options = MetalDelegate.Options()
options.isPrecisionLossAllowed = false
options.waitType = .passive
options.isQuantizationEnabled = true
let delegate = MetalDelegate(options: options)

// IS THE SAME AS THIS:
let delegate = MetalDelegate()
วัตถุประสงค์-C
// THIS:
TFLMetalDelegateOptions* options = [[TFLMetalDelegateOptions alloc] init];
options.precisionLossAllowed = false;
options.waitType = TFLMetalDelegateThreadWaitTypePassive;
options.quantizationEnabled = true;

TFLMetalDelegate* delegate = [[TFLMetalDelegate alloc] initWithOptions:options];

// IS THE SAME AS THIS:
TFLMetalDelegate* delegate = [[TFLMetalDelegate alloc] init];
ค
// THIS:
const TFLGpuDelegateOptions options = {
  .allow_precision_loss = false,
  .wait_type = TFLGpuDelegateWaitType::TFLGpuDelegateWaitTypePassive,
  .enable_quantization = true,
};

TfLiteDelegate* delegate = TFLGpuDelegateCreate(options);

// IS THE SAME AS THIS:
TfLiteDelegate* delegate = TFLGpuDelegateCreate(nullptr);
บัฟเฟอร์อินพุต/เอาท์พุตโดยใช้ C++ API
การคำนวณบน GPU ต้องการให้ GPU เข้าถึงข้อมูลได้ ข้อกำหนดนี้มักหมายความว่าคุณต้องทำสำเนาหน่วยความจำ คุณควรหลีกเลี่ยงไม่ให้ข้อมูลของคุณข้ามขอบเขตหน่วยความจำ CPU/GPU หากเป็นไปได้ เนื่องจากอาจใช้เวลานานพอสมควร โดยปกติแล้วการข้ามดังกล่าวเป็นสิ่งที่หลีกเลี่ยงไม่ได้ แต่ในบางกรณีพิเศษสามารถละเว้นอย่างใดอย่างหนึ่งได้
หากอินพุตของเครือข่ายเป็นรูปภาพที่โหลดไว้ในหน่วยความจำ GPU แล้ว (เช่น พื้นผิว GPU ที่มีฟีดกล้อง) รูปภาพนั้นจะยังคงอยู่ในหน่วยความจำ GPU โดยไม่ต้องเข้าสู่หน่วยความจำ CPU เลย ในทำนองเดียวกัน หากเอาต์พุตของเครือข่ายอยู่ในรูปแบบของรูปภาพที่สามารถเรนเดอร์ได้ เช่น การดำเนินการ ถ่ายโอนสไตล์รูปภาพ คุณสามารถแสดงผลลัพธ์บนหน้าจอได้โดยตรง
เพื่อให้ได้ประสิทธิภาพที่ดีที่สุด TensorFlow Lite ทำให้ผู้ใช้สามารถอ่านและเขียนไปยังบัฟเฟอร์ฮาร์ดแวร์ TensorFlow ได้โดยตรง และข้ามสำเนาหน่วยความจำที่หลีกเลี่ยงได้
สมมติว่าอินพุตรูปภาพอยู่ในหน่วยความจำ GPU คุณต้องแปลงเป็นออบเจ็กต์ MTLBuffer สำหรับ Metal ก่อน คุณสามารถเชื่อมโยง TfLiteTensor กับ MTLBuffer ที่ผู้ใช้เตรียมไว้ด้วยฟังก์ชัน TFLGpuDelegateBindMetalBufferToTensor() โปรดทราบว่าฟังก์ชันนี้ จะต้อง ถูกเรียกใช้หลังจาก Interpreter::ModifyGraphWithDelegate() นอกจากนี้ ตามค่าเริ่มต้นแล้ว เอาต์พุตการอนุมานจะถูกคัดลอกจากหน่วยความจำ GPU ไปยังหน่วยความจำ CPU คุณสามารถปิดลักษณะการทำงานนี้ได้โดยการเรียก Interpreter::SetAllowBufferHandleOutput(true) ในระหว่างการเตรียมใช้งาน
ซี++
#include "tensorflow/lite/delegates/gpu/metal_delegate.h"
#include "tensorflow/lite/delegates/gpu/metal_delegate_internal.h"

// ...

// Prepare GPU delegate.
auto* delegate = TFLGpuDelegateCreate(nullptr);

if (interpreter->ModifyGraphWithDelegate(delegate) != kTfLiteOk) return false;

interpreter->SetAllowBufferHandleOutput(true);  // disable default gpu->cpu copy
if (!TFLGpuDelegateBindMetalBufferToTensor(
        delegate, interpreter->inputs()[0], user_provided_input_buffer)) {
  return false;
}
if (!TFLGpuDelegateBindMetalBufferToTensor(
        delegate, interpreter->outputs()[0], user_provided_output_buffer)) {
  return false;
}

// Run inference.
if (interpreter->Invoke() != kTfLiteOk) return false;
เมื่อปิดการทำงานเริ่มต้นแล้ว การคัดลอกเอาท์พุตการอนุมานจากหน่วยความจำ GPU ไปยังหน่วยความจำ CPU จำเป็นต้องมีการเรียก Interpreter::EnsureTensorDataIsReadable() อย่างชัดเจนสำหรับเทนเซอร์เอาท์พุตแต่ละตัว วิธีการนี้ยังใช้ได้กับโมเดลเชิงปริมาณด้วย แต่คุณยังคงต้องใช้ บัฟเฟอร์ขนาด float32 กับข้อมูล float32 เนื่องจากบัฟเฟอร์ถูกผูกไว้กับบัฟเฟอร์ที่แยกปริมาณภายใน
โมเดลเชิงปริมาณ
ไลบรารีผู้รับมอบสิทธิ์ iOS GPU รองรับโมเดลเชิงปริมาณตามค่าเริ่มต้น คุณไม่จำเป็นต้องทำการเปลี่ยนแปลงโค้ดใดๆ เพื่อใช้โมเดลเชิงปริมาณกับตัวแทน GPU ส่วนต่อไปนี้จะอธิบายวิธีปิดใช้งานการสนับสนุนเชิงปริมาณเพื่อการทดสอบหรือการทดลอง
ปิดใช้งานการสนับสนุนโมเดลเชิงปริมาณ
รหัสต่อไปนี้แสดงวิธี ปิดใช้งาน การสนับสนุนสำหรับโมเดลเชิงปริมาณ
สวิฟท์
    var options = MetalDelegate.Options()
    options.isQuantizationEnabled = false
    let delegate = MetalDelegate(options: options)
วัตถุประสงค์-C
    TFLMetalDelegateOptions* options = [[TFLMetalDelegateOptions alloc] init];
    options.quantizationEnabled = false;
ค
    TFLGpuDelegateOptions options = TFLGpuDelegateOptionsDefault();
    options.enable_quantization = false;

    TfLiteDelegate* delegate = TFLGpuDelegateCreate(options);
สำหรับข้อมูลเพิ่มเติมเกี่ยวกับการรันโมเดลเชิงปริมาณที่มีการเร่งความเร็วของ GPU โปรดดูภาพรวม ของผู้แทน GPU