|---|---|---|---|
| [View on TensorFlow.org](https://www.tensorflow.org/quantum/tutorials/research_tools) | [Run in Google Colab](https://colab.research.google.com/github/tensorflow/quantum/blob/master/docs/tutorials/research_tools.ipynb) | [View source on GitHub](https://github.com/tensorflow/quantum/blob/master/docs/tutorials/research_tools.ipynb) | [Download notebook](https://storage.googleapis.com/tensorflow_docs/quantum/docs/tutorials/research_tools.ipynb) |
TensorFlow Quantum brings quantum primitives into the TensorFlow ecosystem. Now quantum researchers can leverage tools from TensorFlow. In this tutorial you will take a closer look at incorporating [TensorBoard](https://www.tensorflow.org/tensorboard) into your quantum computing research. Using the [DCGAN tutorial](https://www.tensorflow.org/tutorials/generative/dcgan) from TensorFlow you will quickly build up working experiments and visualizations similar to ones done by [Niu et al.](https://arxiv.org/pdf/2010.11983.pdf). Broadly speaking you will:
1. Train a GAN to produce samples that look like they came from quantum circuits.
2. Visualize the training progress as well as distribution evolution over time.
3. Benchmark the experiment by exploring the compute graph.
## Setup
Install TensorFlow and TensorFlow Quantum:
# In Colab, you will be asked to restart the session after this finishes.
pip install tensorflow==2.18.1 tensorflow-quantum==0.7.6
Configure the use of Keras 2:
import os
# Keras 2 must be selected before importing TensorFlow or TensorFlow Quantum:
os.environ["TF_USE_LEGACY_KERAS"] = "1"
Install TensorBoard:
pip install tensorboard_plugin_profile==2.15.0
#docs_infra: no_execute
%load_ext tensorboard
Now import TensorFlow, TensorFlow Quantum, and other modules needed:
import datetime
import time
import cirq
import tensorflow as tf
import tensorflow_quantum as tfq
from tensorflow.keras import layers
# visualization tools
%matplotlib inline
import matplotlib.pyplot as plt
from cirq.contrib.svg import SVGCircuit
```
2026-04-18 07:14:56.358236: E external/local_xla/xla/stream_executor/cuda/cuda_fft.cc:477] Unable to register cuFFT factory: Attempting to register factory for plugin cuFFT when one has already been registered
WARNING: All log messages before absl::InitializeLog() is called are written to STDERR
E0000 00:00:1776510896.380551 16337 cuda_dnn.cc:8310] Unable to register cuDNN factory: Attempting to register factory for plugin cuDNN when one has already been registered
E0000 00:00:1776510896.387208 16337 cuda_blas.cc:1418] Unable to register cuBLAS factory: Attempting to register factory for plugin cuBLAS when one has already been registered
2026-04-18 07:14:58.783608: E external/local_xla/xla/stream_executor/cuda/cuda_driver.cc:152] failed call to cuInit: INTERNAL: CUDA error: Failed call to cuInit: CUDA_ERROR_NO_DEVICE: no CUDA-capable device is detected
```
## 1. Data generation
Start by gathering some data. You can use TensorFlow Quantum to quickly generate some bitstring samples that will be the primary datasource for the rest of your experiments. Like Niu et al. you will explore how easy it is to emulate sampling from random circuits with drastically reduced depth. First, define some helpers:
def generate_circuit(qubits):
"""Generate a random circuit on qubits."""
random_circuit = cirq.experiments.random_rotations_between_grid_interaction_layers_circuit(
qubits, depth=2)
return random_circuit
def generate_data(circuit, n_samples):
"""Draw n_samples samples from circuit into a tf.Tensor."""
return tf.squeeze(tfq.layers.Sample()(circuit,
repetitions=n_samples).to_tensor())
Now you can inspect the circuit as well as some sample data:
qubits = cirq.GridQubit.rect(1, 5)
random_circuit_m = generate_circuit(qubits) + cirq.measure_each(*qubits)
SVGCircuit(random_circuit_m)

samples = cirq.sample(random_circuit_m, repetitions=10)
print('10 Random bitstrings from this circuit:')
print(samples)
```
10 Random bitstrings from this circuit:
q(0, 0)=0010111010
q(0, 1)=1111111111
q(0, 2)=0111111111
q(0, 3)=1111110011
q(0, 4)=1111111011
```
You can do the same thing in TensorFlow Quantum with:
generate_data(random_circuit_m, 10)
```
```
Now you can quickly generate your training data with:
N_SAMPLES = 60000
N_QUBITS = 10
QUBITS = cirq.GridQubit.rect(1, N_QUBITS)
REFERENCE_CIRCUIT = generate_circuit(QUBITS)
all_data = generate_data(REFERENCE_CIRCUIT, N_SAMPLES)
all_data
```
```
It will be useful to define some helper functions to visualize as training gets underway. Two interesting quantities to use are:
1. The integer values of samples, so that you can create histograms of the distribution.
2. The [linear XEB](https://arxiv.org/pdf/1608.00263.pdf) fidelity estimate of a set of samples, to give some indication of how "truly quantum random" the samples are.
> [!NOTE]
> **Note:** Since you are dealing with reduced depth random circuits XEB fidelity numbers may tend to vary from run to run.
@tf.function
def bits_to_ints(bits):
"""Convert tensor of bitstrings to tensor of ints."""
sigs = tf.constant([1 << i for i in range(N_QUBITS)], dtype=tf.int32)
rounded_bits = tf.clip_by_value(tf.math.round(
tf.cast(bits, dtype=tf.dtypes.float32)),
clip_value_min=0,
clip_value_max=1)
return tf.einsum('jk,k->j', tf.cast(rounded_bits, dtype=tf.dtypes.int32),
sigs)
@tf.function
def xeb_fid(bits):
"""Compute linear XEB fidelity of bitstrings."""
final_probs = tf.squeeze(
tf.abs(tfq.layers.State()(REFERENCE_CIRCUIT).to_tensor())**2)
nums = bits_to_ints(bits)
return (2**N_QUBITS) * tf.reduce_mean(tf.gather(final_probs, nums)) - 1.0
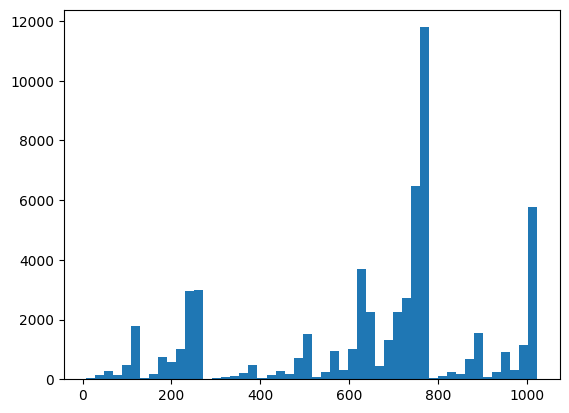
Here you can visualize your distribution and sanity check things using XEB:
plt.hist(bits_to_ints(all_data).numpy(), 50)
plt.show()
xeb_fid(all_data)
```
WARNING:tensorflow:You are casting an input of type complex64 to an incompatible dtype float32. This will discard the imaginary part and may not be what you intended.
```
## 2. Build a model
Here you can use the relevant components from the [DCGAN tutorial](https://www.tensorflow.org/tutorials/generative/dcgan) for the quantum case. Instead of producing MNIST digits the new GAN will be used to produce bitstring samples with length `N_QUBITS`
LATENT_DIM = 100
def make_generator_model():
"""Construct generator model."""
model = tf.keras.Sequential()
model.add(layers.Dense(256, use_bias=False, input_shape=(LATENT_DIM,)))
model.add(layers.Dense(128, activation='relu'))
model.add(layers.Dropout(0.3))
model.add(layers.Dense(64, activation='relu'))
model.add(layers.Dense(N_QUBITS, activation='relu'))
return model
def make_discriminator_model():
"""Construct discriminator model."""
model = tf.keras.Sequential()
model.add(layers.Dense(256, use_bias=False, input_shape=(N_QUBITS,)))
model.add(layers.Dense(128, activation='relu'))
model.add(layers.Dropout(0.3))
model.add(layers.Dense(32, activation='relu'))
model.add(layers.Dense(1))
return model
Next, instantiate your generator and discriminator models, define the losses and create the `train_step` function to use for your main training loop:
discriminator = make_discriminator_model()
generator = make_generator_model()
cross_entropy = tf.keras.losses.BinaryCrossentropy(from_logits=True)
def discriminator_loss(real_output, fake_output):
"""Compute discriminator loss."""
real_loss = cross_entropy(tf.ones_like(real_output), real_output)
fake_loss = cross_entropy(tf.zeros_like(fake_output), fake_output)
total_loss = real_loss + fake_loss
return total_loss
def generator_loss(fake_output):
"""Compute generator loss."""
return cross_entropy(tf.ones_like(fake_output), fake_output)
generator_optimizer = tf.keras.optimizers.Adam(1e-4)
discriminator_optimizer = tf.keras.optimizers.Adam(1e-4)
BATCH_SIZE = 256
@tf.function
def train_step(images):
"""Run train step on provided image batch."""
noise = tf.random.normal([BATCH_SIZE, LATENT_DIM])
with tf.GradientTape() as gen_tape, tf.GradientTape() as disc_tape:
generated_images = generator(noise, training=True)
real_output = discriminator(images, training=True)
fake_output = discriminator(generated_images, training=True)
gen_loss = generator_loss(fake_output)
disc_loss = discriminator_loss(real_output, fake_output)
gradients_of_generator = gen_tape.gradient(gen_loss,
generator.trainable_variables)
gradients_of_discriminator = disc_tape.gradient(
disc_loss, discriminator.trainable_variables)
generator_optimizer.apply_gradients(
zip(gradients_of_generator, generator.trainable_variables))
discriminator_optimizer.apply_gradients(
zip(gradients_of_discriminator, discriminator.trainable_variables))
return gen_loss, disc_loss
Now that you have all the building blocks needed for your model, you can setup a training function that incorporates TensorBoard visualization. First setup a TensorBoard filewriter:
logdir = "tb_logs/" + datetime.datetime.now().strftime("%Y%m%d-%H%M%S")
file_writer = tf.summary.create_file_writer(logdir + "/metrics")
file_writer.set_as_default()
Using the [`tf.summary`](https://www.tensorflow.org/api_docs/python/tf/summary) module, you can now incorporate `scalar`, `histogram` (as well as other) logging to TensorBoard inside of the main `train` function:
def train(dataset, epochs, start_epoch=1):
"""Launch full training run for the given number of epochs."""
# Log original training distribution.
tf.summary.histogram('Training Distribution',
data=bits_to_ints(dataset),
step=0)
batched_data = tf.data.Dataset.from_tensor_slices(dataset).shuffle(
N_SAMPLES).batch(512)
t = time.time()
for epoch in range(start_epoch, start_epoch + epochs):
for i, image_batch in enumerate(batched_data):
# Log batch-wise loss.
gl, dl = train_step(image_batch)
tf.summary.scalar('Generator loss',
data=gl,
step=epoch * len(batched_data) + i)
tf.summary.scalar('Discriminator loss',
data=dl,
step=epoch * len(batched_data) + i)
# Log full dataset XEB Fidelity and generated distribution.
generated_samples = generator(tf.random.normal([N_SAMPLES, 100]))
tf.summary.scalar('Generator XEB Fidelity Estimate',
data=xeb_fid(generated_samples),
step=epoch)
tf.summary.histogram('Generator distribution',
data=bits_to_ints(generated_samples),
step=epoch)
# Log new samples drawn from this particular random circuit.
random_new_distribution = generate_data(REFERENCE_CIRCUIT, N_SAMPLES)
tf.summary.histogram('New round of True samples',
data=bits_to_ints(random_new_distribution),
step=epoch)
if epoch % 10 == 0:
print(f'Epoch {epoch}, took {time.time() - t}(s)')
t = time.time()
## 3. Visualize training and performance
The TensorBoard dashboard can now be launched with:
#docs_infra: no_execute
%tensorboard --logdir tb_logs/
When calling `train` the TensorBoard dashboard will auto-update with all of the summary statistics given in the training loop.
train(all_data, epochs=50)
```
Epoch 10, took 13.344118595123291(s)
Epoch 20, took 10.973461866378784(s)
Epoch 30, took 10.67044711112976(s)
Epoch 40, took 10.796007871627808(s)
Epoch 50, took 10.673804998397827(s)
```
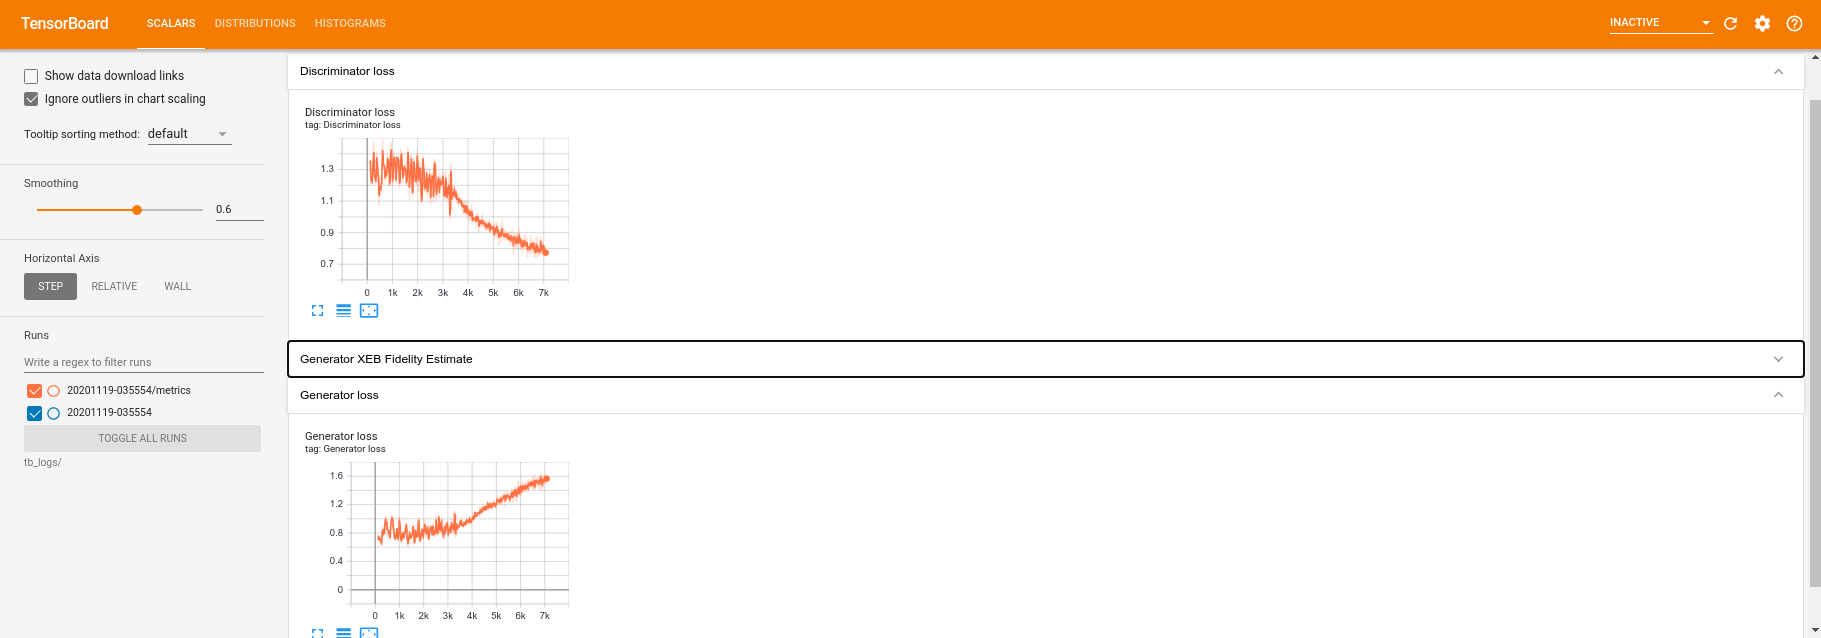
While the training is running (and once it is complete) you can examine the scalar quantities:
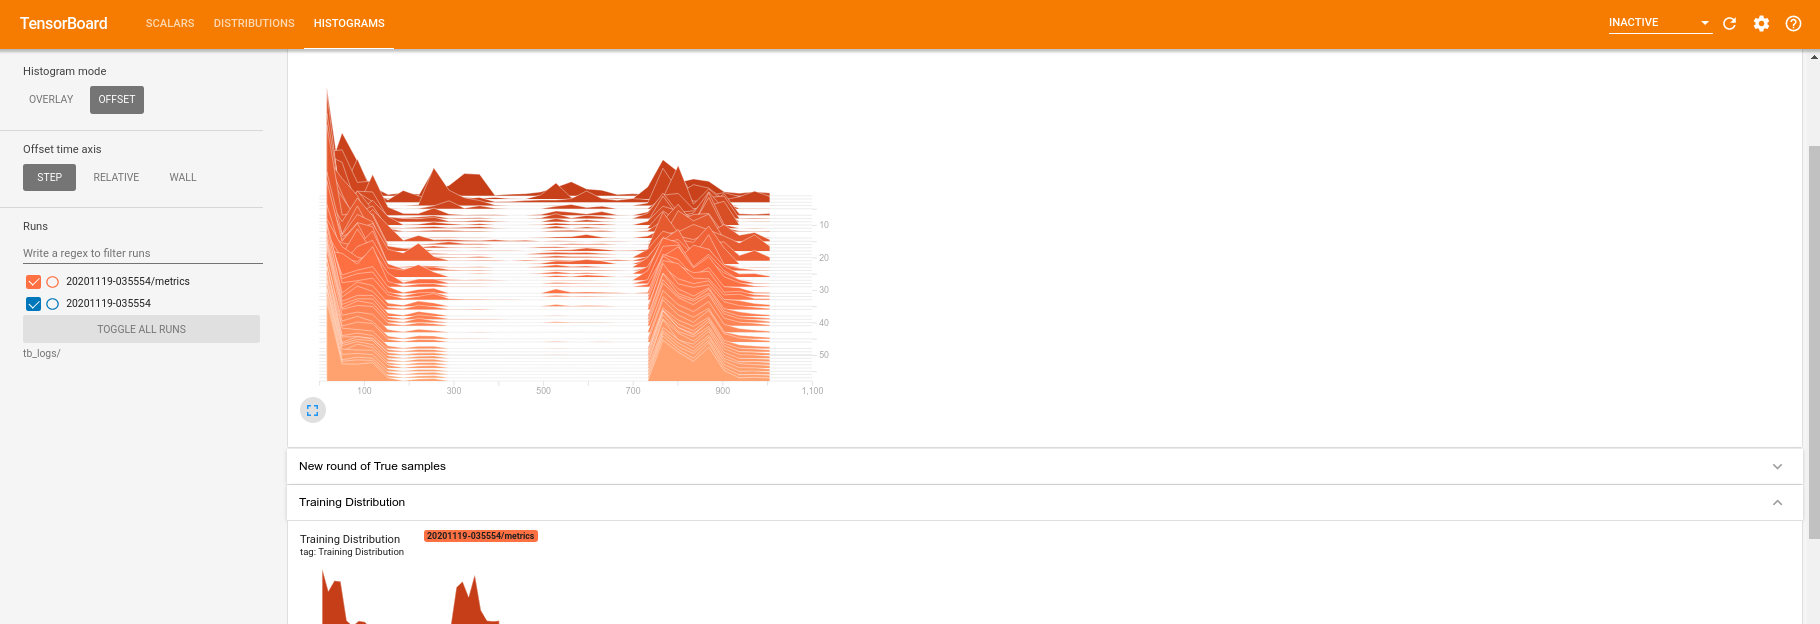
Switching over to the histogram tab you can also see how well the generator network does at recreating samples from the quantum distribution:
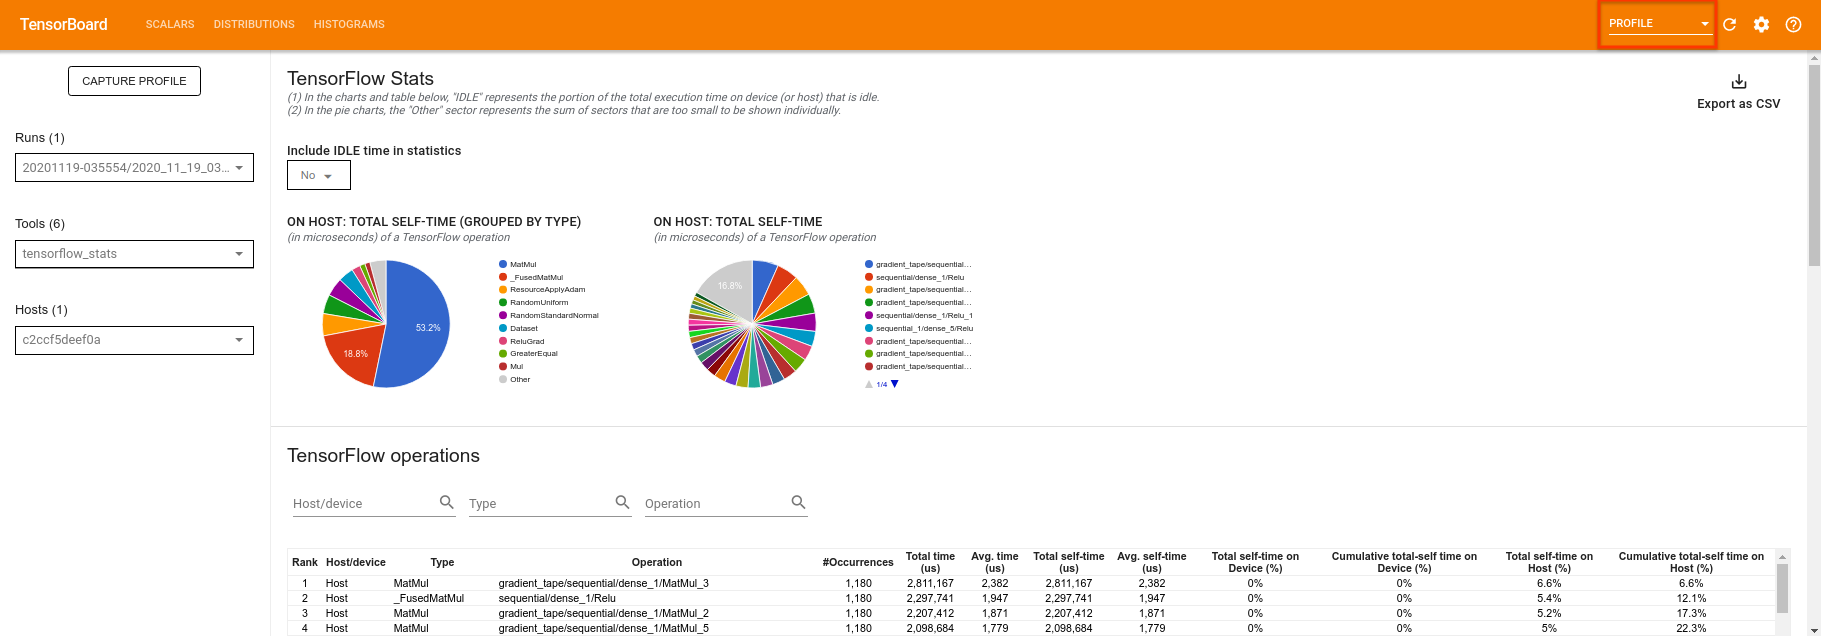
In addition to allowing real time monitoring of summary statistics related to your experiment, TensorBoard can also help you profile your experiments to identify performance bottlenecks. To re-run your model with performance monitoring you can do:
tf.profiler.experimental.start(logdir)
train(all_data, epochs=10, start_epoch=50)
tf.profiler.experimental.stop()
```
Epoch 50, took 1.2607486248016357(s)
```
TensorBoard will profile all of the code between [`tf.profiler.experimental.start`](https://www.tensorflow.org/api_docs/python/tf/profiler/experimental/start) and [`tf.profiler.experimental.stop`](https://www.tensorflow.org/api_docs/python/tf/profiler/experimental/stop). This profile data can then be viewed in the `profile` page of TensorBoard:
> [!TIP]
> **Success:** You have now conducted and visualized an experiment using TensorFlow Quantum and TensorBoard.
Try increasing the depth or experimenting with different classes of quantum circuits. Check out all the other great features of [TensorBoard](https://www.tensorflow.org/tensorboard) like [hyperparameter tuning](https://www.tensorflow.org/tensorboard/hyperparameter_tuning_with_hparams) that you can incorporate into your TensorFlow Quantum experiments.