
| | |  Lihat di GitHub Lihat di GitHub | | |
Tutorial ini berisi kode lengkap untuk menyempurnakan BERT untuk melakukan analisis sentimen pada kumpulan data ulasan film IMDB teks biasa. Selain melatih model, Anda akan mempelajari cara memproses teks ke dalam format yang sesuai.
Dalam buku catatan ini, Anda akan:
- Muat kumpulan data IMDB
- Muat model BERT dari TensorFlow Hub
- Bangun model Anda sendiri dengan menggabungkan BERT dengan pengklasifikasi
- Latih model Anda sendiri, sesuaikan BERT sebagai bagian dari itu
- Simpan model Anda dan gunakan untuk mengklasifikasikan kalimat
Jika Anda baru untuk bekerja dengan dataset IMDB, silakan lihat klasifikasi teks dasar untuk lebih jelasnya.
Tentang BERT
Bert dan arsitektur Transformer encoder lainnya telah sangat sukses pada berbagai tugas dalam NLP (pengolahan bahasa alami). Mereka menghitung representasi ruang vektor dari bahasa alami yang cocok untuk digunakan dalam model pembelajaran mendalam. Keluarga model BERT menggunakan arsitektur encoder Transformer untuk memproses setiap token teks input dalam konteks penuh semua token sebelum dan sesudah, oleh karena itu namanya: Representasi Encoder Bidirectional dari Transformers.
Model BERT biasanya telah dilatih sebelumnya pada kumpulan teks yang besar, kemudian disesuaikan untuk tugas-tugas tertentu.
Mempersiapkan
# A dependency of the preprocessing for BERT inputspip install -q -U tensorflow-text
Anda akan menggunakan optimizer AdamW dari tensorflow / model .
pip install -q tf-models-official
import os
import shutil

import tensorflow as tf
import tensorflow_hub as hub
import tensorflow_text as text
from official.nlp import optimization  # to create AdamW optimizer

import matplotlib.pyplot as plt

tf.get_logger().setLevel('ERROR')
/tmpfs/src/tf_docs_env/lib/python3.7/site-packages/pkg_resources/__init__.py:119: PkgResourcesDeprecationWarning: 0.18ubuntu0.18.04.1 is an invalid version and will not be supported in a future release
  PkgResourcesDeprecationWarning,
Analisis sentimen
Notebook ini melatih model analisis sentimen untuk ulasan film mengklasifikasikan sebagai positif atau negatif, berdasarkan teks review.
Anda akan menggunakan Movie Review Dataset besar yang berisi teks dari 50.000 ulasan film dari Internet Movie Database .
Unduh kumpulan data IMDB
Mari unduh dan ekstrak dataset, lalu jelajahi struktur direktori.
url = 'https://ai.stanford.edu/~amaas/data/sentiment/aclImdb_v1.tar.gz'

dataset = tf.keras.utils.get_file('aclImdb_v1.tar.gz', url,
                                  untar=True, cache_dir='.',
                                  cache_subdir='')

dataset_dir = os.path.join(os.path.dirname(dataset), 'aclImdb')

train_dir = os.path.join(dataset_dir, 'train')

# remove unused folders to make it easier to load the data
remove_dir = os.path.join(train_dir, 'unsup')
shutil.rmtree(remove_dir)
Downloading data from https://ai.stanford.edu/~amaas/data/sentiment/aclImdb_v1.tar.gz
84131840/84125825 [==============================] - 7s 0us/step
84140032/84125825 [==============================] - 7s 0us/step
Berikutnya, Anda akan menggunakan text_dataset_from_directory utilitas untuk membuat label tf.data.Dataset .
Set data IMDB telah dibagi menjadi pelatihan dan pengujian, tetapi tidak memiliki set validasi. Mari kita membuat satu set validasi menggunakan 80:20 perpecahan dari data pelatihan dengan menggunakan validation_split argumen di bawah ini.
AUTOTUNE = tf.data.AUTOTUNE
batch_size = 32
seed = 42

raw_train_ds = tf.keras.utils.text_dataset_from_directory(
    'aclImdb/train',
    batch_size=batch_size,
    validation_split=0.2,
    subset='training',
    seed=seed)

class_names = raw_train_ds.class_names
train_ds = raw_train_ds.cache().prefetch(buffer_size=AUTOTUNE)

val_ds = tf.keras.utils.text_dataset_from_directory(
    'aclImdb/train',
    batch_size=batch_size,
    validation_split=0.2,
    subset='validation',
    seed=seed)

val_ds = val_ds.cache().prefetch(buffer_size=AUTOTUNE)

test_ds = tf.keras.utils.text_dataset_from_directory(
    'aclImdb/test',
    batch_size=batch_size)

test_ds = test_ds.cache().prefetch(buffer_size=AUTOTUNE)
Found 25000 files belonging to 2 classes.
Using 20000 files for training.
Found 25000 files belonging to 2 classes.
Using 5000 files for validation.
Found 25000 files belonging to 2 classes.
Mari kita lihat beberapa ulasan.
for text_batch, label_batch in train_ds.take(1):
  for i in range(3):
    print(f'Review: {text_batch.numpy()[i]}')
    label = label_batch.numpy()[i]
    print(f'Label : {label} ({class_names[label]})')
Review: b'"Pandemonium" is a horror movie spoof that comes off more stupid than funny. Believe me when I tell you, I love comedies. Especially comedy spoofs. "Airplane", "The Naked Gun" trilogy, "Blazing Saddles", "High Anxiety", and "Spaceballs" are some of my favorite comedies that spoof a particular genre. "Pandemonium" is not up there with those films. Most of the scenes in this movie had me sitting there in stunned silence because the movie wasn\'t all that funny. There are a few laughs in the film, but when you watch a comedy, you expect to laugh a lot more than a few times and that\'s all this film has going for it. Geez, "Scream" had more laughs than this film and that was more of a horror film. How bizarre is that?<br /><br />*1/2 (out of four)'
Label : 0 (neg)
Review: b"David Mamet is a very interesting and a very un-equal director. His first movie 'House of Games' was the one I liked best, and it set a series of films with characters whose perspective of life changes as they get into complicated situations, and so does the perspective of the viewer.<br /><br />So is 'Homicide' which from the title tries to set the mind of the viewer to the usual crime drama. The principal characters are two cops, one Jewish and one Irish who deal with a racially charged area. The murder of an old Jewish shop owner who proves to be an ancient veteran of the Israeli Independence war triggers the Jewish identity in the mind and heart of the Jewish detective.<br /><br />This is were the flaws of the film are the more obvious. The process of awakening is theatrical and hard to believe, the group of Jewish militants is operatic, and the way the detective eventually walks to the final violent confrontation is pathetic. The end of the film itself is Mamet-like smart, but disappoints from a human emotional perspective.<br /><br />Joe Mantegna and William Macy give strong performances, but the flaws of the story are too evident to be easily compensated."
Label : 0 (neg)
Review: b'Great documentary about the lives of NY firefighters during the worst terrorist attack of all time.. That reason alone is why this should be a must see collectors item.. What shocked me was not only the attacks, but the"High Fat Diet" and physical appearance of some of these firefighters. I think a lot of Doctors would agree with me that,in the physical shape they were in, some of these firefighters would NOT of made it to the 79th floor carrying over 60 lbs of gear. Having said that i now have a greater respect for firefighters and i realize becoming a firefighter is a life altering job. The French have a history of making great documentary\'s and that is what this is, a Great Documentary.....'
Label : 1 (pos)
2021-12-01 12:17:32.795514: W tensorflow/core/kernels/data/cache_dataset_ops.cc:768] The calling iterator did not fully read the dataset being cached. In order to avoid unexpected truncation of the dataset, the partially cached contents of the dataset  will be discarded. This can happen if you have an input pipeline similar to `dataset.cache().take(k).repeat()`. You should use `dataset.take(k).cache().repeat()` instead.
Memuat model dari TensorFlow Hub
Di sini Anda dapat memilih model BERT mana yang akan Anda muat dari TensorFlow Hub dan menyempurnakannya. Ada beberapa model BERT yang tersedia.
- Bert-Base , Uncased dan tujuh model yang lebih dengan bobot dilatih dirilis oleh penulis Bert asli.
- Berts kecil memiliki arsitektur yang sama umum tetapi lebih sedikit dan / atau blok Transformer kecil, yang memungkinkan Anda menjelajahi timbal balik antara kecepatan, ukuran dan kualitas.
- ALBERT : empat ukuran yang berbeda dari "A Lite Bert" yang mengurangi ukuran Model (tapi tidak waktu komputasi) dengan berbagi parameter antara lapisan.
- Bert Ahli : delapan model yang semua memiliki arsitektur Bert-dasar tetapi menawarkan pilihan antara domain pra-pelatihan yang berbeda, untuk menyelaraskan lebih dekat dengan tugas sasaran.
- Electra memiliki arsitektur yang sama seperti Bert (dalam tiga ukuran yang berbeda), tapi akan pra-dilatih sebagai diskriminator dalam satu set-up yang menyerupai sebuah generatif Adversarial Network (GAN).
- Bert dengan Talking-Kepala Perhatian dan Gated Gelu [ dasar , besar ] memiliki dua perbaikan inti dari arsitektur Transformer.
Dokumentasi model di TensorFlow Hub memiliki lebih banyak detail dan referensi ke literatur penelitian. Ikuti link di atas, atau klik pada tfhub.dev URL dicetak setelah eksekusi sel berikutnya.
Sarannya adalah memulai dengan BERT Kecil (dengan parameter lebih sedikit) karena lebih cepat untuk menyempurnakan. Jika Anda menyukai model kecil tetapi dengan akurasi yang lebih tinggi, ALBERT mungkin menjadi pilihan Anda berikutnya. Jika Anda menginginkan akurasi yang lebih baik, pilih salah satu ukuran BERT klasik atau penyempurnaan terbarunya seperti Electra, Talking Heads, atau BERT Expert.
Selain dari model yang tersedia di bawah ini, ada beberapa versi model yang lebih besar dan dapat menghasilkan akurasi yang lebih baik, tetapi mereka terlalu besar untuk fine-tuned pada GPU tunggal. Anda akan dapat melakukan itu pada Memecahkan tugas LEM menggunakan Bert pada colab TPU .
Anda akan melihat dalam kode di bawah ini bahwa mengganti URL tfhub.dev sudah cukup untuk mencoba salah satu model ini, karena semua perbedaan di antara mereka dirangkum dalam SavedModels dari TF Hub.
Pilih model BERT untuk menyempurnakan
bert_model_name = 'small_bert/bert_en_uncased_L-4_H-512_A-8'

map_name_to_handle = {
    'bert_en_uncased_L-12_H-768_A-12':
        'https://tfhub.dev/tensorflow/bert_en_uncased_L-12_H-768_A-12/3',
    'bert_en_cased_L-12_H-768_A-12':
        'https://tfhub.dev/tensorflow/bert_en_cased_L-12_H-768_A-12/3',
    'bert_multi_cased_L-12_H-768_A-12':
        'https://tfhub.dev/tensorflow/bert_multi_cased_L-12_H-768_A-12/3',
    'small_bert/bert_en_uncased_L-2_H-128_A-2':
        'https://tfhub.dev/tensorflow/small_bert/bert_en_uncased_L-2_H-128_A-2/1',
    'small_bert/bert_en_uncased_L-2_H-256_A-4':
        'https://tfhub.dev/tensorflow/small_bert/bert_en_uncased_L-2_H-256_A-4/1',
    'small_bert/bert_en_uncased_L-2_H-512_A-8':
        'https://tfhub.dev/tensorflow/small_bert/bert_en_uncased_L-2_H-512_A-8/1',
    'small_bert/bert_en_uncased_L-2_H-768_A-12':
        'https://tfhub.dev/tensorflow/small_bert/bert_en_uncased_L-2_H-768_A-12/1',
    'small_bert/bert_en_uncased_L-4_H-128_A-2':
        'https://tfhub.dev/tensorflow/small_bert/bert_en_uncased_L-4_H-128_A-2/1',
    'small_bert/bert_en_uncased_L-4_H-256_A-4':
        'https://tfhub.dev/tensorflow/small_bert/bert_en_uncased_L-4_H-256_A-4/1',
    'small_bert/bert_en_uncased_L-4_H-512_A-8':
        'https://tfhub.dev/tensorflow/small_bert/bert_en_uncased_L-4_H-512_A-8/1',
    'small_bert/bert_en_uncased_L-4_H-768_A-12':
        'https://tfhub.dev/tensorflow/small_bert/bert_en_uncased_L-4_H-768_A-12/1',
    'small_bert/bert_en_uncased_L-6_H-128_A-2':
        'https://tfhub.dev/tensorflow/small_bert/bert_en_uncased_L-6_H-128_A-2/1',
    'small_bert/bert_en_uncased_L-6_H-256_A-4':
        'https://tfhub.dev/tensorflow/small_bert/bert_en_uncased_L-6_H-256_A-4/1',
    'small_bert/bert_en_uncased_L-6_H-512_A-8':
        'https://tfhub.dev/tensorflow/small_bert/bert_en_uncased_L-6_H-512_A-8/1',
    'small_bert/bert_en_uncased_L-6_H-768_A-12':
        'https://tfhub.dev/tensorflow/small_bert/bert_en_uncased_L-6_H-768_A-12/1',
    'small_bert/bert_en_uncased_L-8_H-128_A-2':
        'https://tfhub.dev/tensorflow/small_bert/bert_en_uncased_L-8_H-128_A-2/1',
    'small_bert/bert_en_uncased_L-8_H-256_A-4':
        'https://tfhub.dev/tensorflow/small_bert/bert_en_uncased_L-8_H-256_A-4/1',
    'small_bert/bert_en_uncased_L-8_H-512_A-8':
        'https://tfhub.dev/tensorflow/small_bert/bert_en_uncased_L-8_H-512_A-8/1',
    'small_bert/bert_en_uncased_L-8_H-768_A-12':
        'https://tfhub.dev/tensorflow/small_bert/bert_en_uncased_L-8_H-768_A-12/1',
    'small_bert/bert_en_uncased_L-10_H-128_A-2':
        'https://tfhub.dev/tensorflow/small_bert/bert_en_uncased_L-10_H-128_A-2/1',
    'small_bert/bert_en_uncased_L-10_H-256_A-4':
        'https://tfhub.dev/tensorflow/small_bert/bert_en_uncased_L-10_H-256_A-4/1',
    'small_bert/bert_en_uncased_L-10_H-512_A-8':
        'https://tfhub.dev/tensorflow/small_bert/bert_en_uncased_L-10_H-512_A-8/1',
    'small_bert/bert_en_uncased_L-10_H-768_A-12':
        'https://tfhub.dev/tensorflow/small_bert/bert_en_uncased_L-10_H-768_A-12/1',
    'small_bert/bert_en_uncased_L-12_H-128_A-2':
        'https://tfhub.dev/tensorflow/small_bert/bert_en_uncased_L-12_H-128_A-2/1',
    'small_bert/bert_en_uncased_L-12_H-256_A-4':
        'https://tfhub.dev/tensorflow/small_bert/bert_en_uncased_L-12_H-256_A-4/1',
    'small_bert/bert_en_uncased_L-12_H-512_A-8':
        'https://tfhub.dev/tensorflow/small_bert/bert_en_uncased_L-12_H-512_A-8/1',
    'small_bert/bert_en_uncased_L-12_H-768_A-12':
        'https://tfhub.dev/tensorflow/small_bert/bert_en_uncased_L-12_H-768_A-12/1',
    'albert_en_base':
        'https://tfhub.dev/tensorflow/albert_en_base/2',
    'electra_small':
        'https://tfhub.dev/google/electra_small/2',
    'electra_base':
        'https://tfhub.dev/google/electra_base/2',
    'experts_pubmed':
        'https://tfhub.dev/google/experts/bert/pubmed/2',
    'experts_wiki_books':
        'https://tfhub.dev/google/experts/bert/wiki_books/2',
    'talking-heads_base':
        'https://tfhub.dev/tensorflow/talkheads_ggelu_bert_en_base/1',
}

map_model_to_preprocess = {
    'bert_en_uncased_L-12_H-768_A-12':
        'https://tfhub.dev/tensorflow/bert_en_uncased_preprocess/3',
    'bert_en_cased_L-12_H-768_A-12':
        'https://tfhub.dev/tensorflow/bert_en_cased_preprocess/3',
    'small_bert/bert_en_uncased_L-2_H-128_A-2':
        'https://tfhub.dev/tensorflow/bert_en_uncased_preprocess/3',
    'small_bert/bert_en_uncased_L-2_H-256_A-4':
        'https://tfhub.dev/tensorflow/bert_en_uncased_preprocess/3',
    'small_bert/bert_en_uncased_L-2_H-512_A-8':
        'https://tfhub.dev/tensorflow/bert_en_uncased_preprocess/3',
    'small_bert/bert_en_uncased_L-2_H-768_A-12':
        'https://tfhub.dev/tensorflow/bert_en_uncased_preprocess/3',
    'small_bert/bert_en_uncased_L-4_H-128_A-2':
        'https://tfhub.dev/tensorflow/bert_en_uncased_preprocess/3',
    'small_bert/bert_en_uncased_L-4_H-256_A-4':
        'https://tfhub.dev/tensorflow/bert_en_uncased_preprocess/3',
    'small_bert/bert_en_uncased_L-4_H-512_A-8':
        'https://tfhub.dev/tensorflow/bert_en_uncased_preprocess/3',
    'small_bert/bert_en_uncased_L-4_H-768_A-12':
        'https://tfhub.dev/tensorflow/bert_en_uncased_preprocess/3',
    'small_bert/bert_en_uncased_L-6_H-128_A-2':
        'https://tfhub.dev/tensorflow/bert_en_uncased_preprocess/3',
    'small_bert/bert_en_uncased_L-6_H-256_A-4':
        'https://tfhub.dev/tensorflow/bert_en_uncased_preprocess/3',
    'small_bert/bert_en_uncased_L-6_H-512_A-8':
        'https://tfhub.dev/tensorflow/bert_en_uncased_preprocess/3',
    'small_bert/bert_en_uncased_L-6_H-768_A-12':
        'https://tfhub.dev/tensorflow/bert_en_uncased_preprocess/3',
    'small_bert/bert_en_uncased_L-8_H-128_A-2':
        'https://tfhub.dev/tensorflow/bert_en_uncased_preprocess/3',
    'small_bert/bert_en_uncased_L-8_H-256_A-4':
        'https://tfhub.dev/tensorflow/bert_en_uncased_preprocess/3',
    'small_bert/bert_en_uncased_L-8_H-512_A-8':
        'https://tfhub.dev/tensorflow/bert_en_uncased_preprocess/3',
    'small_bert/bert_en_uncased_L-8_H-768_A-12':
        'https://tfhub.dev/tensorflow/bert_en_uncased_preprocess/3',
    'small_bert/bert_en_uncased_L-10_H-128_A-2':
        'https://tfhub.dev/tensorflow/bert_en_uncased_preprocess/3',
    'small_bert/bert_en_uncased_L-10_H-256_A-4':
        'https://tfhub.dev/tensorflow/bert_en_uncased_preprocess/3',
    'small_bert/bert_en_uncased_L-10_H-512_A-8':
        'https://tfhub.dev/tensorflow/bert_en_uncased_preprocess/3',
    'small_bert/bert_en_uncased_L-10_H-768_A-12':
        'https://tfhub.dev/tensorflow/bert_en_uncased_preprocess/3',
    'small_bert/bert_en_uncased_L-12_H-128_A-2':
        'https://tfhub.dev/tensorflow/bert_en_uncased_preprocess/3',
    'small_bert/bert_en_uncased_L-12_H-256_A-4':
        'https://tfhub.dev/tensorflow/bert_en_uncased_preprocess/3',
    'small_bert/bert_en_uncased_L-12_H-512_A-8':
        'https://tfhub.dev/tensorflow/bert_en_uncased_preprocess/3',
    'small_bert/bert_en_uncased_L-12_H-768_A-12':
        'https://tfhub.dev/tensorflow/bert_en_uncased_preprocess/3',
    'bert_multi_cased_L-12_H-768_A-12':
        'https://tfhub.dev/tensorflow/bert_multi_cased_preprocess/3',
    'albert_en_base':
        'https://tfhub.dev/tensorflow/albert_en_preprocess/3',
    'electra_small':
        'https://tfhub.dev/tensorflow/bert_en_uncased_preprocess/3',
    'electra_base':
        'https://tfhub.dev/tensorflow/bert_en_uncased_preprocess/3',
    'experts_pubmed':
        'https://tfhub.dev/tensorflow/bert_en_uncased_preprocess/3',
    'experts_wiki_books':
        'https://tfhub.dev/tensorflow/bert_en_uncased_preprocess/3',
    'talking-heads_base':
        'https://tfhub.dev/tensorflow/bert_en_uncased_preprocess/3',
}

tfhub_handle_encoder = map_name_to_handle[bert_model_name]
tfhub_handle_preprocess = map_model_to_preprocess[bert_model_name]

print(f'BERT model selected           : {tfhub_handle_encoder}')
print(f'Preprocess model auto-selected: {tfhub_handle_preprocess}')
BERT model selected           : https://tfhub.dev/tensorflow/small_bert/bert_en_uncased_L-4_H-512_A-8/1
Preprocess model auto-selected: https://tfhub.dev/tensorflow/bert_en_uncased_preprocess/3
Model pra-pemrosesan
Input teks perlu diubah menjadi id token numerik dan diatur dalam beberapa Tensor sebelum dimasukkan ke BERT. TensorFlow Hub menyediakan model prapemrosesan yang cocok untuk setiap model BERT yang dibahas di atas, yang mengimplementasikan transformasi ini menggunakan operasi TF dari pustaka TF.text. Anda tidak perlu menjalankan kode Python murni di luar model TensorFlow Anda untuk melakukan praproses teks.
Model pra-pemrosesan harus yang direferensikan oleh dokumentasi model BERT, yang dapat Anda baca di URL yang tercetak di atas. Untuk model BERT dari drop-down di atas, model preprocessing dipilih secara otomatis.
bert_preprocess_model = hub.KerasLayer(tfhub_handle_preprocess)
Mari kita coba model preprocessing pada beberapa teks dan lihat hasilnya:
text_test = ['this is such an amazing movie!']
text_preprocessed = bert_preprocess_model(text_test)

print(f'Keys       : {list(text_preprocessed.keys())}')
print(f'Shape      : {text_preprocessed["input_word_ids"].shape}')
print(f'Word Ids   : {text_preprocessed["input_word_ids"][0, :12]}')
print(f'Input Mask : {text_preprocessed["input_mask"][0, :12]}')
print(f'Type Ids   : {text_preprocessed["input_type_ids"][0, :12]}')
Keys       : ['input_word_ids', 'input_mask', 'input_type_ids']
Shape      : (1, 128)
Word Ids   : [ 101 2023 2003 2107 2019 6429 3185  999  102    0    0    0]
Input Mask : [1 1 1 1 1 1 1 1 1 0 0 0]
Type Ids   : [0 0 0 0 0 0 0 0 0 0 0 0]
Seperti yang Anda lihat, sekarang Anda memiliki 3 output dari preprocessing yang model Bert akan menggunakan ( input_words_id , input_mask dan input_type_ids ).
Beberapa poin penting lainnya:
- Input dipotong menjadi 128 token. Jumlah token dapat disesuaikan, dan Anda dapat melihat rincian lebih lanjut tentang Memecahkan tugas LEM menggunakan Bert pada colab TPU .
- The
input_type_idshanya memiliki satu nilai (0) karena ini adalah masukan kalimat tunggal. Untuk input beberapa kalimat, itu akan memiliki satu nomor untuk setiap input.
Karena praprosesor teks ini adalah model TensorFlow, Praprosesor ini dapat disertakan dalam model Anda secara langsung.
Menggunakan model BERT
Sebelum menempatkan BERT ke dalam model Anda sendiri, mari kita lihat outputnya. Anda akan memuatnya dari TF Hub dan melihat nilai yang dikembalikan.
bert_model = hub.KerasLayer(tfhub_handle_encoder)
bert_results = bert_model(text_preprocessed)

print(f'Loaded BERT: {tfhub_handle_encoder}')
print(f'Pooled Outputs Shape:{bert_results["pooled_output"].shape}')
print(f'Pooled Outputs Values:{bert_results["pooled_output"][0, :12]}')
print(f'Sequence Outputs Shape:{bert_results["sequence_output"].shape}')
print(f'Sequence Outputs Values:{bert_results["sequence_output"][0, :12]}')
Loaded BERT: https://tfhub.dev/tensorflow/small_bert/bert_en_uncased_L-4_H-512_A-8/1
Pooled Outputs Shape:(1, 512)
Pooled Outputs Values:[ 0.76262873  0.99280983 -0.1861186   0.36673835  0.15233682  0.65504444
  0.9681154  -0.9486272   0.00216158 -0.9877732   0.0684272  -0.9763061 ]
Sequence Outputs Shape:(1, 128, 512)
Sequence Outputs Values:[[-0.28946388  0.3432126   0.33231565 ...  0.21300787  0.7102078
  -0.05771166]
 [-0.28742015  0.31981024 -0.2301858  ...  0.58455074 -0.21329722
   0.7269209 ]
 [-0.66157013  0.6887685  -0.87432927 ...  0.10877253 -0.26173282
   0.47855264]
 ...
 [-0.2256118  -0.28925604 -0.07064401 ...  0.4756601   0.8327715
   0.40025353]
 [-0.29824278 -0.27473143 -0.05450511 ...  0.48849759  1.0955356
   0.18163344]
 [-0.44378197  0.00930723  0.07223766 ...  0.1729009   1.1833246
   0.07897988]]
Model Bert kembali peta dengan 3 kunci penting: pooled_output , sequence_output , encoder_outputs :
-
pooled_outputmewakili setiap urutan input secara keseluruhan. Bentuknya[batch_size, H]. Anda dapat menganggap ini sebagai penyematan untuk keseluruhan ulasan film. -
sequence_outputmewakili setiap masukan token konteks. Bentuknya[batch_size, seq_length, H]. Anda dapat menganggap ini sebagai penyematan kontekstual untuk setiap token dalam ulasan film. -
encoder_outputsadalah aktivasi antara dariLblok Transformer.outputs["encoder_outputs"][i]adalah Tensor bentuk[batch_size, seq_length, 1024]dengan output dari i-th blok Transformer, untuk0 <= i < L. Nilai terakhir dari daftar adalah sama dengansequence_output.
Untuk fine-tuning Anda akan menggunakan pooled_output larik.
Tentukan model Anda
Anda akan membuat model fine-tuned yang sangat sederhana, dengan model preprocessing, model BERT yang dipilih, satu layer Dense dan Dropout.
def build_classifier_model():
  text_input = tf.keras.layers.Input(shape=(), dtype=tf.string, name='text')
  preprocessing_layer = hub.KerasLayer(tfhub_handle_preprocess, name='preprocessing')
  encoder_inputs = preprocessing_layer(text_input)
  encoder = hub.KerasLayer(tfhub_handle_encoder, trainable=True, name='BERT_encoder')
  outputs = encoder(encoder_inputs)
  net = outputs['pooled_output']
  net = tf.keras.layers.Dropout(0.1)(net)
  net = tf.keras.layers.Dense(1, activation=None, name='classifier')(net)
  return tf.keras.Model(text_input, net)
Mari kita periksa apakah model berjalan dengan output dari model preprocessing.
classifier_model = build_classifier_model()
bert_raw_result = classifier_model(tf.constant(text_test))
print(tf.sigmoid(bert_raw_result))
tf.Tensor([[0.6749899]], shape=(1, 1), dtype=float32)
Outputnya tidak ada artinya, tentu saja, karena modelnya belum dilatih.
Mari kita lihat struktur modelnya.
tf.keras.utils.plot_model(classifier_model)

Pelatihan model
Anda sekarang memiliki semua bagian untuk melatih model, termasuk modul prapemrosesan, encoder BERT, data, dan pengklasifikasi.
Fungsi kerugian
Karena ini adalah masalah klasifikasi biner dan model output probabilitas (satu lapisan unit), Anda akan menggunakan losses.BinaryCrossentropy fungsi kerugian.
loss = tf.keras.losses.BinaryCrossentropy(from_logits=True)
metrics = tf.metrics.BinaryAccuracy()
Pengoptimal
Untuk penyetelan yang lebih baik, mari gunakan pengoptimal yang sama dengan yang awalnya dilatih BERT: "Momen Adaptif" (Adam). Optimizer ini meminimalkan hilangnya prediksi dan melakukan regularisasi oleh peluruhan berat (tidak menggunakan momen), yang juga dikenal sebagai AdamW .
Untuk tingkat pembelajaran ( init_lr ), Anda akan menggunakan jadwal yang sama seperti Bert pra-pelatihan: pembusukan linear dari tingkat pembelajaran awal nosional, diawali dengan fase pemanasan linear selama 10% pertama dari pelatihan langkah ( num_warmup_steps ). Sejalan dengan makalah BERT, tingkat pembelajaran awal lebih kecil untuk fine-tuning (terbaik dari 5e-5, 3e-5, 2e-5).
epochs = 5
steps_per_epoch = tf.data.experimental.cardinality(train_ds).numpy()
num_train_steps = steps_per_epoch * epochs
num_warmup_steps = int(0.1*num_train_steps)

init_lr = 3e-5
optimizer = optimization.create_optimizer(init_lr=init_lr,
                                          num_train_steps=num_train_steps,
                                          num_warmup_steps=num_warmup_steps,
                                          optimizer_type='adamw')
Memuat model dan pelatihan BERT
Menggunakan classifier_model Anda buat sebelumnya, anda dapat mengkompilasi model dengan kerugian, metrik dan optimizer.
classifier_model.compile(optimizer=optimizer,
                         loss=loss,
                         metrics=metrics)
print(f'Training model with {tfhub_handle_encoder}')
history = classifier_model.fit(x=train_ds,
                               validation_data=val_ds,
                               epochs=epochs)
Training model with https://tfhub.dev/tensorflow/small_bert/bert_en_uncased_L-4_H-512_A-8/1
Epoch 1/5
625/625 [==============================] - 91s 138ms/step - loss: 0.4776 - binary_accuracy: 0.7513 - val_loss: 0.3791 - val_binary_accuracy: 0.8380
Epoch 2/5
625/625 [==============================] - 85s 136ms/step - loss: 0.3266 - binary_accuracy: 0.8547 - val_loss: 0.3659 - val_binary_accuracy: 0.8486
Epoch 3/5
625/625 [==============================] - 86s 138ms/step - loss: 0.2521 - binary_accuracy: 0.8928 - val_loss: 0.3975 - val_binary_accuracy: 0.8518
Epoch 4/5
625/625 [==============================] - 86s 137ms/step - loss: 0.1910 - binary_accuracy: 0.9269 - val_loss: 0.4180 - val_binary_accuracy: 0.8522
Epoch 5/5
625/625 [==============================] - 86s 137ms/step - loss: 0.1509 - binary_accuracy: 0.9433 - val_loss: 0.4641 - val_binary_accuracy: 0.8522
Evaluasi modelnya
Mari kita lihat bagaimana kinerja modelnya. Dua nilai akan dikembalikan. Loss (angka yang mewakili kesalahan, nilai yang lebih rendah lebih baik), dan akurasi.
loss, accuracy = classifier_model.evaluate(test_ds)

print(f'Loss: {loss}')
print(f'Accuracy: {accuracy}')
782/782 [==============================] - 61s 78ms/step - loss: 0.4495 - binary_accuracy: 0.8554
Loss: 0.4494614601135254
Accuracy: 0.8553599715232849
Plot akurasi dan kerugian dari waktu ke waktu
Berdasarkan History objek dikembalikan oleh model.fit() . Anda dapat memplot kerugian pelatihan dan validasi untuk perbandingan, serta akurasi pelatihan dan validasi:
history_dict = history.history
print(history_dict.keys())

acc = history_dict['binary_accuracy']
val_acc = history_dict['val_binary_accuracy']
loss = history_dict['loss']
val_loss = history_dict['val_loss']

epochs = range(1, len(acc) + 1)
fig = plt.figure(figsize=(10, 6))
fig.tight_layout()

plt.subplot(2, 1, 1)
# r is for "solid red line"
plt.plot(epochs, loss, 'r', label='Training loss')
# b is for "solid blue line"
plt.plot(epochs, val_loss, 'b', label='Validation loss')
plt.title('Training and validation loss')
# plt.xlabel('Epochs')
plt.ylabel('Loss')
plt.legend()

plt.subplot(2, 1, 2)
plt.plot(epochs, acc, 'r', label='Training acc')
plt.plot(epochs, val_acc, 'b', label='Validation acc')
plt.title('Training and validation accuracy')
plt.xlabel('Epochs')
plt.ylabel('Accuracy')
plt.legend(loc='lower right')
dict_keys(['loss', 'binary_accuracy', 'val_loss', 'val_binary_accuracy'])
<matplotlib.legend.Legend at 0x7fee7cdb4450>
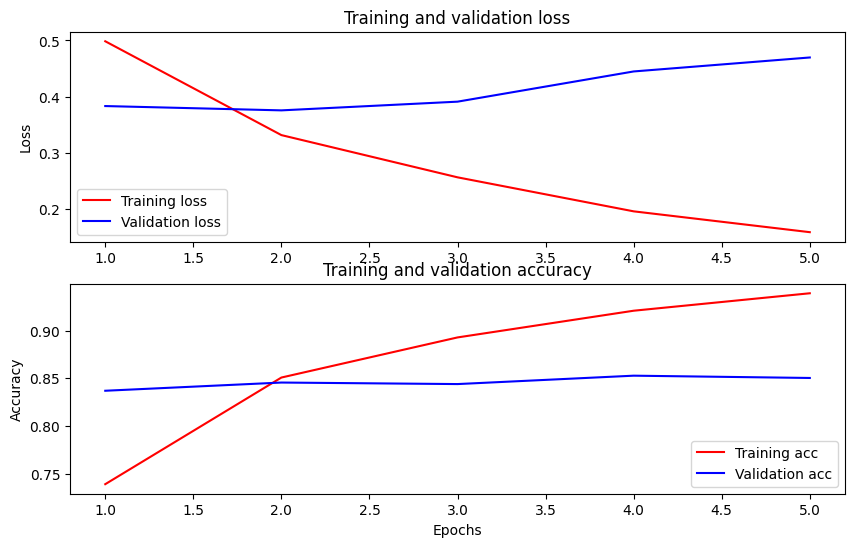
Dalam plot ini, garis merah mewakili kehilangan dan akurasi pelatihan, dan garis biru adalah kehilangan dan akurasi validasi.
Ekspor untuk inferensi
Sekarang Anda tinggal menyimpan model yang telah disesuaikan untuk digunakan nanti.
dataset_name = 'imdb'
saved_model_path = './{}_bert'.format(dataset_name.replace('/', '_'))

classifier_model.save(saved_model_path, include_optimizer=False)
2021-12-01 12:26:06.207608: W tensorflow/python/util/util.cc:368] Sets are not currently considered sequences, but this may change in the future, so consider avoiding using them.
WARNING:absl:Found untraced functions such as restored_function_body, restored_function_body, restored_function_body, restored_function_body, restored_function_body while saving (showing 5 of 310). These functions will not be directly callable after loading.
Mari kita reload modelnya, agar bisa dicoba berdampingan dengan model yang masih ada di memori.
reloaded_model = tf.saved_model.load(saved_model_path)
Di sini Anda dapat menguji model Anda pada kalimat apa pun yang Anda inginkan, cukup tambahkan ke variabel contoh di bawah ini.
def print_my_examples(inputs, results):
  result_for_printing = \
    [f'input: {inputs[i]:<30} : score: {results[i][0]:.6f}'
                         for i in range(len(inputs))]
  print(*result_for_printing, sep='\n')
  print()


examples = [
    'this is such an amazing movie!',  # this is the same sentence tried earlier
    'The movie was great!',
    'The movie was meh.',
    'The movie was okish.',
    'The movie was terrible...'
]

reloaded_results = tf.sigmoid(reloaded_model(tf.constant(examples)))
original_results = tf.sigmoid(classifier_model(tf.constant(examples)))

print('Results from the saved model:')
print_my_examples(examples, reloaded_results)
print('Results from the model in memory:')
print_my_examples(examples, original_results)
Results from the saved model:
input: this is such an amazing movie! : score: 0.999521
input: The movie was great!           : score: 0.997015
input: The movie was meh.             : score: 0.988535
input: The movie was okish.           : score: 0.079138
input: The movie was terrible...      : score: 0.001622

Results from the model in memory:
input: this is such an amazing movie! : score: 0.999521
input: The movie was great!           : score: 0.997015
input: The movie was meh.             : score: 0.988535
input: The movie was okish.           : score: 0.079138
input: The movie was terrible...      : score: 0.001622
Jika Anda ingin menggunakan model Anda pada TF Melayani , ingatlah bahwa ia akan memanggil SavedModel Anda melalui salah satu tanda tangan bernama. Dengan Python, Anda dapat mengujinya sebagai berikut:
serving_results = reloaded_model \
            .signatures['serving_default'](tf.constant(examples))

serving_results = tf.sigmoid(serving_results['classifier'])

print_my_examples(examples, serving_results)
input: this is such an amazing movie! : score: 0.999521
input: The movie was great!           : score: 0.997015
input: The movie was meh.             : score: 0.988535
input: The movie was okish.           : score: 0.079138
input: The movie was terrible...      : score: 0.001622
Langkah selanjutnya
Sebagai langkah berikutnya, Anda dapat mencoba Memecahkan tugas LEM menggunakan Bert pada tutorial TPU , yang berjalan pada TPU dan menunjukkan Anda bagaimana untuk bekerja dengan beberapa masukan.