
머신러닝(ML) 모델을 실행하기 위해 그래픽 처리 장치(GPU)를 사용하는 것은 모델의 성능과 ML 지원 애플리케이션의 사용자 경험을 극적으로 향상할 수 있습니다. iOS 기기에서, 대리자를 사용해 모델에 대한 GPU 가속화 실행 사용을 활성화할 수 있습니다. 대리자는 TensorFlow Lite의 하드웨어 드라이버 역할을 하여 GPU 프로세서에서 모델의 코드를 실행할 수 있습니다.
이 페이지는 iOS 앱에서 TensorFlow Lite 모델용 GPU 가속화를 활성화하는 방법을 설명합니다. 모범 사례와 고급 기술을 포함한 TensorFlow Lite용 GPU 대리자를 사용하는 데 대한 더 자세한 정보는 GPU 대리자 페이지를 참조하세요.
Interpreter API가 있는 GPU 사용
TensorFlow Lite Interpreter API는 머신러닝 애플리케이션을 빌드하기 위한 일련의 범용 목적 API를 제공합니다. 다음 지침은 iOS 앱에 GPU 지원을 추가하는 것을 통해 여러분을 가이드합니다. 이 가이드는 여러분에게 이미 TensorFlow Lite를 통해 ML 모델을 성공적으로 실행할 수 있는 iOS 앱이 있다고 가정합니다.
참고: TensorFlow Lite를 사용하는 iOS 앱을 이미 가지고 있지 않은 경우, iOS 빠른 시작을 따라 데모 앱을 빌드하세요. 튜토리얼을 마친 후, 이러한 지침을 따라 GPU 지원을 활성화할 수 있습니다.
Podfile을 수정하여 GPU 지원 포함하기
TensorFlow Lite 2.3.0 릴리스부터 GPU 대리자는 바이너리 크기를 줄이기 위해 포드에서 제외됩니다. TensorFlowLiteSwift 포드에 대한 하위 사양을 지정하여 이를 포함할 수 있습니다.
pod 'TensorFlowLiteSwift/Metal', '~> 0.0.1-nightly',
또는
pod 'TensorFlowLiteSwift', '~> 0.0.1-nightly', :subspecs => ['Metal']
버전 2.4.0 이상 또는 C API에서 사용할 수 있는 Objective-C를 사용하려는 경우 TensorFlowLiteObjC 또는 TensorFlowLiteC를 사용할 수도 있습니다.
참고: TensorFlow Lite 버전 2.1.0에서 2.2.0의 경우, GPU 대리자는 TensorFlowLiteC 포드에 포함됩니다. 사용하는 프로그래밍 언어에 따라 TensorFlowLiteC와 TensorFlowLiteSwift 중 선택할 수 있습니다.
GPU 대리자 초기화 및 사용
많은 프로그래밍 언어를 통해 TensorFlow Lite Interpreter API로 GPU 대리자를 사용할 수 있습니다. Swift 및 Objective-C가 좋지만, C++ 및 C도 사용할 수 있습니다. TensorFlow Lite 2.4보다 전 버전을 사용하는 경우 C를 사용해야 합니다. 다음 코드 예제는 이러한 각 언어를 통해 대리자를 사용하는 방법을 간략히 설명합니다.
Swift
import TensorFlowLite

// Load model ...

// Initialize TensorFlow Lite interpreter with the GPU delegate.
let delegate = MetalDelegate()
if let interpreter = try Interpreter(modelPath: modelPath,
                                      delegates: [delegate]) {
  // Run inference ...
}
Objective-C
// Import module when using CocoaPods with module support
@import TFLTensorFlowLite;

// Or import following headers manually
#import "tensorflow/lite/objc/apis/TFLMetalDelegate.h"
#import "tensorflow/lite/objc/apis/TFLTensorFlowLite.h"

// Initialize GPU delegate
TFLMetalDelegate* metalDelegate = [[TFLMetalDelegate alloc] init];

// Initialize interpreter with model path and GPU delegate
TFLInterpreterOptions* options = [[TFLInterpreterOptions alloc] init];
NSError* error = nil;
TFLInterpreter* interpreter = [[TFLInterpreter alloc]
                                initWithModelPath:modelPath
                                          options:options
                                        delegates:@[ metalDelegate ]
                                            error:&error];
if (error != nil) { /* Error handling... */ }

if (![interpreter allocateTensorsWithError:&error]) { /* Error handling... */ }
if (error != nil) { /* Error handling... */ }

// Run inference ...
C++
// Set up interpreter.
auto model = FlatBufferModel::BuildFromFile(model_path);
if (!model) return false;
tflite::ops::builtin::BuiltinOpResolver op_resolver;
std::unique_ptr<Interpreter> interpreter;
InterpreterBuilder(*model, op_resolver)(&interpreter);

// Prepare GPU delegate.
auto* delegate = TFLGpuDelegateCreate(/*default options=*/nullptr);
if (interpreter->ModifyGraphWithDelegate(delegate) != kTfLiteOk) return false;

// Run inference.
WriteToInputTensor(interpreter->typed_input_tensor<float>(0));
if (interpreter->Invoke() != kTfLiteOk) return false;
ReadFromOutputTensor(interpreter->typed_output_tensor<float>(0));

// Clean up.
TFLGpuDelegateDelete(delegate);
C(2.4.0 전)
#include "tensorflow/lite/c/c_api.h"
#include "tensorflow/lite/delegates/gpu/metal_delegate.h"

// Initialize model
TfLiteModel* model = TfLiteModelCreateFromFile(model_path);

// Initialize interpreter with GPU delegate
TfLiteInterpreterOptions* options = TfLiteInterpreterOptionsCreate();
TfLiteDelegate* delegate = TFLGPUDelegateCreate(nil);  // default config
TfLiteInterpreterOptionsAddDelegate(options, metal_delegate);
TfLiteInterpreter* interpreter = TfLiteInterpreterCreate(model, options);
TfLiteInterpreterOptionsDelete(options);

TfLiteInterpreterAllocateTensors(interpreter);

NSMutableData *input_data = [NSMutableData dataWithLength:input_size * sizeof(float)];
NSMutableData *output_data = [NSMutableData dataWithLength:output_size * sizeof(float)];
TfLiteTensor* input = TfLiteInterpreterGetInputTensor(interpreter, 0);
const TfLiteTensor* output = TfLiteInterpreterGetOutputTensor(interpreter, 0);

// Run inference
TfLiteTensorCopyFromBuffer(input, inputData.bytes, inputData.length);
TfLiteInterpreterInvoke(interpreter);
TfLiteTensorCopyToBuffer(output, outputData.mutableBytes, outputData.length);

// Clean up
TfLiteInterpreterDelete(interpreter);
TFLGpuDelegateDelete(metal_delegate);
TfLiteModelDelete(model);
GPU API 언어 사용 노트
- TensorFlow Lite 버전이 2.4.0보다 앞서면 Objective-C용 C API만 사용할 수 있습니다.
- bazel을 사용하고 있거나 직접 TensorFlow Lite를 빌드하는 경우 C++ API만 사용할 수 있습니다. C++ API는 CocoaPods와 함께 사용할 수 없습니다.
- C++로 GPU 대리자를 통해 TensorFlow Lite를 사용하는 경우,
TFLGpuDelegateCreate()함수를 통해 GPU 대리자를 얻은 후,Interpreter::AllocateTensors()를 호출하는 대신 이를Interpreter::ModifyGraphWithDelegate()에 전달합니다.
릴리스 모드로 빌드 및 테스트
성능을 향상하고 최종 테스트를 위해 적절한 Metal API 가속기 설정을 통해 릴리스 빌드로 변경합니다. 이 섹션은 릴리스 빌드를 활성화하는 방법과 Metal 가속화에 대한 설정을 구성하는 방법에 대해 설명합니다.
참조: 이러한 지침은 XCode v.10.1 이상이 필요합니다.
릴리스 빌드로 변경하기
- Product > Scheme > Edit Scheme...을 선택한 후 Run을 선택하여 빌드 설정을 편집합니다.
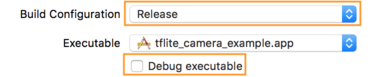
- Info 탭에서, Build Configuration을 Release로 변경하고 Debug executable의 체크 표시를 해제합니다.
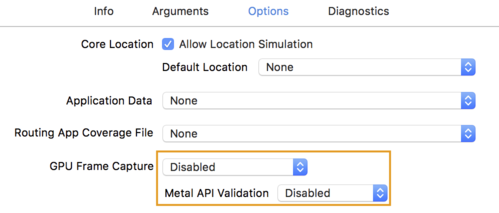
- Options 탭을 클릭하고 GPU Frame Capture를 Disabled으로 변경하고 Metal API Validation를 Disabled으로 변경합니다.
- 64비트 아키텍처에서 릴리스 전용 빌드를 선택해야 합니다. Project navigator > tflite_camera_example > PROJECT > your_project_name > Build Settings에서 Build Active Architecture Only > Release를 Yes로 설정합니다.

고급 GPU 지원
이 섹션은 대리자 옵션, 입력 및 출력 버퍼, 양자화된 모델의 사용을 포함한 iOS용 GPU 대리자 고급 사용에 대해 다룹니다.
iOS용 대리자 옵션
GPU 대리자용 생성자는 Swift API, Objective-C API 및 C API의 옵션 struct를 수락합니다. 이니셜라저로 nullptr (C API) 또는 아무것도 전달하지 않으면(Objective-C 및 Swift API) 기본 옵션이 설정됩니다(위의 기본 사용 예제에서 설명됨).
Swift
// THIS:
var options = MetalDelegate.Options()
options.isPrecisionLossAllowed = false
options.waitType = .passive
options.isQuantizationEnabled = true
let delegate = MetalDelegate(options: options)

// IS THE SAME AS THIS:
let delegate = MetalDelegate()
Objective-C
// THIS:
TFLMetalDelegateOptions* options = [[TFLMetalDelegateOptions alloc] init];
options.precisionLossAllowed = false;
options.waitType = TFLMetalDelegateThreadWaitTypePassive;
options.quantizationEnabled = true;

TFLMetalDelegate* delegate = [[TFLMetalDelegate alloc] initWithOptions:options];

// IS THE SAME AS THIS:
TFLMetalDelegate* delegate = [[TFLMetalDelegate alloc] init];
C
// THIS:
const TFLGpuDelegateOptions options = {
  .allow_precision_loss = false,
  .wait_type = TFLGpuDelegateWaitType::TFLGpuDelegateWaitTypePassive,
  .enable_quantization = true,
};

TfLiteDelegate* delegate = TFLGpuDelegateCreate(options);

// IS THE SAME AS THIS:
TfLiteDelegate* delegate = TFLGpuDelegateCreate(nullptr);
팁: nullptr 또는 기본 생성자를 사용하는 것이 편리하지만 나중에 기본값이 변경될 경우 예기치 않은 동작이 발생하지 않도록 옵션을 명시적으로 설정해야 합니다.
C++ API를 사용하는 입력/출력 버퍼
GPU에서 계산을 수행하려면 GPU에서 데이터를 사용할 수 있어야 합니다. 따라서 종종 메모리를 복사해야 합니다. 상당한 시간이 소요될 수 있으므로 가능하다면 CPU/GPU 메모리 경계를 넘지 않는 것이 좋습니다. 일반적으로 이러한 교차는 불가피하지만, 일부 특수한 경우에는 둘 중 하나를 생략할 수 있습니다.
참조: Bazel을 사용하고 있거나 직접 TensorFlow Lite를 빌드 중인 경우 다음 기술만 사용할 수 있습니다. C++ API는 CocoaPods와 함께 사용할 수 없습니다.
네트워크의 입력이 GPU 메모리에 이미 로드된 이미지라면(예를 들어, 카메라 피드를 포함하는 GPU 텍스처) CPU 메모리에 입력되지 않고도 GPU 메모리에 남아있을 수 있습니다. 마찬가지로, 네트워크의 출력이 이미지 스타일 전송 연산과 같은 렌더링 가능한 이미지 형식이라면 직접 화면에 결과를 표시할 수 있습니다.
최고의 성능을 내도록 TensorFlow Lite는 사용자가 TensorFlow 하드웨어 버퍼에서 직접 읽고 쓸 수 있게 하고, 피할 수 있는 메모리 사본을 우회할 수 있도록 합니다.
이미지 입력이 GPU 메모리에 있다고 가정하면 먼저 이 입력을 Metal용 MTLBuffer 객체로 변환해야 합니다. TfLiteTensor를 TFLGpuDelegateBindMetalBufferToTensor() 함수로 사용자가 준비한 MTLBuffer와 연결할 수 있습니다. 이 함수는 Interpreter::ModifyGraphWithDelegate() 후에 호출되어야 합니다. 또한, 추론 출력은 기본적으로 GPU 메모리에서 CPU 메모리로 복사됩니다. 이 동작은 초기화 중 Interpreter::SetAllowBufferHandleOutput(true)을 호출하여 끌 수 있습니다.
C++
#include "tensorflow/lite/delegates/gpu/metal_delegate.h"
#include "tensorflow/lite/delegates/gpu/metal_delegate_internal.h"

// ...

// Prepare GPU delegate.
auto* delegate = TFLGpuDelegateCreate(nullptr);

if (interpreter->ModifyGraphWithDelegate(delegate) != kTfLiteOk) return false;

interpreter->SetAllowBufferHandleOutput(true);  // disable default gpu->cpu copy
if (!TFLGpuDelegateBindMetalBufferToTensor(
        delegate, interpreter->inputs()[0], user_provided_input_buffer)) {
  return false;
}
if (!TFLGpuDelegateBindMetalBufferToTensor(
        delegate, interpreter->outputs()[0], user_provided_output_buffer)) {
  return false;
}

// Run inference.
if (interpreter->Invoke() != kTfLiteOk) return false;
기본 동작이 꺼지면 GPU 메모리에서 추론 출력을 각 출력 텐서에 Interpreter::EnsureTensorDataIsReadable()에 대한 명시적인 호출이 필요한 CPU 메모리로 복사합니다. 이 접근 방식은 양자화 모델에서도 작동하지만, 버퍼가 내부 비양자화된 버퍼에 연결되어 있으므로 float32 데이터가 있는 float32 크기의 버퍼를 여전히 사용해야 합니다.
양자화 모델
iOS GPU 대리자 라이브러리는 기본으로 양자화 모델을 지원합니다. GPU 대리자를 통해 양자화 모델을 사용해 모드를 변경할 필요가 없습니다. 다음 섹션은 테스트 또는 실험 목적으로 양자화 지원을 비활성화하는 방법을 설명합니다.
양자화 모델 지원 비활성화
다음 코드는 양자화 모델에 대한 지원을 비활성화하는 방법을 보여줍니다.
Swift
    var options = MetalDelegate.Options()
    options.isQuantizationEnabled = false
    let delegate = MetalDelegate(options: options)
Objective-C
    TFLMetalDelegateOptions* options = [[TFLMetalDelegateOptions alloc] init];
    options.quantizationEnabled = false;
C
    TFLGpuDelegateOptions options = TFLGpuDelegateOptionsDefault();
    options.enable_quantization = false;

    TfLiteDelegate* delegate = TFLGpuDelegateCreate(options);
GPU 가속화로 양자화 모델을 실행하는 데 대한 더 자세한 정보는 GPU 대리자 개요를 참조하세요.