
| | |  Ver código fuente en GitHub Ver código fuente en GitHub |
Swift For TensorFlow admite la interoperabilidad de Python.
Puede importar módulos de Python desde Swift, llamar a funciones de Python y convertir valores entre Swift y Python.
import PythonKit
print(Python.version)
3.6.9 (default, Oct  8 2020, 12:12:24)
[GCC 8.4.0]
Configurar la versión de Python
De forma predeterminada, cuando import Python , Swift busca en las rutas de la biblioteca del sistema la versión más reciente de Python instalada. Para utilizar una instalación de Python específica, configure la variable de entorno PYTHON_LIBRARY en la biblioteca compartida libpython proporcionada por la instalación. Por ejemplo:
export PYTHON_LIBRARY="~/anaconda3/lib/libpython3.7m.so"
El nombre de archivo exacto variará según los entornos y plataformas de Python.
Alternativamente, puede configurar la variable de entorno PYTHON_VERSION , que le indica a Swift que busque en las rutas de la biblioteca del sistema una versión de Python coincidente. Tenga en cuenta que PYTHON_LIBRARY tiene prioridad sobre PYTHON_VERSION .
En el código, también puedes llamar a la función PythonLibrary.useVersion , que equivale a configurar PYTHON_VERSION .
// PythonLibrary.useVersion(2)
// PythonLibrary.useVersion(3, 7)
Nota: debes ejecutar PythonLibrary.useVersion justo después import Python , antes de llamar a cualquier código Python. No se puede utilizar para cambiar dinámicamente las versiones de Python.
Establezca PYTHON_LOADER_LOGGING=1 para ver el resultado de depuración para la carga de la biblioteca de Python .
Lo esencial
En Swift, PythonObject representa un objeto de Python. Todas las API de Python utilizan y devuelven instancias PythonObject .
Los tipos básicos en Swift (como números y matrices) se pueden convertir a PythonObject . En algunos casos (para literales y funciones que toman argumentos PythonConvertible ), la conversión ocurre implícitamente. Para convertir explícitamente un valor Swift a PythonObject , use el inicializador PythonObject .
PythonObject define muchas operaciones estándar, incluidas operaciones numéricas, indexación e iteración.
// Convert standard Swift types to Python.
let pythonInt: PythonObject = 1
let pythonFloat: PythonObject = 3.0
let pythonString: PythonObject = "Hello Python!"
let pythonRange: PythonObject = PythonObject(5..<10)
let pythonArray: PythonObject = [1, 2, 3, 4]
let pythonDict: PythonObject = ["foo": [0], "bar": [1, 2, 3]]

// Perform standard operations on Python objects.
print(pythonInt + pythonFloat)
print(pythonString[0..<6])
print(pythonRange)
print(pythonArray[2])
print(pythonDict["bar"])
4.0
Hello
slice(5, 10, None)
3
[1, 2, 3]
// Convert Python objects back to Swift.
let int = Int(pythonInt)!
let float = Float(pythonFloat)!
let string = String(pythonString)!
let range = Range<Int>(pythonRange)!
let array: [Int] = Array(pythonArray)!
let dict: [String: [Int]] = Dictionary(pythonDict)!

// Perform standard operations.
// Outputs are the same as Python!
print(Float(int) + float)
print(string.prefix(6))
print(range)
print(array[2])
print(dict["bar"]!)
4.0
Hello
5..<10
3
[1, 2, 3]
PythonObject define conformidades con muchos protocolos Swift estándar:
-
Equatable -
Comparable -
Hashable -
SignedNumeric -
Strideable -
MutableCollection - Todos los protocolos
ExpressibleBy_Literal
Tenga en cuenta que estas conformidades no son seguras para los tipos: se producirán fallas si intenta utilizar la funcionalidad del protocolo desde una instancia PythonObject incompatible.
let one: PythonObject = 1
print(one == one)
print(one < one)
print(one + one)

let array: PythonObject = [1, 2, 3]
for (i, x) in array.enumerated() {
  print(i, x)
}
True
False
2
0 1
1 2
2 3
Para convertir tuplas de Python a Swift, debes conocer estáticamente la aridad de la tupla.
Llame a uno de los siguientes métodos de instancia:
-
PythonObject.tuple2 -
PythonObject.tuple3 -
PythonObject.tuple4
let pythonTuple = Python.tuple([1, 2, 3])
print(pythonTuple, Python.len(pythonTuple))

// Convert to Swift.
let tuple = pythonTuple.tuple3
print(tuple)
(1, 2, 3) 3
(1, 2, 3)
Incorporaciones de Python
Acceda a las funciones integradas de Python a través de la interfaz global Python .
// `Python.builtins` is a dictionary of all Python builtins.
_ = Python.builtins

// Try some Python builtins.
print(Python.type(1))
print(Python.len([1, 2, 3]))
print(Python.sum([1, 2, 3]))
<class 'int'>
3
6
Importando módulos de Python
Utilice Python.import para importar un módulo de Python. Funciona como la palabra clave import en Python .
let np = Python.import("numpy")
print(np)
let zeros = np.ones([2, 3])
print(zeros)
<module 'numpy' from '/tmpfs/src/tf_docs_env/lib/python3.6/site-packages/numpy/__init__.py'>
[[1. 1. 1.]
 [1. 1. 1.]]
Utilice la función de lanzamiento Python.attemptImport para realizar una importación segura.
let maybeModule = try? Python.attemptImport("nonexistent_module")
print(maybeModule)
nil
Conversión con numpy.ndarray
Los siguientes tipos de Swift se pueden convertir hacia y desde numpy.ndarray :
-
Array<Element> -
ShapedArray<Scalar> -
Tensor<Scalar>
La conversión se realiza correctamente solo si el dtype de numpy.ndarray es compatible con el tipo de parámetro genérico Element o Scalar .
Para Array , la conversión de numpy solo se realiza correctamente si numpy.ndarray es 1-D.
import TensorFlow

let numpyArray = np.ones([4], dtype: np.float32)
print("Swift type:", type(of: numpyArray))
print("Python type:", Python.type(numpyArray))
print(numpyArray.shape)
Swift type: PythonObject
Python type: <class 'numpy.ndarray'>
(4,)
// Examples of converting `numpy.ndarray` to Swift types.
let array: [Float] = Array(numpy: numpyArray)!
let shapedArray = ShapedArray<Float>(numpy: numpyArray)!
let tensor = Tensor<Float>(numpy: numpyArray)!

// Examples of converting Swift types to `numpy.ndarray`.
print(array.makeNumpyArray())
print(shapedArray.makeNumpyArray())
print(tensor.makeNumpyArray())

// Examples with different dtypes.
let doubleArray: [Double] = Array(numpy: np.ones([3], dtype: np.float))!
let intTensor = Tensor<Int32>(numpy: np.ones([2, 3], dtype: np.int32))!
[1. 1. 1. 1.]
[1. 1. 1. 1.]
[1. 1. 1. 1.]
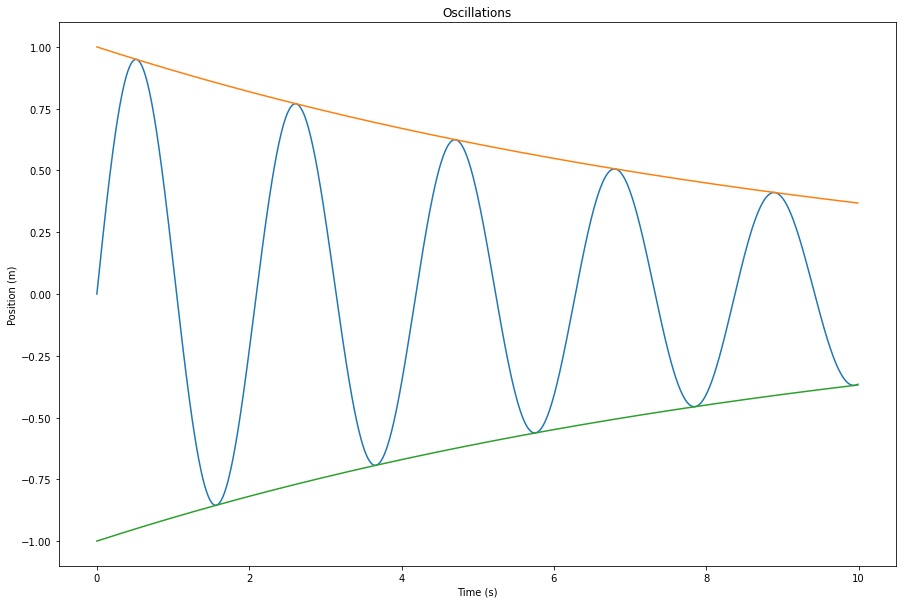
Mostrando imágenes
Puede mostrar imágenes en línea usando matplotlib , como en los cuadernos de Python.
// This cell is here to display plots inside a Jupyter Notebook.
// Do not copy it into another environment.
%include "EnableIPythonDisplay.swift"
print(IPythonDisplay.shell.enable_matplotlib("inline"))
('inline', 'module://ipykernel.pylab.backend_inline')
let np = Python.import("numpy")
let plt = Python.import("matplotlib.pyplot")

let time = np.arange(0, 10, 0.01)
let amplitude = np.exp(-0.1 * time)
let position = amplitude * np.sin(3 * time)

plt.figure(figsize: [15, 10])

plt.plot(time, position)
plt.plot(time, amplitude)
plt.plot(time, -amplitude)

plt.xlabel("Time (s)")
plt.ylabel("Position (m)")
plt.title("Oscillations")

plt.show()
Use `print()` to show values.