
| | |  GitHub पर स्रोत देखें GitHub पर स्रोत देखें |
इस नोटबुक में अंग्रेजी के आधार पर अनुवाद करने के लिए स्पेनिश के लिए करने के लिए अनुक्रम (seq2seq) मॉडल एक दृश्य गाड़ियों प्रभावी पर ध्यान आधारित तंत्रिका मशीन अनुवाद दृष्टिकोण । यह एक उन्नत उदाहरण है जो कुछ ज्ञान ग्रहण करता है:
- अनुक्रम मॉडल के अनुक्रम
- केरस परत के नीचे TensorFlow की बुनियादी बातें:
- सीधे टेंसर के साथ काम करना
- लेखन कस्टम
keras.Modelऔरkeras.layers
हालांकि यह वास्तुकला कुछ हद तक पुरानी है यह अभी भी के माध्यम से काम करने के लिए एक बहुत ही उपयोगी परियोजना (करने के लिए पर जाने से पहले ध्यान तंत्र की एक गहरी समझ पाने के लिए है ट्रांसफॉर्मर )।
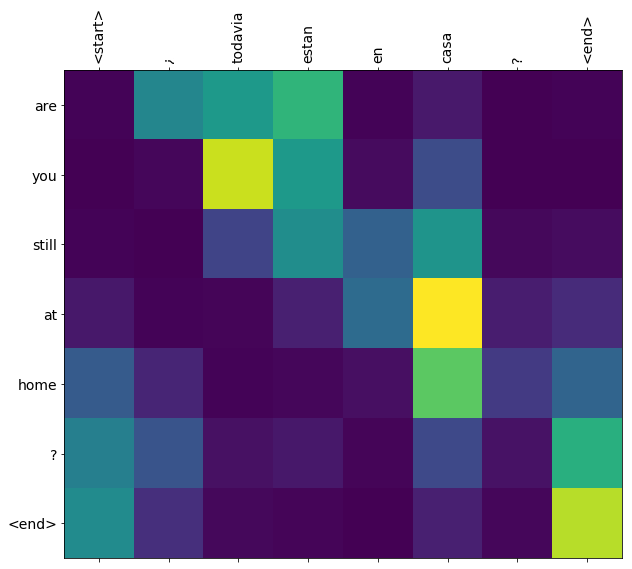
"? ¿Todavia एस्तन एन कासा" इस नोटबुक में मॉडल प्रशिक्षण के बाद, आप इस तरह के रूप, इनपुट एक स्पेनिश वाक्य में सक्षम हो जाएगा, और अंग्रेज़ी अनुवाद वापसी: "क्या आप घर पर अभी भी कर रहे हैं"
जिसके परिणामस्वरूप मॉडल एक के रूप में निर्यात करने योग्य है tf.saved_model तो यह अन्य TensorFlow वातावरण में इस्तेमाल किया जा सकता।
एक खिलौना उदाहरण के लिए अनुवाद की गुणवत्ता उचित है, लेकिन उत्पन्न ध्यान की साजिश शायद अधिक दिलचस्प है। यह दिखाता है कि अनुवाद करते समय इनपुट वाक्य के किन हिस्सों में मॉडल का ध्यान होता है:
सेट अप
pip install tensorflow_text
import numpy as np

import typing
from typing import Any, Tuple

import tensorflow as tf

import tensorflow_text as tf_text

import matplotlib.pyplot as plt
import matplotlib.ticker as ticker
यह ट्यूटोरियल खरोंच से कुछ परतें बनाता है, यदि आप कस्टम और बिल्टिन कार्यान्वयन के बीच स्विच करना चाहते हैं तो इस चर का उपयोग करें।
use_builtins = True
यह ट्यूटोरियल बहुत सारे निम्न स्तर के एपीआई का उपयोग करता है जहां आकृतियों को गलत करना आसान है। इस वर्ग का उपयोग पूरे ट्यूटोरियल में आकृतियों की जांच के लिए किया जाता है।
आकार चेकर
class ShapeChecker():
  def __init__(self):
    # Keep a cache of every axis-name seen
    self.shapes = {}

  def __call__(self, tensor, names, broadcast=False):
    if not tf.executing_eagerly():
      return

    if isinstance(names, str):
      names = (names,)

    shape = tf.shape(tensor)
    rank = tf.rank(tensor)

    if rank != len(names):
      raise ValueError(f'Rank mismatch:\n'
                       f'    found {rank}: {shape.numpy()}\n'
                       f'    expected {len(names)}: {names}\n')

    for i, name in enumerate(names):
      if isinstance(name, int):
        old_dim = name
      else:
        old_dim = self.shapes.get(name, None)
      new_dim = shape[i]

      if (broadcast and new_dim == 1):
        continue

      if old_dim is None:
        # If the axis name is new, add its length to the cache.
        self.shapes[name] = new_dim
        continue

      if new_dim != old_dim:
        raise ValueError(f"Shape mismatch for dimension: '{name}'\n"
                         f"    found: {new_dim}\n"
                         f"    expected: {old_dim}\n")
आंकड़ा
हम द्वारा प्रदान की जाने वाली भाषा डाटासेट इस्तेमाल करेंगे http://www.manythings.org/anki/ यह डेटासेट प्रारूप में भाषा अनुवाद जोड़े शामिल हैं:
May I borrow this book? ¿Puedo tomar prestado este libro?
उनके पास कई तरह की भाषाएं उपलब्ध हैं, लेकिन हम अंग्रेज़ी-स्पैनिश डेटासेट का उपयोग करेंगे।
डेटासेट डाउनलोड करें और तैयार करें
सुविधा के लिए, हमने Google क्लाउड पर इस डेटासेट की एक कॉपी होस्ट की है, लेकिन आप अपनी खुद की कॉपी भी डाउनलोड कर सकते हैं। डेटासेट डाउनलोड करने के बाद, डेटा तैयार करने के लिए हम यहां कदम उठाएंगे:
- प्रारंभ और समाप्ति प्रत्येक वाक्य को टोकन जोड़ें।
- विशेष वर्णों को हटाकर वाक्यों को साफ करें।
- एक वर्ड इंडेक्स और रिवर्स वर्ड इंडेक्स बनाएं (शब्द → आईडी और आईडी → शब्द से मैपिंग शब्दकोश)।
- प्रत्येक वाक्य को अधिकतम लंबाई तक पैड करें।
# Download the file
import pathlib

path_to_zip = tf.keras.utils.get_file(
    'spa-eng.zip', origin='http://storage.googleapis.com/download.tensorflow.org/data/spa-eng.zip',
    extract=True)

path_to_file = pathlib.Path(path_to_zip).parent/'spa-eng/spa.txt'
Downloading data from http://storage.googleapis.com/download.tensorflow.org/data/spa-eng.zip
2646016/2638744 [==============================] - 0s 0us/step
2654208/2638744 [==============================] - 0s 0us/step
def load_data(path):
  text = path.read_text(encoding='utf-8')

  lines = text.splitlines()
  pairs = [line.split('\t') for line in lines]

  inp = [inp for targ, inp in pairs]
  targ = [targ for targ, inp in pairs]

  return targ, inp
targ, inp = load_data(path_to_file)
print(inp[-1])
Si quieres sonar como un hablante nativo, debes estar dispuesto a practicar diciendo la misma frase una y otra vez de la misma manera en que un músico de banjo practica el mismo fraseo una y otra vez hasta que lo puedan tocar correctamente y en el tiempo esperado.
print(targ[-1])
If you want to sound like a native speaker, you must be willing to practice saying the same sentence over and over in the same way that banjo players practice the same phrase over and over until they can play it correctly and at the desired tempo.
एक tf.डेटा डेटासेट बनाएं
तार के इन सरणियों से आप एक बना सकते हैं tf.data.Dataset कि शफ़ल और उन्हें बैचों कुशलता से तार की:
BUFFER_SIZE = len(inp)
BATCH_SIZE = 64

dataset = tf.data.Dataset.from_tensor_slices((inp, targ)).shuffle(BUFFER_SIZE)
dataset = dataset.batch(BATCH_SIZE)
for example_input_batch, example_target_batch in dataset.take(1):
  print(example_input_batch[:5])
  print()
  print(example_target_batch[:5])
  break
tf.Tensor(
[b'No s\xc3\xa9 lo que quiero.' b'\xc2\xbfDeber\xc3\xada repetirlo?'
 b'Tard\xc3\xa9 m\xc3\xa1s de 2 horas en traducir unas p\xc3\xa1ginas en ingl\xc3\xa9s.'
 b'A Tom comenz\xc3\xb3 a temerle a Mary.' b'Mi pasatiempo es la lectura.'], shape=(5,), dtype=string)

tf.Tensor(
[b"I don't know what I want." b'Should I repeat it?'
 b'It took me more than two hours to translate a few pages of English.'
 b'Tom became afraid of Mary.' b'My hobby is reading.'], shape=(5,), dtype=string)
टेक्स्ट प्रीप्रोसेसिंग
इस ट्यूटोरियल का एक उद्देश्य यह एक मॉडल है कि एक के रूप में निर्यात किया जा सकता का निर्माण करना है tf.saved_model । कि निर्यात मॉडल उपयोगी बनाने के लिए इसे ले जाना चाहिए tf.string आदानों, और वापसी tf.string आउटपुट: सभी पाठ प्रसंस्करण मॉडल के अंदर होता है।
मानकीकरण
मॉडल एक सीमित शब्दावली के साथ बहुभाषी पाठ के साथ काम कर रहा है। इसलिए इनपुट टेक्स्ट को मानकीकृत करना महत्वपूर्ण होगा।
उच्चारण वर्णों को विभाजित करने और उनके ASCII समकक्षों के साथ संगतता वर्णों को प्रतिस्थापित करने के लिए पहला चरण यूनिकोड सामान्यीकरण है।
tensorflow_text पैकेज एक यूनिकोड सामान्य ऑपरेशन में शामिल हैं:
example_text = tf.constant('¿Todavía está en casa?')

print(example_text.numpy())
print(tf_text.normalize_utf8(example_text, 'NFKD').numpy())
b'\xc2\xbfTodav\xc3\xada est\xc3\xa1 en casa?'
b'\xc2\xbfTodavi\xcc\x81a esta\xcc\x81 en casa?'
टेक्स्ट मानकीकरण फ़ंक्शन में यूनिकोड सामान्यीकरण पहला कदम होगा:
def tf_lower_and_split_punct(text):
  # Split accecented characters.
  text = tf_text.normalize_utf8(text, 'NFKD')
  text = tf.strings.lower(text)
  # Keep space, a to z, and select punctuation.
  text = tf.strings.regex_replace(text, '[^ a-z.?!,¿]', '')
  # Add spaces around punctuation.
  text = tf.strings.regex_replace(text, '[.?!,¿]', r' \0 ')
  # Strip whitespace.
  text = tf.strings.strip(text)

  text = tf.strings.join(['[START]', text, '[END]'], separator=' ')
  return text
print(example_text.numpy().decode())
print(tf_lower_and_split_punct(example_text).numpy().decode())
¿Todavía está en casa?
[START] ¿ todavia esta en casa ? [END]
पाठ वैश्वीकरण
इस मानकीकरण समारोह एक में लिपटे हो जाएगा tf.keras.layers.TextVectorization परत जो शब्दावली निष्कर्षण और इनपुट पाठ के रूपांतरण टोकन के दृश्यों को संभाल लेंगे।
max_vocab_size = 5000

input_text_processor = tf.keras.layers.TextVectorization(
    standardize=tf_lower_and_split_punct,
    max_tokens=max_vocab_size)
TextVectorization परत और कई अन्य पूर्व प्रसंस्करण परतों एक है adapt विधि। इस विधि प्रशिक्षण डेटा में से एक युग पढ़ता है, और की तरह एक बहुत काम करता है Model.fix । यह adapt विधि परत डेटा के आधार पर initializes। यहाँ यह शब्दावली निर्धारित करता है:
input_text_processor.adapt(inp)

# Here are the first 10 words from the vocabulary:
input_text_processor.get_vocabulary()[:10]
['', '[UNK]', '[START]', '[END]', '.', 'que', 'de', 'el', 'a', 'no']
यही कारण है कि स्पेनिश है TextVectorization परत, अब निर्माण और .adapt() अंग्रेजी एक:
output_text_processor = tf.keras.layers.TextVectorization(
    standardize=tf_lower_and_split_punct,
    max_tokens=max_vocab_size)

output_text_processor.adapt(targ)
output_text_processor.get_vocabulary()[:10]
['', '[UNK]', '[START]', '[END]', '.', 'the', 'i', 'to', 'you', 'tom']
अब ये परतें स्ट्रिंग्स के एक बैच को टोकन आईडी के बैच में बदल सकती हैं:
example_tokens = input_text_processor(example_input_batch)
example_tokens[:3, :10]
<tf.Tensor: shape=(3, 10), dtype=int64, numpy=
array([[   2,    9,   17,   22,    5,   48,    4,    3,    0,    0],
       [   2,   13,  177,    1,   12,    3,    0,    0,    0,    0],
       [   2,  120,   35,    6,  290,   14, 2134,  506, 2637,   14]])>
get_vocabulary विधि टोकन आईडी पाठ करने के लिए वापस परिवर्तित करने के लिए इस्तेमाल किया जा सकता:
input_vocab = np.array(input_text_processor.get_vocabulary())
tokens = input_vocab[example_tokens[0].numpy()]
' '.join(tokens)
'[START] no se lo que quiero . [END] '
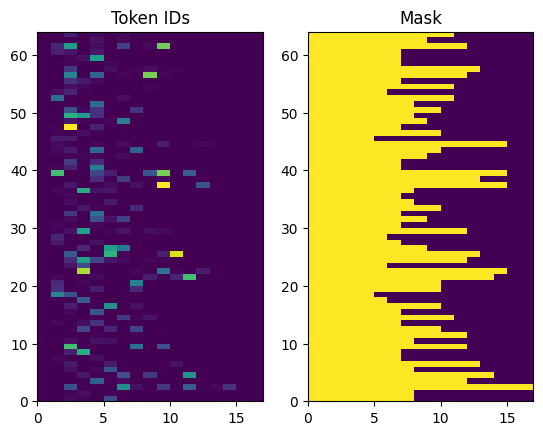
लौटाए गए टोकन आईडी शून्य-गद्देदार हैं। इसे आसानी से मास्क में बदला जा सकता है:
plt.subplot(1, 2, 1)
plt.pcolormesh(example_tokens)
plt.title('Token IDs')

plt.subplot(1, 2, 2)
plt.pcolormesh(example_tokens != 0)
plt.title('Mask')
Text(0.5, 1.0, 'Mask')
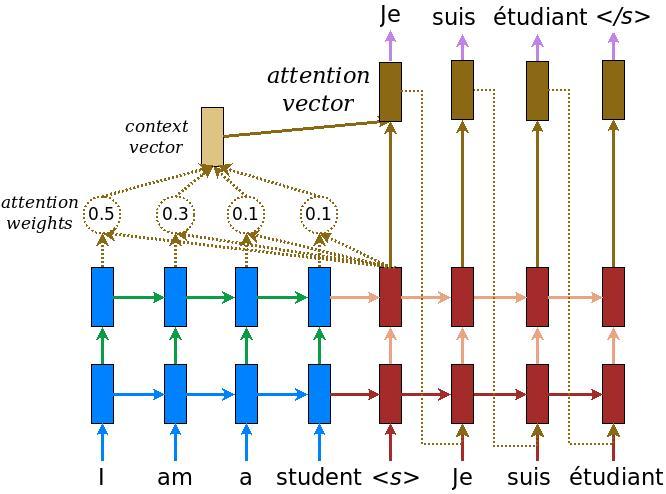
एनकोडर/डिकोडर मॉडल
निम्नलिखित आरेख मॉडल का एक सिंहावलोकन दिखाता है। प्रत्येक समय-चरण पर डिकोडर के आउटपुट को अगले शब्द की भविष्यवाणी करने के लिए एन्कोडेड इनपुट पर भारित योग के साथ जोड़ा जाता है। चित्र और सूत्रों से हैं Luong के कागज ।
इसमें आने से पहले मॉडल के लिए कुछ स्थिरांक परिभाषित करें:
embedding_dim = 256
units = 1024
एनकोडर
एन्कोडर बनाकर शुरू करें, ऊपर दिए गए आरेख का नीला भाग।
एन्कोडर:
- (से टोकन आईडी की सूची ले जाता है
input_text_processor)। - प्रत्येक टोकन के लिए एक embedding वेक्टर को खोजता है (एक का उपयोग करना
layers.Embedding)। - एक नया अनुक्रम में embeddings (एक का उपयोग प्रक्रियाओं
layers.GRU)। - रिटर्न:
- संसाधित अनुक्रम। इसे ध्यान प्रमुख को भेजा जाएगा।
- आंतरिक अवस्था। इसका उपयोग डिकोडर को इनिशियलाइज़ करने के लिए किया जाएगा
class Encoder(tf.keras.layers.Layer):
  def __init__(self, input_vocab_size, embedding_dim, enc_units):
    super(Encoder, self).__init__()
    self.enc_units = enc_units
    self.input_vocab_size = input_vocab_size

    # The embedding layer converts tokens to vectors
    self.embedding = tf.keras.layers.Embedding(self.input_vocab_size,
                                               embedding_dim)

    # The GRU RNN layer processes those vectors sequentially.
    self.gru = tf.keras.layers.GRU(self.enc_units,
                                   # Return the sequence and state
                                   return_sequences=True,
                                   return_state=True,
                                   recurrent_initializer='glorot_uniform')

  def call(self, tokens, state=None):
    shape_checker = ShapeChecker()
    shape_checker(tokens, ('batch', 's'))

    # 2. The embedding layer looks up the embedding for each token.
    vectors = self.embedding(tokens)
    shape_checker(vectors, ('batch', 's', 'embed_dim'))

    # 3. The GRU processes the embedding sequence.
    #    output shape: (batch, s, enc_units)
    #    state shape: (batch, enc_units)
    output, state = self.gru(vectors, initial_state=state)
    shape_checker(output, ('batch', 's', 'enc_units'))
    shape_checker(state, ('batch', 'enc_units'))

    # 4. Returns the new sequence and its state.
    return output, state
यहां बताया गया है कि यह अब तक एक साथ कैसे फिट बैठता है:
# Convert the input text to tokens.
example_tokens = input_text_processor(example_input_batch)

# Encode the input sequence.
encoder = Encoder(input_text_processor.vocabulary_size(),
                  embedding_dim, units)
example_enc_output, example_enc_state = encoder(example_tokens)

print(f'Input batch, shape (batch): {example_input_batch.shape}')
print(f'Input batch tokens, shape (batch, s): {example_tokens.shape}')
print(f'Encoder output, shape (batch, s, units): {example_enc_output.shape}')
print(f'Encoder state, shape (batch, units): {example_enc_state.shape}')
Input batch, shape (batch): (64,)
Input batch tokens, shape (batch, s): (64, 14)
Encoder output, shape (batch, s, units): (64, 14, 1024)
Encoder state, shape (batch, units): (64, 1024)
एन्कोडर अपनी आंतरिक स्थिति लौटाता है ताकि इसकी स्थिति का उपयोग डिकोडर को प्रारंभ करने के लिए किया जा सके।
आरएनएन के लिए अपनी स्थिति वापस करना भी आम है ताकि वह कई कॉलों पर अनुक्रम को संसाधित कर सके। आप डिकोडर का निर्माण करते हुए और अधिक देखेंगे।
ध्यान प्रमुख
डिकोडर इनपुट अनुक्रम के कुछ हिस्सों पर चुनिंदा रूप से ध्यान केंद्रित करने के लिए ध्यान का उपयोग करता है। ध्यान प्रत्येक उदाहरण के लिए इनपुट के रूप में वैक्टर का एक क्रम लेता है और प्रत्येक उदाहरण के लिए "ध्यान" वेक्टर देता है। यह ध्यान परत एक के समान है layers.GlobalAveragePoling1D लेकिन ध्यान परत एक भारित औसत प्रदर्शन करती है।
आइए देखें कि यह कैसे काम करता है:


कहां:
- \(s\) एनकोडर सूचकांक है।
- \(t\) डिकोडर सूचकांक है।
- \(\alpha_{ts}\) ध्यान भार है।
- \(h_s\) एनकोडर आउटपुट के अनुक्रम (ध्यान "कुंजी" और "मूल्य" ट्रांसफार्मर शब्दावली में) करने के लिए भाग लिया जा रहा है।
- \(h_t\) विकोडक राज्य अनुक्रम (ध्यान "क्वेरी" ट्रांसफार्मर शब्दावली में) में भाग लेने के लिए है।
- \(c_t\) जिसके परिणामस्वरूप संदर्भ वेक्टर है।
- \(a_t\) अंतिम "संदर्भ" और "क्वेरी" के संयोजन उत्पादन होता है।
समीकरण:
- ध्यान वजन, गणना करता है \(\alpha_{ts}\), एनकोडर के उत्पादन अनुक्रम में एक softmax के रूप में।
- एनकोडर आउटपुट के भारित योग के रूप में संदर्भ वेक्टर की गणना करता है।
अंतिम है \(score\) कार्य करते हैं। इसका काम प्रत्येक कुंजी-क्वेरी जोड़ी के लिए स्केलर लॉग-स्कोर की गणना करना है। दो सामान्य दृष्टिकोण हैं:

इस ट्यूटोरियल का उपयोग करता Bahdanau के अतिरिक्त ध्यान । TensorFlow दोनों के रूप में के कार्यान्वयन में शामिल layers.Attention और layers.AdditiveAttention । हैंडल नीचे वर्ग की एक जोड़ी में वजन मैट्रिक्स layers.Dense परतें, और अंतर्निहित कार्यान्वयन कहता है।
class BahdanauAttention(tf.keras.layers.Layer):
  def __init__(self, units):
    super().__init__()
    # For Eqn. (4), the  Bahdanau attention
    self.W1 = tf.keras.layers.Dense(units, use_bias=False)
    self.W2 = tf.keras.layers.Dense(units, use_bias=False)

    self.attention = tf.keras.layers.AdditiveAttention()

  def call(self, query, value, mask):
    shape_checker = ShapeChecker()
    shape_checker(query, ('batch', 't', 'query_units'))
    shape_checker(value, ('batch', 's', 'value_units'))
    shape_checker(mask, ('batch', 's'))

    # From Eqn. (4), `W1@ht`.
    w1_query = self.W1(query)
    shape_checker(w1_query, ('batch', 't', 'attn_units'))

    # From Eqn. (4), `W2@hs`.
    w2_key = self.W2(value)
    shape_checker(w2_key, ('batch', 's', 'attn_units'))

    query_mask = tf.ones(tf.shape(query)[:-1], dtype=bool)
    value_mask = mask

    context_vector, attention_weights = self.attention(
        inputs = [w1_query, value, w2_key],
        mask=[query_mask, value_mask],
        return_attention_scores = True,
    )
    shape_checker(context_vector, ('batch', 't', 'value_units'))
    shape_checker(attention_weights, ('batch', 't', 's'))

    return context_vector, attention_weights
ध्यान परत का परीक्षण करें
एक बनाएं BahdanauAttention परत:
attention_layer = BahdanauAttention(units)
यह परत 3 इनपुट लेती है:
-
query: यह बाद में, विकोडक द्वारा उत्पन्न हो जाएगा। -
value: इस एनकोडर के उत्पादन होगा। -
mask: गद्दी छोड़ने के लिए,example_tokens != 0
(example_tokens != 0).shape
TensorShape([64, 14])
ध्यान परत के वेक्टरकृत कार्यान्वयन से आप क्वेरी वैक्टर के अनुक्रमों का एक बैच और मूल्य वैक्टर के अनुक्रम का एक बैच पास कर सकते हैं। परिणाम है:
- परिणाम वैक्टर के अनुक्रमों का एक बैच प्रश्नों के आकार को दर्शाता है।
- एक बैच ध्यान आकार के साथ, नक्शे
(query_length, value_length)।
# Later, the decoder will generate this attention query
example_attention_query = tf.random.normal(shape=[len(example_tokens), 2, 10])

# Attend to the encoded tokens

context_vector, attention_weights = attention_layer(
    query=example_attention_query,
    value=example_enc_output,
    mask=(example_tokens != 0))

print(f'Attention result shape: (batch_size, query_seq_length, units):           {context_vector.shape}')
print(f'Attention weights shape: (batch_size, query_seq_length, value_seq_length): {attention_weights.shape}')
Attention result shape: (batch_size, query_seq_length, units):           (64, 2, 1024)
Attention weights shape: (batch_size, query_seq_length, value_seq_length): (64, 2, 14)
ध्यान वजन करने के लिए योग करना चाहिए 1.0 प्रत्येक दृश्य के लिए।
यहाँ पर दृश्यों भर में ध्यान वजन रहे हैं t=0 :
plt.subplot(1, 2, 1)
plt.pcolormesh(attention_weights[:, 0, :])
plt.title('Attention weights')

plt.subplot(1, 2, 2)
plt.pcolormesh(example_tokens != 0)
plt.title('Mask')
Text(0.5, 1.0, 'Mask')

छोटे यादृच्छिक आरंभीकरण की वजह से ध्यान वजन करने के लिए सभी करीब हैं 1/(sequence_length) । आप एक ही दृश्य के लिए वजन पर ज़ूम हैं, तो आप देख सकते हैं कुछ छोटा सा बदलाव है कि मॉडल का विस्तार करने में जान सकते हैं, और शोषण होता है।
attention_weights.shape
TensorShape([64, 2, 14])
attention_slice = attention_weights[0, 0].numpy()
attention_slice = attention_slice[attention_slice != 0]
plt.suptitle('Attention weights for one sequence')

plt.figure(figsize=(12, 6))
a1 = plt.subplot(1, 2, 1)
plt.bar(range(len(attention_slice)), attention_slice)
# freeze the xlim
plt.xlim(plt.xlim())
plt.xlabel('Attention weights')

a2 = plt.subplot(1, 2, 2)
plt.bar(range(len(attention_slice)), attention_slice)
plt.xlabel('Attention weights, zoomed')

# zoom in
top = max(a1.get_ylim())
zoom = 0.85*top
a2.set_ylim([0.90*top, top])
a1.plot(a1.get_xlim(), [zoom, zoom], color='k')
[<matplotlib.lines.Line2D at 0x7fb42c5b1090>]
<Figure size 432x288 with 0 Axes>

डिकोडर
डिकोडर का काम अगले आउटपुट टोकन के लिए भविष्यवाणियां उत्पन्न करना है।
- डिकोडर को पूरा एनकोडर आउटपुट प्राप्त होता है।
- यह अब तक जो कुछ भी उत्पन्न हुआ है उसका ट्रैक रखने के लिए यह एक आरएनएन का उपयोग करता है।
- यह अपने आरएनएन आउटपुट का उपयोग एन्कोडर के आउटपुट पर ध्यान देने के लिए क्वेरी के रूप में करता है, जो संदर्भ वेक्टर का उत्पादन करता है।
- यह "ध्यान वेक्टर" उत्पन्न करने के लिए समीकरण 3 (नीचे) का उपयोग करके आरएनएन आउटपुट और संदर्भ वेक्टर को जोड़ती है।
- यह "ध्यान वेक्टर" के आधार पर अगले टोकन के लिए लॉगिट भविष्यवाणियां उत्पन्न करता है।

यहाँ है Decoder वर्ग और उसके प्रारंभकर्ता। प्रारंभकर्ता सभी आवश्यक परतें बनाता है।
class Decoder(tf.keras.layers.Layer):
  def __init__(self, output_vocab_size, embedding_dim, dec_units):
    super(Decoder, self).__init__()
    self.dec_units = dec_units
    self.output_vocab_size = output_vocab_size
    self.embedding_dim = embedding_dim

    # For Step 1. The embedding layer convets token IDs to vectors
    self.embedding = tf.keras.layers.Embedding(self.output_vocab_size,
                                               embedding_dim)

    # For Step 2. The RNN keeps track of what's been generated so far.
    self.gru = tf.keras.layers.GRU(self.dec_units,
                                   return_sequences=True,
                                   return_state=True,
                                   recurrent_initializer='glorot_uniform')

    # For step 3. The RNN output will be the query for the attention layer.
    self.attention = BahdanauAttention(self.dec_units)

    # For step 4. Eqn. (3): converting `ct` to `at`
    self.Wc = tf.keras.layers.Dense(dec_units, activation=tf.math.tanh,
                                    use_bias=False)

    # For step 5. This fully connected layer produces the logits for each
    # output token.
    self.fc = tf.keras.layers.Dense(self.output_vocab_size)
call इस परत के लिए विधि लेता है और कई tensors देता है। उन्हें साधारण कंटेनर कक्षाओं में व्यवस्थित करें:
class DecoderInput(typing.NamedTuple):
  new_tokens: Any
  enc_output: Any
  mask: Any

class DecoderOutput(typing.NamedTuple):
  logits: Any
  attention_weights: Any
यहाँ के कार्यान्वयन है call विधि:
def call(self,
         inputs: DecoderInput,
         state=None) -> Tuple[DecoderOutput, tf.Tensor]:
  shape_checker = ShapeChecker()
  shape_checker(inputs.new_tokens, ('batch', 't'))
  shape_checker(inputs.enc_output, ('batch', 's', 'enc_units'))
  shape_checker(inputs.mask, ('batch', 's'))

  if state is not None:
    shape_checker(state, ('batch', 'dec_units'))

  # Step 1. Lookup the embeddings
  vectors = self.embedding(inputs.new_tokens)
  shape_checker(vectors, ('batch', 't', 'embedding_dim'))

  # Step 2. Process one step with the RNN
  rnn_output, state = self.gru(vectors, initial_state=state)

  shape_checker(rnn_output, ('batch', 't', 'dec_units'))
  shape_checker(state, ('batch', 'dec_units'))

  # Step 3. Use the RNN output as the query for the attention over the
  # encoder output.
  context_vector, attention_weights = self.attention(
      query=rnn_output, value=inputs.enc_output, mask=inputs.mask)
  shape_checker(context_vector, ('batch', 't', 'dec_units'))
  shape_checker(attention_weights, ('batch', 't', 's'))

  # Step 4. Eqn. (3): Join the context_vector and rnn_output
  #     [ct; ht] shape: (batch t, value_units + query_units)
  context_and_rnn_output = tf.concat([context_vector, rnn_output], axis=-1)

  # Step 4. Eqn. (3): `at = tanh(Wc@[ct; ht])`
  attention_vector = self.Wc(context_and_rnn_output)
  shape_checker(attention_vector, ('batch', 't', 'dec_units'))

  # Step 5. Generate logit predictions:
  logits = self.fc(attention_vector)
  shape_checker(logits, ('batch', 't', 'output_vocab_size'))

  return DecoderOutput(logits, attention_weights), state
Decoder.call = call
एनकोडर अपने RNN के लिए एक कॉल के साथ अपनी पूरी इनपुट अनुक्रम संसाधित करता है। डिकोडर का यह कार्यान्वयन कुशल प्रशिक्षण के लिए ऐसा कर सकते हैं और साथ ही। लेकिन यह ट्यूटोरियल कुछ कारणों से डिकोडर को लूप में चलाएगा:
- लचीलापन: लूप लिखने से आपको प्रशिक्षण प्रक्रिया पर सीधा नियंत्रण मिलता है।
- स्पष्टता: यह मास्किंग चाल करते हैं और उपयोग करने के लिए संभव है
layers.RNN, याtfa.seq2seqएक कॉल में यह सब पैक करने के लिए एपीआई। लेकिन इसे लूप के रूप में लिखना स्पष्ट हो सकता है।- लूप निशुल्क प्रशिक्षण में दर्शाया गया है पाठ पीढ़ी tutiorial।
अब इस डिकोडर का उपयोग करके देखें।
decoder = Decoder(output_text_processor.vocabulary_size(),
                  embedding_dim, units)
डिकोडर 4 इनपुट लेता है।
-
new_tokens- पिछले टोकन जेनरेट। साथ विकोडक प्रारंभ"[START]"टोकन। -
enc_output- द्वारा उत्पन्नEncoder। -
mask- एक बूलियन टेन्सर जो दर्शाता है किtokens != 0 -
state- पिछलेstateविकोडक से निर्गम (विकोडक के RNN की आंतरिक स्थिति)। दर्राNoneकरने के लिए यह शून्य आरंभ कर देगा। मूल पेपर इसे एन्कोडर के अंतिम आरएनएन राज्य से प्रारंभ करता है।
# Convert the target sequence, and collect the "[START]" tokens
example_output_tokens = output_text_processor(example_target_batch)

start_index = output_text_processor.get_vocabulary().index('[START]')
first_token = tf.constant([[start_index]] * example_output_tokens.shape[0])
# Run the decoder
dec_result, dec_state = decoder(
    inputs = DecoderInput(new_tokens=first_token,
                          enc_output=example_enc_output,
                          mask=(example_tokens != 0)),
    state = example_enc_state
)

print(f'logits shape: (batch_size, t, output_vocab_size) {dec_result.logits.shape}')
print(f'state shape: (batch_size, dec_units) {dec_state.shape}')
logits shape: (batch_size, t, output_vocab_size) (64, 1, 5000)
state shape: (batch_size, dec_units) (64, 1024)
लॉग के अनुसार टोकन का नमूना लें:
sampled_token = tf.random.categorical(dec_result.logits[:, 0, :], num_samples=1)
आउटपुट के पहले शब्द के रूप में टोकन को डीकोड करें:
vocab = np.array(output_text_processor.get_vocabulary())
first_word = vocab[sampled_token.numpy()]
first_word[:5]
array([['already'],
       ['plants'],
       ['pretended'],
       ['convince'],
       ['square']], dtype='<U16')
अब लॉग का दूसरा सेट बनाने के लिए डिकोडर का उपयोग करें।
- एक ही दर्रा
enc_outputऔरmask, इन नहीं बदला है। - दर्रा के रूप में टोकन नमूना
new_tokens। - दर्रा
decoder_stateविकोडक पिछली बार लौट आए, तो RNN जहां यह पिछली बार दूर छोड़ दिया की स्मृति के साथ जारी है।
dec_result, dec_state = decoder(
    DecoderInput(sampled_token,
                 example_enc_output,
                 mask=(example_tokens != 0)),
    state=dec_state)
sampled_token = tf.random.categorical(dec_result.logits[:, 0, :], num_samples=1)
first_word = vocab[sampled_token.numpy()]
first_word[:5]
array([['nap'],
       ['mean'],
       ['worker'],
       ['passage'],
       ['baked']], dtype='<U16')
प्रशिक्षण
अब जब आपके पास सभी मॉडल घटक हैं, तो मॉडल का प्रशिक्षण शुरू करने का समय आ गया है। आपको ज़रूरत होगी:
- अनुकूलन करने के लिए एक हानि कार्य और अनुकूलक।
- प्रत्येक इनपुट/लक्ष्य बैच के लिए मॉडल को अपडेट करने का तरीका परिभाषित करने वाला एक प्रशिक्षण चरण फ़ंक्शन।
- प्रशिक्षण को चलाने और चौकियों को बचाने के लिए एक प्रशिक्षण लूप।
हानि फ़ंक्शन को परिभाषित करें
class MaskedLoss(tf.keras.losses.Loss):
  def __init__(self):
    self.name = 'masked_loss'
    self.loss = tf.keras.losses.SparseCategoricalCrossentropy(
        from_logits=True, reduction='none')

  def __call__(self, y_true, y_pred):
    shape_checker = ShapeChecker()
    shape_checker(y_true, ('batch', 't'))
    shape_checker(y_pred, ('batch', 't', 'logits'))

    # Calculate the loss for each item in the batch.
    loss = self.loss(y_true, y_pred)
    shape_checker(loss, ('batch', 't'))

    # Mask off the losses on padding.
    mask = tf.cast(y_true != 0, tf.float32)
    shape_checker(mask, ('batch', 't'))
    loss *= mask

    # Return the total.
    return tf.reduce_sum(loss)
प्रशिक्षण चरण लागू करें
एक मॉडल वर्ग के साथ शुरू करो, प्रशिक्षण प्रक्रिया के रूप में लागू किया जाएगा train_step इस मॉडल पर विधि। देखें अनुकूलित फिट जानकारी के लिए।
यहाँ train_step विधि के चारों ओर एक आवरण है _train_step कार्यान्वयन जो बाद में आ जाएगा। यह आवरण पर और बंद करने के लिए एक स्विच भी शामिल tf.function , संकलन आसान डिबगिंग बनाने के लिए।
class TrainTranslator(tf.keras.Model):
  def __init__(self, embedding_dim, units,
               input_text_processor,
               output_text_processor,
               use_tf_function=True):
    super().__init__()
    # Build the encoder and decoder
    encoder = Encoder(input_text_processor.vocabulary_size(),
                      embedding_dim, units)
    decoder = Decoder(output_text_processor.vocabulary_size(),
                      embedding_dim, units)

    self.encoder = encoder
    self.decoder = decoder
    self.input_text_processor = input_text_processor
    self.output_text_processor = output_text_processor
    self.use_tf_function = use_tf_function
    self.shape_checker = ShapeChecker()

  def train_step(self, inputs):
    self.shape_checker = ShapeChecker()
    if self.use_tf_function:
      return self._tf_train_step(inputs)
    else:
      return self._train_step(inputs)
कुल मिलाकर के लिए कार्यान्वयन Model.train_step विधि इस प्रकार है:
- का एक बैच प्राप्त
input_text, target_textसेtf.data.Dataset। - उन कच्चे टेक्स्ट इनपुट को टोकन-एम्बेडिंग और मास्क में बदलें।
- पर एनकोडर चलाने
input_tokensपाने के लिएencoder_outputऔरencoder_state। - डिकोडर स्थिति और हानि को प्रारंभ करें।
- अधिक लूप
target_tokens:- डिकोडर को एक बार में एक कदम चलाएं।
- प्रत्येक चरण के लिए हानि की गणना करें।
- औसत हानि संचित करें।
- नुकसान की ढाल की गणना और मॉडल के लिए अपडेट लागू करने अनुकूलक का उपयोग
trainable_variables।
_preprocess विधि, नीचे जुड़ते, औजार # 1 और # 2 कदम:
def _preprocess(self, input_text, target_text):
  self.shape_checker(input_text, ('batch',))
  self.shape_checker(target_text, ('batch',))

  # Convert the text to token IDs
  input_tokens = self.input_text_processor(input_text)
  target_tokens = self.output_text_processor(target_text)
  self.shape_checker(input_tokens, ('batch', 's'))
  self.shape_checker(target_tokens, ('batch', 't'))

  # Convert IDs to masks.
  input_mask = input_tokens != 0
  self.shape_checker(input_mask, ('batch', 's'))

  target_mask = target_tokens != 0
  self.shape_checker(target_mask, ('batch', 't'))

  return input_tokens, input_mask, target_tokens, target_mask
TrainTranslator._preprocess = _preprocess
_train_step विधि, नीचे कहा, वास्तव में विकोडक चलाने के लिए छोड़कर शेष चरणों संभालता है:
def _train_step(self, inputs):
  input_text, target_text = inputs

  (input_tokens, input_mask,
   target_tokens, target_mask) = self._preprocess(input_text, target_text)

  max_target_length = tf.shape(target_tokens)[1]

  with tf.GradientTape() as tape:
    # Encode the input
    enc_output, enc_state = self.encoder(input_tokens)
    self.shape_checker(enc_output, ('batch', 's', 'enc_units'))
    self.shape_checker(enc_state, ('batch', 'enc_units'))

    # Initialize the decoder's state to the encoder's final state.
    # This only works if the encoder and decoder have the same number of
    # units.
    dec_state = enc_state
    loss = tf.constant(0.0)

    for t in tf.range(max_target_length-1):
      # Pass in two tokens from the target sequence:
      # 1. The current input to the decoder.
      # 2. The target for the decoder's next prediction.
      new_tokens = target_tokens[:, t:t+2]
      step_loss, dec_state = self._loop_step(new_tokens, input_mask,
                                             enc_output, dec_state)
      loss = loss + step_loss

    # Average the loss over all non padding tokens.
    average_loss = loss / tf.reduce_sum(tf.cast(target_mask, tf.float32))

  # Apply an optimization step
  variables = self.trainable_variables
  gradients = tape.gradient(average_loss, variables)
  self.optimizer.apply_gradients(zip(gradients, variables))

  # Return a dict mapping metric names to current value
  return {'batch_loss': average_loss}
TrainTranslator._train_step = _train_step
_loop_step विधि, नीचे कहा, विकोडक कार्यान्वित और वृद्धिशील नुकसान और नए डिकोडर राज्य (गणना करता dec_state )।
def _loop_step(self, new_tokens, input_mask, enc_output, dec_state):
  input_token, target_token = new_tokens[:, 0:1], new_tokens[:, 1:2]

  # Run the decoder one step.
  decoder_input = DecoderInput(new_tokens=input_token,
                               enc_output=enc_output,
                               mask=input_mask)

  dec_result, dec_state = self.decoder(decoder_input, state=dec_state)
  self.shape_checker(dec_result.logits, ('batch', 't1', 'logits'))
  self.shape_checker(dec_result.attention_weights, ('batch', 't1', 's'))
  self.shape_checker(dec_state, ('batch', 'dec_units'))

  # `self.loss` returns the total for non-padded tokens
  y = target_token
  y_pred = dec_result.logits
  step_loss = self.loss(y, y_pred)

  return step_loss, dec_state
TrainTranslator._loop_step = _loop_step
प्रशिक्षण चरण का परीक्षण करें
एक का निर्माण TrainTranslator , और का उपयोग कर प्रशिक्षण के लिए कॉन्फ़िगर Model.compile विधि:
translator = TrainTranslator(
    embedding_dim, units,
    input_text_processor=input_text_processor,
    output_text_processor=output_text_processor,
    use_tf_function=False)

# Configure the loss and optimizer
translator.compile(
    optimizer=tf.optimizers.Adam(),
    loss=MaskedLoss(),
)
बाहर का परीक्षण train_step । इस तरह के एक टेक्स्ट मॉडल के लिए नुकसान करीब से शुरू होना चाहिए:
np.log(output_text_processor.vocabulary_size())
8.517193191416236
%%time
for n in range(10):
  print(translator.train_step([example_input_batch, example_target_batch]))
print()
{'batch_loss': <tf.Tensor: shape=(), dtype=float32, numpy=7.5849695>}
{'batch_loss': <tf.Tensor: shape=(), dtype=float32, numpy=7.55271>}
{'batch_loss': <tf.Tensor: shape=(), dtype=float32, numpy=7.4929113>}
{'batch_loss': <tf.Tensor: shape=(), dtype=float32, numpy=7.3296022>}
{'batch_loss': <tf.Tensor: shape=(), dtype=float32, numpy=6.80437>}
{'batch_loss': <tf.Tensor: shape=(), dtype=float32, numpy=5.000246>}
{'batch_loss': <tf.Tensor: shape=(), dtype=float32, numpy=5.8740363>}
{'batch_loss': <tf.Tensor: shape=(), dtype=float32, numpy=4.794589>}
{'batch_loss': <tf.Tensor: shape=(), dtype=float32, numpy=4.3175836>}
{'batch_loss': <tf.Tensor: shape=(), dtype=float32, numpy=4.108163>}

CPU times: user 5.49 s, sys: 0 ns, total: 5.49 s
Wall time: 5.45 s
हालांकि यह एक बिना डिबग करने के लिए आसान है tf.function यह एक प्रदर्शन को बढ़ावा देने है। तो अब जबकि _train_step विधि काम कर रहा है, कोशिश tf.function -wrapped _tf_train_step जबकि प्रशिक्षण प्रदर्शन को अधिकतम करने,:
@tf.function(input_signature=[[tf.TensorSpec(dtype=tf.string, shape=[None]),
                               tf.TensorSpec(dtype=tf.string, shape=[None])]])
def _tf_train_step(self, inputs):
  return self._train_step(inputs)
TrainTranslator._tf_train_step = _tf_train_step
translator.use_tf_function = True
पहला कॉल धीमा होगा, क्योंकि यह फ़ंक्शन का पता लगाता है।
translator.train_step([example_input_batch, example_target_batch])
2021-12-04 12:09:48.074769: E tensorflow/core/grappler/optimizers/meta_optimizer.cc:812] function_optimizer failed: INVALID_ARGUMENT: Input 6 of node gradient_tape/while/while_grad/body/_531/gradient_tape/while/gradients/while/decoder_1/gru_3/PartitionedCall_grad/PartitionedCall was passed variant from gradient_tape/while/while_grad/body/_531/gradient_tape/while/gradients/while/decoder_1/gru_3/PartitionedCall_grad/TensorListPopBack_2:1 incompatible with expected float.
2021-12-04 12:09:48.180156: E tensorflow/core/grappler/optimizers/meta_optimizer.cc:812] layout failed: OUT_OF_RANGE: src_output = 25, but num_outputs is only 25
2021-12-04 12:09:48.285846: E tensorflow/core/grappler/optimizers/meta_optimizer.cc:812] tfg_optimizer{} failed: INVALID_ARGUMENT: Input 6 of node gradient_tape/while/while_grad/body/_531/gradient_tape/while/gradients/while/decoder_1/gru_3/PartitionedCall_grad/PartitionedCall was passed variant from gradient_tape/while/while_grad/body/_531/gradient_tape/while/gradients/while/decoder_1/gru_3/PartitionedCall_grad/TensorListPopBack_2:1 incompatible with expected float.
    when importing GraphDef to MLIR module in GrapplerHook
2021-12-04 12:09:48.307794: E tensorflow/core/grappler/optimizers/meta_optimizer.cc:812] function_optimizer failed: INVALID_ARGUMENT: Input 6 of node gradient_tape/while/while_grad/body/_531/gradient_tape/while/gradients/while/decoder_1/gru_3/PartitionedCall_grad/PartitionedCall was passed variant from gradient_tape/while/while_grad/body/_531/gradient_tape/while/gradients/while/decoder_1/gru_3/PartitionedCall_grad/TensorListPopBack_2:1 incompatible with expected float.
2021-12-04 12:09:48.425447: W tensorflow/core/common_runtime/process_function_library_runtime.cc:866] Ignoring multi-device function optimization failure: INVALID_ARGUMENT: Input 1 of node while/body/_1/while/TensorListPushBack_56 was passed float from while/body/_1/while/decoder_1/gru_3/PartitionedCall:6 incompatible with expected variant.
{'batch_loss': <tf.Tensor: shape=(), dtype=float32, numpy=4.045638>}
लेकिन उसके बाद यह आम तौर पर 2-3x तेजी से उत्सुक से है train_step विधि:
%%time
for n in range(10):
  print(translator.train_step([example_input_batch, example_target_batch]))
print()
{'batch_loss': <tf.Tensor: shape=(), dtype=float32, numpy=4.1098256>}
{'batch_loss': <tf.Tensor: shape=(), dtype=float32, numpy=4.169871>}
{'batch_loss': <tf.Tensor: shape=(), dtype=float32, numpy=4.139249>}
{'batch_loss': <tf.Tensor: shape=(), dtype=float32, numpy=4.0410743>}
{'batch_loss': <tf.Tensor: shape=(), dtype=float32, numpy=3.9664454>}
{'batch_loss': <tf.Tensor: shape=(), dtype=float32, numpy=3.895707>}
{'batch_loss': <tf.Tensor: shape=(), dtype=float32, numpy=3.8154407>}
{'batch_loss': <tf.Tensor: shape=(), dtype=float32, numpy=3.7583396>}
{'batch_loss': <tf.Tensor: shape=(), dtype=float32, numpy=3.6986444>}
{'batch_loss': <tf.Tensor: shape=(), dtype=float32, numpy=3.640298>}

CPU times: user 4.4 s, sys: 960 ms, total: 5.36 s
Wall time: 1.67 s
एक नए मॉडल का एक अच्छा परीक्षण यह देखना है कि यह इनपुट के एक बैच को ओवरफिट कर सकता है। इसे आज़माएं, नुकसान जल्दी से शून्य हो जाना चाहिए:
losses = []
for n in range(100):
  print('.', end='')
  logs = translator.train_step([example_input_batch, example_target_batch])
  losses.append(logs['batch_loss'].numpy())

print()
plt.plot(losses)
....................................................................................................
[<matplotlib.lines.Line2D at 0x7fb427edf210>]

अब जब आप आश्वस्त हैं कि प्रशिक्षण चरण काम कर रहा है, तो नए सिरे से प्रशिक्षण के लिए मॉडल की एक नई प्रति बनाएं:
train_translator = TrainTranslator(
    embedding_dim, units,
    input_text_processor=input_text_processor,
    output_text_processor=output_text_processor)

# Configure the loss and optimizer
train_translator.compile(
    optimizer=tf.optimizers.Adam(),
    loss=MaskedLoss(),
)
मॉडल को प्रशिक्षित करें
वहाँ है, अपने स्वयं के कस्टम प्रशिक्षण पाश लेखन को लागू करने के साथ कुछ भी नहीं गलत Model.train_step विधि, पिछले अनुभाग में के रूप में, आप को चलाने के लिए अनुमति देता है Model.fit और से बचने के सभी कि बॉयलर-प्लेट कोड को फिर से लिखने।
इस ट्यूटोरियल केवल अवधियों के एक जोड़े के लिए गाड़ियों, तो एक का उपयोग callbacks.Callback की साजिश रचने के लिए, बैच नुकसान के इतिहास एकत्र करने के लिए:
class BatchLogs(tf.keras.callbacks.Callback):
  def __init__(self, key):
    self.key = key
    self.logs = []

  def on_train_batch_end(self, n, logs):
    self.logs.append(logs[self.key])

batch_loss = BatchLogs('batch_loss')
train_translator.fit(dataset, epochs=3,
                     callbacks=[batch_loss])
Epoch 1/3
2021-12-04 12:10:11.617839: E tensorflow/core/grappler/optimizers/meta_optimizer.cc:812] function_optimizer failed: INVALID_ARGUMENT: Input 6 of node StatefulPartitionedCall/gradient_tape/while/while_grad/body/_589/gradient_tape/while/gradients/while/decoder_2/gru_5/PartitionedCall_grad/PartitionedCall was passed variant from StatefulPartitionedCall/gradient_tape/while/while_grad/body/_589/gradient_tape/while/gradients/while/decoder_2/gru_5/PartitionedCall_grad/TensorListPopBack_2:1 incompatible with expected float.
2021-12-04 12:10:11.737105: E tensorflow/core/grappler/optimizers/meta_optimizer.cc:812] layout failed: OUT_OF_RANGE: src_output = 25, but num_outputs is only 25
2021-12-04 12:10:11.855054: E tensorflow/core/grappler/optimizers/meta_optimizer.cc:812] tfg_optimizer{} failed: INVALID_ARGUMENT: Input 6 of node StatefulPartitionedCall/gradient_tape/while/while_grad/body/_589/gradient_tape/while/gradients/while/decoder_2/gru_5/PartitionedCall_grad/PartitionedCall was passed variant from StatefulPartitionedCall/gradient_tape/while/while_grad/body/_589/gradient_tape/while/gradients/while/decoder_2/gru_5/PartitionedCall_grad/TensorListPopBack_2:1 incompatible with expected float.
    when importing GraphDef to MLIR module in GrapplerHook
2021-12-04 12:10:11.878896: E tensorflow/core/grappler/optimizers/meta_optimizer.cc:812] function_optimizer failed: INVALID_ARGUMENT: Input 6 of node StatefulPartitionedCall/gradient_tape/while/while_grad/body/_589/gradient_tape/while/gradients/while/decoder_2/gru_5/PartitionedCall_grad/PartitionedCall was passed variant from StatefulPartitionedCall/gradient_tape/while/while_grad/body/_589/gradient_tape/while/gradients/while/decoder_2/gru_5/PartitionedCall_grad/TensorListPopBack_2:1 incompatible with expected float.
2021-12-04 12:10:12.004755: W tensorflow/core/common_runtime/process_function_library_runtime.cc:866] Ignoring multi-device function optimization failure: INVALID_ARGUMENT: Input 1 of node StatefulPartitionedCall/while/body/_59/while/TensorListPushBack_56 was passed float from StatefulPartitionedCall/while/body/_59/while/decoder_2/gru_5/PartitionedCall:6 incompatible with expected variant.
1859/1859 [==============================] - 349s 185ms/step - batch_loss: 2.0443
Epoch 2/3
1859/1859 [==============================] - 350s 188ms/step - batch_loss: 1.0382
Epoch 3/3
1859/1859 [==============================] - 343s 184ms/step - batch_loss: 0.8085
<keras.callbacks.History at 0x7fb42c3eda10>
plt.plot(batch_loss.logs)
plt.ylim([0, 3])
plt.xlabel('Batch #')
plt.ylabel('CE/token')
Text(0, 0.5, 'CE/token')
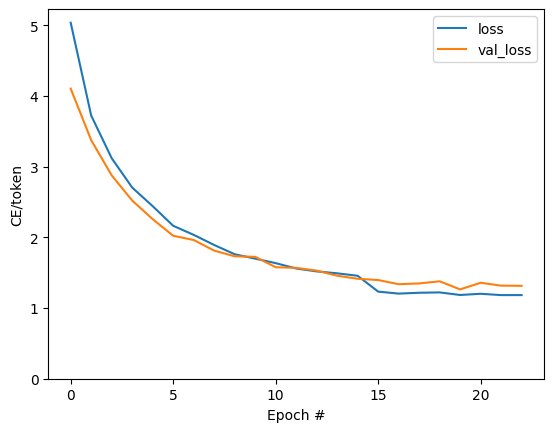
कथानक में दिखाई देने वाली छलांग युग की सीमाओं पर हैं।
अनुवाद करना
अब जब कि मॉडल प्रशिक्षित किया जाता है, पूर्ण अमल करने के लिए एक समारोह को लागू text => text अनुवाद।
इस मॉडल की जरूरत को उलटने के लिए text => token IDs मानचित्रण द्वारा प्रदान की output_text_processor । इसे विशेष टोकन के लिए आईडी भी जानना आवश्यक है। यह सब नए वर्ग के लिए कंस्ट्रक्टर में लागू किया गया है। वास्तविक अनुवाद पद्धति का कार्यान्वयन अनुसरण करेगा।
कुल मिलाकर यह प्रशिक्षण लूप के समान है, सिवाय इसके कि हर समय कदम पर डिकोडर का इनपुट डिकोडर की अंतिम भविष्यवाणी का एक नमूना है।
class Translator(tf.Module):

  def __init__(self, encoder, decoder, input_text_processor,
               output_text_processor):
    self.encoder = encoder
    self.decoder = decoder
    self.input_text_processor = input_text_processor
    self.output_text_processor = output_text_processor

    self.output_token_string_from_index = (
        tf.keras.layers.StringLookup(
            vocabulary=output_text_processor.get_vocabulary(),
            mask_token='',
            invert=True))

    # The output should never generate padding, unknown, or start.
    index_from_string = tf.keras.layers.StringLookup(
        vocabulary=output_text_processor.get_vocabulary(), mask_token='')
    token_mask_ids = index_from_string(['', '[UNK]', '[START]']).numpy()

    token_mask = np.zeros([index_from_string.vocabulary_size()], dtype=np.bool)
    token_mask[np.array(token_mask_ids)] = True
    self.token_mask = token_mask

    self.start_token = index_from_string(tf.constant('[START]'))
    self.end_token = index_from_string(tf.constant('[END]'))
translator = Translator(
    encoder=train_translator.encoder,
    decoder=train_translator.decoder,
    input_text_processor=input_text_processor,
    output_text_processor=output_text_processor,
)
/tmpfs/src/tf_docs_env/lib/python3.7/site-packages/ipykernel_launcher.py:21: DeprecationWarning: `np.bool` is a deprecated alias for the builtin `bool`. To silence this warning, use `bool` by itself. Doing this will not modify any behavior and is safe. If you specifically wanted the numpy scalar type, use `np.bool_` here.
Deprecated in NumPy 1.20; for more details and guidance: https://numpy.org/devdocs/release/1.20.0-notes.html#deprecations
टोकन आईडी को टेक्स्ट में बदलें
लागू करने के लिए पहली विधि है tokens_to_text मानव पठनीय पाठ करने के लिए टोकन आईडी से जो धर्मान्तरित।
def tokens_to_text(self, result_tokens):
  shape_checker = ShapeChecker()
  shape_checker(result_tokens, ('batch', 't'))
  result_text_tokens = self.output_token_string_from_index(result_tokens)
  shape_checker(result_text_tokens, ('batch', 't'))

  result_text = tf.strings.reduce_join(result_text_tokens,
                                       axis=1, separator=' ')
  shape_checker(result_text, ('batch'))

  result_text = tf.strings.strip(result_text)
  shape_checker(result_text, ('batch',))
  return result_text
Translator.tokens_to_text = tokens_to_text
कुछ यादृच्छिक टोकन आईडी इनपुट करें और देखें कि यह क्या उत्पन्न करता है:
example_output_tokens = tf.random.uniform(
    shape=[5, 2], minval=0, dtype=tf.int64,
    maxval=output_text_processor.vocabulary_size())
translator.tokens_to_text(example_output_tokens).numpy()
array([b'vain mysteries', b'funny ham', b'drivers responding',
       b'mysterious ignoring', b'fashion votes'], dtype=object)
डिकोडर की भविष्यवाणियों से नमूना
यह फ़ंक्शन डिकोडर के लॉगिट आउटपुट लेता है और उस वितरण से नमूने टोकन आईडी लेता है:
def sample(self, logits, temperature):
  shape_checker = ShapeChecker()
  # 't' is usually 1 here.
  shape_checker(logits, ('batch', 't', 'vocab'))
  shape_checker(self.token_mask, ('vocab',))

  token_mask = self.token_mask[tf.newaxis, tf.newaxis, :]
  shape_checker(token_mask, ('batch', 't', 'vocab'), broadcast=True)

  # Set the logits for all masked tokens to -inf, so they are never chosen.
  logits = tf.where(self.token_mask, -np.inf, logits)

  if temperature == 0.0:
    new_tokens = tf.argmax(logits, axis=-1)
  else:
    logits = tf.squeeze(logits, axis=1)
    new_tokens = tf.random.categorical(logits/temperature,
                                        num_samples=1)

  shape_checker(new_tokens, ('batch', 't'))

  return new_tokens
Translator.sample = sample
कुछ यादृच्छिक इनपुट पर इस फ़ंक्शन का परीक्षण करें:
example_logits = tf.random.normal([5, 1, output_text_processor.vocabulary_size()])
example_output_tokens = translator.sample(example_logits, temperature=1.0)
example_output_tokens
<tf.Tensor: shape=(5, 1), dtype=int64, numpy=
array([[4506],
       [3577],
       [2961],
       [4586],
       [ 944]])>
अनुवाद लूप लागू करें
यहां टेक्स्ट टू टेक्स्ट ट्रांसलेशन लूप का पूर्ण कार्यान्वयन है।
इस कार्यान्वयन अजगर सूचियों में परिणाम एकत्र करता है, उपयोग करने से पहले tf.concat उन्हें tensors में शामिल होने के लिए।
इस कार्यान्वयन स्थिर करने के लिए बाहर ग्राफ unrolls max_length पुनरावृत्तियों। यह अजगर में उत्सुक निष्पादन के साथ ठीक है।
def translate_unrolled(self,
                       input_text, *,
                       max_length=50,
                       return_attention=True,
                       temperature=1.0):
  batch_size = tf.shape(input_text)[0]
  input_tokens = self.input_text_processor(input_text)
  enc_output, enc_state = self.encoder(input_tokens)

  dec_state = enc_state
  new_tokens = tf.fill([batch_size, 1], self.start_token)

  result_tokens = []
  attention = []
  done = tf.zeros([batch_size, 1], dtype=tf.bool)

  for _ in range(max_length):
    dec_input = DecoderInput(new_tokens=new_tokens,
                             enc_output=enc_output,
                             mask=(input_tokens!=0))

    dec_result, dec_state = self.decoder(dec_input, state=dec_state)

    attention.append(dec_result.attention_weights)

    new_tokens = self.sample(dec_result.logits, temperature)

    # If a sequence produces an `end_token`, set it `done`
    done = done | (new_tokens == self.end_token)
    # Once a sequence is done it only produces 0-padding.
    new_tokens = tf.where(done, tf.constant(0, dtype=tf.int64), new_tokens)

    # Collect the generated tokens
    result_tokens.append(new_tokens)

    if tf.executing_eagerly() and tf.reduce_all(done):
      break

  # Convert the list of generates token ids to a list of strings.
  result_tokens = tf.concat(result_tokens, axis=-1)
  result_text = self.tokens_to_text(result_tokens)

  if return_attention:
    attention_stack = tf.concat(attention, axis=1)
    return {'text': result_text, 'attention': attention_stack}
  else:
    return {'text': result_text}
Translator.translate = translate_unrolled
इसे एक साधारण इनपुट पर चलाएँ:
%%time
input_text = tf.constant([
    'hace mucho frio aqui.', # "It's really cold here."
    'Esta es mi vida.', # "This is my life.""
])

result = translator.translate(
    input_text = input_text)

print(result['text'][0].numpy().decode())
print(result['text'][1].numpy().decode())
print()
its a long cold here .
this is my life .

CPU times: user 165 ms, sys: 4.37 ms, total: 169 ms
Wall time: 164 ms
आप इस मॉडल निर्यात करना चाहते हैं, तो आप एक में इस विधि रैप करने के लिए की आवश्यकता होगी tf.function । यदि आप ऐसा करने का प्रयास करते हैं तो इस बुनियादी कार्यान्वयन में कुछ समस्याएं हैं:
- परिणामी ग्राफ़ बहुत बड़े होते हैं और उन्हें बनाने, सहेजने या लोड करने में कुछ सेकंड लगते हैं।
- आप एक स्थिर unrolled पाश से नहीं तोड़ सकता है तो वह हमेशा चलेंगे
max_lengthपुनरावृत्तियों, भले ही सभी outputs किया जाता है। लेकिन फिर भी यह उत्सुक निष्पादन से थोड़ा तेज है।
@tf.function(input_signature=[tf.TensorSpec(dtype=tf.string, shape=[None])])
def tf_translate(self, input_text):
  return self.translate(input_text)

Translator.tf_translate = tf_translate
भागो tf.function एक बार यह संकलन करने:
%%time
result = translator.tf_translate(
    input_text = input_text)
CPU times: user 18.8 s, sys: 0 ns, total: 18.8 s
Wall time: 18.7 s
%%time
result = translator.tf_translate(
    input_text = input_text)

print(result['text'][0].numpy().decode())
print(result['text'][1].numpy().decode())
print()
its very cold here .
this is my life .

CPU times: user 175 ms, sys: 0 ns, total: 175 ms
Wall time: 88 ms
[वैकल्पिक] एक प्रतीकात्मक लूप का प्रयोग करें
def translate_symbolic(self,
                       input_text,
                       *,
                       max_length=50,
                       return_attention=True,
                       temperature=1.0):
  shape_checker = ShapeChecker()
  shape_checker(input_text, ('batch',))

  batch_size = tf.shape(input_text)[0]

  # Encode the input
  input_tokens = self.input_text_processor(input_text)
  shape_checker(input_tokens, ('batch', 's'))

  enc_output, enc_state = self.encoder(input_tokens)
  shape_checker(enc_output, ('batch', 's', 'enc_units'))
  shape_checker(enc_state, ('batch', 'enc_units'))

  # Initialize the decoder
  dec_state = enc_state
  new_tokens = tf.fill([batch_size, 1], self.start_token)
  shape_checker(new_tokens, ('batch', 't1'))

  # Initialize the accumulators
  result_tokens = tf.TensorArray(tf.int64, size=1, dynamic_size=True)
  attention = tf.TensorArray(tf.float32, size=1, dynamic_size=True)
  done = tf.zeros([batch_size, 1], dtype=tf.bool)
  shape_checker(done, ('batch', 't1'))

  for t in tf.range(max_length):
    dec_input = DecoderInput(
        new_tokens=new_tokens, enc_output=enc_output, mask=(input_tokens != 0))

    dec_result, dec_state = self.decoder(dec_input, state=dec_state)

    shape_checker(dec_result.attention_weights, ('batch', 't1', 's'))
    attention = attention.write(t, dec_result.attention_weights)

    new_tokens = self.sample(dec_result.logits, temperature)
    shape_checker(dec_result.logits, ('batch', 't1', 'vocab'))
    shape_checker(new_tokens, ('batch', 't1'))

    # If a sequence produces an `end_token`, set it `done`
    done = done | (new_tokens == self.end_token)
    # Once a sequence is done it only produces 0-padding.
    new_tokens = tf.where(done, tf.constant(0, dtype=tf.int64), new_tokens)

    # Collect the generated tokens
    result_tokens = result_tokens.write(t, new_tokens)

    if tf.reduce_all(done):
      break

  # Convert the list of generated token ids to a list of strings.
  result_tokens = result_tokens.stack()
  shape_checker(result_tokens, ('t', 'batch', 't0'))
  result_tokens = tf.squeeze(result_tokens, -1)
  result_tokens = tf.transpose(result_tokens, [1, 0])
  shape_checker(result_tokens, ('batch', 't'))

  result_text = self.tokens_to_text(result_tokens)
  shape_checker(result_text, ('batch',))

  if return_attention:
    attention_stack = attention.stack()
    shape_checker(attention_stack, ('t', 'batch', 't1', 's'))

    attention_stack = tf.squeeze(attention_stack, 2)
    shape_checker(attention_stack, ('t', 'batch', 's'))

    attention_stack = tf.transpose(attention_stack, [1, 0, 2])
    shape_checker(attention_stack, ('batch', 't', 's'))

    return {'text': result_text, 'attention': attention_stack}
  else:
    return {'text': result_text}
Translator.translate = translate_symbolic
प्रारंभिक कार्यान्वयन ने आउटपुट एकत्र करने के लिए पायथन सूचियों का उपयोग किया। इस का उपयोग करता है tf.range पाश इटरेटर के रूप में अनुमति tf.autograph पाश कन्वर्ट करने के लिए। इस कार्यान्वयन में सबसे बड़ा परिवर्तन का प्रयोग होता है tf.TensorArray बजाय अजगर list जमा tensors के लिए। tf.TensorArray ग्राफ मोड में tensors के परिवर्तनशील इकट्ठा करने के लिए आवश्यक है।
उत्सुक निष्पादन के साथ यह कार्यान्वयन मूल के बराबर प्रदर्शन करता है:
%%time
result = translator.translate(
    input_text = input_text)

print(result['text'][0].numpy().decode())
print(result['text'][1].numpy().decode())
print()
its very cold here .
this is my life .

CPU times: user 175 ms, sys: 0 ns, total: 175 ms
Wall time: 170 ms
लेकिन जब आप एक में लपेट tf.function आप दो अंतर देखने को मिलेंगे।
@tf.function(input_signature=[tf.TensorSpec(dtype=tf.string, shape=[None])])
def tf_translate(self, input_text):
  return self.translate(input_text)

Translator.tf_translate = tf_translate
पहली: ग्राफ़ निर्माण बहुत तेजी से है (~ 10x), के बाद से यह पैदा नहीं करता max_iterations मॉडल की प्रतियां।
%%time
result = translator.tf_translate(
    input_text = input_text)
CPU times: user 1.79 s, sys: 0 ns, total: 1.79 s
Wall time: 1.77 s
दूसरा: संकलित कार्य छोटे इनपुट (इस उदाहरण पर 5x) पर बहुत तेज है, क्योंकि यह लूप से बाहर निकल सकता है।
%%time
result = translator.tf_translate(
    input_text = input_text)

print(result['text'][0].numpy().decode())
print(result['text'][1].numpy().decode())
print()
its very cold here .
this is my life .

CPU times: user 40.1 ms, sys: 0 ns, total: 40.1 ms
Wall time: 17.1 ms
प्रक्रिया की कल्पना करें
ध्यान वजन द्वारा लौटाए translate विधि शो जहां मॉडल था "देख" जब यह प्रत्येक उत्पादन टोकन जेनरेट।
तो इनपुट पर ध्यान देने का योग सभी को वापस करना चाहिए:
a = result['attention'][0]

print(np.sum(a, axis=-1))
[1.0000001 0.99999994 1. 0.99999994 1. 0.99999994]
पहले उदाहरण के पहले आउटपुट चरण के लिए ध्यान वितरण यहां दिया गया है। ध्यान दें कि अप्रशिक्षित मॉडल की तुलना में अब ध्यान कितना अधिक केंद्रित है:
_ = plt.bar(range(len(a[0, :])), a[0, :])

चूंकि इनपुट और आउटपुट शब्दों के बीच कुछ मोटा संरेखण है, आप उम्मीद करते हैं कि ध्यान विकर्ण के पास केंद्रित होगा:
plt.imshow(np.array(a), vmin=0.0)
<matplotlib.image.AxesImage at 0x7faf2886ced0>

बेहतर ध्यान देने की साजिश बनाने के लिए यहां कुछ कोड दिया गया है:
लेबल किए गए ध्यान प्लॉट
def plot_attention(attention, sentence, predicted_sentence):
  sentence = tf_lower_and_split_punct(sentence).numpy().decode().split()
  predicted_sentence = predicted_sentence.numpy().decode().split() + ['[END]']
  fig = plt.figure(figsize=(10, 10))
  ax = fig.add_subplot(1, 1, 1)

  attention = attention[:len(predicted_sentence), :len(sentence)]

  ax.matshow(attention, cmap='viridis', vmin=0.0)

  fontdict = {'fontsize': 14}

  ax.set_xticklabels([''] + sentence, fontdict=fontdict, rotation=90)
  ax.set_yticklabels([''] + predicted_sentence, fontdict=fontdict)

  ax.xaxis.set_major_locator(ticker.MultipleLocator(1))
  ax.yaxis.set_major_locator(ticker.MultipleLocator(1))

  ax.set_xlabel('Input text')
  ax.set_ylabel('Output text')
  plt.suptitle('Attention weights')
i=0
plot_attention(result['attention'][i], input_text[i], result['text'][i])
/tmpfs/src/tf_docs_env/lib/python3.7/site-packages/ipykernel_launcher.py:14: UserWarning: FixedFormatter should only be used together with FixedLocator

/tmpfs/src/tf_docs_env/lib/python3.7/site-packages/ipykernel_launcher.py:15: UserWarning: FixedFormatter should only be used together with FixedLocator
  from ipykernel import kernelapp as app
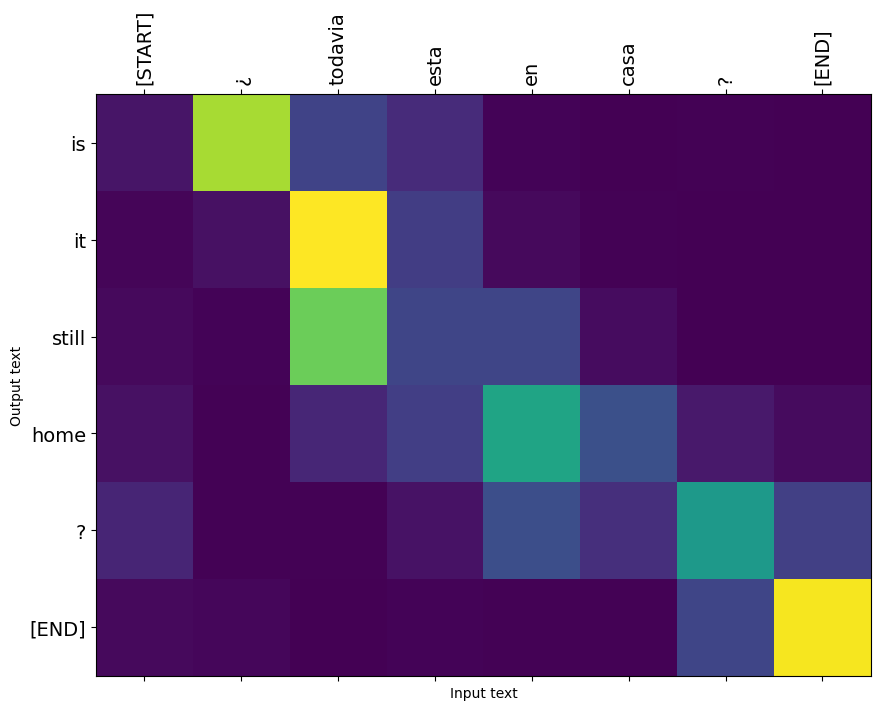
कुछ और वाक्यों का अनुवाद करें और उन्हें प्लॉट करें:
%%time
three_input_text = tf.constant([
    # This is my life.
    'Esta es mi vida.',
    # Are they still home?
    '¿Todavía están en casa?',
    # Try to find out.'
    'Tratar de descubrir.',
])

result = translator.tf_translate(three_input_text)

for tr in result['text']:
  print(tr.numpy().decode())

print()
this is my life .
are you still at home ?
all about killed .

CPU times: user 78 ms, sys: 23 ms, total: 101 ms
Wall time: 23.1 ms
result['text']
<tf.Tensor: shape=(3,), dtype=string, numpy=
array([b'this is my life .', b'are you still at home ?',
       b'all about killed .'], dtype=object)>
i = 0
plot_attention(result['attention'][i], three_input_text[i], result['text'][i])
/tmpfs/src/tf_docs_env/lib/python3.7/site-packages/ipykernel_launcher.py:14: UserWarning: FixedFormatter should only be used together with FixedLocator

/tmpfs/src/tf_docs_env/lib/python3.7/site-packages/ipykernel_launcher.py:15: UserWarning: FixedFormatter should only be used together with FixedLocator
  from ipykernel import kernelapp as app

i = 1
plot_attention(result['attention'][i], three_input_text[i], result['text'][i])
/tmpfs/src/tf_docs_env/lib/python3.7/site-packages/ipykernel_launcher.py:14: UserWarning: FixedFormatter should only be used together with FixedLocator

/tmpfs/src/tf_docs_env/lib/python3.7/site-packages/ipykernel_launcher.py:15: UserWarning: FixedFormatter should only be used together with FixedLocator
  from ipykernel import kernelapp as app

i = 2
plot_attention(result['attention'][i], three_input_text[i], result['text'][i])
/tmpfs/src/tf_docs_env/lib/python3.7/site-packages/ipykernel_launcher.py:14: UserWarning: FixedFormatter should only be used together with FixedLocator

/tmpfs/src/tf_docs_env/lib/python3.7/site-packages/ipykernel_launcher.py:15: UserWarning: FixedFormatter should only be used together with FixedLocator
  from ipykernel import kernelapp as app

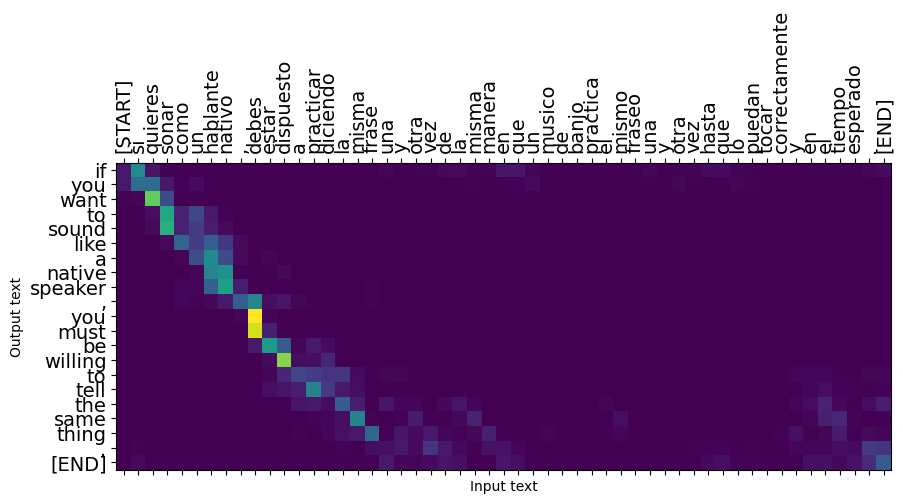
छोटे वाक्य अक्सर अच्छी तरह से काम करते हैं, लेकिन अगर इनपुट बहुत लंबा है तो मॉडल सचमुच फोकस खो देता है और उचित भविष्यवाणियां प्रदान करना बंद कर देता है। इसके दो मुख्य कारण हैं:
- मॉडल की भविष्यवाणियों की परवाह किए बिना, प्रत्येक चरण पर सही टोकन खिलाकर शिक्षक-मजबूर के साथ मॉडल को प्रशिक्षित किया गया था। मॉडल को और अधिक मजबूत बनाया जा सकता है यदि इसे कभी-कभी अपनी भविष्यवाणियों को खिलाया जाता है।
- मॉडल के पास केवल आरएनएन राज्य के माध्यम से अपने पिछले आउटपुट तक पहुंच है। यदि RNN स्थिति दूषित हो जाती है, तो मॉडल के ठीक होने का कोई रास्ता नहीं है। ट्रांसफॉर्मर एनकोडर और विकोडक में आत्म-ध्यान का उपयोग करके इस का समाधान।
long_input_text = tf.constant([inp[-1]])

import textwrap
print('Expected output:\n', '\n'.join(textwrap.wrap(targ[-1])))
Expected output:
 If you want to sound like a native speaker, you must be willing to
practice saying the same sentence over and over in the same way that
banjo players practice the same phrase over and over until they can
play it correctly and at the desired tempo.
result = translator.tf_translate(long_input_text)

i = 0
plot_attention(result['attention'][i], long_input_text[i], result['text'][i])
_ = plt.suptitle('This never works')
/tmpfs/src/tf_docs_env/lib/python3.7/site-packages/ipykernel_launcher.py:14: UserWarning: FixedFormatter should only be used together with FixedLocator

/tmpfs/src/tf_docs_env/lib/python3.7/site-packages/ipykernel_launcher.py:15: UserWarning: FixedFormatter should only be used together with FixedLocator
  from ipykernel import kernelapp as app
निर्यात
एक बार जब आप एक मॉडल आप आप के साथ संतुष्ट हो के रूप में निर्यात करने के लिए चाहते हो सकता है tf.saved_model इस अजगर कार्यक्रम है कि यह बनाया के उपयोग के बाहर के लिए।
के बाद से मॉडल की एक उपवर्ग है tf.Module (के माध्यम से keras.Model ), और निर्यात के लिए सभी कार्यक्षमता एक में संकलित किया गया है tf.function मॉडल के साथ सफाई से निर्यात कर लेना चाहिए tf.saved_model.save :
अब समारोह पता लगाया गया है कि यह का उपयोग कर निर्यात किया जा सकता saved_model.save :
tf.saved_model.save(translator, 'translator',
                    signatures={'serving_default': translator.tf_translate})
2021-12-04 12:27:54.310890: W tensorflow/python/util/util.cc:368] Sets are not currently considered sequences, but this may change in the future, so consider avoiding using them.
WARNING:absl:Found untraced functions such as encoder_2_layer_call_fn, encoder_2_layer_call_and_return_conditional_losses, decoder_2_layer_call_fn, decoder_2_layer_call_and_return_conditional_losses, embedding_4_layer_call_fn while saving (showing 5 of 60). These functions will not be directly callable after loading.
INFO:tensorflow:Assets written to: translator/assets
INFO:tensorflow:Assets written to: translator/assets
reloaded = tf.saved_model.load('translator')
result = reloaded.tf_translate(three_input_text)
%%time
result = reloaded.tf_translate(three_input_text)

for tr in result['text']:
  print(tr.numpy().decode())

print()
this is my life .
are you still at home ?
find out about to find out .

CPU times: user 42.8 ms, sys: 7.69 ms, total: 50.5 ms
Wall time: 20 ms
अगले कदम
- एक अलग डाटासेट डाउनलोड फ्रेंच जर्मन, या अंग्रेजी के अनुवाद के साथ प्रयोग करने के लिए, उदाहरण के लिए, अंग्रेजी।
- बड़े डेटासेट पर प्रशिक्षण के साथ प्रयोग करें, या अधिक युगों का उपयोग करें।
- प्रयास करें ट्रांसफार्मर ट्यूटोरियल जो एक समान अनुवाद कार्य को लागू करता है लेकिन RNNs के बजाय एक ट्रांसफार्मर परतों का उपयोग करता है। इस संस्करण में भी एक का उपयोग करता है
text.BertTokenizerwordpiece tokenization लागू करने के लिए। - पर एक नज़र डालें tensorflow_addons.seq2seq अनुक्रम मॉडल के अनुक्रम की इस तरह लागू करने के लिए।
tfa.seq2seqपैकेज की तरह उच्च स्तर की कार्यक्षमता भी शामिलseq2seq.BeamSearchDecoder।