
 ดูแหล่งที่มาบน GitHub
Swift For TensorFlow รองรับการทำงานร่วมกันของ Python
คุณสามารถนำเข้าโมดูล Python จาก Swift เรียกใช้ฟังก์ชัน Python และแปลงค่าระหว่าง Swift และ Python
import PythonKit
print(Python.version)
3.6.9 (default, Oct  8 2020, 12:12:24)
[GCC 8.4.0]
การตั้งค่าเวอร์ชัน Python
ตามค่าเริ่มต้น เมื่อคุณ import Python Swift จะค้นหาเส้นทางไลบรารีระบบเพื่อหา Python เวอร์ชันใหม่ล่าสุดที่ติดตั้งไว้ หากต้องการใช้การติดตั้ง Python เฉพาะ ให้ตั้งค่าตัวแปรสภาพแวดล้อม PYTHON_LIBRARY เป็นไลบรารีที่ใช้ร่วมกัน libpython ที่ได้รับจากการติดตั้ง ตัวอย่างเช่น:
export PYTHON_LIBRARY="~/anaconda3/lib/libpython3.7m.so"
ชื่อไฟล์ที่แน่นอนจะแตกต่างกันไปตามสภาพแวดล้อมและแพลตฟอร์มของ Python
หรือคุณสามารถตั้งค่าตัวแปรสภาพแวดล้อม PYTHON_VERSION ซึ่งสั่งให้ Swift ค้นหาเส้นทางไลบรารีระบบสำหรับเวอร์ชัน Python ที่ตรงกัน โปรดทราบว่า PYTHON_LIBRARY มีความสำคัญมากกว่า PYTHON_VERSION
ในโค้ด คุณยังสามารถเรียกใช้ฟังก์ชัน PythonLibrary.useVersion ซึ่งเทียบเท่ากับการตั้งค่า PYTHON_VERSION
// PythonLibrary.useVersion(2)
// PythonLibrary.useVersion(3, 7)
หมายเหตุ: คุณควรรัน PythonLibrary.useVersion ทันทีหลังจาก import Python ก่อนที่จะเรียกใช้โค้ด Python ใดๆ ไม่สามารถใช้เพื่อสลับเวอร์ชัน Python แบบไดนามิกได้
ตั้งค่า PYTHON_LOADER_LOGGING=1 เพื่อดู เอาต์พุตการดีบักสำหรับการโหลดไลบรารี Python
พื้นฐาน
ใน Swift นั้น PythonObject แสดงถึงวัตถุจาก Python Python API ทั้งหมดใช้และส่งคืนอินสแตนซ์ PythonObject
ประเภทพื้นฐานใน Swift (เช่น ตัวเลขและอาร์เรย์) สามารถแปลงเป็น PythonObject ได้ ในบางกรณี (สำหรับตัวอักษรและฟังก์ชันที่ใช้อาร์กิวเมนต์ PythonConvertible ) การแปลงจะเกิดขึ้นโดยปริยาย หากต้องการส่งค่า Swift ไปที่ PythonObject อย่างชัดเจน ให้ใช้ PythonObject Initializer
PythonObject กำหนดการดำเนินการมาตรฐานหลายประการ รวมถึงการดำเนินการเชิงตัวเลข การทำดัชนี และการวนซ้ำ
// Convert standard Swift types to Python.
let pythonInt: PythonObject = 1
let pythonFloat: PythonObject = 3.0
let pythonString: PythonObject = "Hello Python!"
let pythonRange: PythonObject = PythonObject(5..<10)
let pythonArray: PythonObject = [1, 2, 3, 4]
let pythonDict: PythonObject = ["foo": [0], "bar": [1, 2, 3]]

// Perform standard operations on Python objects.
print(pythonInt + pythonFloat)
print(pythonString[0..<6])
print(pythonRange)
print(pythonArray[2])
print(pythonDict["bar"])
4.0
Hello
slice(5, 10, None)
3
[1, 2, 3]
// Convert Python objects back to Swift.
let int = Int(pythonInt)!
let float = Float(pythonFloat)!
let string = String(pythonString)!
let range = Range<Int>(pythonRange)!
let array: [Int] = Array(pythonArray)!
let dict: [String: [Int]] = Dictionary(pythonDict)!

// Perform standard operations.
// Outputs are the same as Python!
print(Float(int) + float)
print(string.prefix(6))
print(range)
print(array[2])
print(dict["bar"]!)
4.0
Hello
5..<10
3
[1, 2, 3]
PythonObject กำหนดความสอดคล้องกับโปรโตคอล Swift มาตรฐานหลายตัว:
-
Equatable -
Comparable -
Hashable -
SignedNumeric -
Strideable -
MutableCollection - โปรโตคอล
ExpressibleBy_Literalทั้งหมด
โปรดทราบว่าความสอดคล้องเหล่านี้ไม่ปลอดภัยต่อประเภท: การขัดข้องจะเกิดขึ้นหากคุณพยายามใช้ฟังก์ชันโปรโตคอลจากอินสแตนซ์ PythonObject ที่เข้ากันไม่ได้
let one: PythonObject = 1
print(one == one)
print(one < one)
print(one + one)

let array: PythonObject = [1, 2, 3]
for (i, x) in array.enumerated() {
  print(i, x)
}
True
False
2
0 1
1 2
2 3
หากต้องการแปลงทูเพิลจาก Python เป็น Swift คุณต้องทราบความสมบูรณ์ของทูเพิลแบบคงที่
เรียกหนึ่งในวิธีอินสแตนซ์ต่อไปนี้:
-
PythonObject.tuple2 -
PythonObject.tuple3 -
PythonObject.tuple4
let pythonTuple = Python.tuple([1, 2, 3])
print(pythonTuple, Python.len(pythonTuple))

// Convert to Swift.
let tuple = pythonTuple.tuple3
print(tuple)
(1, 2, 3) 3
(1, 2, 3)
Python บิวด์อิน
เข้าถึง Python บิวด์อินผ่านอินเทอร์เฟซ Python ส่วนกลาง
// `Python.builtins` is a dictionary of all Python builtins.
_ = Python.builtins

// Try some Python builtins.
print(Python.type(1))
print(Python.len([1, 2, 3]))
print(Python.sum([1, 2, 3]))
<class 'int'>
3
6
การนำเข้าโมดูล Python
ใช้ Python.import เพื่อนำเข้าโมดูล Python มันทำงานเหมือนกับคีย์เวิร์ด import ใน Python
let np = Python.import("numpy")
print(np)
let zeros = np.ones([2, 3])
print(zeros)
<module 'numpy' from '/tmpfs/src/tf_docs_env/lib/python3.6/site-packages/numpy/__init__.py'>
[[1. 1. 1.]
 [1. 1. 1.]]
ใช้ฟังก์ชันการขว้างปา Python.attemptImport เพื่อดำเนินการนำเข้าอย่างปลอดภัย
let maybeModule = try? Python.attemptImport("nonexistent_module")
print(maybeModule)
nil
การแปลงด้วย numpy.ndarray
ประเภท Swift ต่อไปนี้สามารถแปลงเป็นและจาก numpy.ndarray :
-
Array<Element> -
ShapedArray<Scalar> -
Tensor<Scalar>
การแปลงจะสำเร็จก็ต่อเมื่อ dtype ของ numpy.ndarray เข้ากันได้กับประเภทพารามิเตอร์ทั่วไปของ Element หรือ Scalar
สำหรับ Array การแปลงจาก numpy จะสำเร็จก็ต่อเมื่อ numpy.ndarray เป็น 1-D
import TensorFlow

let numpyArray = np.ones([4], dtype: np.float32)
print("Swift type:", type(of: numpyArray))
print("Python type:", Python.type(numpyArray))
print(numpyArray.shape)
Swift type: PythonObject
Python type: <class 'numpy.ndarray'>
(4,)
// Examples of converting `numpy.ndarray` to Swift types.
let array: [Float] = Array(numpy: numpyArray)!
let shapedArray = ShapedArray<Float>(numpy: numpyArray)!
let tensor = Tensor<Float>(numpy: numpyArray)!

// Examples of converting Swift types to `numpy.ndarray`.
print(array.makeNumpyArray())
print(shapedArray.makeNumpyArray())
print(tensor.makeNumpyArray())

// Examples with different dtypes.
let doubleArray: [Double] = Array(numpy: np.ones([3], dtype: np.float))!
let intTensor = Tensor<Int32>(numpy: np.ones([2, 3], dtype: np.int32))!
[1. 1. 1. 1.]
[1. 1. 1. 1.]
[1. 1. 1. 1.]
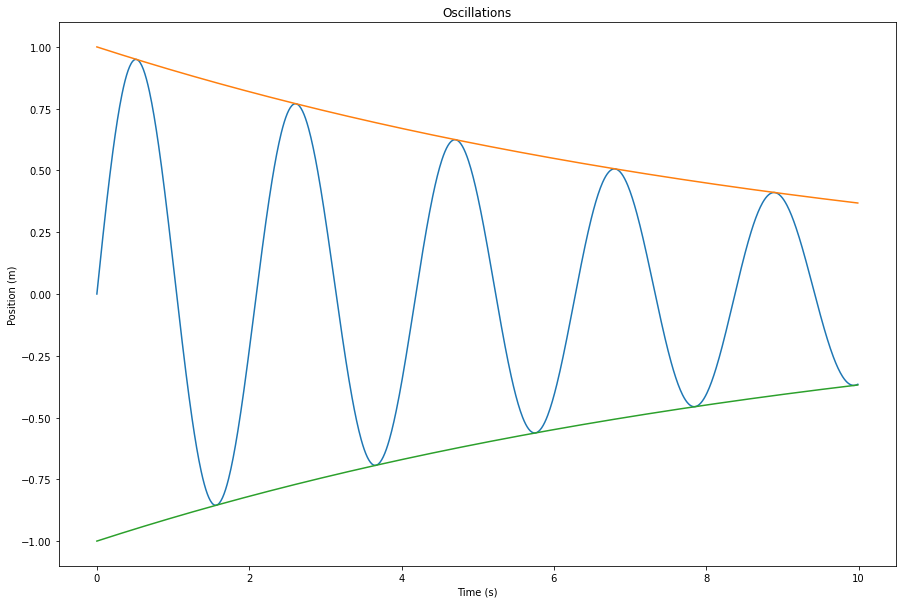
กำลังแสดงภาพ
คุณสามารถแสดงรูปภาพในบรรทัดได้โดยใช้ matplotlib เช่นเดียวกับในสมุดบันทึก Python
// This cell is here to display plots inside a Jupyter Notebook.
// Do not copy it into another environment.
%include "EnableIPythonDisplay.swift"
print(IPythonDisplay.shell.enable_matplotlib("inline"))
('inline', 'module://ipykernel.pylab.backend_inline')
let np = Python.import("numpy")
let plt = Python.import("matplotlib.pyplot")

let time = np.arange(0, 10, 0.01)
let amplitude = np.exp(-0.1 * time)
let position = amplitude * np.sin(3 * time)

plt.figure(figsize: [15, 10])

plt.plot(time, position)
plt.plot(time, amplitude)
plt.plot(time, -amplitude)

plt.xlabel("Time (s)")
plt.ylabel("Position (m)")
plt.title("Oscillations")

plt.show()
Use `print()` to show values.