
| | |  ดูบน GitHub ดูบน GitHub | | |
บทช่วยสอนนี้มีโค้ดที่สมบูรณ์เพื่อปรับแต่ง BERT เพื่อวิเคราะห์ความรู้สึกในชุดข้อมูลบทวิจารณ์ภาพยนตร์ IMDB แบบข้อความธรรมดา นอกจากการฝึกโมเดลแล้ว คุณจะได้เรียนรู้วิธีประมวลผลข้อความล่วงหน้าในรูปแบบที่เหมาะสม
ในสมุดบันทึกนี้ คุณจะ:
- โหลดชุดข้อมูล IMDB
- โหลดโมเดล BERT จาก TensorFlow Hub
- สร้างแบบจำลองของคุณเองโดยการรวม BERT เข้ากับตัวแยกประเภท
- ฝึกโมเดลของคุณเอง ปรับแต่ง BERT ให้เป็นส่วนหนึ่งของสิ่งนั้น
- บันทึกโมเดลของคุณและใช้เพื่อจำแนกประโยค
หากคุณกำลังใหม่จะทำงานร่วมกับชุดข้อมูลที่ไอเอ็มโปรดดูที่ การจัดหมวดหมู่ข้อความพื้นฐาน สำหรับรายละเอียดเพิ่มเติม
เกี่ยวกับ BERT
BERT และสถาปัตยกรรมหม้อแปลงเข้ารหัสอื่น ๆ ที่ได้รับความสำเร็จอย่างดุเดือดบนความหลากหลายของงานใน NLP (การประมวลผลภาษาธรรมชาติ) พวกเขาคำนวณการแสดงแทนพื้นที่เวกเตอร์ของภาษาธรรมชาติที่เหมาะสำหรับใช้ในแบบจำลองการเรียนรู้เชิงลึก โมเดลตระกูล BERT ใช้สถาปัตยกรรมตัวเข้ารหัส Transformer เพื่อประมวลผลแต่ละโทเค็นของข้อความอินพุตในบริบททั้งหมดของโทเค็นทั้งหมดก่อนและหลัง ดังนั้นชื่อ: การแสดงตัวเข้ารหัสแบบสองทิศทางจาก Transformers
แบบจำลอง BERT มักจะได้รับการฝึกอบรมล่วงหน้าในคลังข้อความขนาดใหญ่ จากนั้นจึงปรับให้เหมาะกับงานเฉพาะ
ติดตั้ง
# A dependency of the preprocessing for BERT inputspip install -q -U tensorflow-text
คุณจะใช้เพิ่มประสิทธิภาพ AdamW จาก tensorflow / รุ่น
pip install -q tf-models-official
import os
import shutil

import tensorflow as tf
import tensorflow_hub as hub
import tensorflow_text as text
from official.nlp import optimization  # to create AdamW optimizer

import matplotlib.pyplot as plt

tf.get_logger().setLevel('ERROR')
/tmpfs/src/tf_docs_env/lib/python3.7/site-packages/pkg_resources/__init__.py:119: PkgResourcesDeprecationWarning: 0.18ubuntu0.18.04.1 is an invalid version and will not be supported in a future release
  PkgResourcesDeprecationWarning,
การวิเคราะห์ความรู้สึก
โน๊ตบุ๊คนี้รถไฟรูปแบบการวิเคราะห์ความเชื่อมั่นให้กับบทวิจารณ์ภาพยนตร์จัดเป็นบวกหรือลบขึ้นอยู่กับข้อความของทบทวน
คุณจะใช้ ขนาดใหญ่ดูหนังชุดข้อมูล ที่ประกอบด้วยข้อความ 50,000 บทวิจารณ์ภาพยนตร์จากที่ ฐานข้อมูลภาพยนตร์อินเทอร์เน็ต
ดาวน์โหลดชุดข้อมูล IMDB
มาดาวน์โหลดและแตกชุดข้อมูล จากนั้นสำรวจโครงสร้างไดเรกทอรี
url = 'https://ai.stanford.edu/~amaas/data/sentiment/aclImdb_v1.tar.gz'

dataset = tf.keras.utils.get_file('aclImdb_v1.tar.gz', url,
                                  untar=True, cache_dir='.',
                                  cache_subdir='')

dataset_dir = os.path.join(os.path.dirname(dataset), 'aclImdb')

train_dir = os.path.join(dataset_dir, 'train')

# remove unused folders to make it easier to load the data
remove_dir = os.path.join(train_dir, 'unsup')
shutil.rmtree(remove_dir)
Downloading data from https://ai.stanford.edu/~amaas/data/sentiment/aclImdb_v1.tar.gz
84131840/84125825 [==============================] - 7s 0us/step
84140032/84125825 [==============================] - 7s 0us/step
ถัดไปคุณจะใช้ text_dataset_from_directory ยูทิลิตี้ในการสร้างที่มีป้ายกำกับ tf.data.Dataset
ชุดข้อมูล IMDB ถูกแบ่งออกเป็นการฝึกและการทดสอบแล้ว แต่ไม่มีชุดการตรวจสอบความถูกต้อง ลองสร้างชุดการตรวจสอบการใช้ 80:20 แยกข้อมูลการฝึกอบรมโดยใช้ validation_split โต้แย้งด้านล่าง
AUTOTUNE = tf.data.AUTOTUNE
batch_size = 32
seed = 42

raw_train_ds = tf.keras.utils.text_dataset_from_directory(
    'aclImdb/train',
    batch_size=batch_size,
    validation_split=0.2,
    subset='training',
    seed=seed)

class_names = raw_train_ds.class_names
train_ds = raw_train_ds.cache().prefetch(buffer_size=AUTOTUNE)

val_ds = tf.keras.utils.text_dataset_from_directory(
    'aclImdb/train',
    batch_size=batch_size,
    validation_split=0.2,
    subset='validation',
    seed=seed)

val_ds = val_ds.cache().prefetch(buffer_size=AUTOTUNE)

test_ds = tf.keras.utils.text_dataset_from_directory(
    'aclImdb/test',
    batch_size=batch_size)

test_ds = test_ds.cache().prefetch(buffer_size=AUTOTUNE)
Found 25000 files belonging to 2 classes.
Using 20000 files for training.
Found 25000 files belonging to 2 classes.
Using 5000 files for validation.
Found 25000 files belonging to 2 classes.
มาดูรีวิวกันหน่อย
for text_batch, label_batch in train_ds.take(1):
  for i in range(3):
    print(f'Review: {text_batch.numpy()[i]}')
    label = label_batch.numpy()[i]
    print(f'Label : {label} ({class_names[label]})')
Review: b'"Pandemonium" is a horror movie spoof that comes off more stupid than funny. Believe me when I tell you, I love comedies. Especially comedy spoofs. "Airplane", "The Naked Gun" trilogy, "Blazing Saddles", "High Anxiety", and "Spaceballs" are some of my favorite comedies that spoof a particular genre. "Pandemonium" is not up there with those films. Most of the scenes in this movie had me sitting there in stunned silence because the movie wasn\'t all that funny. There are a few laughs in the film, but when you watch a comedy, you expect to laugh a lot more than a few times and that\'s all this film has going for it. Geez, "Scream" had more laughs than this film and that was more of a horror film. How bizarre is that?<br /><br />*1/2 (out of four)'
Label : 0 (neg)
Review: b"David Mamet is a very interesting and a very un-equal director. His first movie 'House of Games' was the one I liked best, and it set a series of films with characters whose perspective of life changes as they get into complicated situations, and so does the perspective of the viewer.<br /><br />So is 'Homicide' which from the title tries to set the mind of the viewer to the usual crime drama. The principal characters are two cops, one Jewish and one Irish who deal with a racially charged area. The murder of an old Jewish shop owner who proves to be an ancient veteran of the Israeli Independence war triggers the Jewish identity in the mind and heart of the Jewish detective.<br /><br />This is were the flaws of the film are the more obvious. The process of awakening is theatrical and hard to believe, the group of Jewish militants is operatic, and the way the detective eventually walks to the final violent confrontation is pathetic. The end of the film itself is Mamet-like smart, but disappoints from a human emotional perspective.<br /><br />Joe Mantegna and William Macy give strong performances, but the flaws of the story are too evident to be easily compensated."
Label : 0 (neg)
Review: b'Great documentary about the lives of NY firefighters during the worst terrorist attack of all time.. That reason alone is why this should be a must see collectors item.. What shocked me was not only the attacks, but the"High Fat Diet" and physical appearance of some of these firefighters. I think a lot of Doctors would agree with me that,in the physical shape they were in, some of these firefighters would NOT of made it to the 79th floor carrying over 60 lbs of gear. Having said that i now have a greater respect for firefighters and i realize becoming a firefighter is a life altering job. The French have a history of making great documentary\'s and that is what this is, a Great Documentary.....'
Label : 1 (pos)
2021-12-01 12:17:32.795514: W tensorflow/core/kernels/data/cache_dataset_ops.cc:768] The calling iterator did not fully read the dataset being cached. In order to avoid unexpected truncation of the dataset, the partially cached contents of the dataset  will be discarded. This can happen if you have an input pipeline similar to `dataset.cache().take(k).repeat()`. You should use `dataset.take(k).cache().repeat()` instead.
กำลังโหลดโมเดลจาก TensorFlow Hub
ที่นี่คุณสามารถเลือกรุ่น BERT ที่คุณจะโหลดจาก TensorFlow Hub และปรับแต่งได้ มี BERT หลายรุ่นให้เลือก
- BERT-Base , uncased และ อีกเจ็ดรุ่น ที่มีน้ำหนักการฝึกอบรมที่ออกโดยผู้เขียน BERT เดิม
- BERTs ขนาดเล็ก มีสถาปัตยกรรมทั่วไปเหมือนกัน แต่น้อยลงและ / หรือเล็กบล็อกหม้อแปลงไฟฟ้าซึ่งจะช่วยให้คุณสำรวจความสมดุลระหว่างความเร็ว, ขนาดและคุณภาพ
- ALBERT : สี่ขนาดที่แตกต่างกัน "A Lite BERT" ที่ช่วยลดขนาดของรูปแบบ ( แต่ไม่ใช่เวลาในการคำนวณ) โดยการแบ่งปันพารามิเตอร์ระหว่างชั้น
- ผู้เชี่ยวชาญ BERT : แปดรูปแบบที่ทุกคนมีสถาปัตยกรรม BERT ฐาน แต่เสนอทางเลือกระหว่างโดเมนก่อนการฝึกอบรมที่แตกต่างกันในการจัดขึ้นอย่างใกล้ชิดกับงานเป้าหมาย
- Electra มีสถาปัตยกรรมเดียวกับเบิร์ต (ในสามขนาดที่แตกต่างกัน) แต่ได้รับก่อนการฝึกอบรมเป็น discriminator ในการตั้งค่าที่คล้ายกำเนิดขัดแย้งเครือข่าย (GAN)
- BERT กับ Talking Heads-เรียนและรั้วรอบขอบชิด Gelu [ ฐาน , ขนาดใหญ่ ] มีสองการปรับปรุงหลักของสถาปัตยกรรมหม้อแปลง
เอกสารประกอบแบบจำลองบน TensorFlow Hub มีรายละเอียดเพิ่มเติมและการอ้างอิงถึงเอกสารการวิจัย ตามลิงค์ข้างต้นหรือคลิกที่ tfhub.dev URL พิมพ์หลังจากที่การกระทำเซลล์ถัดไป
ข้อเสนอแนะคือการเริ่มต้นด้วย Small BERT (ที่มีพารามิเตอร์น้อยกว่า) เนื่องจากจะปรับแต่งได้เร็วกว่า หากคุณชอบโมเดลขนาดเล็กแต่มีความแม่นยำสูงกว่า ALBERT อาจเป็นตัวเลือกถัดไปของคุณ หากคุณต้องการความแม่นยำที่ดียิ่งขึ้น ให้เลือกขนาด BERT แบบคลาสสิกหรือการปรับแต่งล่าสุด เช่น Electra, Talking Heads หรือ BERT Expert
นอกเหนือจากรูปแบบที่มีอยู่ด้านล่างมี หลายรุ่น ของแบบจำลองที่มีขนาดใหญ่และมีความถูกต้องสามารถให้ผลผลิตได้ดียิ่งขึ้น แต่พวกเขามีขนาดใหญ่เกินไปที่จะปรับใน GPU เดี่ยว คุณจะสามารถที่จะทำใน งานแก้กาวใช้ BERT บน Colab TPU
คุณจะเห็นในโค้ดด้านล่างว่าการเปลี่ยน URL tfhub.dev นั้นเพียงพอที่จะลองใช้โมเดลเหล่านี้ เนื่องจากความแตกต่างทั้งหมดจะถูกห่อหุ้มไว้ใน SavedModels จาก TF Hub
เลือกรุ่น BERT เพื่อปรับแต่ง
bert_model_name = 'small_bert/bert_en_uncased_L-4_H-512_A-8'

map_name_to_handle = {
    'bert_en_uncased_L-12_H-768_A-12':
        'https://tfhub.dev/tensorflow/bert_en_uncased_L-12_H-768_A-12/3',
    'bert_en_cased_L-12_H-768_A-12':
        'https://tfhub.dev/tensorflow/bert_en_cased_L-12_H-768_A-12/3',
    'bert_multi_cased_L-12_H-768_A-12':
        'https://tfhub.dev/tensorflow/bert_multi_cased_L-12_H-768_A-12/3',
    'small_bert/bert_en_uncased_L-2_H-128_A-2':
        'https://tfhub.dev/tensorflow/small_bert/bert_en_uncased_L-2_H-128_A-2/1',
    'small_bert/bert_en_uncased_L-2_H-256_A-4':
        'https://tfhub.dev/tensorflow/small_bert/bert_en_uncased_L-2_H-256_A-4/1',
    'small_bert/bert_en_uncased_L-2_H-512_A-8':
        'https://tfhub.dev/tensorflow/small_bert/bert_en_uncased_L-2_H-512_A-8/1',
    'small_bert/bert_en_uncased_L-2_H-768_A-12':
        'https://tfhub.dev/tensorflow/small_bert/bert_en_uncased_L-2_H-768_A-12/1',
    'small_bert/bert_en_uncased_L-4_H-128_A-2':
        'https://tfhub.dev/tensorflow/small_bert/bert_en_uncased_L-4_H-128_A-2/1',
    'small_bert/bert_en_uncased_L-4_H-256_A-4':
        'https://tfhub.dev/tensorflow/small_bert/bert_en_uncased_L-4_H-256_A-4/1',
    'small_bert/bert_en_uncased_L-4_H-512_A-8':
        'https://tfhub.dev/tensorflow/small_bert/bert_en_uncased_L-4_H-512_A-8/1',
    'small_bert/bert_en_uncased_L-4_H-768_A-12':
        'https://tfhub.dev/tensorflow/small_bert/bert_en_uncased_L-4_H-768_A-12/1',
    'small_bert/bert_en_uncased_L-6_H-128_A-2':
        'https://tfhub.dev/tensorflow/small_bert/bert_en_uncased_L-6_H-128_A-2/1',
    'small_bert/bert_en_uncased_L-6_H-256_A-4':
        'https://tfhub.dev/tensorflow/small_bert/bert_en_uncased_L-6_H-256_A-4/1',
    'small_bert/bert_en_uncased_L-6_H-512_A-8':
        'https://tfhub.dev/tensorflow/small_bert/bert_en_uncased_L-6_H-512_A-8/1',
    'small_bert/bert_en_uncased_L-6_H-768_A-12':
        'https://tfhub.dev/tensorflow/small_bert/bert_en_uncased_L-6_H-768_A-12/1',
    'small_bert/bert_en_uncased_L-8_H-128_A-2':
        'https://tfhub.dev/tensorflow/small_bert/bert_en_uncased_L-8_H-128_A-2/1',
    'small_bert/bert_en_uncased_L-8_H-256_A-4':
        'https://tfhub.dev/tensorflow/small_bert/bert_en_uncased_L-8_H-256_A-4/1',
    'small_bert/bert_en_uncased_L-8_H-512_A-8':
        'https://tfhub.dev/tensorflow/small_bert/bert_en_uncased_L-8_H-512_A-8/1',
    'small_bert/bert_en_uncased_L-8_H-768_A-12':
        'https://tfhub.dev/tensorflow/small_bert/bert_en_uncased_L-8_H-768_A-12/1',
    'small_bert/bert_en_uncased_L-10_H-128_A-2':
        'https://tfhub.dev/tensorflow/small_bert/bert_en_uncased_L-10_H-128_A-2/1',
    'small_bert/bert_en_uncased_L-10_H-256_A-4':
        'https://tfhub.dev/tensorflow/small_bert/bert_en_uncased_L-10_H-256_A-4/1',
    'small_bert/bert_en_uncased_L-10_H-512_A-8':
        'https://tfhub.dev/tensorflow/small_bert/bert_en_uncased_L-10_H-512_A-8/1',
    'small_bert/bert_en_uncased_L-10_H-768_A-12':
        'https://tfhub.dev/tensorflow/small_bert/bert_en_uncased_L-10_H-768_A-12/1',
    'small_bert/bert_en_uncased_L-12_H-128_A-2':
        'https://tfhub.dev/tensorflow/small_bert/bert_en_uncased_L-12_H-128_A-2/1',
    'small_bert/bert_en_uncased_L-12_H-256_A-4':
        'https://tfhub.dev/tensorflow/small_bert/bert_en_uncased_L-12_H-256_A-4/1',
    'small_bert/bert_en_uncased_L-12_H-512_A-8':
        'https://tfhub.dev/tensorflow/small_bert/bert_en_uncased_L-12_H-512_A-8/1',
    'small_bert/bert_en_uncased_L-12_H-768_A-12':
        'https://tfhub.dev/tensorflow/small_bert/bert_en_uncased_L-12_H-768_A-12/1',
    'albert_en_base':
        'https://tfhub.dev/tensorflow/albert_en_base/2',
    'electra_small':
        'https://tfhub.dev/google/electra_small/2',
    'electra_base':
        'https://tfhub.dev/google/electra_base/2',
    'experts_pubmed':
        'https://tfhub.dev/google/experts/bert/pubmed/2',
    'experts_wiki_books':
        'https://tfhub.dev/google/experts/bert/wiki_books/2',
    'talking-heads_base':
        'https://tfhub.dev/tensorflow/talkheads_ggelu_bert_en_base/1',
}

map_model_to_preprocess = {
    'bert_en_uncased_L-12_H-768_A-12':
        'https://tfhub.dev/tensorflow/bert_en_uncased_preprocess/3',
    'bert_en_cased_L-12_H-768_A-12':
        'https://tfhub.dev/tensorflow/bert_en_cased_preprocess/3',
    'small_bert/bert_en_uncased_L-2_H-128_A-2':
        'https://tfhub.dev/tensorflow/bert_en_uncased_preprocess/3',
    'small_bert/bert_en_uncased_L-2_H-256_A-4':
        'https://tfhub.dev/tensorflow/bert_en_uncased_preprocess/3',
    'small_bert/bert_en_uncased_L-2_H-512_A-8':
        'https://tfhub.dev/tensorflow/bert_en_uncased_preprocess/3',
    'small_bert/bert_en_uncased_L-2_H-768_A-12':
        'https://tfhub.dev/tensorflow/bert_en_uncased_preprocess/3',
    'small_bert/bert_en_uncased_L-4_H-128_A-2':
        'https://tfhub.dev/tensorflow/bert_en_uncased_preprocess/3',
    'small_bert/bert_en_uncased_L-4_H-256_A-4':
        'https://tfhub.dev/tensorflow/bert_en_uncased_preprocess/3',
    'small_bert/bert_en_uncased_L-4_H-512_A-8':
        'https://tfhub.dev/tensorflow/bert_en_uncased_preprocess/3',
    'small_bert/bert_en_uncased_L-4_H-768_A-12':
        'https://tfhub.dev/tensorflow/bert_en_uncased_preprocess/3',
    'small_bert/bert_en_uncased_L-6_H-128_A-2':
        'https://tfhub.dev/tensorflow/bert_en_uncased_preprocess/3',
    'small_bert/bert_en_uncased_L-6_H-256_A-4':
        'https://tfhub.dev/tensorflow/bert_en_uncased_preprocess/3',
    'small_bert/bert_en_uncased_L-6_H-512_A-8':
        'https://tfhub.dev/tensorflow/bert_en_uncased_preprocess/3',
    'small_bert/bert_en_uncased_L-6_H-768_A-12':
        'https://tfhub.dev/tensorflow/bert_en_uncased_preprocess/3',
    'small_bert/bert_en_uncased_L-8_H-128_A-2':
        'https://tfhub.dev/tensorflow/bert_en_uncased_preprocess/3',
    'small_bert/bert_en_uncased_L-8_H-256_A-4':
        'https://tfhub.dev/tensorflow/bert_en_uncased_preprocess/3',
    'small_bert/bert_en_uncased_L-8_H-512_A-8':
        'https://tfhub.dev/tensorflow/bert_en_uncased_preprocess/3',
    'small_bert/bert_en_uncased_L-8_H-768_A-12':
        'https://tfhub.dev/tensorflow/bert_en_uncased_preprocess/3',
    'small_bert/bert_en_uncased_L-10_H-128_A-2':
        'https://tfhub.dev/tensorflow/bert_en_uncased_preprocess/3',
    'small_bert/bert_en_uncased_L-10_H-256_A-4':
        'https://tfhub.dev/tensorflow/bert_en_uncased_preprocess/3',
    'small_bert/bert_en_uncased_L-10_H-512_A-8':
        'https://tfhub.dev/tensorflow/bert_en_uncased_preprocess/3',
    'small_bert/bert_en_uncased_L-10_H-768_A-12':
        'https://tfhub.dev/tensorflow/bert_en_uncased_preprocess/3',
    'small_bert/bert_en_uncased_L-12_H-128_A-2':
        'https://tfhub.dev/tensorflow/bert_en_uncased_preprocess/3',
    'small_bert/bert_en_uncased_L-12_H-256_A-4':
        'https://tfhub.dev/tensorflow/bert_en_uncased_preprocess/3',
    'small_bert/bert_en_uncased_L-12_H-512_A-8':
        'https://tfhub.dev/tensorflow/bert_en_uncased_preprocess/3',
    'small_bert/bert_en_uncased_L-12_H-768_A-12':
        'https://tfhub.dev/tensorflow/bert_en_uncased_preprocess/3',
    'bert_multi_cased_L-12_H-768_A-12':
        'https://tfhub.dev/tensorflow/bert_multi_cased_preprocess/3',
    'albert_en_base':
        'https://tfhub.dev/tensorflow/albert_en_preprocess/3',
    'electra_small':
        'https://tfhub.dev/tensorflow/bert_en_uncased_preprocess/3',
    'electra_base':
        'https://tfhub.dev/tensorflow/bert_en_uncased_preprocess/3',
    'experts_pubmed':
        'https://tfhub.dev/tensorflow/bert_en_uncased_preprocess/3',
    'experts_wiki_books':
        'https://tfhub.dev/tensorflow/bert_en_uncased_preprocess/3',
    'talking-heads_base':
        'https://tfhub.dev/tensorflow/bert_en_uncased_preprocess/3',
}

tfhub_handle_encoder = map_name_to_handle[bert_model_name]
tfhub_handle_preprocess = map_model_to_preprocess[bert_model_name]

print(f'BERT model selected           : {tfhub_handle_encoder}')
print(f'Preprocess model auto-selected: {tfhub_handle_preprocess}')
BERT model selected           : https://tfhub.dev/tensorflow/small_bert/bert_en_uncased_L-4_H-512_A-8/1
Preprocess model auto-selected: https://tfhub.dev/tensorflow/bert_en_uncased_preprocess/3
โมเดลการประมวลผลล่วงหน้า
การป้อนข้อความจำเป็นต้องแปลงเป็นรหัสโทเค็นตัวเลขและจัดเรียงเป็นเมตริกซ์หลายตัวก่อนที่จะป้อนลงใน BERT TensorFlow Hub จัดเตรียมรูปแบบการประมวลผลล่วงหน้าที่ตรงกันสำหรับแต่ละรุ่นของ BERT ที่กล่าวถึงข้างต้น ซึ่งใช้การแปลงนี้โดยใช้ TF ops จากไลบรารี TF.text ไม่จำเป็นต้องเรียกใช้โค้ด Python แท้นอกโมเดล TensorFlow เพื่อประมวลผลข้อความล่วงหน้า
โมเดลการประมวลผลล่วงหน้าต้องเป็นแบบที่อ้างอิงโดยเอกสารประกอบของโมเดล BERT ซึ่งคุณสามารถอ่านได้ที่ URL ที่พิมพ์ด้านบน สำหรับรุ่น BERT จากดรอปดาวน์ด้านบน โมเดลการประมวลผลล่วงหน้าจะถูกเลือกโดยอัตโนมัติ
bert_preprocess_model = hub.KerasLayer(tfhub_handle_preprocess)
มาลองใช้โมเดลการประมวลผลล่วงหน้ากับข้อความและดูผลลัพธ์กัน:
text_test = ['this is such an amazing movie!']
text_preprocessed = bert_preprocess_model(text_test)

print(f'Keys       : {list(text_preprocessed.keys())}')
print(f'Shape      : {text_preprocessed["input_word_ids"].shape}')
print(f'Word Ids   : {text_preprocessed["input_word_ids"][0, :12]}')
print(f'Input Mask : {text_preprocessed["input_mask"][0, :12]}')
print(f'Type Ids   : {text_preprocessed["input_type_ids"][0, :12]}')
Keys       : ['input_word_ids', 'input_mask', 'input_type_ids']
Shape      : (1, 128)
Word Ids   : [ 101 2023 2003 2107 2019 6429 3185  999  102    0    0    0]
Input Mask : [1 1 1 1 1 1 1 1 1 0 0 0]
Type Ids   : [0 0 0 0 0 0 0 0 0 0 0 0]
ที่คุณสามารถดูตอนนี้คุณมี 3 ผลจากการ preprocessing ว่ารูปแบบเบิร์ตจะใช้ ( input_words_id , input_mask และ input_type_ids )
ประเด็นสำคัญอื่นๆ:
- อินพุตถูกตัดทอนเหลือ 128 โทเค็น จำนวนของสัญญาณที่สามารถปรับแต่งและคุณสามารถดูรายละเอียดเพิ่มเติมเกี่ยวกับการ แก้ปัญหางานกาวใช้ BERT บน Colab TPU
-
input_type_idsมีเพียงหนึ่งค่า (0) เพราะนี่คือการป้อนข้อมูลประโยคเดียว สำหรับการป้อนหลายประโยค จะมีหนึ่งตัวเลขสำหรับแต่ละอินพุต
เนื่องจากตัวประมวลผลล่วงหน้าข้อความนี้เป็นโมเดล TensorFlow จึงสามารถรวมไว้ในโมเดลของคุณได้โดยตรง
การใช้แบบจำลอง BERT
ก่อนนำ BERT ไปใช้กับโมเดลของคุณ เรามาดูผลลัพธ์ของมันกันก่อน คุณจะโหลดจาก TF Hub และดูค่าที่ส่งคืน
bert_model = hub.KerasLayer(tfhub_handle_encoder)
bert_results = bert_model(text_preprocessed)

print(f'Loaded BERT: {tfhub_handle_encoder}')
print(f'Pooled Outputs Shape:{bert_results["pooled_output"].shape}')
print(f'Pooled Outputs Values:{bert_results["pooled_output"][0, :12]}')
print(f'Sequence Outputs Shape:{bert_results["sequence_output"].shape}')
print(f'Sequence Outputs Values:{bert_results["sequence_output"][0, :12]}')
Loaded BERT: https://tfhub.dev/tensorflow/small_bert/bert_en_uncased_L-4_H-512_A-8/1
Pooled Outputs Shape:(1, 512)
Pooled Outputs Values:[ 0.76262873  0.99280983 -0.1861186   0.36673835  0.15233682  0.65504444
  0.9681154  -0.9486272   0.00216158 -0.9877732   0.0684272  -0.9763061 ]
Sequence Outputs Shape:(1, 128, 512)
Sequence Outputs Values:[[-0.28946388  0.3432126   0.33231565 ...  0.21300787  0.7102078
  -0.05771166]
 [-0.28742015  0.31981024 -0.2301858  ...  0.58455074 -0.21329722
   0.7269209 ]
 [-0.66157013  0.6887685  -0.87432927 ...  0.10877253 -0.26173282
   0.47855264]
 ...
 [-0.2256118  -0.28925604 -0.07064401 ...  0.4756601   0.8327715
   0.40025353]
 [-0.29824278 -0.27473143 -0.05450511 ...  0.48849759  1.0955356
   0.18163344]
 [-0.44378197  0.00930723  0.07223766 ...  0.1729009   1.1833246
   0.07897988]]
รุ่น BERT กลับแผนที่ที่มีกุญแจสำคัญ 3: pooled_output , sequence_output , encoder_outputs :
-
pooled_outputหมายถึงลำดับการป้อนข้อมูลแต่ละที่เป็นทั้ง รูปร่าง[batch_size, H]คุณสามารถคิดได้ว่าสิ่งนี้เป็นการฝังสำหรับการวิจารณ์ภาพยนตร์ทั้งเรื่อง -
sequence_outputแสดงให้เห็นถึงการป้อนข้อมูลแต่ละ token ในบริบท รูปร่าง[batch_size, seq_length, H]คุณสามารถคิดว่านี่เป็นการฝังตามบริบทสำหรับโทเค็นทุกตัวในการวิจารณ์ภาพยนตร์ -
encoder_outputsมีการเปิดใช้งานกลางของLบล็อกหม้อแปลงoutputs["encoder_outputs"][i]เป็น Tensor ของรูปร่าง[batch_size, seq_length, 1024]ที่มีผลของ i-TH บล็อกหม้อแปลงสำหรับ0 <= i < Lค่าสุดท้ายของรายการเท่ากับsequence_output
สำหรับการปรับจูนที่คุณจะใช้ pooled_output อาร์เรย์
กำหนดรุ่นของคุณ
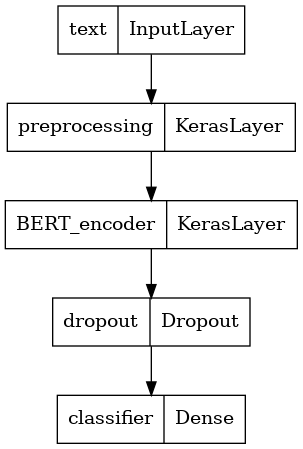
คุณจะสร้างแบบจำลองที่ปรับแต่งอย่างประณีตอย่างเรียบง่าย โดยใช้โมเดลการประมวลผลล่วงหน้า โมเดล BERT ที่เลือก หนึ่งเลเยอร์ Dense และ Dropout
def build_classifier_model():
  text_input = tf.keras.layers.Input(shape=(), dtype=tf.string, name='text')
  preprocessing_layer = hub.KerasLayer(tfhub_handle_preprocess, name='preprocessing')
  encoder_inputs = preprocessing_layer(text_input)
  encoder = hub.KerasLayer(tfhub_handle_encoder, trainable=True, name='BERT_encoder')
  outputs = encoder(encoder_inputs)
  net = outputs['pooled_output']
  net = tf.keras.layers.Dropout(0.1)(net)
  net = tf.keras.layers.Dense(1, activation=None, name='classifier')(net)
  return tf.keras.Model(text_input, net)
ให้ตรวจสอบว่าโมเดลทำงานพร้อมกับเอาต์พุตของโมเดลการประมวลผลล่วงหน้าหรือไม่
classifier_model = build_classifier_model()
bert_raw_result = classifier_model(tf.constant(text_test))
print(tf.sigmoid(bert_raw_result))
tf.Tensor([[0.6749899]], shape=(1, 1), dtype=float32)
ผลลัพธ์นั้นไร้ความหมายแน่นอนเพราะโมเดลยังไม่ได้รับการฝึกอบรม
มาดูโครงสร้างของโมเดลกัน
tf.keras.utils.plot_model(classifier_model)
การฝึกโมเดล
ตอนนี้คุณมีชิ้นส่วนทั้งหมดในการฝึกโมเดล รวมถึงโมดูลการประมวลผลล่วงหน้า ตัวเข้ารหัส BERT ข้อมูล และตัวแยกประเภท
ฟังก์ชั่นการสูญเสีย
ตั้งแต่นี้เป็นปัญหาที่จำแนกไบนารีและรูปแบบจะแสดงความน่าจะเป็น (ชั้น-หน่วยเดียว) คุณจะใช้ losses.BinaryCrossentropy ฟังก์ชั่นการสูญเสีย
loss = tf.keras.losses.BinaryCrossentropy(from_logits=True)
metrics = tf.metrics.BinaryAccuracy()
เครื่องมือเพิ่มประสิทธิภาพ
สำหรับการปรับแต่ง ลองใช้เครื่องมือเพิ่มประสิทธิภาพแบบเดียวกับที่ BERT เดิมฝึกด้วย: "Adaptive Moments" (Adam) เพิ่มประสิทธิภาพนี้จะช่วยลดการสูญเสียการทำนายและไม่ regularization จากการสลายตัวน้ำหนัก (ไม่ได้ใช้ช่วงเวลา) ซึ่งเป็นที่รู้จักกัน AdamW
สำหรับอัตราการเรียนรู้ ( init_lr ) คุณจะใช้ตารางเวลาเดียวกับ BERT การฝึกอบรมพื้นฐาน: การสลายตัวเชิงเส้นของอัตราการเรียนรู้ความคิดเริ่มต้นนำหน้าด้วยขั้นตอนการอุ่นเครื่องเชิงเส้นในช่วงแรก 10% ของการฝึกอบรมขั้นตอน ( num_warmup_steps ) ตามรายงานของ BERT อัตราการเรียนรู้เริ่มต้นจะน้อยกว่าสำหรับการปรับแต่งอย่างละเอียด (ดีที่สุดของ 5e-5, 3e-5, 2e-5)
epochs = 5
steps_per_epoch = tf.data.experimental.cardinality(train_ds).numpy()
num_train_steps = steps_per_epoch * epochs
num_warmup_steps = int(0.1*num_train_steps)

init_lr = 3e-5
optimizer = optimization.create_optimizer(init_lr=init_lr,
                                          num_train_steps=num_train_steps,
                                          num_warmup_steps=num_warmup_steps,
                                          optimizer_type='adamw')
กำลังโหลดแบบจำลอง BERT และการฝึกอบรม
ใช้ classifier_model คุณสร้างขึ้นก่อนหน้านี้คุณสามารถรวบรวมรุ่นที่มีการสูญเสียตัวชี้วัดและเพิ่มประสิทธิภาพ
classifier_model.compile(optimizer=optimizer,
                         loss=loss,
                         metrics=metrics)
print(f'Training model with {tfhub_handle_encoder}')
history = classifier_model.fit(x=train_ds,
                               validation_data=val_ds,
                               epochs=epochs)
Training model with https://tfhub.dev/tensorflow/small_bert/bert_en_uncased_L-4_H-512_A-8/1
Epoch 1/5
625/625 [==============================] - 91s 138ms/step - loss: 0.4776 - binary_accuracy: 0.7513 - val_loss: 0.3791 - val_binary_accuracy: 0.8380
Epoch 2/5
625/625 [==============================] - 85s 136ms/step - loss: 0.3266 - binary_accuracy: 0.8547 - val_loss: 0.3659 - val_binary_accuracy: 0.8486
Epoch 3/5
625/625 [==============================] - 86s 138ms/step - loss: 0.2521 - binary_accuracy: 0.8928 - val_loss: 0.3975 - val_binary_accuracy: 0.8518
Epoch 4/5
625/625 [==============================] - 86s 137ms/step - loss: 0.1910 - binary_accuracy: 0.9269 - val_loss: 0.4180 - val_binary_accuracy: 0.8522
Epoch 5/5
625/625 [==============================] - 86s 137ms/step - loss: 0.1509 - binary_accuracy: 0.9433 - val_loss: 0.4641 - val_binary_accuracy: 0.8522
ประเมินแบบจำลอง
เรามาดูกันว่าโมเดลทำงานอย่างไร สองค่าจะถูกส่งกลับ การสูญเสีย (ตัวเลขที่แสดงถึงข้อผิดพลาด ค่าที่ต่ำกว่าจะดีกว่า) และความแม่นยำ
loss, accuracy = classifier_model.evaluate(test_ds)

print(f'Loss: {loss}')
print(f'Accuracy: {accuracy}')
782/782 [==============================] - 61s 78ms/step - loss: 0.4495 - binary_accuracy: 0.8554
Loss: 0.4494614601135254
Accuracy: 0.8553599715232849
พล็อตความแม่นยำและการสูญเสียเมื่อเวลาผ่านไป
ขึ้นอยู่กับ History ของวัตถุกลับโดย model.fit() คุณสามารถวางแผนการสูญเสียการฝึกอบรมและการตรวจสอบเพื่อเปรียบเทียบ รวมถึงความแม่นยำของการฝึกอบรมและการตรวจสอบ:
history_dict = history.history
print(history_dict.keys())

acc = history_dict['binary_accuracy']
val_acc = history_dict['val_binary_accuracy']
loss = history_dict['loss']
val_loss = history_dict['val_loss']

epochs = range(1, len(acc) + 1)
fig = plt.figure(figsize=(10, 6))
fig.tight_layout()

plt.subplot(2, 1, 1)
# r is for "solid red line"
plt.plot(epochs, loss, 'r', label='Training loss')
# b is for "solid blue line"
plt.plot(epochs, val_loss, 'b', label='Validation loss')
plt.title('Training and validation loss')
# plt.xlabel('Epochs')
plt.ylabel('Loss')
plt.legend()

plt.subplot(2, 1, 2)
plt.plot(epochs, acc, 'r', label='Training acc')
plt.plot(epochs, val_acc, 'b', label='Validation acc')
plt.title('Training and validation accuracy')
plt.xlabel('Epochs')
plt.ylabel('Accuracy')
plt.legend(loc='lower right')
dict_keys(['loss', 'binary_accuracy', 'val_loss', 'val_binary_accuracy'])
<matplotlib.legend.Legend at 0x7fee7cdb4450>
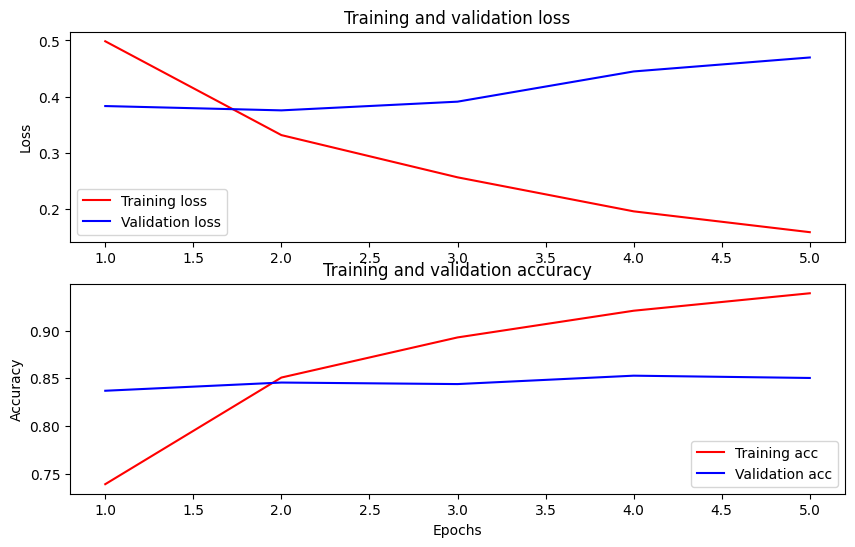
ในพล็อตนี้ เส้นสีแดงแสดงถึงการสูญเสียและความแม่นยำในการฝึก และเส้นสีน้ำเงินคือการสูญเสียและความแม่นยำในการตรวจสอบ
ส่งออกเพื่อการอนุมาน
ตอนนี้คุณเพียงแค่บันทึกโมเดลที่ปรับแต่งอย่างละเอียดเพื่อใช้ในภายหลัง
dataset_name = 'imdb'
saved_model_path = './{}_bert'.format(dataset_name.replace('/', '_'))

classifier_model.save(saved_model_path, include_optimizer=False)
2021-12-01 12:26:06.207608: W tensorflow/python/util/util.cc:368] Sets are not currently considered sequences, but this may change in the future, so consider avoiding using them.
WARNING:absl:Found untraced functions such as restored_function_body, restored_function_body, restored_function_body, restored_function_body, restored_function_body while saving (showing 5 of 310). These functions will not be directly callable after loading.
มาโหลดโมเดลกันใหม่ คุณจะได้ลองเทียบกับรุ่นที่ยังอยู่ในหน่วยความจำได้
reloaded_model = tf.saved_model.load(saved_model_path)
ที่นี่ คุณสามารถทดสอบโมเดลของคุณกับประโยคใดก็ได้ที่คุณต้องการ เพียงแค่เพิ่มตัวแปรตัวอย่างด้านล่าง
def print_my_examples(inputs, results):
  result_for_printing = \
    [f'input: {inputs[i]:<30} : score: {results[i][0]:.6f}'
                         for i in range(len(inputs))]
  print(*result_for_printing, sep='\n')
  print()


examples = [
    'this is such an amazing movie!',  # this is the same sentence tried earlier
    'The movie was great!',
    'The movie was meh.',
    'The movie was okish.',
    'The movie was terrible...'
]

reloaded_results = tf.sigmoid(reloaded_model(tf.constant(examples)))
original_results = tf.sigmoid(classifier_model(tf.constant(examples)))

print('Results from the saved model:')
print_my_examples(examples, reloaded_results)
print('Results from the model in memory:')
print_my_examples(examples, original_results)
Results from the saved model:
input: this is such an amazing movie! : score: 0.999521
input: The movie was great!           : score: 0.997015
input: The movie was meh.             : score: 0.988535
input: The movie was okish.           : score: 0.079138
input: The movie was terrible...      : score: 0.001622

Results from the model in memory:
input: this is such an amazing movie! : score: 0.999521
input: The movie was great!           : score: 0.997015
input: The movie was meh.             : score: 0.988535
input: The movie was okish.           : score: 0.079138
input: The movie was terrible...      : score: 0.001622
หากคุณต้องการที่จะใช้รูปแบบของคุณบน TF การแสดง , จำไว้ว่ามันจะเรียก SavedModel ของคุณผ่านทางหนึ่งของลายเซ็นชื่อของมัน ใน Python คุณสามารถทดสอบได้ดังนี้:
serving_results = reloaded_model \
            .signatures['serving_default'](tf.constant(examples))

serving_results = tf.sigmoid(serving_results['classifier'])

print_my_examples(examples, serving_results)
input: this is such an amazing movie! : score: 0.999521
input: The movie was great!           : score: 0.997015
input: The movie was meh.             : score: 0.988535
input: The movie was okish.           : score: 0.079138
input: The movie was terrible...      : score: 0.001622
ขั้นตอนถัดไป
ในฐานะที่เป็นขั้นตอนต่อไปคุณสามารถลอง แก้ไขงานกาวใช้เบิร์ตบนกวดวิชา TPU ซึ่งทำงานบน TPU และแสดงให้เห็นวิธีการทำงานร่วมกับหลายปัจจัย