
|
|
|
 View on GitHub View on GitHub
|
|
|
This tutorial contains complete code to fine-tune BERT to perform sentiment analysis on a dataset of plain-text IMDB movie reviews. In addition to training a model, you will learn how to preprocess text into an appropriate format.
In this notebook, you will:
- Load the IMDB dataset
- Load a BERT model from TensorFlow Hub
- Build your own model by combining BERT with a classifier
- Train your own model, fine-tuning BERT as part of that
- Save your model and use it to classify sentences
If you're new to working with the IMDB dataset, please see Basic text classification for more details.
About BERT
BERT and other Transformer encoder architectures have been wildly successful on a variety of tasks in NLP (natural language processing). They compute vector-space representations of natural language that are suitable for use in deep learning models. The BERT family of models uses the Transformer encoder architecture to process each token of input text in the full context of all tokens before and after, hence the name: Bidirectional Encoder Representations from Transformers.
BERT models are usually pre-trained on a large corpus of text, then fine-tuned for specific tasks.
Setup
# A dependency of the preprocessing for BERT inputspip install -U "tensorflow-text==2.13.*"
You will use the AdamW optimizer from tensorflow/models.
pip install "tf-models-official==2.13.*"import os
import shutil
import tensorflow as tf
import tensorflow_hub as hub
import tensorflow_text as text
from official.nlp import optimization # to create AdamW optimizer
import matplotlib.pyplot as plt
tf.get_logger().setLevel('ERROR')
Sentiment analysis
This notebook trains a sentiment analysis model to classify movie reviews as positive or negative, based on the text of the review.
You'll use the Large Movie Review Dataset that contains the text of 50,000 movie reviews from the Internet Movie Database.
Download the IMDB dataset
Let's download and extract the dataset, then explore the directory structure.
url = 'https://ai.stanford.edu/~amaas/data/sentiment/aclImdb_v1.tar.gz'

dataset = tf.keras.utils.get_file('aclImdb_v1.tar.gz', url,
                                  untar=True, cache_dir='.',
                                  cache_subdir='')

dataset_dir = os.path.join(os.path.dirname(dataset), 'aclImdb')

train_dir = os.path.join(dataset_dir, 'train')

# remove unused folders to make it easier to load the data
remove_dir = os.path.join(train_dir, 'unsup')
shutil.rmtree(remove_dir)
Downloading data from https://ai.stanford.edu/~amaas/data/sentiment/aclImdb_v1.tar.gz
84125825/84125825 [==============================] - 6s 0us/step
Next, you will use the text_dataset_from_directory utility to create a labeled tf.data.Dataset.
The IMDB dataset has already been divided into train and test, but it lacks a validation set. Let's create a validation set using an 80:20 split of the training data by using the validation_split argument below.
AUTOTUNE = tf.data.AUTOTUNE
batch_size = 32
seed = 42

raw_train_ds = tf.keras.utils.text_dataset_from_directory(
    'aclImdb/train',
    batch_size=batch_size,
    validation_split=0.2,
    subset='training',
    seed=seed)

class_names = raw_train_ds.class_names
train_ds = raw_train_ds.cache().prefetch(buffer_size=AUTOTUNE)

val_ds = tf.keras.utils.text_dataset_from_directory(
    'aclImdb/train',
    batch_size=batch_size,
    validation_split=0.2,
    subset='validation',
    seed=seed)

val_ds = val_ds.cache().prefetch(buffer_size=AUTOTUNE)

test_ds = tf.keras.utils.text_dataset_from_directory(
    'aclImdb/test',
    batch_size=batch_size)

test_ds = test_ds.cache().prefetch(buffer_size=AUTOTUNE)
Found 25000 files belonging to 2 classes.
Using 20000 files for training.
2024-07-19 11:36:48.385099: W tensorflow/core/common_runtime/gpu/gpu_device.cc:1960] Cannot dlopen some GPU libraries. Please make sure the missing libraries mentioned above are installed properly if you would like to use GPU. Follow the guide at https://www.tensorflow.org/install/gpu for how to download and setup the required libraries for your platform.
Skipping registering GPU devices...
Found 25000 files belonging to 2 classes.
Using 5000 files for validation.
Found 25000 files belonging to 2 classes.
Let's take a look at a few reviews.
for text_batch, label_batch in train_ds.take(1):
  for i in range(3):
    print(f'Review: {text_batch.numpy()[i]}')
    label = label_batch.numpy()[i]
    print(f'Label : {label} ({class_names[label]})')
Review: b'"Pandemonium" is a horror movie spoof that comes off more stupid than funny. Believe me when I tell you, I love comedies. Especially comedy spoofs. "Airplane", "The Naked Gun" trilogy, "Blazing Saddles", "High Anxiety", and "Spaceballs" are some of my favorite comedies that spoof a particular genre. "Pandemonium" is not up there with those films. Most of the scenes in this movie had me sitting there in stunned silence because the movie wasn\'t all that funny. There are a few laughs in the film, but when you watch a comedy, you expect to laugh a lot more than a few times and that\'s all this film has going for it. Geez, "Scream" had more laughs than this film and that was more of a horror film. How bizarre is that?<br /><br />*1/2 (out of four)'
Label : 0 (neg)
Review: b"David Mamet is a very interesting and a very un-equal director. His first movie 'House of Games' was the one I liked best, and it set a series of films with characters whose perspective of life changes as they get into complicated situations, and so does the perspective of the viewer.<br /><br />So is 'Homicide' which from the title tries to set the mind of the viewer to the usual crime drama. The principal characters are two cops, one Jewish and one Irish who deal with a racially charged area. The murder of an old Jewish shop owner who proves to be an ancient veteran of the Israeli Independence war triggers the Jewish identity in the mind and heart of the Jewish detective.<br /><br />This is were the flaws of the film are the more obvious. The process of awakening is theatrical and hard to believe, the group of Jewish militants is operatic, and the way the detective eventually walks to the final violent confrontation is pathetic. The end of the film itself is Mamet-like smart, but disappoints from a human emotional perspective.<br /><br />Joe Mantegna and William Macy give strong performances, but the flaws of the story are too evident to be easily compensated."
Label : 0 (neg)
Review: b'Great documentary about the lives of NY firefighters during the worst terrorist attack of all time.. That reason alone is why this should be a must see collectors item.. What shocked me was not only the attacks, but the"High Fat Diet" and physical appearance of some of these firefighters. I think a lot of Doctors would agree with me that,in the physical shape they were in, some of these firefighters would NOT of made it to the 79th floor carrying over 60 lbs of gear. Having said that i now have a greater respect for firefighters and i realize becoming a firefighter is a life altering job. The French have a history of making great documentary\'s and that is what this is, a Great Documentary.....'
Label : 1 (pos)
2024-07-19 11:36:50.738060: W tensorflow/core/kernels/data/cache_dataset_ops.cc:854] The calling iterator did not fully read the dataset being cached. In order to avoid unexpected truncation of the dataset, the partially cached contents of the dataset  will be discarded. This can happen if you have an input pipeline similar to `dataset.cache().take(k).repeat()`. You should use `dataset.take(k).cache().repeat()` instead.
Loading models from TensorFlow Hub
Here you can choose which BERT model you will load from TensorFlow Hub and fine-tune. There are multiple BERT models available.
- BERT-Base, Uncased and seven more models with trained weights released by the original BERT authors.
- Small BERTs have the same general architecture but fewer and/or smaller Transformer blocks, which lets you explore tradeoffs between speed, size and quality.
- ALBERT: four different sizes of "A Lite BERT" that reduces model size (but not computation time) by sharing parameters between layers.
- BERT Experts: eight models that all have the BERT-base architecture but offer a choice between different pre-training domains, to align more closely with the target task.
- Electra has the same architecture as BERT (in three different sizes), but gets pre-trained as a discriminator in a set-up that resembles a Generative Adversarial Network (GAN).
- BERT with Talking-Heads Attention and Gated GELU [base, large] has two improvements to the core of the Transformer architecture.
The model documentation on TensorFlow Hub has more details and references to the
research literature. Follow the links above, or click on the tfhub.dev URL
printed after the next cell execution.
The suggestion is to start with a Small BERT (with fewer parameters) since they are faster to fine-tune. If you like a small model but with higher accuracy, ALBERT might be your next option. If you want even better accuracy, choose one of the classic BERT sizes or their recent refinements like Electra, Talking Heads, or a BERT Expert.
Aside from the models available below, there are multiple versions of the models that are larger and can yield even better accuracy, but they are too big to be fine-tuned on a single GPU. You will be able to do that on the Solve GLUE tasks using BERT on a TPU colab.
You'll see in the code below that switching the tfhub.dev URL is enough to try any of these models, because all the differences between them are encapsulated in the SavedModels from TF Hub.
Choose a BERT model to fine-tune
bert_model_name = 'small_bert/bert_en_uncased_L-4_H-512_A-8'

map_name_to_handle = {
    'bert_en_uncased_L-12_H-768_A-12':
        'https://tfhub.dev/tensorflow/bert_en_uncased_L-12_H-768_A-12/3',
    'bert_en_cased_L-12_H-768_A-12':
        'https://tfhub.dev/tensorflow/bert_en_cased_L-12_H-768_A-12/3',
    'bert_multi_cased_L-12_H-768_A-12':
        'https://tfhub.dev/tensorflow/bert_multi_cased_L-12_H-768_A-12/3',
    'small_bert/bert_en_uncased_L-2_H-128_A-2':
        'https://tfhub.dev/tensorflow/small_bert/bert_en_uncased_L-2_H-128_A-2/1',
    'small_bert/bert_en_uncased_L-2_H-256_A-4':
        'https://tfhub.dev/tensorflow/small_bert/bert_en_uncased_L-2_H-256_A-4/1',
    'small_bert/bert_en_uncased_L-2_H-512_A-8':
        'https://tfhub.dev/tensorflow/small_bert/bert_en_uncased_L-2_H-512_A-8/1',
    'small_bert/bert_en_uncased_L-2_H-768_A-12':
        'https://tfhub.dev/tensorflow/small_bert/bert_en_uncased_L-2_H-768_A-12/1',
    'small_bert/bert_en_uncased_L-4_H-128_A-2':
        'https://tfhub.dev/tensorflow/small_bert/bert_en_uncased_L-4_H-128_A-2/1',
    'small_bert/bert_en_uncased_L-4_H-256_A-4':
        'https://tfhub.dev/tensorflow/small_bert/bert_en_uncased_L-4_H-256_A-4/1',
    'small_bert/bert_en_uncased_L-4_H-512_A-8':
        'https://tfhub.dev/tensorflow/small_bert/bert_en_uncased_L-4_H-512_A-8/1',
    'small_bert/bert_en_uncased_L-4_H-768_A-12':
        'https://tfhub.dev/tensorflow/small_bert/bert_en_uncased_L-4_H-768_A-12/1',
    'small_bert/bert_en_uncased_L-6_H-128_A-2':
        'https://tfhub.dev/tensorflow/small_bert/bert_en_uncased_L-6_H-128_A-2/1',
    'small_bert/bert_en_uncased_L-6_H-256_A-4':
        'https://tfhub.dev/tensorflow/small_bert/bert_en_uncased_L-6_H-256_A-4/1',
    'small_bert/bert_en_uncased_L-6_H-512_A-8':
        'https://tfhub.dev/tensorflow/small_bert/bert_en_uncased_L-6_H-512_A-8/1',
    'small_bert/bert_en_uncased_L-6_H-768_A-12':
        'https://tfhub.dev/tensorflow/small_bert/bert_en_uncased_L-6_H-768_A-12/1',
    'small_bert/bert_en_uncased_L-8_H-128_A-2':
        'https://tfhub.dev/tensorflow/small_bert/bert_en_uncased_L-8_H-128_A-2/1',
    'small_bert/bert_en_uncased_L-8_H-256_A-4':
        'https://tfhub.dev/tensorflow/small_bert/bert_en_uncased_L-8_H-256_A-4/1',
    'small_bert/bert_en_uncased_L-8_H-512_A-8':
        'https://tfhub.dev/tensorflow/small_bert/bert_en_uncased_L-8_H-512_A-8/1',
    'small_bert/bert_en_uncased_L-8_H-768_A-12':
        'https://tfhub.dev/tensorflow/small_bert/bert_en_uncased_L-8_H-768_A-12/1',
    'small_bert/bert_en_uncased_L-10_H-128_A-2':
        'https://tfhub.dev/tensorflow/small_bert/bert_en_uncased_L-10_H-128_A-2/1',
    'small_bert/bert_en_uncased_L-10_H-256_A-4':
        'https://tfhub.dev/tensorflow/small_bert/bert_en_uncased_L-10_H-256_A-4/1',
    'small_bert/bert_en_uncased_L-10_H-512_A-8':
        'https://tfhub.dev/tensorflow/small_bert/bert_en_uncased_L-10_H-512_A-8/1',
    'small_bert/bert_en_uncased_L-10_H-768_A-12':
        'https://tfhub.dev/tensorflow/small_bert/bert_en_uncased_L-10_H-768_A-12/1',
    'small_bert/bert_en_uncased_L-12_H-128_A-2':
        'https://tfhub.dev/tensorflow/small_bert/bert_en_uncased_L-12_H-128_A-2/1',
    'small_bert/bert_en_uncased_L-12_H-256_A-4':
        'https://tfhub.dev/tensorflow/small_bert/bert_en_uncased_L-12_H-256_A-4/1',
    'small_bert/bert_en_uncased_L-12_H-512_A-8':
        'https://tfhub.dev/tensorflow/small_bert/bert_en_uncased_L-12_H-512_A-8/1',
    'small_bert/bert_en_uncased_L-12_H-768_A-12':
        'https://tfhub.dev/tensorflow/small_bert/bert_en_uncased_L-12_H-768_A-12/1',
    'albert_en_base':
        'https://tfhub.dev/tensorflow/albert_en_base/2',
    'electra_small':
        'https://tfhub.dev/google/electra_small/2',
    'electra_base':
        'https://tfhub.dev/google/electra_base/2',
    'experts_pubmed':
        'https://tfhub.dev/google/experts/bert/pubmed/2',
    'experts_wiki_books':
        'https://tfhub.dev/google/experts/bert/wiki_books/2',
    'talking-heads_base':
        'https://tfhub.dev/tensorflow/talkheads_ggelu_bert_en_base/1',
}

map_model_to_preprocess = {
    'bert_en_uncased_L-12_H-768_A-12':
        'https://tfhub.dev/tensorflow/bert_en_uncased_preprocess/3',
    'bert_en_cased_L-12_H-768_A-12':
        'https://tfhub.dev/tensorflow/bert_en_cased_preprocess/3',
    'small_bert/bert_en_uncased_L-2_H-128_A-2':
        'https://tfhub.dev/tensorflow/bert_en_uncased_preprocess/3',
    'small_bert/bert_en_uncased_L-2_H-256_A-4':
        'https://tfhub.dev/tensorflow/bert_en_uncased_preprocess/3',
    'small_bert/bert_en_uncased_L-2_H-512_A-8':
        'https://tfhub.dev/tensorflow/bert_en_uncased_preprocess/3',
    'small_bert/bert_en_uncased_L-2_H-768_A-12':
        'https://tfhub.dev/tensorflow/bert_en_uncased_preprocess/3',
    'small_bert/bert_en_uncased_L-4_H-128_A-2':
        'https://tfhub.dev/tensorflow/bert_en_uncased_preprocess/3',
    'small_bert/bert_en_uncased_L-4_H-256_A-4':
        'https://tfhub.dev/tensorflow/bert_en_uncased_preprocess/3',
    'small_bert/bert_en_uncased_L-4_H-512_A-8':
        'https://tfhub.dev/tensorflow/bert_en_uncased_preprocess/3',
    'small_bert/bert_en_uncased_L-4_H-768_A-12':
        'https://tfhub.dev/tensorflow/bert_en_uncased_preprocess/3',
    'small_bert/bert_en_uncased_L-6_H-128_A-2':
        'https://tfhub.dev/tensorflow/bert_en_uncased_preprocess/3',
    'small_bert/bert_en_uncased_L-6_H-256_A-4':
        'https://tfhub.dev/tensorflow/bert_en_uncased_preprocess/3',
    'small_bert/bert_en_uncased_L-6_H-512_A-8':
        'https://tfhub.dev/tensorflow/bert_en_uncased_preprocess/3',
    'small_bert/bert_en_uncased_L-6_H-768_A-12':
        'https://tfhub.dev/tensorflow/bert_en_uncased_preprocess/3',
    'small_bert/bert_en_uncased_L-8_H-128_A-2':
        'https://tfhub.dev/tensorflow/bert_en_uncased_preprocess/3',
    'small_bert/bert_en_uncased_L-8_H-256_A-4':
        'https://tfhub.dev/tensorflow/bert_en_uncased_preprocess/3',
    'small_bert/bert_en_uncased_L-8_H-512_A-8':
        'https://tfhub.dev/tensorflow/bert_en_uncased_preprocess/3',
    'small_bert/bert_en_uncased_L-8_H-768_A-12':
        'https://tfhub.dev/tensorflow/bert_en_uncased_preprocess/3',
    'small_bert/bert_en_uncased_L-10_H-128_A-2':
        'https://tfhub.dev/tensorflow/bert_en_uncased_preprocess/3',
    'small_bert/bert_en_uncased_L-10_H-256_A-4':
        'https://tfhub.dev/tensorflow/bert_en_uncased_preprocess/3',
    'small_bert/bert_en_uncased_L-10_H-512_A-8':
        'https://tfhub.dev/tensorflow/bert_en_uncased_preprocess/3',
    'small_bert/bert_en_uncased_L-10_H-768_A-12':
        'https://tfhub.dev/tensorflow/bert_en_uncased_preprocess/3',
    'small_bert/bert_en_uncased_L-12_H-128_A-2':
        'https://tfhub.dev/tensorflow/bert_en_uncased_preprocess/3',
    'small_bert/bert_en_uncased_L-12_H-256_A-4':
        'https://tfhub.dev/tensorflow/bert_en_uncased_preprocess/3',
    'small_bert/bert_en_uncased_L-12_H-512_A-8':
        'https://tfhub.dev/tensorflow/bert_en_uncased_preprocess/3',
    'small_bert/bert_en_uncased_L-12_H-768_A-12':
        'https://tfhub.dev/tensorflow/bert_en_uncased_preprocess/3',
    'bert_multi_cased_L-12_H-768_A-12':
        'https://tfhub.dev/tensorflow/bert_multi_cased_preprocess/3',
    'albert_en_base':
        'https://tfhub.dev/tensorflow/albert_en_preprocess/3',
    'electra_small':
        'https://tfhub.dev/tensorflow/bert_en_uncased_preprocess/3',
    'electra_base':
        'https://tfhub.dev/tensorflow/bert_en_uncased_preprocess/3',
    'experts_pubmed':
        'https://tfhub.dev/tensorflow/bert_en_uncased_preprocess/3',
    'experts_wiki_books':
        'https://tfhub.dev/tensorflow/bert_en_uncased_preprocess/3',
    'talking-heads_base':
        'https://tfhub.dev/tensorflow/bert_en_uncased_preprocess/3',
}

tfhub_handle_encoder = map_name_to_handle[bert_model_name]
tfhub_handle_preprocess = map_model_to_preprocess[bert_model_name]

print(f'BERT model selected           : {tfhub_handle_encoder}')
print(f'Preprocess model auto-selected: {tfhub_handle_preprocess}')
BERT model selected           : https://tfhub.dev/tensorflow/small_bert/bert_en_uncased_L-4_H-512_A-8/1
Preprocess model auto-selected: https://tfhub.dev/tensorflow/bert_en_uncased_preprocess/3
The preprocessing model
Text inputs need to be transformed to numeric token ids and arranged in several Tensors before being input to BERT. TensorFlow Hub provides a matching preprocessing model for each of the BERT models discussed above, which implements this transformation using TF ops from the TF.text library. It is not necessary to run pure Python code outside your TensorFlow model to preprocess text.
The preprocessing model must be the one referenced by the documentation of the BERT model, which you can read at the URL printed above. For BERT models from the drop-down above, the preprocessing model is selected automatically.
bert_preprocess_model = hub.KerasLayer(tfhub_handle_preprocess)
Let's try the preprocessing model on some text and see the output:
text_test = ['this is such an amazing movie!']
text_preprocessed = bert_preprocess_model(text_test)

print(f'Keys       : {list(text_preprocessed.keys())}')
print(f'Shape      : {text_preprocessed["input_word_ids"].shape}')
print(f'Word Ids   : {text_preprocessed["input_word_ids"][0, :12]}')
print(f'Input Mask : {text_preprocessed["input_mask"][0, :12]}')
print(f'Type Ids   : {text_preprocessed["input_type_ids"][0, :12]}')
Keys       : ['input_word_ids', 'input_type_ids', 'input_mask']
Shape      : (1, 128)
Word Ids   : [ 101 2023 2003 2107 2019 6429 3185  999  102    0    0    0]
Input Mask : [1 1 1 1 1 1 1 1 1 0 0 0]
Type Ids   : [0 0 0 0 0 0 0 0 0 0 0 0]
As you can see, now you have the 3 outputs from the preprocessing that a BERT model would use (input_words_id, input_mask and input_type_ids).
Some other important points:
- The input is truncated to 128 tokens. The number of tokens can be customized, and you can see more details on the Solve GLUE tasks using BERT on a TPU colab.
- The
input_type_idsonly have one value (0) because this is a single sentence input. For a multiple sentence input, it would have one number for each input.
Since this text preprocessor is a TensorFlow model, It can be included in your model directly.
Using the BERT model
Before putting BERT into your own model, let's take a look at its outputs. You will load it from TF Hub and see the returned values.
bert_model = hub.KerasLayer(tfhub_handle_encoder)
bert_results = bert_model(text_preprocessed)

print(f'Loaded BERT: {tfhub_handle_encoder}')
print(f'Pooled Outputs Shape:{bert_results["pooled_output"].shape}')
print(f'Pooled Outputs Values:{bert_results["pooled_output"][0, :12]}')
print(f'Sequence Outputs Shape:{bert_results["sequence_output"].shape}')
print(f'Sequence Outputs Values:{bert_results["sequence_output"][0, :12]}')
Loaded BERT: https://tfhub.dev/tensorflow/small_bert/bert_en_uncased_L-4_H-512_A-8/1
Pooled Outputs Shape:(1, 512)
Pooled Outputs Values:[ 0.762629    0.99280983 -0.18611868  0.36673862  0.15233733  0.6550447
  0.9681154  -0.9486271   0.00216128 -0.9877732   0.06842692 -0.97630584]
Sequence Outputs Shape:(1, 128, 512)
Sequence Outputs Values:[[-0.28946346  0.3432128   0.33231518 ...  0.21300825  0.7102068
  -0.05771117]
 [-0.28742072  0.31981036 -0.23018576 ...  0.58455    -0.21329743
   0.72692114]
 [-0.66157067  0.68876773 -0.8743301  ...  0.1087725  -0.26173177
   0.47855407]
 ...
 [-0.2256118  -0.2892561  -0.0706445  ...  0.47566038  0.83277136
   0.40025333]
 [-0.2982428  -0.27473134 -0.05450517 ...  0.48849747  1.0955354
   0.18163396]
 [-0.44378242  0.00930811  0.07223688 ...  0.1729009   1.1833243
   0.07898017]]
The BERT models return a map with 3 important keys: pooled_output, sequence_output, encoder_outputs:
pooled_outputrepresents each input sequence as a whole. The shape is[batch_size, H]. You can think of this as an embedding for the entire movie review.sequence_outputrepresents each input token in the context. The shape is[batch_size, seq_length, H]. You can think of this as a contextual embedding for every token in the movie review.encoder_outputsare the intermediate activations of theLTransformer blocks.outputs["encoder_outputs"][i]is a Tensor of shape[batch_size, seq_length, 1024]with the outputs of the i-th Transformer block, for0 <= i < L. The last value of the list is equal tosequence_output.
For the fine-tuning you are going to use the pooled_output array.
Define your model
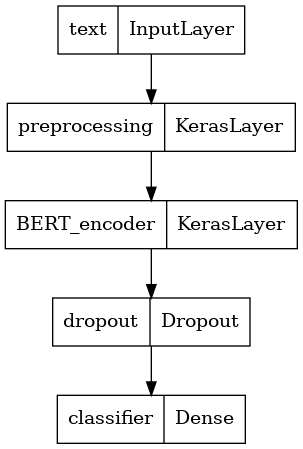
You will create a very simple fine-tuned model, with the preprocessing model, the selected BERT model, one Dense and a Dropout layer.
def build_classifier_model():
  text_input = tf.keras.layers.Input(shape=(), dtype=tf.string, name='text')
  preprocessing_layer = hub.KerasLayer(tfhub_handle_preprocess, name='preprocessing')
  encoder_inputs = preprocessing_layer(text_input)
  encoder = hub.KerasLayer(tfhub_handle_encoder, trainable=True, name='BERT_encoder')
  outputs = encoder(encoder_inputs)
  net = outputs['pooled_output']
  net = tf.keras.layers.Dropout(0.1)(net)
  net = tf.keras.layers.Dense(1, activation=None, name='classifier')(net)
  return tf.keras.Model(text_input, net)
Let's check that the model runs with the output of the preprocessing model.
classifier_model = build_classifier_model()
bert_raw_result = classifier_model(tf.constant(text_test))
print(tf.sigmoid(bert_raw_result))
tf.Tensor([[0.20992665]], shape=(1, 1), dtype=float32)
The output is meaningless, of course, because the model has not been trained yet.
Let's take a look at the model's structure.
tf.keras.utils.plot_model(classifier_model)
Model training
You now have all the pieces to train a model, including the preprocessing module, BERT encoder, data, and classifier.
Loss function
Since this is a binary classification problem and the model outputs a probability (a single-unit layer), you'll use losses.BinaryCrossentropy loss function.
loss = tf.keras.losses.BinaryCrossentropy(from_logits=True)
metrics = tf.metrics.BinaryAccuracy()
Optimizer
For fine-tuning, let's use the same optimizer that BERT was originally trained with: the "Adaptive Moments" (Adam). This optimizer minimizes the prediction loss and does regularization by weight decay (not using moments), which is also known as AdamW.
For the learning rate (init_lr), you will use the same schedule as BERT pre-training: linear decay of a notional initial learning rate, prefixed with a linear warm-up phase over the first 10% of training steps (num_warmup_steps). In line with the BERT paper, the initial learning rate is smaller for fine-tuning (best of 5e-5, 3e-5, 2e-5).
epochs = 5
steps_per_epoch = tf.data.experimental.cardinality(train_ds).numpy()
num_train_steps = steps_per_epoch * epochs
num_warmup_steps = int(0.1*num_train_steps)

init_lr = 3e-5
optimizer = optimization.create_optimizer(init_lr=init_lr,
                                          num_train_steps=num_train_steps,
                                          num_warmup_steps=num_warmup_steps,
                                          optimizer_type='adamw')
Loading the BERT model and training
Using the classifier_model you created earlier, you can compile the model with the loss, metric and optimizer.
classifier_model.compile(optimizer=optimizer,
                         loss=loss,
                         metrics=metrics)
print(f'Training model with {tfhub_handle_encoder}')
history = classifier_model.fit(x=train_ds,
                               validation_data=val_ds,
                               epochs=epochs)
Training model with https://tfhub.dev/tensorflow/small_bert/bert_en_uncased_L-4_H-512_A-8/1
Epoch 1/5
625/625 [==============================] - 695s 1s/step - loss: 0.4986 - binary_accuracy: 0.7390 - val_loss: 0.3835 - val_binary_accuracy: 0.8370
Epoch 2/5
625/625 [==============================] - 677s 1s/step - loss: 0.3318 - binary_accuracy: 0.8508 - val_loss: 0.3758 - val_binary_accuracy: 0.8456
Epoch 3/5
625/625 [==============================] - 674s 1s/step - loss: 0.2568 - binary_accuracy: 0.8929 - val_loss: 0.3913 - val_binary_accuracy: 0.8440
Epoch 4/5
625/625 [==============================] - 676s 1s/step - loss: 0.1964 - binary_accuracy: 0.9209 - val_loss: 0.4450 - val_binary_accuracy: 0.8528
Epoch 5/5
625/625 [==============================] - 676s 1s/step - loss: 0.1593 - binary_accuracy: 0.9392 - val_loss: 0.4698 - val_binary_accuracy: 0.8504
Evaluate the model
Let's see how the model performs. Two values will be returned. Loss (a number which represents the error, lower values are better), and accuracy.
loss, accuracy = classifier_model.evaluate(test_ds)

print(f'Loss: {loss}')
print(f'Accuracy: {accuracy}')
782/782 [==============================] - 222s 284ms/step - loss: 0.4493 - binary_accuracy: 0.8542
Loss: 0.4492934048175812
Accuracy: 0.8541600108146667
Plot the accuracy and loss over time
Based on the History object returned by model.fit(). You can plot the training and validation loss for comparison, as well as the training and validation accuracy:
history_dict = history.history
print(history_dict.keys())

acc = history_dict['binary_accuracy']
val_acc = history_dict['val_binary_accuracy']
loss = history_dict['loss']
val_loss = history_dict['val_loss']

epochs = range(1, len(acc) + 1)
fig = plt.figure(figsize=(10, 6))
fig.tight_layout()

plt.subplot(2, 1, 1)
# r is for "solid red line"
plt.plot(epochs, loss, 'r', label='Training loss')
# b is for "solid blue line"
plt.plot(epochs, val_loss, 'b', label='Validation loss')
plt.title('Training and validation loss')
# plt.xlabel('Epochs')
plt.ylabel('Loss')
plt.legend()

plt.subplot(2, 1, 2)
plt.plot(epochs, acc, 'r', label='Training acc')
plt.plot(epochs, val_acc, 'b', label='Validation acc')
plt.title('Training and validation accuracy')
plt.xlabel('Epochs')
plt.ylabel('Accuracy')
plt.legend(loc='lower right')
dict_keys(['loss', 'binary_accuracy', 'val_loss', 'val_binary_accuracy'])
<matplotlib.legend.Legend at 0x7f3adf10d3a0>
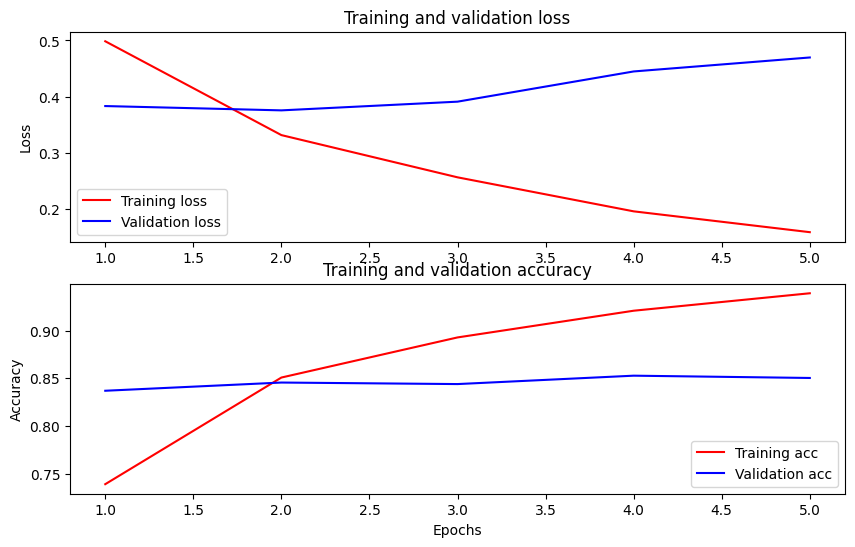
In this plot, the red lines represent the training loss and accuracy, and the blue lines are the validation loss and accuracy.
Export for inference
Now you just save your fine-tuned model for later use.
dataset_name = 'imdb'
saved_model_path = './{}_bert'.format(dataset_name.replace('/', '_'))

classifier_model.save(saved_model_path, include_optimizer=False)
Let's reload the model, so you can try it side by side with the model that is still in memory.
reloaded_model = tf.saved_model.load(saved_model_path)
Here you can test your model on any sentence you want, just add to the examples variable below.
def print_my_examples(inputs, results):
  result_for_printing = \
    [f'input: {inputs[i]:<30} : score: {results[i][0]:.6f}'
                         for i in range(len(inputs))]
  print(*result_for_printing, sep='\n')
  print()


examples = [
    'this is such an amazing movie!',  # this is the same sentence tried earlier
    'The movie was great!',
    'The movie was meh.',
    'The movie was okish.',
    'The movie was terrible...'
]

reloaded_results = tf.sigmoid(reloaded_model(tf.constant(examples)))
original_results = tf.sigmoid(classifier_model(tf.constant(examples)))

print('Results from the saved model:')
print_my_examples(examples, reloaded_results)
print('Results from the model in memory:')
print_my_examples(examples, original_results)
Results from the saved model:
input: this is such an amazing movie! : score: 0.999361
input: The movie was great!           : score: 0.989547
input: The movie was meh.             : score: 0.856317
input: The movie was okish.           : score: 0.022705
input: The movie was terrible...      : score: 0.001032

Results from the model in memory:
input: this is such an amazing movie! : score: 0.999361
input: The movie was great!           : score: 0.989547
input: The movie was meh.             : score: 0.856317
input: The movie was okish.           : score: 0.022705
input: The movie was terrible...      : score: 0.001032
If you want to use your model on TF Serving, remember that it will call your SavedModel through one of its named signatures. In Python, you can test them as follows:
serving_results = reloaded_model \
            .signatures['serving_default'](tf.constant(examples))

serving_results = tf.sigmoid(serving_results['classifier'])

print_my_examples(examples, serving_results)
input: this is such an amazing movie! : score: 0.999361
input: The movie was great!           : score: 0.989547
input: The movie was meh.             : score: 0.856317
input: The movie was okish.           : score: 0.022705
input: The movie was terrible...      : score: 0.001032
Next steps
As a next step, you can try Solve GLUE tasks using BERT on a TPU tutorial, which runs on a TPU and shows you how to work with multiple inputs.