
Given an image or a video stream, an object detection model can identify which of a known set of objects might be present and provide information about their positions within the image.
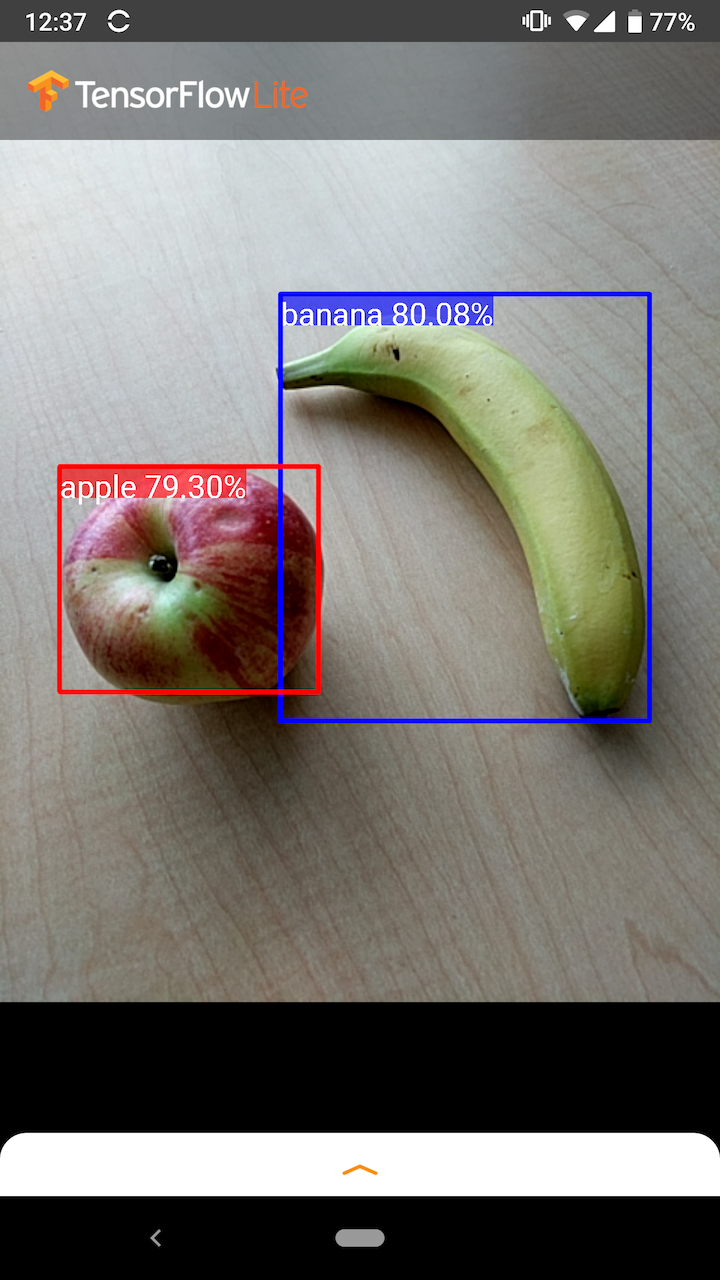
For example, this screenshot of the example application shows how two objects have been recognized and their positions annotated:
Get started
To learn how to use object detection in a mobile app, explore the Example applications and guides.
If you are using a platform other than Android or iOS, or if you are already familiar with the TensorFlow Lite APIs, you can download our starter object detection model and the accompanying labels.
Download starter model with Metadata
For more information about Metadata and associated fields (eg: labels.txt) see
Read
the metadata from models
If you want to train a custom detection model for your own task, see Model customization.
For the following use cases, you should use a different type of model:
- Predicting which single label the image most likely represents (see image classification)
- Predicting the composition of an image, for example subject versus background (see segmentation)
Example applications and guides
If you are new to TensorFlow Lite and are working with Android or iOS, we recommend exploring the following example applications that can help you get started.
Android
You can leverage the out-of-box API from TensorFlow Lite Task Library to integrate object detection models in just a few lines of code. You can also build your own custom inference pipeline using the TensorFlow Lite Interpreter Java API.
The Android example below demonstrates the implementation for both methods using Task library and interpreter API, respectively.
iOS
You can integrate the model using the TensorFlow Lite Interpreter Swift API. See the iOS example below.
Model description
This section describes the signature for Single-Shot Detector models converted to TensorFlow Lite from the TensorFlow Object Detection API.
An object detection model is trained to detect the presence and location of multiple classes of objects. For example, a model might be trained with images that contain various pieces of fruit, along with a label that specifies the class of fruit they represent (e.g. an apple, a banana, or a strawberry), and data specifying where each object appears in the image.
When an image is subsequently provided to the model, it will output a list of the objects it detects, the location of a bounding box that contains each object, and a score that indicates the confidence that detection was correct.
Input Signature
The model takes an image as input.
Lets assume the expected image is 300x300 pixels, with three channels (red, blue, and green) per pixel. This should be fed to the model as a flattened buffer of 270,000 byte values (300x300x3). If the model is quantized, each value should be a single byte representing a value between 0 and 255.
You can take a look at our example app code to understand how to do this pre-processing on Android.
Output Signature
The model outputs four arrays, mapped to the indices 0-4. Arrays 0, 1, and 2
describe N detected objects, with one element in each array corresponding to
each object.
| Index | Name | Description |
|---|---|---|
| 0 | Locations | Multidimensional array of [N][4] floating point values between 0 and 1, the inner arrays representing bounding boxes in the form [top, left, bottom, right] |
| 1 | Classes | Array of N integers (output as floating point values) each indicating the index of a class label from the labels file |
| 2 | Scores | Array of N floating point values between 0 and 1 representing probability that a class was detected |
| 3 | Number of detections | Integer value of N |
For example, imagine a model has been trained to detect apples, bananas, and strawberries. When provided an image, it will output a set number of detection results - in this example, 5.
| Class | Score | Location |
|---|---|---|
| Apple | 0.92 | [18, 21, 57, 63] |
| Banana | 0.88 | [100, 30, 180, 150] |
| Strawberry | 0.87 | [7, 82, 89, 163] |
| Banana | 0.23 | [42, 66, 57, 83] |
| Apple | 0.11 | [6, 42, 31, 58] |
Confidence score
To interpret these results, we can look at the score and the location for each detected object. The score is a number between 0 and 1 that indicates confidence that the object was genuinely detected. The closer the number is to 1, the more confident the model is.
Depending on your application, you can decide a cut-off threshold below which you will discard detection results. For the current example, a sensible cut-off is a score of 0.5 (meaning a 50% probability that the detection is valid). In that case, the last two objects in the array would be ignored because those confidence scores are below 0.5:
| Class | Score | Location |
|---|---|---|
| Apple | 0.92 | [18, 21, 57, 63] |
| Banana | 0.88 | [100, 30, 180, 150] |
| Strawberry | 0.87 | [7, 82, 89, 163] |
| Banana | 0.23 | [42, 66, 57, 83] |
| Apple | 0.11 | [6, 42, 31, 58] |
The cut-off you use should be based on whether you are more comfortable with false positives (objects that are wrongly identified, or areas of the image that are erroneously identified as objects when they are not), or false negatives (genuine objects that are missed because their confidence was low).
For example, in the following image, a pear (which is not an object that the model was trained to detect) was misidentified as a "person". This is an example of a false positive that could be ignored by selecting an appropriate cut-off. In this case, a cut-off of 0.6 (or 60%) would comfortably exclude the false positive.

Location
For each detected object, the model will return an array of four numbers representing a bounding rectangle that surrounds its position. For the starter model provided, the numbers are ordered as follows:
| [ | top, | left, | bottom, | right | ] |
The top value represents the distance of the rectangle’s top edge from the top of the image, in pixels. The left value represents the left edge’s distance from the left of the input image. The other values represent the bottom and right edges in a similar manner.
Performance benchmarks
Performance benchmark numbers for our starter model are generated with the tool described here.
| Model Name | Model size | Device | GPU | CPU |
|---|---|---|---|---|
| COCO SSD MobileNet v1 | 27 Mb | Pixel 3 (Android 10) | 22ms | 46ms* |
| Pixel 4 (Android 10) | 20ms | 29ms* | ||
| iPhone XS (iOS 12.4.1) | 7.6ms | 11ms** |
* 4 threads used.
** 2 threads used on iPhone for the best performance result.
Model Customization
Pre-trained models
Mobile-optimized detection models with a variety of latency and precision characteristics can be found in the Detection Zoo. Each one of them follows the input and output signatures described in the following sections.
Most of the download zips contain a model.tflite file. If there isn't one, a
TensorFlow Lite flatbuffer can be generated using
these instructions.
SSD models from the
TF2 Object Detection Zoo
can also be converted to TensorFlow Lite using the instructions
here.
It is important to note that detection models cannot be converted directly using
the TensorFlow Lite Converter, since
they require an intermediate step of generating a mobile-friendly source model.
The scripts linked above perform this step.
Both the
TF1
&
TF2
exporting scripts have parameters that can enable a larger number of output
objects or slower, more-accurate post processing. Please use --help with the
scripts to see an exhaustive list of supported arguments.
Currently, on-device inference is only optimized with SSD models. Better support for other architectures like CenterNet and EfficientDet is being investigated.
How to choose a model to customize?
Each model comes with its own precision (quantified by mAP value) and latency characteristics. You should choose a model that works the best for your use-case and intended hardware. For example, the Edge TPU models are ideal for inference on Google's Edge TPU on Pixel 4.
You can use our benchmark tool to evaluate models and choose the most efficient option available.
Fine-tuning models on custom data
The pre-trained models we provide are trained to detect 90 classes of objects. For a full list of classes, see the labels file in the model metadata.
You can use a technique known as transfer learning to re-train a model to recognize classes not in the original set. For example, you could re-train the model to detect multiple types of vegetable, despite there only being one vegetable in the original training data. To do this, you will need a set of training images for each of the new labels you wish to train. The recommended way is to use TensorFlow Lite Model Maker library which simplifies the process of training a TensorFlow Lite model using custom dataset, with a few lines of codes. It uses transfer learning to reduce the amount of required training data and time. You can also learn from Few-shot detection Colab as an example of fine-tuning a pre-trained model with few examples.
For fine-tuning with larger datasets, take a look at the these guides for training your own models with the TensorFlow Object Detection API: TF1, TF2. Once trained, they can be converted to a TFLite-friendly format with the instructions here: TF1, TF2