
| |  GitHubで表示 GitHubで表示 | |
このチュートリアルには、BERTを微調整して、プレーンテキストのIMDB映画レビューのデータセットに対して感情分析を実行するための完全なコードが含まれています。モデルのトレーニングに加えて、テキストを適切な形式に前処理する方法を学習します。
このノートブックでは、次のことを行います。
- IMDBデータセットをロードする
- TensorFlowハブからBERTモデルをロードする
- BERTと分類器を組み合わせて独自のモデルを構築する
- 独自のモデルをトレーニングし、その一環としてBERTを微調整します
- モデルを保存し、それを使用して文を分類します
あなたはIMDBデータセットでの作業に慣れていた場合は、参照してください。基本的なテキスト分類の詳細については。
BERTについて
BERTや他のトランスエンコーダ・アーキテクチャは、NLP(自然言語処理)におけるさまざまなタスクに乱暴に成功しています。これらは、深層学習モデルでの使用に適した自然言語のベクトル空間表現を計算します。 BERTファミリーのモデルは、Transformerエンコーダーアーキテクチャを使用して、入力テキストの各トークンを前後のすべてのトークンの完全なコンテキストで処理します。そのため、名前はTransformersからの双方向エンコーダー表現です。
BERTモデルは通常、大量のテキストで事前にトレーニングされ、特定のタスクに合わせて微調整されます。
設定
# A dependency of the preprocessing for BERT inputspip install -q -U tensorflow-text
あなたはからAdamWオプティマイザを使用しますtensorflow /モデル。
pip install -q tf-models-official
import os
import shutil

import tensorflow as tf
import tensorflow_hub as hub
import tensorflow_text as text
from official.nlp import optimization  # to create AdamW optimizer

import matplotlib.pyplot as plt

tf.get_logger().setLevel('ERROR')
/tmpfs/src/tf_docs_env/lib/python3.7/site-packages/pkg_resources/__init__.py:119: PkgResourcesDeprecationWarning: 0.18ubuntu0.18.04.1 is an invalid version and will not be supported in a future release
  PkgResourcesDeprecationWarning,
感情分析
このノートブックはレビューのテキストに基づいて、正または負として分類映画レビューに感情分析モデルを養成します。
あなたは使います大規模な映画レビューデータセットから50,000の映画レビューのテキストが含まれ、インターネットムービーデータベースを。
IMDBデータセットをダウンロードする
データセットをダウンロードして抽出してから、ディレクトリ構造を調べてみましょう。
url = 'https://ai.stanford.edu/~amaas/data/sentiment/aclImdb_v1.tar.gz'

dataset = tf.keras.utils.get_file('aclImdb_v1.tar.gz', url,
                                  untar=True, cache_dir='.',
                                  cache_subdir='')

dataset_dir = os.path.join(os.path.dirname(dataset), 'aclImdb')

train_dir = os.path.join(dataset_dir, 'train')

# remove unused folders to make it easier to load the data
remove_dir = os.path.join(train_dir, 'unsup')
shutil.rmtree(remove_dir)
Downloading data from https://ai.stanford.edu/~amaas/data/sentiment/aclImdb_v1.tar.gz
84131840/84125825 [==============================] - 7s 0us/step
84140032/84125825 [==============================] - 7s 0us/step
次に、あなたが使用するtext_dataset_from_directoryラベルを作成するユーティリティをtf.data.Dataset 。
IMDBデータセットはすでにトレーニングとテストに分割されていますが、検証セットがありません。さんが使ってトレーニングデータの80:20分割を使用した検証セットを作成してみましょうvalidation_split下の引数を。
AUTOTUNE = tf.data.AUTOTUNE
batch_size = 32
seed = 42

raw_train_ds = tf.keras.utils.text_dataset_from_directory(
    'aclImdb/train',
    batch_size=batch_size,
    validation_split=0.2,
    subset='training',
    seed=seed)

class_names = raw_train_ds.class_names
train_ds = raw_train_ds.cache().prefetch(buffer_size=AUTOTUNE)

val_ds = tf.keras.utils.text_dataset_from_directory(
    'aclImdb/train',
    batch_size=batch_size,
    validation_split=0.2,
    subset='validation',
    seed=seed)

val_ds = val_ds.cache().prefetch(buffer_size=AUTOTUNE)

test_ds = tf.keras.utils.text_dataset_from_directory(
    'aclImdb/test',
    batch_size=batch_size)

test_ds = test_ds.cache().prefetch(buffer_size=AUTOTUNE)
Found 25000 files belonging to 2 classes.
Using 20000 files for training.
Found 25000 files belonging to 2 classes.
Using 5000 files for validation.
Found 25000 files belonging to 2 classes.
いくつかのレビューを見てみましょう。
for text_batch, label_batch in train_ds.take(1):
  for i in range(3):
    print(f'Review: {text_batch.numpy()[i]}')
    label = label_batch.numpy()[i]
    print(f'Label : {label} ({class_names[label]})')
Review: b'"Pandemonium" is a horror movie spoof that comes off more stupid than funny. Believe me when I tell you, I love comedies. Especially comedy spoofs. "Airplane", "The Naked Gun" trilogy, "Blazing Saddles", "High Anxiety", and "Spaceballs" are some of my favorite comedies that spoof a particular genre. "Pandemonium" is not up there with those films. Most of the scenes in this movie had me sitting there in stunned silence because the movie wasn\'t all that funny. There are a few laughs in the film, but when you watch a comedy, you expect to laugh a lot more than a few times and that\'s all this film has going for it. Geez, "Scream" had more laughs than this film and that was more of a horror film. How bizarre is that?<br /><br />*1/2 (out of four)'
Label : 0 (neg)
Review: b"David Mamet is a very interesting and a very un-equal director. His first movie 'House of Games' was the one I liked best, and it set a series of films with characters whose perspective of life changes as they get into complicated situations, and so does the perspective of the viewer.<br /><br />So is 'Homicide' which from the title tries to set the mind of the viewer to the usual crime drama. The principal characters are two cops, one Jewish and one Irish who deal with a racially charged area. The murder of an old Jewish shop owner who proves to be an ancient veteran of the Israeli Independence war triggers the Jewish identity in the mind and heart of the Jewish detective.<br /><br />This is were the flaws of the film are the more obvious. The process of awakening is theatrical and hard to believe, the group of Jewish militants is operatic, and the way the detective eventually walks to the final violent confrontation is pathetic. The end of the film itself is Mamet-like smart, but disappoints from a human emotional perspective.<br /><br />Joe Mantegna and William Macy give strong performances, but the flaws of the story are too evident to be easily compensated."
Label : 0 (neg)
Review: b'Great documentary about the lives of NY firefighters during the worst terrorist attack of all time.. That reason alone is why this should be a must see collectors item.. What shocked me was not only the attacks, but the"High Fat Diet" and physical appearance of some of these firefighters. I think a lot of Doctors would agree with me that,in the physical shape they were in, some of these firefighters would NOT of made it to the 79th floor carrying over 60 lbs of gear. Having said that i now have a greater respect for firefighters and i realize becoming a firefighter is a life altering job. The French have a history of making great documentary\'s and that is what this is, a Great Documentary.....'
Label : 1 (pos)
2021-12-01 12:17:32.795514: W tensorflow/core/kernels/data/cache_dataset_ops.cc:768] The calling iterator did not fully read the dataset being cached. In order to avoid unexpected truncation of the dataset, the partially cached contents of the dataset  will be discarded. This can happen if you have an input pipeline similar to `dataset.cache().take(k).repeat()`. You should use `dataset.take(k).cache().repeat()` instead.
TensorFlowハブからモデルを読み込んでいます
ここでは、TensorFlow HubからロードするBERTモデルを選択し、微調整できます。利用可能な複数のBERTモデルがあります。
- BERT-ベース、 Uncasedおよび7つのより多くのモデル、元BERTの作者によって解放訓練された重みを持ちます。
- 小型のBERTは、あなたがスピード、サイズと品質の間のトレードオフを探ることができます同じ一般的なアーキテクチャが、少ないおよび/またはより小さなトランスブロックを、持っています。
- ALBERT :層間パラメータを共有することにより、モデルサイズ(ただし、計算時間)を減少させる「AライトBERT」の4種類のサイズ。
- BERT専門家:8つのモデル全てのことは、BERTベースのアーキテクチャを持っていますが、対象タスクとより密接に整合するように、異なる事前研修ドメイン間の選択肢を提供します。
- エレクトラは(3種類のサイズで)BERTと同じアーキテクチャを持っていますが、似ている生成的敵対ネットワーク(GAN)ことをセット・アップに弁別よう事前に訓練を受け取得します。
- トーキング・ヘッドの注意とゲーテッドGELUとBERT [塩基、大型は】トランスアーキテクチャのコアに2つの改良を有しています。
TensorFlow Hubのモデルドキュメントには、詳細と研究文献への参照があります。上記のリンクに従ってください、またはをクリックしてtfhub.dev次のセルの実行後に印刷されたURL。
微調整が速いので、小さいBERT(パラメーターが少ない)から始めることをお勧めします。小さいモデルが好きで、精度が高い場合は、ALBERTが次の選択肢になる可能性があります。さらに精度を高めたい場合は、クラシックなBERTサイズ、またはElectra、Talking Heads、BERTExpertなどの最近の改良版のいずれかを選択してください。
脇下の利用可能なモデルから、ある複数のバージョンより大きく、より良い精度を得ることができるモデルのは、彼らは、単一のGPU上で微調整するにはあまりにも大きいです。あなたは上でそれを行うことができるようになりますTPUのコラボでBERTを使用して解決GLUEタスク。
以下のコードでは、tfhub.dev URLを切り替えるだけで、これらのモデルのいずれかを試すことができます。これは、モデル間のすべての違いがTFHubのSavedModelsにカプセル化されているためです。
BERTモデルを選択して微調整します
bert_model_name = 'small_bert/bert_en_uncased_L-4_H-512_A-8'

map_name_to_handle = {
    'bert_en_uncased_L-12_H-768_A-12':
        'https://tfhub.dev/tensorflow/bert_en_uncased_L-12_H-768_A-12/3',
    'bert_en_cased_L-12_H-768_A-12':
        'https://tfhub.dev/tensorflow/bert_en_cased_L-12_H-768_A-12/3',
    'bert_multi_cased_L-12_H-768_A-12':
        'https://tfhub.dev/tensorflow/bert_multi_cased_L-12_H-768_A-12/3',
    'small_bert/bert_en_uncased_L-2_H-128_A-2':
        'https://tfhub.dev/tensorflow/small_bert/bert_en_uncased_L-2_H-128_A-2/1',
    'small_bert/bert_en_uncased_L-2_H-256_A-4':
        'https://tfhub.dev/tensorflow/small_bert/bert_en_uncased_L-2_H-256_A-4/1',
    'small_bert/bert_en_uncased_L-2_H-512_A-8':
        'https://tfhub.dev/tensorflow/small_bert/bert_en_uncased_L-2_H-512_A-8/1',
    'small_bert/bert_en_uncased_L-2_H-768_A-12':
        'https://tfhub.dev/tensorflow/small_bert/bert_en_uncased_L-2_H-768_A-12/1',
    'small_bert/bert_en_uncased_L-4_H-128_A-2':
        'https://tfhub.dev/tensorflow/small_bert/bert_en_uncased_L-4_H-128_A-2/1',
    'small_bert/bert_en_uncased_L-4_H-256_A-4':
        'https://tfhub.dev/tensorflow/small_bert/bert_en_uncased_L-4_H-256_A-4/1',
    'small_bert/bert_en_uncased_L-4_H-512_A-8':
        'https://tfhub.dev/tensorflow/small_bert/bert_en_uncased_L-4_H-512_A-8/1',
    'small_bert/bert_en_uncased_L-4_H-768_A-12':
        'https://tfhub.dev/tensorflow/small_bert/bert_en_uncased_L-4_H-768_A-12/1',
    'small_bert/bert_en_uncased_L-6_H-128_A-2':
        'https://tfhub.dev/tensorflow/small_bert/bert_en_uncased_L-6_H-128_A-2/1',
    'small_bert/bert_en_uncased_L-6_H-256_A-4':
        'https://tfhub.dev/tensorflow/small_bert/bert_en_uncased_L-6_H-256_A-4/1',
    'small_bert/bert_en_uncased_L-6_H-512_A-8':
        'https://tfhub.dev/tensorflow/small_bert/bert_en_uncased_L-6_H-512_A-8/1',
    'small_bert/bert_en_uncased_L-6_H-768_A-12':
        'https://tfhub.dev/tensorflow/small_bert/bert_en_uncased_L-6_H-768_A-12/1',
    'small_bert/bert_en_uncased_L-8_H-128_A-2':
        'https://tfhub.dev/tensorflow/small_bert/bert_en_uncased_L-8_H-128_A-2/1',
    'small_bert/bert_en_uncased_L-8_H-256_A-4':
        'https://tfhub.dev/tensorflow/small_bert/bert_en_uncased_L-8_H-256_A-4/1',
    'small_bert/bert_en_uncased_L-8_H-512_A-8':
        'https://tfhub.dev/tensorflow/small_bert/bert_en_uncased_L-8_H-512_A-8/1',
    'small_bert/bert_en_uncased_L-8_H-768_A-12':
        'https://tfhub.dev/tensorflow/small_bert/bert_en_uncased_L-8_H-768_A-12/1',
    'small_bert/bert_en_uncased_L-10_H-128_A-2':
        'https://tfhub.dev/tensorflow/small_bert/bert_en_uncased_L-10_H-128_A-2/1',
    'small_bert/bert_en_uncased_L-10_H-256_A-4':
        'https://tfhub.dev/tensorflow/small_bert/bert_en_uncased_L-10_H-256_A-4/1',
    'small_bert/bert_en_uncased_L-10_H-512_A-8':
        'https://tfhub.dev/tensorflow/small_bert/bert_en_uncased_L-10_H-512_A-8/1',
    'small_bert/bert_en_uncased_L-10_H-768_A-12':
        'https://tfhub.dev/tensorflow/small_bert/bert_en_uncased_L-10_H-768_A-12/1',
    'small_bert/bert_en_uncased_L-12_H-128_A-2':
        'https://tfhub.dev/tensorflow/small_bert/bert_en_uncased_L-12_H-128_A-2/1',
    'small_bert/bert_en_uncased_L-12_H-256_A-4':
        'https://tfhub.dev/tensorflow/small_bert/bert_en_uncased_L-12_H-256_A-4/1',
    'small_bert/bert_en_uncased_L-12_H-512_A-8':
        'https://tfhub.dev/tensorflow/small_bert/bert_en_uncased_L-12_H-512_A-8/1',
    'small_bert/bert_en_uncased_L-12_H-768_A-12':
        'https://tfhub.dev/tensorflow/small_bert/bert_en_uncased_L-12_H-768_A-12/1',
    'albert_en_base':
        'https://tfhub.dev/tensorflow/albert_en_base/2',
    'electra_small':
        'https://tfhub.dev/google/electra_small/2',
    'electra_base':
        'https://tfhub.dev/google/electra_base/2',
    'experts_pubmed':
        'https://tfhub.dev/google/experts/bert/pubmed/2',
    'experts_wiki_books':
        'https://tfhub.dev/google/experts/bert/wiki_books/2',
    'talking-heads_base':
        'https://tfhub.dev/tensorflow/talkheads_ggelu_bert_en_base/1',
}

map_model_to_preprocess = {
    'bert_en_uncased_L-12_H-768_A-12':
        'https://tfhub.dev/tensorflow/bert_en_uncased_preprocess/3',
    'bert_en_cased_L-12_H-768_A-12':
        'https://tfhub.dev/tensorflow/bert_en_cased_preprocess/3',
    'small_bert/bert_en_uncased_L-2_H-128_A-2':
        'https://tfhub.dev/tensorflow/bert_en_uncased_preprocess/3',
    'small_bert/bert_en_uncased_L-2_H-256_A-4':
        'https://tfhub.dev/tensorflow/bert_en_uncased_preprocess/3',
    'small_bert/bert_en_uncased_L-2_H-512_A-8':
        'https://tfhub.dev/tensorflow/bert_en_uncased_preprocess/3',
    'small_bert/bert_en_uncased_L-2_H-768_A-12':
        'https://tfhub.dev/tensorflow/bert_en_uncased_preprocess/3',
    'small_bert/bert_en_uncased_L-4_H-128_A-2':
        'https://tfhub.dev/tensorflow/bert_en_uncased_preprocess/3',
    'small_bert/bert_en_uncased_L-4_H-256_A-4':
        'https://tfhub.dev/tensorflow/bert_en_uncased_preprocess/3',
    'small_bert/bert_en_uncased_L-4_H-512_A-8':
        'https://tfhub.dev/tensorflow/bert_en_uncased_preprocess/3',
    'small_bert/bert_en_uncased_L-4_H-768_A-12':
        'https://tfhub.dev/tensorflow/bert_en_uncased_preprocess/3',
    'small_bert/bert_en_uncased_L-6_H-128_A-2':
        'https://tfhub.dev/tensorflow/bert_en_uncased_preprocess/3',
    'small_bert/bert_en_uncased_L-6_H-256_A-4':
        'https://tfhub.dev/tensorflow/bert_en_uncased_preprocess/3',
    'small_bert/bert_en_uncased_L-6_H-512_A-8':
        'https://tfhub.dev/tensorflow/bert_en_uncased_preprocess/3',
    'small_bert/bert_en_uncased_L-6_H-768_A-12':
        'https://tfhub.dev/tensorflow/bert_en_uncased_preprocess/3',
    'small_bert/bert_en_uncased_L-8_H-128_A-2':
        'https://tfhub.dev/tensorflow/bert_en_uncased_preprocess/3',
    'small_bert/bert_en_uncased_L-8_H-256_A-4':
        'https://tfhub.dev/tensorflow/bert_en_uncased_preprocess/3',
    'small_bert/bert_en_uncased_L-8_H-512_A-8':
        'https://tfhub.dev/tensorflow/bert_en_uncased_preprocess/3',
    'small_bert/bert_en_uncased_L-8_H-768_A-12':
        'https://tfhub.dev/tensorflow/bert_en_uncased_preprocess/3',
    'small_bert/bert_en_uncased_L-10_H-128_A-2':
        'https://tfhub.dev/tensorflow/bert_en_uncased_preprocess/3',
    'small_bert/bert_en_uncased_L-10_H-256_A-4':
        'https://tfhub.dev/tensorflow/bert_en_uncased_preprocess/3',
    'small_bert/bert_en_uncased_L-10_H-512_A-8':
        'https://tfhub.dev/tensorflow/bert_en_uncased_preprocess/3',
    'small_bert/bert_en_uncased_L-10_H-768_A-12':
        'https://tfhub.dev/tensorflow/bert_en_uncased_preprocess/3',
    'small_bert/bert_en_uncased_L-12_H-128_A-2':
        'https://tfhub.dev/tensorflow/bert_en_uncased_preprocess/3',
    'small_bert/bert_en_uncased_L-12_H-256_A-4':
        'https://tfhub.dev/tensorflow/bert_en_uncased_preprocess/3',
    'small_bert/bert_en_uncased_L-12_H-512_A-8':
        'https://tfhub.dev/tensorflow/bert_en_uncased_preprocess/3',
    'small_bert/bert_en_uncased_L-12_H-768_A-12':
        'https://tfhub.dev/tensorflow/bert_en_uncased_preprocess/3',
    'bert_multi_cased_L-12_H-768_A-12':
        'https://tfhub.dev/tensorflow/bert_multi_cased_preprocess/3',
    'albert_en_base':
        'https://tfhub.dev/tensorflow/albert_en_preprocess/3',
    'electra_small':
        'https://tfhub.dev/tensorflow/bert_en_uncased_preprocess/3',
    'electra_base':
        'https://tfhub.dev/tensorflow/bert_en_uncased_preprocess/3',
    'experts_pubmed':
        'https://tfhub.dev/tensorflow/bert_en_uncased_preprocess/3',
    'experts_wiki_books':
        'https://tfhub.dev/tensorflow/bert_en_uncased_preprocess/3',
    'talking-heads_base':
        'https://tfhub.dev/tensorflow/bert_en_uncased_preprocess/3',
}

tfhub_handle_encoder = map_name_to_handle[bert_model_name]
tfhub_handle_preprocess = map_model_to_preprocess[bert_model_name]

print(f'BERT model selected           : {tfhub_handle_encoder}')
print(f'Preprocess model auto-selected: {tfhub_handle_preprocess}')
BERT model selected           : https://tfhub.dev/tensorflow/small_bert/bert_en_uncased_L-4_H-512_A-8/1
Preprocess model auto-selected: https://tfhub.dev/tensorflow/bert_en_uncased_preprocess/3
前処理モデル
テキスト入力は、BERTに入力する前に、数値トークンIDに変換し、いくつかのテンソルに配置する必要があります。 TensorFlow Hubは、上記の各BERTモデルに一致する前処理モデルを提供します。これは、TF.textライブラリのTFopsを使用してこの変換を実装します。テキストを前処理するために、TensorFlowモデルの外部で純粋なPythonコードを実行する必要はありません。
前処理モデルは、上に印刷されたURLで読むことができるBERTモデルのドキュメントで参照されているモデルである必要があります。上のドロップダウンからのBERTモデルの場合、前処理モデルが自動的に選択されます。
bert_preprocess_model = hub.KerasLayer(tfhub_handle_preprocess)
いくつかのテキストで前処理モデルを試して、出力を見てみましょう。
text_test = ['this is such an amazing movie!']
text_preprocessed = bert_preprocess_model(text_test)

print(f'Keys       : {list(text_preprocessed.keys())}')
print(f'Shape      : {text_preprocessed["input_word_ids"].shape}')
print(f'Word Ids   : {text_preprocessed["input_word_ids"][0, :12]}')
print(f'Input Mask : {text_preprocessed["input_mask"][0, :12]}')
print(f'Type Ids   : {text_preprocessed["input_type_ids"][0, :12]}')
Keys       : ['input_word_ids', 'input_mask', 'input_type_ids']
Shape      : (1, 128)
Word Ids   : [ 101 2023 2003 2107 2019 6429 3185  999  102    0    0    0]
Input Mask : [1 1 1 1 1 1 1 1 1 0 0 0]
Type Ids   : [0 0 0 0 0 0 0 0 0 0 0 0]
あなたが見ることができるように、今はBERTモデルは、(使用することを前から3つの出力持ちinput_words_id 、 input_maskとinput_type_ids )。
その他の重要なポイント:
- 入力は128トークンに切り捨てられます。トークンの数をカスタマイズすることができ、あなたはの詳細を確認できTPUのコラボでBERTを使用して解決GLUEタスクを。
-
input_type_ids、これは、単一の文の入力であるため、唯一の値(0)を有します。複数文の入力の場合、入力ごとに1つの番号があります。
このテキストプリプロセッサはTensorFlowモデルであるため、モデルに直接含めることができます。
BERTモデルの使用
BERTを独自のモデルに組み込む前に、その出力を見てみましょう。 TF Hubからロードして、戻り値を確認します。
bert_model = hub.KerasLayer(tfhub_handle_encoder)
bert_results = bert_model(text_preprocessed)

print(f'Loaded BERT: {tfhub_handle_encoder}')
print(f'Pooled Outputs Shape:{bert_results["pooled_output"].shape}')
print(f'Pooled Outputs Values:{bert_results["pooled_output"][0, :12]}')
print(f'Sequence Outputs Shape:{bert_results["sequence_output"].shape}')
print(f'Sequence Outputs Values:{bert_results["sequence_output"][0, :12]}')
Loaded BERT: https://tfhub.dev/tensorflow/small_bert/bert_en_uncased_L-4_H-512_A-8/1
Pooled Outputs Shape:(1, 512)
Pooled Outputs Values:[ 0.76262873  0.99280983 -0.1861186   0.36673835  0.15233682  0.65504444
  0.9681154  -0.9486272   0.00216158 -0.9877732   0.0684272  -0.9763061 ]
Sequence Outputs Shape:(1, 128, 512)
Sequence Outputs Values:[[-0.28946388  0.3432126   0.33231565 ...  0.21300787  0.7102078
  -0.05771166]
 [-0.28742015  0.31981024 -0.2301858  ...  0.58455074 -0.21329722
   0.7269209 ]
 [-0.66157013  0.6887685  -0.87432927 ...  0.10877253 -0.26173282
   0.47855264]
 ...
 [-0.2256118  -0.28925604 -0.07064401 ...  0.4756601   0.8327715
   0.40025353]
 [-0.29824278 -0.27473143 -0.05450511 ...  0.48849759  1.0955356
   0.18163344]
 [-0.44378197  0.00930723  0.07223766 ...  0.1729009   1.1833246
   0.07897988]]
:BERTモデルは、3つの重要なキーでマップを返すpooled_output 、 sequence_output 、 encoder_outputs :
-
pooled_output全体として、各入力シーケンスを表します。形状は[batch_size, H]これは、映画レビュー全体の埋め込みと考えることができます。 -
sequence_outputコンテキストトークン各入力を表します。形状は[batch_size, seq_length, H]これは、映画レビューのすべてのトークンのコンテキスト埋め込みと考えることができます。 -
encoder_outputsの中間のアクティベーションされているLトランスブロック。outputs["encoder_outputs"][i]形状のテンソルである[batch_size, seq_length, 1024]のために、i番目のトランスブロックの出力を有する0 <= i < Lリストの最後の値に等しいですsequence_output。
微調整のためには、使用しようとしているpooled_output配列を。
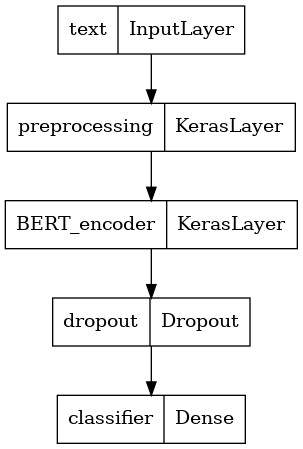
モデルを定義する
前処理モデル、選択したBERTモデル、1つのDenseレイヤー、およびDropoutレイヤーを使用して、非常に単純な微調整されたモデルを作成します。
def build_classifier_model():
  text_input = tf.keras.layers.Input(shape=(), dtype=tf.string, name='text')
  preprocessing_layer = hub.KerasLayer(tfhub_handle_preprocess, name='preprocessing')
  encoder_inputs = preprocessing_layer(text_input)
  encoder = hub.KerasLayer(tfhub_handle_encoder, trainable=True, name='BERT_encoder')
  outputs = encoder(encoder_inputs)
  net = outputs['pooled_output']
  net = tf.keras.layers.Dropout(0.1)(net)
  net = tf.keras.layers.Dense(1, activation=None, name='classifier')(net)
  return tf.keras.Model(text_input, net)
モデルが前処理モデルの出力で実行されることを確認しましょう。
classifier_model = build_classifier_model()
bert_raw_result = classifier_model(tf.constant(text_test))
print(tf.sigmoid(bert_raw_result))
tf.Tensor([[0.6749899]], shape=(1, 1), dtype=float32)
もちろん、モデルはまだトレーニングされていないため、出力は無意味です。
モデルの構造を見てみましょう。
tf.keras.utils.plot_model(classifier_model)
モデルトレーニング
これで、前処理モジュール、BERTエンコーダー、データ、分類器など、モデルをトレーニングするためのすべての要素が揃いました。
損失関数
これは、バイナリ分類問題であり、モデルは、確率(1単位層)を出力するので、あなたは使いますlosses.BinaryCrossentropy損失関数を。
loss = tf.keras.losses.BinaryCrossentropy(from_logits=True)
metrics = tf.metrics.BinaryAccuracy()
オプティマイザ
微調整には、BERTが最初にトレーニングされたのと同じオプティマイザー「AdaptiveMoments」(Adam)を使用しましょう。このオプティマイザは、予測損失を最小化し、またとして知られている量の減衰(モーメントを使用していない)によって正則化を行いAdamW 。
学習率(についてinit_lr段階(トレーニングの最初の10%以上をリニアウォームアップ相が付い名目初期学習率の線形減衰、:BERTは、トレーニング前のように)、あなたは同じスケジュールを使用しますnum_warmup_steps )。 BERTの論文に沿って、微調整の場合、初期学習率は低くなります(5e-5、3e-5、2e-5のベスト)。
epochs = 5
steps_per_epoch = tf.data.experimental.cardinality(train_ds).numpy()
num_train_steps = steps_per_epoch * epochs
num_warmup_steps = int(0.1*num_train_steps)

init_lr = 3e-5
optimizer = optimization.create_optimizer(init_lr=init_lr,
                                          num_train_steps=num_train_steps,
                                          num_warmup_steps=num_warmup_steps,
                                          optimizer_type='adamw')
BERTモデルの読み込みとトレーニング
使用classifier_model以前に作成したが、あなたは損失、メトリックおよびオプティマイザでモデルをコンパイルすることができます。
classifier_model.compile(optimizer=optimizer,
                         loss=loss,
                         metrics=metrics)
print(f'Training model with {tfhub_handle_encoder}')
history = classifier_model.fit(x=train_ds,
                               validation_data=val_ds,
                               epochs=epochs)
Training model with https://tfhub.dev/tensorflow/small_bert/bert_en_uncased_L-4_H-512_A-8/1
Epoch 1/5
625/625 [==============================] - 91s 138ms/step - loss: 0.4776 - binary_accuracy: 0.7513 - val_loss: 0.3791 - val_binary_accuracy: 0.8380
Epoch 2/5
625/625 [==============================] - 85s 136ms/step - loss: 0.3266 - binary_accuracy: 0.8547 - val_loss: 0.3659 - val_binary_accuracy: 0.8486
Epoch 3/5
625/625 [==============================] - 86s 138ms/step - loss: 0.2521 - binary_accuracy: 0.8928 - val_loss: 0.3975 - val_binary_accuracy: 0.8518
Epoch 4/5
625/625 [==============================] - 86s 137ms/step - loss: 0.1910 - binary_accuracy: 0.9269 - val_loss: 0.4180 - val_binary_accuracy: 0.8522
Epoch 5/5
625/625 [==============================] - 86s 137ms/step - loss: 0.1509 - binary_accuracy: 0.9433 - val_loss: 0.4641 - val_binary_accuracy: 0.8522
モデルを評価する
モデルのパフォーマンスを見てみましょう。 2つの値が返されます。損失(エラーを表す数値、値が小さいほど良い)、および精度。
loss, accuracy = classifier_model.evaluate(test_ds)

print(f'Loss: {loss}')
print(f'Accuracy: {accuracy}')
782/782 [==============================] - 61s 78ms/step - loss: 0.4495 - binary_accuracy: 0.8554
Loss: 0.4494614601135254
Accuracy: 0.8553599715232849
時間の経過に伴う精度と損失をプロットします
基づいて、 Historyオブジェクトによって返されたmodel.fit() 。比較のためにトレーニングと検証の損失、およびトレーニングと検証の精度をプロットできます。
history_dict = history.history
print(history_dict.keys())

acc = history_dict['binary_accuracy']
val_acc = history_dict['val_binary_accuracy']
loss = history_dict['loss']
val_loss = history_dict['val_loss']

epochs = range(1, len(acc) + 1)
fig = plt.figure(figsize=(10, 6))
fig.tight_layout()

plt.subplot(2, 1, 1)
# r is for "solid red line"
plt.plot(epochs, loss, 'r', label='Training loss')
# b is for "solid blue line"
plt.plot(epochs, val_loss, 'b', label='Validation loss')
plt.title('Training and validation loss')
# plt.xlabel('Epochs')
plt.ylabel('Loss')
plt.legend()

plt.subplot(2, 1, 2)
plt.plot(epochs, acc, 'r', label='Training acc')
plt.plot(epochs, val_acc, 'b', label='Validation acc')
plt.title('Training and validation accuracy')
plt.xlabel('Epochs')
plt.ylabel('Accuracy')
plt.legend(loc='lower right')
dict_keys(['loss', 'binary_accuracy', 'val_loss', 'val_binary_accuracy'])
<matplotlib.legend.Legend at 0x7fee7cdb4450>
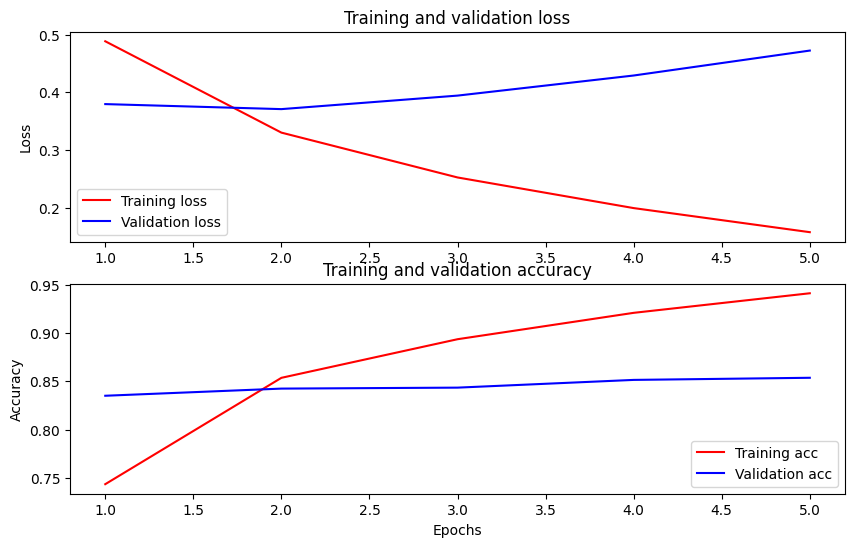
このプロットでは、赤い線はトレーニングの損失と精度を表し、青い線は検証の損失と精度を表しています。
推論のためにエクスポート
これで、後で使用するために微調整したモデルを保存するだけです。
dataset_name = 'imdb'
saved_model_path = './{}_bert'.format(dataset_name.replace('/', '_'))

classifier_model.save(saved_model_path, include_optimizer=False)
2021-12-01 12:26:06.207608: W tensorflow/python/util/util.cc:368] Sets are not currently considered sequences, but this may change in the future, so consider avoiding using them.
WARNING:absl:Found untraced functions such as restored_function_body, restored_function_body, restored_function_body, restored_function_body, restored_function_body while saving (showing 5 of 310). These functions will not be directly callable after loading.
モデルをリロードして、まだメモリに残っているモデルと並べて試してみましょう。
reloaded_model = tf.saved_model.load(saved_model_path)
ここでは、以下のexamples変数に追加するだけで、任意の文でモデルをテストできます。
def print_my_examples(inputs, results):
  result_for_printing = \
    [f'input: {inputs[i]:<30} : score: {results[i][0]:.6f}'
                         for i in range(len(inputs))]
  print(*result_for_printing, sep='\n')
  print()


examples = [
    'this is such an amazing movie!',  # this is the same sentence tried earlier
    'The movie was great!',
    'The movie was meh.',
    'The movie was okish.',
    'The movie was terrible...'
]

reloaded_results = tf.sigmoid(reloaded_model(tf.constant(examples)))
original_results = tf.sigmoid(classifier_model(tf.constant(examples)))

print('Results from the saved model:')
print_my_examples(examples, reloaded_results)
print('Results from the model in memory:')
print_my_examples(examples, original_results)
Results from the saved model:
input: this is such an amazing movie! : score: 0.999521
input: The movie was great!           : score: 0.997015
input: The movie was meh.             : score: 0.988535
input: The movie was okish.           : score: 0.079138
input: The movie was terrible...      : score: 0.001622

Results from the model in memory:
input: this is such an amazing movie! : score: 0.999521
input: The movie was great!           : score: 0.997015
input: The movie was meh.             : score: 0.988535
input: The movie was okish.           : score: 0.079138
input: The movie was terrible...      : score: 0.001622
あなたは上のモデルを使用したい場合はTFサービング、それはその名前の署名のうちの1つを介して、あなたのSavedModelを呼び出すことを覚えておいてください。 Pythonでは、次のようにテストできます。
serving_results = reloaded_model \
            .signatures['serving_default'](tf.constant(examples))

serving_results = tf.sigmoid(serving_results['classifier'])

print_my_examples(examples, serving_results)
input: this is such an amazing movie! : score: 0.999521
input: The movie was great!           : score: 0.997015
input: The movie was meh.             : score: 0.988535
input: The movie was okish.           : score: 0.079138
input: The movie was terrible...      : score: 0.001622
次のステップ
次のステップとして、あなたは試すことができTPUのチュートリアルにBERTを使用してGLUEタスクを解決し、あなたが複数の入力を使用する方法TPUやショーで実行されます。