
| | |  Lihat sumber di GitHub Lihat sumber di GitHub | | |
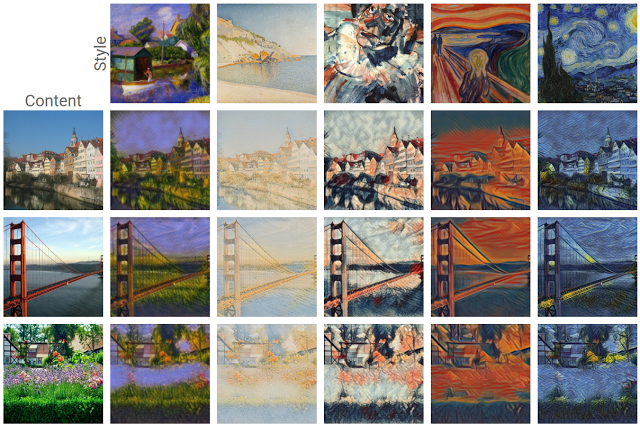
Salah satu perkembangan yang paling menarik dalam pembelajaran yang mendalam untuk keluar baru-baru ini adalah gaya artistik mentransfer , atau kemampuan untuk membuat gambar baru, yang dikenal sebagai bunga rampai , didasarkan pada dua gambar masukan: satu mewakili gaya artistik dan satu yang mewakili konten.
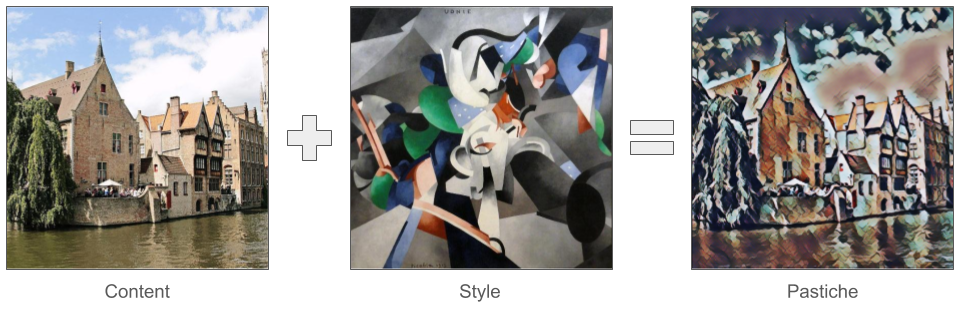
Dengan menggunakan teknik ini, kita dapat menghasilkan karya seni baru yang indah dalam berbagai gaya.
Jika Anda baru menggunakan TensorFlow Lite dan bekerja dengan Android, sebaiknya jelajahi contoh aplikasi berikut yang dapat membantu Anda memulai.
Jika Anda menggunakan platform selain Android atau iOS, atau Anda sudah akrab dengan TensorFlow Lite API , Anda dapat mengikuti tutorial ini untuk mempelajari bagaimana menerapkan pengalihan gaya pada setiap sepasang konten dan gambar gaya dengan pra-dilatih TensorFlow Lite model. Anda dapat menggunakan model untuk menambahkan transfer gaya ke aplikasi seluler Anda sendiri.
Model ini open-source di GitHub . Anda dapat melatih ulang model dengan parameter yang berbeda (mis. menambah bobot lapisan konten untuk membuat gambar keluaran lebih mirip gambar konten).
Memahami arsitektur model
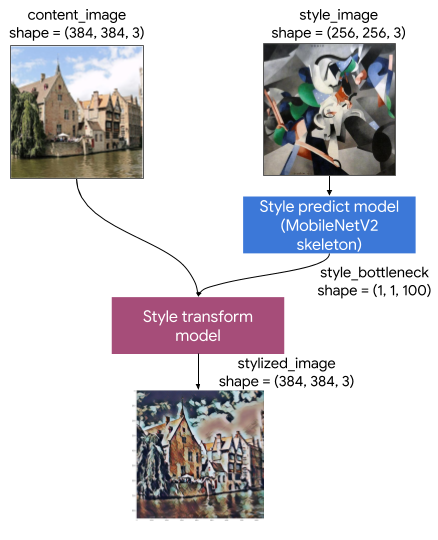
Model Artistic Style Transfer ini terdiri dari dua submodel:
- Gaya Prediciton Model: Sebuah MobilenetV2 berbasis jaringan syaraf yang mengambil gambar gaya masukan ke vektor gaya hambatan 100-dimensi.
- Gaya Transform Model: Sebuah jaringan saraf yang mengambil menerapkan vektor gaya hambatan untuk gambar konten dan menciptakan citra bergaya.
Jika aplikasi Anda hanya perlu mendukung kumpulan gambar gaya yang tetap, Anda dapat menghitung vektor bottleneck gayanya terlebih dahulu, dan mengecualikan Model Prediksi Gaya dari biner aplikasi Anda.
Mempersiapkan
Impor dependensi.
import tensorflow as tf
print(tf.__version__)
2.6.0
import IPython.display as display

import matplotlib.pyplot as plt
import matplotlib as mpl
mpl.rcParams['figure.figsize'] = (12,12)
mpl.rcParams['axes.grid'] = False

import numpy as np
import time
import functools
Unduh konten dan gambar gaya, serta model TensorFlow Lite yang telah dilatih sebelumnya.
content_path = tf.keras.utils.get_file('belfry.jpg','https://storage.googleapis.com/khanhlvg-public.appspot.com/arbitrary-style-transfer/belfry-2611573_1280.jpg')
style_path = tf.keras.utils.get_file('style23.jpg','https://storage.googleapis.com/khanhlvg-public.appspot.com/arbitrary-style-transfer/style23.jpg')

style_predict_path = tf.keras.utils.get_file('style_predict.tflite', 'https://tfhub.dev/google/lite-model/magenta/arbitrary-image-stylization-v1-256/int8/prediction/1?lite-format=tflite')
style_transform_path = tf.keras.utils.get_file('style_transform.tflite', 'https://tfhub.dev/google/lite-model/magenta/arbitrary-image-stylization-v1-256/int8/transfer/1?lite-format=tflite')
Downloading data from https://storage.googleapis.com/khanhlvg-public.appspot.com/arbitrary-style-transfer/belfry-2611573_1280.jpg
458752/458481 [==============================] - 0s 0us/step
466944/458481 [==============================] - 0s 0us/step
Downloading data from https://storage.googleapis.com/khanhlvg-public.appspot.com/arbitrary-style-transfer/style23.jpg
114688/108525 [===============================] - 0s 0us/step
122880/108525 [=================================] - 0s 0us/step
Downloading data from https://tfhub.dev/google/lite-model/magenta/arbitrary-image-stylization-v1-256/int8/prediction/1?lite-format=tflite
2834432/2828838 [==============================] - 0s 0us/step
2842624/2828838 [==============================] - 0s 0us/step
Downloading data from https://tfhub.dev/google/lite-model/magenta/arbitrary-image-stylization-v1-256/int8/transfer/1?lite-format=tflite
286720/284398 [==============================] - 0s 0us/step
294912/284398 [===============================] - 0s 0us/step
Pra-proses input
- Gambar konten dan gambar gaya harus berupa gambar RGB dengan nilai piksel berupa angka float32 antara [0..1].
- Ukuran gambar gaya harus (1, 256, 256, 3). Kami memotong gambar secara terpusat dan mengubah ukurannya.
- Gambar konten harus (1, 384, 384, 3). Kami memotong gambar secara terpusat dan mengubah ukurannya.
# Function to load an image from a file, and add a batch dimension.
def load_img(path_to_img):
  img = tf.io.read_file(path_to_img)
  img = tf.io.decode_image(img, channels=3)
  img = tf.image.convert_image_dtype(img, tf.float32)
  img = img[tf.newaxis, :]

  return img

# Function to pre-process by resizing an central cropping it.
def preprocess_image(image, target_dim):
  # Resize the image so that the shorter dimension becomes 256px.
  shape = tf.cast(tf.shape(image)[1:-1], tf.float32)
  short_dim = min(shape)
  scale = target_dim / short_dim
  new_shape = tf.cast(shape * scale, tf.int32)
  image = tf.image.resize(image, new_shape)

  # Central crop the image.
  image = tf.image.resize_with_crop_or_pad(image, target_dim, target_dim)

  return image

# Load the input images.
content_image = load_img(content_path)
style_image = load_img(style_path)

# Preprocess the input images.
preprocessed_content_image = preprocess_image(content_image, 384)
preprocessed_style_image = preprocess_image(style_image, 256)

print('Style Image Shape:', preprocessed_style_image.shape)
print('Content Image Shape:', preprocessed_content_image.shape)
Style Image Shape: (1, 256, 256, 3)
Content Image Shape: (1, 384, 384, 3)
Visualisasikan inputnya
def imshow(image, title=None):
  if len(image.shape) > 3:
    image = tf.squeeze(image, axis=0)

  plt.imshow(image)
  if title:
    plt.title(title)

plt.subplot(1, 2, 1)
imshow(preprocessed_content_image, 'Content Image')

plt.subplot(1, 2, 2)
imshow(preprocessed_style_image, 'Style Image')

Jalankan transfer gaya dengan TensorFlow Lite
Prediksi gaya
# Function to run style prediction on preprocessed style image.
def run_style_predict(preprocessed_style_image):
  # Load the model.
  interpreter = tf.lite.Interpreter(model_path=style_predict_path)

  # Set model input.
  interpreter.allocate_tensors()
  input_details = interpreter.get_input_details()
  interpreter.set_tensor(input_details[0]["index"], preprocessed_style_image)

  # Calculate style bottleneck.
  interpreter.invoke()
  style_bottleneck = interpreter.tensor(
      interpreter.get_output_details()[0]["index"]
      )()

  return style_bottleneck

# Calculate style bottleneck for the preprocessed style image.
style_bottleneck = run_style_predict(preprocessed_style_image)
print('Style Bottleneck Shape:', style_bottleneck.shape)
Style Bottleneck Shape: (1, 1, 1, 100)
Transformasi gaya
# Run style transform on preprocessed style image
def run_style_transform(style_bottleneck, preprocessed_content_image):
  # Load the model.
  interpreter = tf.lite.Interpreter(model_path=style_transform_path)

  # Set model input.
  input_details = interpreter.get_input_details()
  interpreter.allocate_tensors()

  # Set model inputs.
  interpreter.set_tensor(input_details[0]["index"], preprocessed_content_image)
  interpreter.set_tensor(input_details[1]["index"], style_bottleneck)
  interpreter.invoke()

  # Transform content image.
  stylized_image = interpreter.tensor(
      interpreter.get_output_details()[0]["index"]
      )()

  return stylized_image

# Stylize the content image using the style bottleneck.
stylized_image = run_style_transform(style_bottleneck, preprocessed_content_image)

# Visualize the output.
imshow(stylized_image, 'Stylized Image')

Pencampuran gaya
Kita dapat memadukan gaya gambar konten ke dalam output bergaya, yang pada gilirannya membuat output terlihat lebih seperti gambar konten.
# Calculate style bottleneck of the content image.
style_bottleneck_content = run_style_predict(
    preprocess_image(content_image, 256)
    )
# Define content blending ratio between [0..1].
# 0.0: 0% style extracts from content image.
# 1.0: 100% style extracted from content image.
content_blending_ratio = 0.5

# Blend the style bottleneck of style image and content image
style_bottleneck_blended = content_blending_ratio * style_bottleneck_content \
                           + (1 - content_blending_ratio) * style_bottleneck

# Stylize the content image using the style bottleneck.
stylized_image_blended = run_style_transform(style_bottleneck_blended,
                                             preprocessed_content_image)

# Visualize the output.
imshow(stylized_image_blended, 'Blended Stylized Image')

Tolok Ukur Kinerja
Nomor tolok ukur kinerja yang dihasilkan dengan alat yang dijelaskan di sini .
| Nama model | Ukuran model | Perangkat | NNAPI | CPU | GPU |
|---|---|---|---|---|---|
| Model prediksi gaya (int8) | 2,8 Mb | Piksel 3 (Android 10) | 142ms | 14ms | |
| Piksel 4 (Android 10) | 5.2ms | 6.7ms | |||
| iPhone XS (iOS 12.4.1) | 10.7ms | ||||
| Model transformasi gaya (int8) | 0,2 Mb | Piksel 3 (Android 10) | 540ms | ||
| Piksel 4 (Android 10) | 405ms | ||||
| iPhone XS (iOS 12.4.1) | 251ms | ||||
| Model prediksi gaya (float16) | 4,7 Mb | Piksel 3 (Android 10) | 86ms | 28ms | 9.1ms |
| Piksel 4 (Android 10) | 32ms | 12ms | 10ms | ||
| Model transfer gaya (float16) | 0,4 Mb | Piksel 3 (Android 10) | 1095ms | 545ms | 42ms |
| Piksel 4 (Android 10) | 603ms | 377ms | 42ms |
* 4 benang digunakan.
** 2 utas di iPhone untuk kinerja terbaik.