
 GitHub でソースを表示 GitHub でソースを表示 |
最近開発されたディープラーニングの中で最も面白い開発の 1 つとして、芸術的スタイル転移または パスティーシュ(模倣)として知られる能力があります。これは芸術的スタイルを表現する画像とコンテンツを表現する画像から成る 2 つの入力画像に基づいて新しい画像を創造するものです。
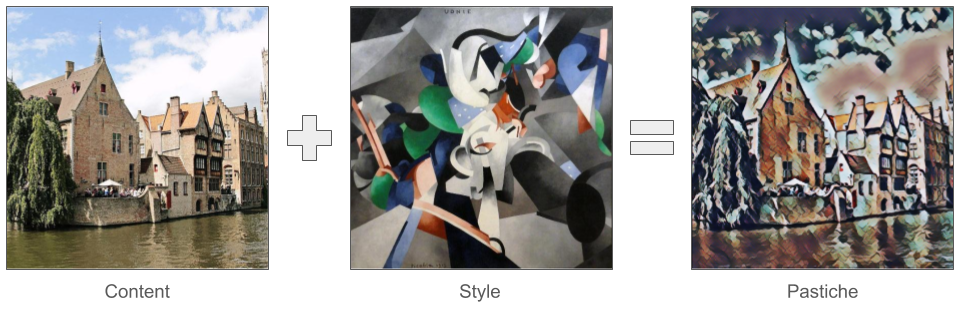
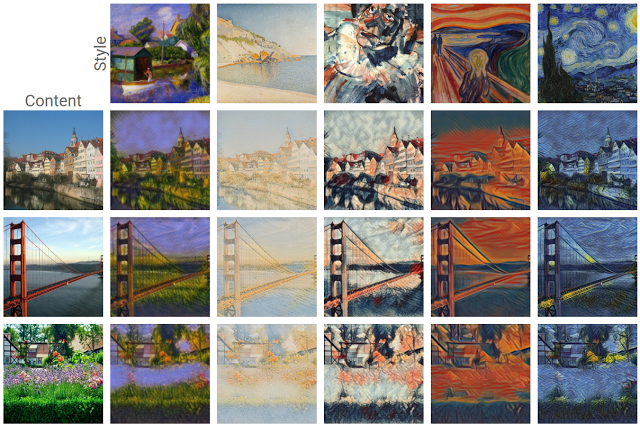
この手法を使用すると、様々なスタイルの美しく新しい作品を生成することができます。
TensorFlow Lite を初めて使用する場合、Android を使用する場合は、以下のサンプルアプリをご覧ください。
Android や iOS 以外のプラットフォームを使用する場合、または、すでに TensorFlow Lite API に精通している場合は、このチュートリアルに従い、事前トレーニング済みの TensorFlow Lite モデル を使用して、任意のコンテンツ画像とスタイル画像のペアにスタイル転移を適用する方法を学ぶことができます。モデルを使用して、独自のモバイルアプリにスタイル転移を追加することができます。
モデルは GitHub でオープンソース化されています。異なるパラメータを使用してモデルの再トレーニング(例えば、コンテンツレイヤーの重みを増やしてよりコンテンツ画像に近い出力画像にするなど)が可能です。
モデルアーキテクチャの理解
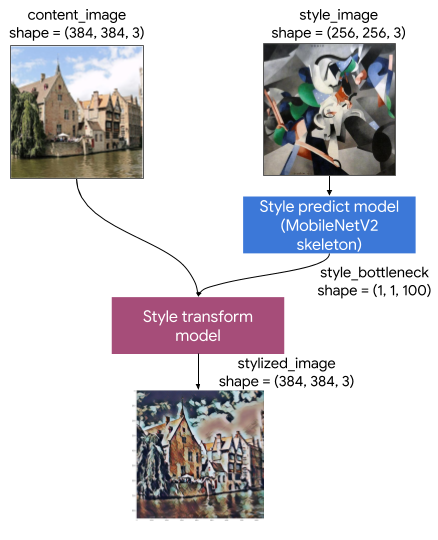
この芸術的スタイル転移モデルは、2 つのサブモデルで構成されています。
- スタイル予測モデル: 入力スタイル画像を 100 次元スタイルのボトルネックベクトルに変換する MobilenetV2 ベースのニューラルネットワーク。
- スタイル変換モデル: コンテンツ画像にスタイルのボトルネックベクトルを適用し、スタイル化された画像を生成するニューラルネットワーク。
アプリが特定のスタイル画像セットのみをサポートする必要がある場合は、それらのスタイルのボトルネックベクトルを事前に計算して、そのスタイル予測モデルをアプリのバイナリから除外します。
セットアップ
依存関係をインポートします。
import tensorflow as tf
print(tf.__version__)
import IPython.display as display

import matplotlib.pyplot as plt
import matplotlib as mpl
mpl.rcParams['figure.figsize'] = (12,12)
mpl.rcParams['axes.grid'] = False

import numpy as np
import time
import functools
コンテンツ画像とスタイル画像、および事前トレーニング済みの TensorFlow Lite モデルをダウンロードします。
content_path = tf.keras.utils.get_file('belfry.jpg','https://storage.googleapis.com/khanhlvg-public.appspot.com/arbitrary-style-transfer/belfry-2611573_1280.jpg')
style_path = tf.keras.utils.get_file('style23.jpg','https://storage.googleapis.com/khanhlvg-public.appspot.com/arbitrary-style-transfer/style23.jpg')

style_predict_path = tf.keras.utils.get_file('style_predict.tflite', 'https://tfhub.dev/google/lite-model/magenta/arbitrary-image-stylization-v1-256/int8/prediction/1?lite-format=tflite')
style_transform_path = tf.keras.utils.get_file('style_transform.tflite', 'https://tfhub.dev/google/lite-model/magenta/arbitrary-image-stylization-v1-256/int8/transfer/1?lite-format=tflite')
入力を前処理する
- コンテンツ画像とスタイル画像は RGB 画像である必要があります。ピクセル値は [0..1] 間の float32 の数値です。
- スタイル画像のサイズは (1, 256, 256, 3) である必要があります。画像を中央でクロップしてサイズを変更します。
- コンテンツ画像は (1, 384, 384, 3) である必要があります。画像を中央でクロップしてサイズを変更します。
# Function to load an image from a file, and add a batch dimension.
def load_img(path_to_img):
  img = tf.io.read_file(path_to_img)
  img = tf.io.decode_image(img, channels=3)
  img = tf.image.convert_image_dtype(img, tf.float32)
  img = img[tf.newaxis, :]

  return img

# Function to pre-process by resizing an central cropping it.
def preprocess_image(image, target_dim):
  # Resize the image so that the shorter dimension becomes 256px.
  shape = tf.cast(tf.shape(image)[1:-1], tf.float32)
  short_dim = min(shape)
  scale = target_dim / short_dim
  new_shape = tf.cast(shape * scale, tf.int32)
  image = tf.image.resize(image, new_shape)

  # Central crop the image.
  image = tf.image.resize_with_crop_or_pad(image, target_dim, target_dim)

  return image

# Load the input images.
content_image = load_img(content_path)
style_image = load_img(style_path)

# Preprocess the input images.
preprocessed_content_image = preprocess_image(content_image, 384)
preprocessed_style_image = preprocess_image(style_image, 256)

print('Style Image Shape:', preprocessed_style_image.shape)
print('Content Image Shape:', preprocessed_content_image.shape)
入力を可視化する
def imshow(image, title=None):
  if len(image.shape) > 3:
    image = tf.squeeze(image, axis=0)

  plt.imshow(image)
  if title:
    plt.title(title)

plt.subplot(1, 2, 1)
imshow(preprocessed_content_image, 'Content Image')

plt.subplot(1, 2, 2)
imshow(preprocessed_style_image, 'Style Image')
TensorFlow Lite でスタイル転移を実行する
スタイルを予測する
# Function to run style prediction on preprocessed style image.
def run_style_predict(preprocessed_style_image):
  # Load the model.
  interpreter = tf.lite.Interpreter(model_path=style_predict_path)

  # Set model input.
  interpreter.allocate_tensors()
  input_details = interpreter.get_input_details()
  interpreter.set_tensor(input_details[0]["index"], preprocessed_style_image)

  # Calculate style bottleneck.
  interpreter.invoke()
  style_bottleneck = interpreter.tensor(
      interpreter.get_output_details()[0]["index"]
      )()

  return style_bottleneck

# Calculate style bottleneck for the preprocessed style image.
style_bottleneck = run_style_predict(preprocessed_style_image)
print('Style Bottleneck Shape:', style_bottleneck.shape)
スタイルを変換する
# Run style transform on preprocessed style image
def run_style_transform(style_bottleneck, preprocessed_content_image):
  # Load the model.
  interpreter = tf.lite.Interpreter(model_path=style_transform_path)

  # Set model input.
  input_details = interpreter.get_input_details()
  interpreter.allocate_tensors()

  # Set model inputs.
  interpreter.set_tensor(input_details[0]["index"], preprocessed_content_image)
  interpreter.set_tensor(input_details[1]["index"], style_bottleneck)
  interpreter.invoke()

  # Transform content image.
  stylized_image = interpreter.tensor(
      interpreter.get_output_details()[0]["index"]
      )()

  return stylized_image

# Stylize the content image using the style bottleneck.
stylized_image = run_style_transform(style_bottleneck, preprocessed_content_image)

# Visualize the output.
imshow(stylized_image, 'Stylized Image')
スタイルをブレンドする
コンテンツ画像のスタイルをスタイル化された出力にブレンドさせることができます。こうすると、出力がよりコンテンツ画像のように見えるようになります。
# Calculate style bottleneck of the content image.
style_bottleneck_content = run_style_predict(
    preprocess_image(content_image, 256)
    )
# Define content blending ratio between [0..1].
# 0.0: 0% style extracts from content image.
# 1.0: 100% style extracted from content image.
content_blending_ratio = 0.5

# Blend the style bottleneck of style image and content image
style_bottleneck_blended = content_blending_ratio * style_bottleneck_content \
                           + (1 - content_blending_ratio) * style_bottleneck

# Stylize the content image using the style bottleneck.
stylized_image_blended = run_style_transform(style_bottleneck_blended,
                                             preprocessed_content_image)

# Visualize the output.
imshow(stylized_image_blended, 'Blended Stylized Image')
パフォーマンスベンチマーク
パフォーマンスベンチマークの数値は、ここで説明するツールで生成されます。
| モデル名 | モデルサイズ | デバイス | NNAPI | CPU | GPU |
|---|---|---|---|---|---|
| スタイル予測モデル (int8) | 2.8 Mb | Pixel 3 (Android 10) | 142ms | 14ms* | |
| Pixel 4 (Android 10) | 5.2ms | 6.7ms* | |||
| iPhone XS (iOS 12.4.1) | 10.7ms** | ||||
| スタイル変換モデル (int8) | 0.2 Mb | Pixel 3 (Android 10) | 540ms* | ||
| Pixel 4 (Android 10) | 405ms* | ||||
| iPhone XS (iOS 12.4.1) | 251ms** | ||||
| スタイル予測モデル (float16) | 4.7 Mb | Pixel 3 (Android 10) | 86ms | 28ms* | 9.1ms |
| Pixel 4 (Android 10) | 32ms | 12ms* | 10ms | ||
| スタイル予測モデル (float16) | 0.4 Mb | Pixel 3 (Android 10) | 1095ms | 545ms* | 42ms |
| Pixel 4 (Android 10) | 603ms | 377ms* | 42ms |
** 4 つのスレッドを使用。*
** 4 つのスレッドを使用。
** 最高のパフォーマンス結果を得るために、iPhone では 2 つのスレッドを使用。*