
 GitHub에서 소스 보기 GitHub에서 소스 보기 |
머신러닝 TensorFlow를 수행하려면 모델을 정의, 저장 및 복원해야 할 수 있습니다.
모델은 추상적으로 다음과 같습니다.
- 텐서에서 무언가를 계산하는 함수(정방향 전달)
- 훈련에 대한 응답으로 업데이트할 수 있는 일부 변수
이 가이드에서는 Keras의 표면 아래로 이동하여 TensorFlow 모델이 어떻게 정의되는지 확인합니다. TensorFlow가 변수와 모델을 수집하는 방법과 변수와 모델이 저장 및 복원되는 방법을 살펴봅니다.
참고: Keras를 즉시 시작하려면 Keras 가이드 모음을 참조하세요.
설정
import tensorflow as tf
from datetime import datetime

%load_ext tensorboard
2022-12-14 21:05:25.152884: W tensorflow/compiler/xla/stream_executor/platform/default/dso_loader.cc:64] Could not load dynamic library 'libnvinfer.so.7'; dlerror: libnvinfer.so.7: cannot open shared object file: No such file or directory
2022-12-14 21:05:25.152982: W tensorflow/compiler/xla/stream_executor/platform/default/dso_loader.cc:64] Could not load dynamic library 'libnvinfer_plugin.so.7'; dlerror: libnvinfer_plugin.so.7: cannot open shared object file: No such file or directory
2022-12-14 21:05:25.152992: W tensorflow/compiler/tf2tensorrt/utils/py_utils.cc:38] TF-TRT Warning: Cannot dlopen some TensorRT libraries. If you would like to use Nvidia GPU with TensorRT, please make sure the missing libraries mentioned above are installed properly.
TensorFlow에서 모델 및 레이어 정의하기
대부분의 모델은 레이어로 구성됩니다. 레이어는 재사용할 수 있고 훈련 가능한 변수를 가진, 알려진 수학적 구조의 함수입니다. TensorFlow에서 Keras 또는 Sonnet과 같은 레이어 및 모델의 상위 수준 구현 대부분은 같은 기본 클래스인 tf.Module를 기반으로 구축됩니다.
다음은 스칼라 텐서에서 동작하는 매우 간단한 tf.Module의 예입니다.
class SimpleModule(tf.Module):
  def __init__(self, name=None):
    super().__init__(name=name)
    self.a_variable = tf.Variable(5.0, name="train_me")
    self.non_trainable_variable = tf.Variable(5.0, trainable=False, name="do_not_train_me")
  def __call__(self, x):
    return self.a_variable * x + self.non_trainable_variable

simple_module = SimpleModule(name="simple")

simple_module(tf.constant(5.0))
<tf.Tensor: shape=(), dtype=float32, numpy=30.0>
모듈과 더 나아가 레이어는 "객체"에 대한 딥 러닝 용어입니다. 내부 상태와 해당 상태를 사용하는 메서드가 있습니다.
Python callable처럼 동작하는 것 외에는__call__에 특별한 점은 없습니다. 원하는 함수로 모델을 호출할 수 있습니다.
미세 조정 중 레이어 및 변수 고정을 포함하여 어떤 이유로든 변수의 훈련 가능성을 설정 및 해제할 수 있습니다.
참고: "tf.Module은 tf.keras.layers.Layer 및 tf.keras.Model의 기본 클래스이므로 여기에 표시되는 모든 항목도 Keras에 적용됩니다. 역사적 호환성의 이유로 Keras 레이어는 모듈에서 변수를 수집하지 않으므로 모델은 모듈만 사용하거나 Keras 레이어만 사용해야 합니다. 그러나 아래 표시된 변수 검사 메서드는 어느 경우에나 모두 같습니다.
tf.Module을 하위 클래스화함으로써 이 객체의 속성에 할당된 tf.Variable 또는 tf.Module 인스턴스가 자동으로 수집됩니다. 이를 통해 변수를 저장 및 로드할 수 있으며 tf.Module 모음을 만들 수도 있습니다.
# All trainable variables
print("trainable variables:", simple_module.trainable_variables)
# Every variable
print("all variables:", simple_module.variables)
trainable variables: (<tf.Variable 'train_me:0' shape=() dtype=float32, numpy=5.0>,)
all variables: (<tf.Variable 'train_me:0' shape=() dtype=float32, numpy=5.0>, <tf.Variable 'do_not_train_me:0' shape=() dtype=float32, numpy=5.0>)
다음은 모듈로 구성된 2개 레이어 선형 레이어 모델의 예입니다.
먼저 밀집 (선형) 레이어입니다.
class Dense(tf.Module):
  def __init__(self, in_features, out_features, name=None):
    super().__init__(name=name)
    self.w = tf.Variable(
      tf.random.normal([in_features, out_features]), name='w')
    self.b = tf.Variable(tf.zeros([out_features]), name='b')
  def __call__(self, x):
    y = tf.matmul(x, self.w) + self.b
    return tf.nn.relu(y)
다음은 두 개의 레이어 인스턴스를 만들고 적용하는 전체 모델입니다.
class SequentialModule(tf.Module):
  def __init__(self, name=None):
    super().__init__(name=name)

    self.dense_1 = Dense(in_features=3, out_features=3)
    self.dense_2 = Dense(in_features=3, out_features=2)

  def __call__(self, x):
    x = self.dense_1(x)
    return self.dense_2(x)

# You have made a model!
my_model = SequentialModule(name="the_model")

# Call it, with random results
print("Model results:", my_model(tf.constant([[2.0, 2.0, 2.0]])))
Model results: tf.Tensor([[0. 0.]], shape=(1, 2), dtype=float32)
tf.Module 인스턴스는 tf.Variable 또는 할당된 tf.Module 인스턴스를 재귀적으로 자동으로 수집합니다. 이를 통해 단일 모델 인스턴스로 tf.Module 모음을 관리하고 전체 모델을 저장 및 로드할 수 있습니다.
print("Submodules:", my_model.submodules)
Submodules: (<__main__.Dense object at 0x7fc324244640>, <__main__.Dense object at 0x7fc21807c8e0>)
for var in my_model.variables:
  print(var, "\n")
<tf.Variable 'b:0' shape=(3,) dtype=float32, numpy=array([0., 0., 0.], dtype=float32)>

<tf.Variable 'w:0' shape=(3, 3) dtype=float32, numpy=
array([[-0.22808331,  0.29274654,  0.6080226 ],
       [-1.1041229 , -0.5975617 , -0.7721161 ],
       [ 0.4206435 ,  0.31748644,  0.34665376]], dtype=float32)>

<tf.Variable 'b:0' shape=(2,) dtype=float32, numpy=array([0., 0.], dtype=float32)>

<tf.Variable 'w:0' shape=(3, 2) dtype=float32, numpy=
array([[-1.2076675 ,  1.7211282 ],
       [-0.22784151,  0.5912422 ],
       [-0.9780839 , -1.3760505 ]], dtype=float32)>
변수 생성 연기하기
여기에서 레이어에 대한 입력 및 출력 크기를 모두 정의해야 한다는 것을 알 수 있습니다. w 변수가 알려진 형상을 가지므로 할당할 수 있습니다.
특정 입력 형상으로 모듈이 처음 호출될 때까지 변수 생성을 연기하면 입력 크기를 미리 지정할 필요가 없습니다.
class FlexibleDenseModule(tf.Module):
  # Note: No need for `in_features`
  def __init__(self, out_features, name=None):
    super().__init__(name=name)
    self.is_built = False
    self.out_features = out_features

  def __call__(self, x):
    # Create variables on first call.
    if not self.is_built:
      self.w = tf.Variable(
        tf.random.normal([x.shape[-1], self.out_features]), name='w')
      self.b = tf.Variable(tf.zeros([self.out_features]), name='b')
      self.is_built = True

    y = tf.matmul(x, self.w) + self.b
    return tf.nn.relu(y)
# Used in a module
class MySequentialModule(tf.Module):
  def __init__(self, name=None):
    super().__init__(name=name)

    self.dense_1 = FlexibleDenseModule(out_features=3)
    self.dense_2 = FlexibleDenseModule(out_features=2)

  def __call__(self, x):
    x = self.dense_1(x)
    return self.dense_2(x)

my_model = MySequentialModule(name="the_model")
print("Model results:", my_model(tf.constant([[2.0, 2.0, 2.0]])))
Model results: tf.Tensor([[0. 0.]], shape=(1, 2), dtype=float32)
이러한 유연성으로 인해 TensorFlow 레이어는 종종 입력 및 출력 크기가 아닌 tf.keras.layers.Dense에서와 같이 출력의 형상만 지정하면 됩니다.
가중치 저장하기
tf.Module을 checkpoint와 SavedModel로 모두 저장할 수 있습니다.
체크포인트는 단지 가중치(즉, 모듈 및 하위 모듈 내부의 변수 세트 값)입니다.
chkp_path = "my_checkpoint"
checkpoint = tf.train.Checkpoint(model=my_model)
checkpoint.write(chkp_path)
'my_checkpoint'
체크포인트는 데이터 자체와 메타데이터용 인덱스 파일이라는 두 가지 종류의 파일로 구성됩니다. 인덱스 파일은 실제로 저장된 항목과 체크포인트의 번호를 추적하는 반면 체크포인트 데이터에는 변수 값과 해당 속성 조회 경로가 포함됩니다.
ls my_checkpoint*my_checkpoint.data-00000-of-00001 my_checkpoint.index
체크포인트 내부를 살펴보면 전체 변수 모음이 저장되고 변수 모음이 포함된 Python 객체별로 정렬되어 있는지 확인할 수 있습니다.
tf.train.list_variables(chkp_path)
[('_CHECKPOINTABLE_OBJECT_GRAPH', []),
 ('model/dense_1/b/.ATTRIBUTES/VARIABLE_VALUE', [3]),
 ('model/dense_1/w/.ATTRIBUTES/VARIABLE_VALUE', [3, 3]),
 ('model/dense_2/b/.ATTRIBUTES/VARIABLE_VALUE', [2]),
 ('model/dense_2/w/.ATTRIBUTES/VARIABLE_VALUE', [3, 2])]
분산 (다중 머신) 훈련 중에 변수 모음이 샤딩될 수 있으므로 번호가 매겨집니다(예: '00000-of-00001'). 하지만 이 경우에는 샤드가 하나만 있습니다.
모델을 다시 로드하면 Python 객체의 값을 덮어씁니다.
new_model = MySequentialModule()
new_checkpoint = tf.train.Checkpoint(model=new_model)
new_checkpoint.restore("my_checkpoint")

# Should be the same result as above
new_model(tf.constant([[2.0, 2.0, 2.0]]))
<tf.Tensor: shape=(1, 2), dtype=float32, numpy=array([[0., 0.]], dtype=float32)>
참고: 체크포인트는 긴 훈련 워크플로의 핵심이므로 tf.checkpoint.CheckpointManager는 체크포인트 관리를 훨씬 쉽게 만들어 주는 도우미 클래스입니다. 자세한 내용은 가이드를 참조하세요.
함수 저장하기
TensorFlow는 TensorFlow Serving 및 TensorFlow Lite에서와 같이 원래 Python 객체 없이 모델을 실행할 수 있으며 TensorFlow Hub에서 훈련된 모델을 다운로드하는 경우에도 실행할 수 있습니다.
TensorFlow는 Python에 설명된 계산을 수행하는 방법을 알아야 하지만 원본 코드는 없습니다. 이를 위해 그래프 및 함수 소개 가이드에 설명된 그래프를 만들 수 있습니다.
이 그래프에는 함수를 구현하는 연산 또는 ops가 포함됩니다.
이 코드가 그래프로 실행되어야 함을 나타내기 위해 @tf.function 데코레이터를 추가하여 위 모델에서 그래프를 정의할 수 있습니다.
class MySequentialModule(tf.Module):
  def __init__(self, name=None):
    super().__init__(name=name)

    self.dense_1 = Dense(in_features=3, out_features=3)
    self.dense_2 = Dense(in_features=3, out_features=2)

  @tf.function
  def __call__(self, x):
    x = self.dense_1(x)
    return self.dense_2(x)

# You have made a model with a graph!
my_model = MySequentialModule(name="the_model")
여러분이 만든 모듈은 이전과 똑같이 동작합니다. 함수에 전달된 각 고유 서명은 별도의 그래프를 생성합니다. 자세한 내용은 그래프 및 함수 소개 가이드를 참조하세요.
print(my_model([[2.0, 2.0, 2.0]]))
print(my_model([[[2.0, 2.0, 2.0], [2.0, 2.0, 2.0]]]))
tf.Tensor([[0.        5.7581444]], shape=(1, 2), dtype=float32)
tf.Tensor(
[[[0.        5.7581444]
  [0.        5.7581444]]], shape=(1, 2, 2), dtype=float32)
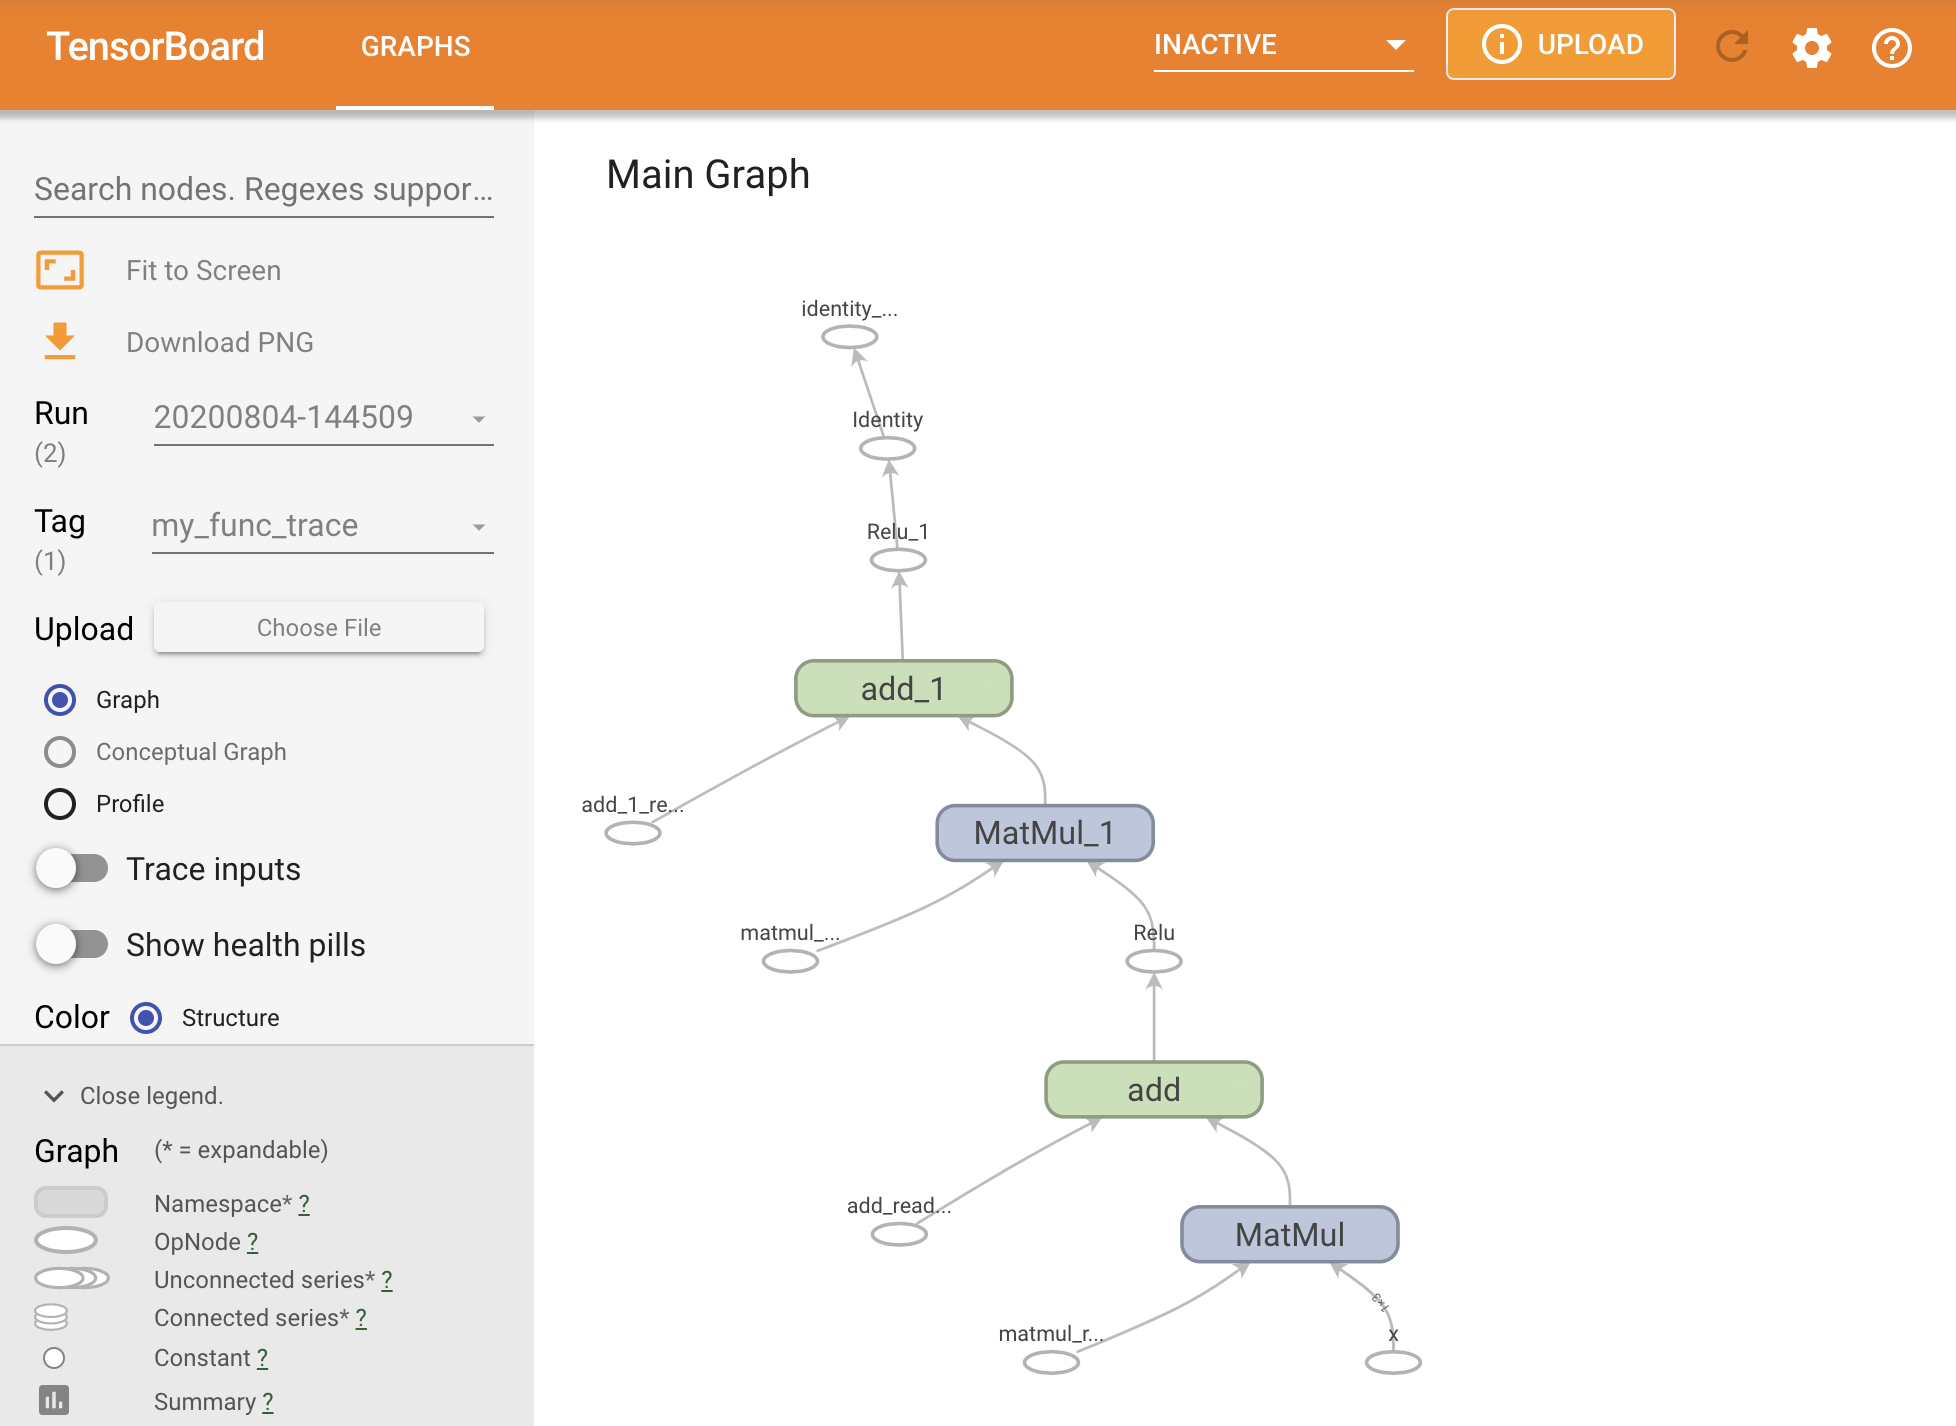
TensorBoard 요약 내에서 그래프를 추적하여 그래프를 시각화할 수 있습니다.
# Set up logging.
stamp = datetime.now().strftime("%Y%m%d-%H%M%S")
logdir = "logs/func/%s" % stamp
writer = tf.summary.create_file_writer(logdir)

# Create a new model to get a fresh trace
# Otherwise the summary will not see the graph.
new_model = MySequentialModule()

# Bracket the function call with
# tf.summary.trace_on() and tf.summary.trace_export().
tf.summary.trace_on(graph=True)
tf.profiler.experimental.start(logdir)
# Call only one tf.function when tracing.
z = print(new_model(tf.constant([[2.0, 2.0, 2.0]])))
with writer.as_default():
  tf.summary.trace_export(
      name="my_func_trace",
      step=0,
      profiler_outdir=logdir)
2022-12-14 21:05:30.274075: W tensorflow/compiler/xla/stream_executor/platform/default/dso_loader.cc:64] Could not load dynamic library 'libcupti.so.11.2'; dlerror: libcupti.so.11.2: cannot open shared object file: No such file or directory
tf.Tensor([[5.365949  0.5893463]], shape=(1, 2), dtype=float32)
Tensorboard를 실행하여 결과 추적을 확인합니다.
#docs_infra: no_execute
%tensorboard --logdir logs/func
SavedModel 생성하기
완전히 훈련된 모델을 공유하는 권장 방법은 SavedModel을 사용하는 것입니다. SavedModel에는 함수 모음과 가중치 모음이 모두 포함됩니다.
다음과 같이 방금 학습한 모델을 저장할 수 있습니다.
tf.saved_model.save(my_model, "the_saved_model")
INFO:tensorflow:Assets written to: the_saved_model/assets
# Inspect the SavedModel in the directoryls -l the_saved_model
total 28
drwxr-sr-x 2 kbuilder kokoro  4096 Dec 14 21:05 assets
-rw-rw-r-- 1 kbuilder kokoro    55 Dec 14 21:05 fingerprint.pb
-rw-rw-r-- 1 kbuilder kokoro 14672 Dec 14 21:05 saved_model.pb
drwxr-sr-x 2 kbuilder kokoro  4096 Dec 14 21:05 variables
# The variables/ directory contains a checkpoint of the variablesls -l the_saved_model/variables
total 8
-rw-rw-r-- 1 kbuilder kokoro 490 Dec 14 21:05 variables.data-00000-of-00001
-rw-rw-r-- 1 kbuilder kokoro 356 Dec 14 21:05 variables.index
saved_model.pb 파일은 함수형 tf.Graph를 설명하는 프로토콜 버퍼입니다.
모델과 레이어는 실제로 이 표현을 생성한 클래스의 인스턴스를 만들지 않고도 이 표현에서 로드할 수 있습니다. 이는 대규모 또는 에지 기기에서 제공하는 것과 같이 Python 인터프리터가 없거나 또는 원하지 않는 상황 또는 원래 Python 코드를 사용할 수 없거나 사용하는 것이 실용적이지 않은 상황에서 바람직합니다.
모델을 새 객체로 로드할 수 있습니다.
new_model = tf.saved_model.load("the_saved_model")
저장된 모델을 로드하여 생성된 new_model은 클래스 지식이 없는 내부 TensorFlow 사용자 객체입니다. SequentialModule 유형이 아닙니다.
isinstance(new_model, SequentialModule)
False
이 새 모델은 이미 정의된 입력 서명에서 동작합니다. 이와 같이 복원된 모델에 더 많은 서명을 추가할 수 없습니다.
print(my_model([[2.0, 2.0, 2.0]]))
print(my_model([[[2.0, 2.0, 2.0], [2.0, 2.0, 2.0]]]))
tf.Tensor([[0.        5.7581444]], shape=(1, 2), dtype=float32)
tf.Tensor(
[[[0.        5.7581444]
  [0.        5.7581444]]], shape=(1, 2, 2), dtype=float32)
따라서, SavedModel을 사용하면 tf.Module을 사용하여 TensorFlow 가중치와 그래프를 저장한 다음 다시 로드할 수 있습니다.
Keras 모델 및 레이어
이 시점까지 Keras에 대한 언급이 없습니다. tf.Module 위에 고유한 상위 수준 API를 빌드할 수 있습니다.
이 섹션에서는 Keras가 tf.Module을 사용하는 방법을 살펴봅니다. Keras 모델에 대한 전체 사용자 가이드는 Keras 가이드에서 찾을 수 있습니다.
Keras 레이어
tf.keras.layers.Layer는 모든 Keras 레이어의 기본 클래스이며 tf.Module에서 상속합니다.
부모를 교체한 다음 __call__을 call로 변경하여 모듈을 Keras 레이어로 변환할 수 있습니다.
class MyDense(tf.keras.layers.Layer):
  # Adding **kwargs to support base Keras layer arguments
  def __init__(self, in_features, out_features, **kwargs):
    super().__init__(**kwargs)

    # This will soon move to the build step; see below
    self.w = tf.Variable(
      tf.random.normal([in_features, out_features]), name='w')
    self.b = tf.Variable(tf.zeros([out_features]), name='b')
  def call(self, x):
    y = tf.matmul(x, self.w) + self.b
    return tf.nn.relu(y)

simple_layer = MyDense(name="simple", in_features=3, out_features=3)
Keras 레이어에는 다음 섹션에서 설명하는 몇 가지 부기(bookkeeping)를 수행한 다음 call()을 호출하는 고유한 __call__이 있습니다. 기능에 변화가 없는 것을 알 수 있습니다.
simple_layer([[2.0, 2.0, 2.0]])
<tf.Tensor: shape=(1, 3), dtype=float32, numpy=array([[2.7910495, 7.292308 , 0. ]], dtype=float32)>
build 단계
앞서 언급했듯이, 입력 형상이 확실해질 때까지 변수를 생성하기 위해 기다리는 것이 많은 경우 편리합니다.
Keras 레이어에는 레이어를 정의하는 방법에 더 많은 유연성을 제공하는 추가 수명 주기 단계가 있고, build 함수에서 정의됩니다.
build는 정확히 한 번만 호출되며 입력 형상으로 호출됩니다. 일반적으로 변수(가중치)를 만드는 데 사용됩니다.
위의 MyDense 레이어를 입력 크기에 맞게 다시 작성할 수 있습니다.
class FlexibleDense(tf.keras.layers.Layer):
  # Note the added `**kwargs`, as Keras supports many arguments
  def __init__(self, out_features, **kwargs):
    super().__init__(**kwargs)
    self.out_features = out_features

  def build(self, input_shape):  # Create the state of the layer (weights)
    self.w = tf.Variable(
      tf.random.normal([input_shape[-1], self.out_features]), name='w')
    self.b = tf.Variable(tf.zeros([self.out_features]), name='b')

  def call(self, inputs):  # Defines the computation from inputs to outputs
    return tf.matmul(inputs, self.w) + self.b

# Create the instance of the layer
flexible_dense = FlexibleDense(out_features=3)
이 시점에서는 모델이 빌드되지 않았으므로 변수가 없습니다.
flexible_dense.variables
[]
함수를 호출하면 적절한 크기의 변수가 할당됩니다.
# Call it, with predictably random results
print("Model results:", flexible_dense(tf.constant([[2.0, 2.0, 2.0], [3.0, 3.0, 3.0]])))
Model results: tf.Tensor(
[[-2.8120208  2.4438493  1.9408028]
 [-4.2180314  3.6657739  2.9112043]], shape=(2, 3), dtype=float32)
flexible_dense.variables
[<tf.Variable 'flexible_dense/w:0' shape=(3, 3) dtype=float32, numpy=
 array([[-0.93394387,  0.07000035,  0.50755775],
        [ 0.27968523,  0.8088689 ,  0.70035136],
        [-0.7517518 ,  0.34305546, -0.23750767]], dtype=float32)>,
 <tf.Variable 'flexible_dense/b:0' shape=(3,) dtype=float32, numpy=array([0., 0., 0.], dtype=float32)>]
build는 한 번만 호출되므로 입력 형상이 레이어의 변수와 호환되지 않으면 입력이 거부됩니다.
try:
  print("Model results:", flexible_dense(tf.constant([[2.0, 2.0, 2.0, 2.0]])))
except tf.errors.InvalidArgumentError as e:
  print("Failed:", e)
Failed: Exception encountered when calling layer 'flexible_dense' (type FlexibleDense).

{ {function_node __wrapped__MatMul_device_/job:localhost/replica:0/task:0/device:GPU:0} } Matrix size-incompatible: In[0]: [1,4], In[1]: [3,3] [Op:MatMul]

Call arguments received by layer 'flexible_dense' (type FlexibleDense):
  • inputs=tf.Tensor(shape=(1, 4), dtype=float32)
Keras 레이어에는 다음과 같은 더 많은 추가 기능이 있습니다.
- 선택적 손실
- 메트릭 지원
- 훈련 및 추론 사용을 구분하기 위한 선택적
training인수에 대한 기본 지원 - Python에서 모델 복제를 허용하도록 구성을 정확하게 저장할 수 있는
get_config및from_config메서드
사용자 정의 레이어에 대한 전체 가이드에서 해당 부분을 읽어보세요.
Keras 모델
모델을 중첩된 Keras 레이어로 정의할 수 있습니다.
그러나 Keras는 tf.keras.Model이라는 완전한 기능을 갖춘 모델 클래스도 제공합니다. tf.keras.layers.Layer에서 상속되므로 Keras 모델은 Keras 레이어와 마찬가지로 사용, 중첩 및 저장할 수 있습니다. Keras 모델에는 쉽게 훈련, 평가, 로드 및 저장하고, 심지어 여러 머신에서 훈련할 수 있는 추가 기능이 있습니다.
거의 동일한 코드로 위에서 SequentialModule을 정의할 수 있으며, 다시 __call__을 call() 로 변환하고 부모를 변경할 수 있습니다.
class MySequentialModel(tf.keras.Model):
  def __init__(self, name=None, **kwargs):
    super().__init__(**kwargs)

    self.dense_1 = FlexibleDense(out_features=3)
    self.dense_2 = FlexibleDense(out_features=2)
  def call(self, x):
    x = self.dense_1(x)
    return self.dense_2(x)

# You have made a Keras model!
my_sequential_model = MySequentialModel(name="the_model")

# Call it on a tensor, with random results
print("Model results:", my_sequential_model(tf.constant([[2.0, 2.0, 2.0]])))
Model results: tf.Tensor([[ 0.3738457 -3.542218 ]], shape=(1, 2), dtype=float32)
추적 변수 및 하위 모듈을 포함하여 같은 기능을 모두 사용할 수 있습니다.
참고: 위의 참고 사항을 강조하기 위해 Keras 레이어 또는 모델 내에 중첩된 원시 tf.Module은 훈련 또는 저장을 위해 수집된 변수를 가져오지 않습니다. 대신 Keras 레이어 내부에 Keras 레이어를 중첩합니다.
my_sequential_model.variables
[<tf.Variable 'my_sequential_model/flexible_dense_1/w:0' shape=(3, 3) dtype=float32, numpy=
 array([[ 0.35083082,  1.2909688 ,  1.2771546 ],
        [ 0.29501054,  0.27460068, -0.4107379 ],
        [ 1.2457877 , -0.3218496 ,  1.446824  ]], dtype=float32)>,
 <tf.Variable 'my_sequential_model/flexible_dense_1/b:0' shape=(3,) dtype=float32, numpy=array([0., 0., 0.], dtype=float32)>,
 <tf.Variable 'my_sequential_model/flexible_dense_2/w:0' shape=(3, 2) dtype=float32, numpy=
 array([[ 0.5598409 , -0.6178658 ],
        [ 0.59970695, -0.8884893 ],
        [-0.6994326 ,  0.21731232]], dtype=float32)>,
 <tf.Variable 'my_sequential_model/flexible_dense_2/b:0' shape=(2,) dtype=float32, numpy=array([0., 0.], dtype=float32)>]
my_sequential_model.submodules
(<__main__.FlexibleDense at 0x7fc21809b280>,
 <__main__.FlexibleDense at 0x7fc301cb4df0>)
tf.keras.Model을 재정의하는 것은 TensorFlow 모델을 빌드하는 Python다운 접근 방식입니다. 다른 프레임워크에서 모델을 마이그레이션하는 경우 매우 간단할 수 있습니다.
기존 레이어와 입력을 간단하게 조합한 모델을 구성하는 경우, 모델 재구성 및 아키텍처와 관련된 추가 기능과 함께 제공되는 함수형 API를 사용하여 시간과 공간을 절약할 수 있습니다.
다음은 함수형 API가 있는 같은 모델입니다.
inputs = tf.keras.Input(shape=[3,])

x = FlexibleDense(3)(inputs)
x = FlexibleDense(2)(x)

my_functional_model = tf.keras.Model(inputs=inputs, outputs=x)

my_functional_model.summary()
Model: "model"
_________________________________________________________________
 Layer (type)                Output Shape              Param #
=================================================================
 input_1 (InputLayer)        [(None, 3)]               0

 flexible_dense_3 (FlexibleD  (None, 3)                12
 ense)

 flexible_dense_4 (FlexibleD  (None, 2)                8
 ense)

=================================================================
Total params: 20
Trainable params: 20
Non-trainable params: 0
_________________________________________________________________
my_functional_model(tf.constant([[2.0, 2.0, 2.0]]))
<tf.Tensor: shape=(1, 2), dtype=float32, numpy=array([[-3.808731 , -3.8700063]], dtype=float32)>
여기서 가장 큰 차이점은 입력 형상이 함수형 구성 프로세스의 일부로 미리 지정된다는 것입니다. 이 경우 input_shape 인수를 완전히 지정할 필요는 없습니다. 일부 차원은 None으로 남겨 둘 수 있습니다.
참고: input_shape 또는 InputLayer를 하위 클래스화된 모델에 지정할 필요가 없습니다. 이들 인수와 레이어는 무시됩니다.
Keras 모델 저장하기
Keras 모델에서는 체크포인트를 사용할 수 있으며 tf.Module과 같게 보입니다.
Keras 모델은 모듈 tf.saved_models.save()로 저장할 수도 있습니다. 그러나 Keras 모델에는 편리한 메서드와 기타 기능이 있습니다.
my_sequential_model.save("exname_of_file")
INFO:tensorflow:Assets written to: exname_of_file/assets
쉽게 다시 로드할 수 있습니다.
reconstructed_model = tf.keras.models.load_model("exname_of_file")
WARNING:tensorflow:No training configuration found in save file, so the model was *not* compiled. Compile it manually.
Keras SavedModels는 또한 메트릭, 손실 및 옵티마아저 상태를 저장합니다.
이 재구성된 모델을 사용할 수 있으며 같은 데이터로 호출될 때 같은 결과를 생성합니다.
reconstructed_model(tf.constant([[2.0, 2.0, 2.0]]))
<tf.Tensor: shape=(1, 2), dtype=float32, numpy=array([[ 0.3738457, -3.542218 ]], dtype=float32)>
기능 지원을 위한 사용자 정의 레이어 대한 구성 방법을 제공하는 것을 포함하여 Keras 모델의 저장 및 직렬화에 대해 알아야 할 정보가 더 많이 있습니다. 저장 및 직렬화 가이드를 확인하세요.
다음 단계
Keras에 대한 자세한 내용을 알고 싶다면, 여기에서 기존 Keras 가이드를 따르세요.
tf.module 기반으로 구축된 상위 수준 API의 또 다른 예는 DeepMind의 Sonnet이며 해당 사이트에서 다룹니다.