
TFX pipelines let you orchestrate your machine learning (ML) workflow on orchestrators, such as: Apache Airflow, Apache Beam, and Kubeflow Pipelines. Pipelines organize your workflow into a sequence of components, where each component performs a step in your ML workflow. TFX standard components provide proven functionality to help you get started building an ML workflow easily. You can also include custom components in your workflow. Custom components let you extend your ML workflow by:
- Building components that are tailored to meet your needs, such as ingesting data from a proprietary system.
- Applying data augmentation, upsampling, or downsampling.
- Perform anomaly detection based on confidence intervals or autoencoder reproduction error.
- Interfacing with external systems such as help desks for alerting and monitoring.
- Applying labels to unlabeled examples.
- Integrating tools built with languages other than Python into your ML workflow, such as performing data analysis using R.
By mixing standard components and custom components, you can build an ML workflow that meets your needs while taking advantage of the best practices built into the TFX standard components.
This guide describes the concepts required to understand TFX custom components, and the different ways that you can build custom components.
Anatomy of a TFX Component
This section provides a high-level overview of the composition of a TFX component. If you are new to TFX pipelines, learn the core concepts by reading the guide to understanding TFX pipelines.
TFX components are composed of a component specification and an executor class which are packaged in a component interface class.
A component specification defines the component's input and output contract. This contract specifies the component's input and output artifacts, and the parameters that are used for the component execution.
A component's executor class provides the implementation for the work performed by the component.
A component interface class combines the component specification with the executor for use as a component in a TFX pipeline.
TFX components at runtime
When a pipeline runs a TFX component, the component is executed in three phases:
- First, the Driver uses the component specification to retrieve the required artifacts from the metadata store and pass them into the component.
- Next, the Executor performs the component's work.
- Then the Publisher uses the component specification and the results from the executor to store the component's outputs in the metadata store.
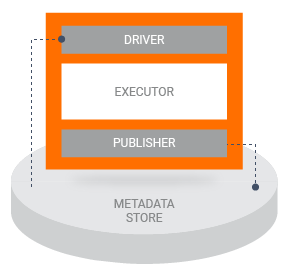
Most custom component implementations do not require you to customize the Driver or the Publisher. Typically, modifications to the Driver and Publisher should be necessary only if you want to change the interaction between your pipeline's components and the metadata store. If you only want to change the inputs, outputs, or parameters for your component you only need to modify the component specification.
Types of custom components
There are three types of custom components: Python function-based components, container-based components, and fully custom components. The following sections describe the different types of components and the cases when you should use each approach.
Python function-based components
Python function-based components are easier to build than container-based
components or fully custom components. The component specification is defined in
the Python function's arguments using type annotations that describe if an
argument is an input artifact, output artifact, or a parameter. The function
body defines the component's executor. The component interface is defined by
adding the
@component decorator
to your function.
By decorating your function with the @component decorator and defining the
function arguments with type annotations, you can create a component without the
complexity of building a component specification, an executor, and a component
interface.
Learn how to build Python function-based components.
Container-based components
Container-based components provide the flexibility to integrate code written in
any language into your pipeline, so long as you can execute that code in a
Docker container. To create a container-based component, you must build a Docker
container image that contains your component's executable code. Then you must
call the
create_container_component function
to define:
- The inputs, outputs, and parameters of your component specification.
- The container image and command that the component executor runs.
This function returns an instance of a component that you can include in your pipeline definition.
This approach is more complex than building a Python function-based component, since it requires packaging your code as a container image. This approach is most suitable for including non-Python code in your pipeline, or for building Python components with complex runtime environments or dependencies.
Learn how to build container-based components.
Fully custom components
Fully custom components let you build components by defining the component specification, executor, and component interface classes. This approach lets you reuse and extend a standard component to fit your needs.
If an existing component is defined with the same inputs and outputs as the custom component that you're developing, you can simply override the Executor class of the existing component. This means that you can reuse a component specification and implement a new executor that derives from an existing component. In this way, you reuse functionality built into existing components and implement only the functionality that is required.
If however the inputs and outputs of your new component are unique, you can define an entirely new component specification.
This approach is best for reusing existing component specifications and executors.
Learn how to build fully custom components.