
| | |  GitHub पर स्रोत देखें GitHub पर स्रोत देखें |
tf.data API आपको सरल, पुन: प्रयोज्य टुकड़ों से जटिल इनपुट पाइपलाइन बनाने में सक्षम बनाता है। उदाहरण के लिए, एक छवि मॉडल के लिए पाइपलाइन एक वितरित फ़ाइल सिस्टम में फ़ाइलों से डेटा एकत्र कर सकती है, प्रत्येक छवि पर यादृच्छिक गड़बड़ी लागू कर सकती है, और प्रशिक्षण के लिए यादृच्छिक रूप से चयनित छवियों को एक बैच में मर्ज कर सकती है। टेक्स्ट मॉडल के लिए पाइपलाइन में कच्चे टेक्स्ट डेटा से प्रतीकों को निकालना, उन्हें लुकअप टेबल के साथ एम्बेडिंग पहचानकर्ताओं में परिवर्तित करना और विभिन्न लंबाई के अनुक्रमों को एक साथ बैच करना शामिल हो सकता है। tf.data API बड़ी मात्रा में डेटा को संभालना, विभिन्न डेटा स्वरूपों से पढ़ना और जटिल परिवर्तन करना संभव बनाता है।
tf.data API एक tf.data.Dataset एब्स्ट्रैक्शन का परिचय देता है जो तत्वों के अनुक्रम का प्रतिनिधित्व करता है, जिसमें प्रत्येक तत्व में एक या अधिक घटक होते हैं। उदाहरण के लिए, एक छवि पाइपलाइन में, एक तत्व एक एकल प्रशिक्षण उदाहरण हो सकता है, जिसमें छवि और उसके लेबल का प्रतिनिधित्व करने वाले टेंसर घटकों की एक जोड़ी होती है।
डेटासेट बनाने के दो अलग-अलग तरीके हैं:
डेटा स्रोत मेमोरी में या एक या अधिक फ़ाइलों में संग्रहीत डेटा से
Datasetका निर्माण करता है।डेटा परिवर्तन एक या अधिक
tf.data.Datasetऑब्जेक्ट से डेटासेट का निर्माण करता है।
import tensorflow as tf
import pathlib
import os
import matplotlib.pyplot as plt
import pandas as pd
import numpy as np

np.set_printoptions(precision=4)
बुनियादी यांत्रिकी
इनपुट पाइपलाइन बनाने के लिए, आपको डेटा स्रोत से प्रारंभ करना होगा। उदाहरण के लिए, मेमोरी में डेटा से Dataset बनाने के लिए, आप tf.data.Dataset.from_tensors() या tf.data.Dataset.from_tensor_slices() का उपयोग कर सकते हैं। वैकल्पिक रूप से, यदि आपका इनपुट डेटा अनुशंसित TFRecord प्रारूप में फ़ाइल में संग्रहीत है, तो आप tf.data.TFRecordDataset() का उपयोग कर सकते हैं।
एक बार जब आपके पास Dataset ऑब्जेक्ट हो, तो आप tf.data.Dataset ऑब्जेक्ट पर मेथड कॉल्स को चेन करके इसे एक नए Dataset में बदल सकते हैं। उदाहरण के लिए, आप प्रति-तत्व रूपांतरण जैसे Dataset.map() , और बहु-तत्व परिवर्तन जैसे Dataset.batch() लागू कर सकते हैं। परिवर्तनों की पूरी सूची के लिए tf.data.Dataset के लिए दस्तावेज़ देखें।
Dataset ऑब्जेक्ट एक पायथन पुनरावर्तनीय है। यह लूप के लिए इसके तत्वों का उपभोग करना संभव बनाता है:
dataset = tf.data.Dataset.from_tensor_slices([8, 3, 0, 8, 2, 1])
dataset
<TensorSliceDataset element_spec=TensorSpec(shape=(), dtype=tf.int32, name=None)>
for elem in dataset:
  print(elem.numpy())
8
3
0
8
2
1
या स्पष्ट रूप से iter का उपयोग करके एक पायथन इटरेटर बनाकर और next का उपयोग करके इसके तत्वों का उपभोग करके:
it = iter(dataset)

print(next(it).numpy())
8
वैकल्पिक रूप से, डेटासेट तत्वों को reduce परिवर्तन का उपयोग करके उपभोग किया जा सकता है, जो सभी तत्वों को एक परिणाम उत्पन्न करने के लिए कम कर देता है। निम्न उदाहरण दिखाता है कि पूर्णांक के डेटासेट के योग की गणना करने के लिए परिवर्तन को reduce करने का उपयोग कैसे करें।
print(dataset.reduce(0, lambda state, value: state + value).numpy())
22
डेटासेट संरचना
एक डेटासेट तत्वों का एक क्रम तैयार करता है, जहां प्रत्येक तत्व घटकों की समान (नेस्टेड) संरचना होती है। संरचना के व्यक्तिगत घटक tf.TypeSpec द्वारा प्रतिनिधित्व योग्य किसी भी प्रकार के हो सकते हैं, जिसमें tf.Tensor , tf.sparse.SparseTensor , tf.RaggedTensor , tf.TensorArray , या tf.data.Dataset ।
पायथन निर्माण जो तत्वों की (नेस्टेड) संरचना को व्यक्त करने के लिए इस्तेमाल किया जा सकता है, उनमें शामिल हैं tuple , dict , NamedTuple , और OrderedDict । विशेष रूप से, list डेटासेट तत्वों की संरचना को व्यक्त करने के लिए मान्य निर्माण नहीं है। ऐसा इसलिए है क्योंकि शुरुआती tf.data उपयोगकर्ताओं ने list इनपुट के बारे में दृढ़ता से महसूस किया (उदाहरण के लिए tf.data.Dataset.from_tensors को पास किया गया) स्वचालित रूप से टेंसर के रूप में पैक किया जा रहा है और list आउटपुट (उदाहरण के लिए उपयोगकर्ता द्वारा परिभाषित कार्यों के वापसी मूल्य) को tuple में मजबूर किया जा रहा है। एक परिणाम के रूप में, यदि आप एक list इनपुट को एक संरचना के रूप में माना जाना चाहते हैं, तो आपको इसे tuple में बदलने की आवश्यकता है और यदि आप एक list आउटपुट को एक घटक के रूप में चाहते हैं, तो आपको इसे स्पष्ट रूप से tf.stack का उपयोग करके पैक करना होगा। .
Dataset.element_spec गुण आपको प्रत्येक तत्व घटक के प्रकार का निरीक्षण करने की अनुमति देता है। गुण tf.TypeSpec ऑब्जेक्ट्स की एक नेस्टेड संरचना लौटाता है, जो तत्व की संरचना से मेल खाता है, जो एक एकल घटक, घटकों का एक टपल या घटकों का एक नेस्टेड टपल हो सकता है। उदाहरण के लिए:
dataset1 = tf.data.Dataset.from_tensor_slices(tf.random.uniform([4, 10]))

dataset1.element_spec
TensorSpec(shape=(10,), dtype=tf.float32, name=None)
dataset2 = tf.data.Dataset.from_tensor_slices(
   (tf.random.uniform([4]),
    tf.random.uniform([4, 100], maxval=100, dtype=tf.int32)))

dataset2.element_spec
(TensorSpec(shape=(), dtype=tf.float32, name=None),
 TensorSpec(shape=(100,), dtype=tf.int32, name=None))
dataset3 = tf.data.Dataset.zip((dataset1, dataset2))

dataset3.element_spec
(TensorSpec(shape=(10,), dtype=tf.float32, name=None),
 (TensorSpec(shape=(), dtype=tf.float32, name=None),
  TensorSpec(shape=(100,), dtype=tf.int32, name=None)))
# Dataset containing a sparse tensor.
dataset4 = tf.data.Dataset.from_tensors(tf.SparseTensor(indices=[[0, 0], [1, 2]], values=[1, 2], dense_shape=[3, 4]))

dataset4.element_spec
SparseTensorSpec(TensorShape([3, 4]), tf.int32)
# Use value_type to see the type of value represented by the element spec
dataset4.element_spec.value_type
tensorflow.python.framework.sparse_tensor.SparseTensor
Dataset रूपांतरण किसी भी संरचना के डेटासेट का समर्थन करते हैं। Dataset.map() , और Dataset.filter() परिवर्तनों का उपयोग करते समय, जो प्रत्येक तत्व पर एक फ़ंक्शन लागू करते हैं, तत्व संरचना फ़ंक्शन के तर्कों को निर्धारित करती है:
dataset1 = tf.data.Dataset.from_tensor_slices(
    tf.random.uniform([4, 10], minval=1, maxval=10, dtype=tf.int32))

dataset1
<TensorSliceDataset element_spec=TensorSpec(shape=(10,), dtype=tf.int32, name=None)>
for z in dataset1:
  print(z.numpy())
[3 3 7 5 9 8 4 2 3 7]
[8 9 6 7 5 6 1 6 2 3]
[9 8 4 4 8 7 1 5 6 7]
[5 9 5 4 2 5 7 8 8 8]
प्लेसहोल्डर24
dataset2 = tf.data.Dataset.from_tensor_slices(
   (tf.random.uniform([4]),
    tf.random.uniform([4, 100], maxval=100, dtype=tf.int32)))

dataset2
<TensorSliceDataset element_spec=(TensorSpec(shape=(), dtype=tf.float32, name=None), TensorSpec(shape=(100,), dtype=tf.int32, name=None))>27 l10n-
dataset3 = tf.data.Dataset.zip((dataset1, dataset2))

dataset3
for a, (b,c) in dataset3:
  print('shapes: {a.shape}, {b.shape}, {c.shape}'.format(a=a, b=b, c=c))
<ZipDataset element_spec=(TensorSpec(shape=(10,), dtype=tf.int32, name=None), (TensorSpec(shape=(), dtype=tf.float32, name=None), TensorSpec(shape=(100,), dtype=tf.int32, name=None)))>
shapes: (10,), (), (100,)
shapes: (10,), (), (100,)
shapes: (10,), (), (100,)
shapes: (10,), (), (100,)
इनपुट डेटा पढ़ना
NumPy सरणियों का उपभोग
अधिक उदाहरणों के लिए लोड हो रहा NumPy सरणियाँ देखें।
यदि आपका सभी इनपुट डेटा मेमोरी में फिट हो जाता है, तो उनसे Dataset बनाने का सबसे सरल तरीका उन्हें tf.Tensor ऑब्जेक्ट में बदलना और Dataset.from_tensor_slices() का उपयोग करना है।
train, test = tf.keras.datasets.fashion_mnist.load_data()
Downloading data from https://storage.googleapis.com/tensorflow/tf-keras-datasets/train-labels-idx1-ubyte.gz
32768/29515 [=================================] - 0s 0us/step
40960/29515 [=========================================] - 0s 0us/step
Downloading data from https://storage.googleapis.com/tensorflow/tf-keras-datasets/train-images-idx3-ubyte.gz
26427392/26421880 [==============================] - 0s 0us/step
26435584/26421880 [==============================] - 0s 0us/step
Downloading data from https://storage.googleapis.com/tensorflow/tf-keras-datasets/t10k-labels-idx1-ubyte.gz
16384/5148 [===============================================================================================] - 0s 0us/step
Downloading data from https://storage.googleapis.com/tensorflow/tf-keras-datasets/t10k-images-idx3-ubyte.gz
4423680/4422102 [==============================] - 0s 0us/step
4431872/4422102 [==============================] - 0s 0us/step
images, labels = train
images = images/255

dataset = tf.data.Dataset.from_tensor_slices((images, labels))
dataset
<TensorSliceDataset element_spec=(TensorSpec(shape=(28, 28), dtype=tf.float64, name=None), TensorSpec(shape=(), dtype=tf.uint8, name=None))>
पायथन जनरेटर का सेवन
एक अन्य सामान्य डेटा स्रोत जिसे आसानी से tf.data.Dataset के रूप में निगला जा सकता है, वह है पायथन जनरेटर।
def count(stop):
  i = 0
  while i<stop:
    yield i
    i += 1
for n in count(5):
  print(n)
0
1
2
3
4
Dataset.from_generator कंस्ट्रक्टर अजगर जनरेटर को पूरी तरह कार्यात्मक tf.data.Dataset में परिवर्तित करता है।
कंस्ट्रक्टर एक कॉल करने योग्य इनपुट के रूप में लेता है, एक पुनरावर्तक नहीं। यह अंत तक पहुंचने पर जनरेटर को पुनरारंभ करने की अनुमति देता है। यह एक वैकल्पिक args तर्क लेता है, जिसे कॉल करने योग्य तर्कों के रूप में पारित किया जाता है।
output_types तर्क आवश्यक है क्योंकि tf.Graph आंतरिक रूप से tf.data बनाता है, और ग्राफ़ किनारों को tf.dtype की आवश्यकता होती है।
ds_counter = tf.data.Dataset.from_generator(count, args=[25], output_types=tf.int32, output_shapes = (), )
for count_batch in ds_counter.repeat().batch(10).take(10):
  print(count_batch.numpy())
[0 1 2 3 4 5 6 7 8 9]
[10 11 12 13 14 15 16 17 18 19]
[20 21 22 23 24  0  1  2  3  4]
[ 5  6  7  8  9 10 11 12 13 14]
[15 16 17 18 19 20 21 22 23 24]
[0 1 2 3 4 5 6 7 8 9]
[10 11 12 13 14 15 16 17 18 19]
[20 21 22 23 24  0  1  2  3  4]
[ 5  6  7  8  9 10 11 12 13 14]
[15 16 17 18 19 20 21 22 23 24]
output_shapes तर्क की आवश्यकता नहीं है, लेकिन इसकी अत्यधिक अनुशंसा की जाती है क्योंकि कई TensorFlow संचालन अज्ञात रैंक वाले टेंसर का समर्थन नहीं करते हैं। यदि किसी विशेष अक्ष की लंबाई अज्ञात या परिवर्तनशील है, तो इसे output_shapes में None के रूप में सेट करें।
यह भी ध्यान रखना महत्वपूर्ण है कि output_shapes और output_types अन्य डेटासेट विधियों के समान ही नेस्टिंग नियमों का पालन करते हैं।
यहां एक उदाहरण जनरेटर है जो दोनों पहलुओं को प्रदर्शित करता है, यह सरणी के टुपल्स देता है, जहां दूसरी सरणी अज्ञात लंबाई वाला वेक्टर है।
def gen_series():
  i = 0
  while True:
    size = np.random.randint(0, 10)
    yield i, np.random.normal(size=(size,))
    i += 1
for i, series in gen_series():
  print(i, ":", str(series))
  if i > 5:
    break
0 : [0.3939]
1 : [ 0.9282 -0.0158  1.0096  0.7155  0.0491  0.6697 -0.2565  0.487 ]
2 : [-0.4831  0.37   -1.3918 -0.4786  0.7425 -0.3299]
3 : [ 0.1427 -1.0438  0.821  -0.8766 -0.8369  0.4168]
4 : [-1.4984 -1.8424  0.0337  0.0941  1.3286 -1.4938]
5 : [-1.3158 -1.2102  2.6887 -1.2809]
6 : []
पहला आउटपुट एक int32 है दूसरा एक float32 है।
पहला आइटम एक अदिश, आकार () है, और दूसरा अज्ञात लंबाई, आकार (None,) का एक वेक्टर है
ds_series = tf.data.Dataset.from_generator(
    gen_series,
    output_types=(tf.int32, tf.float32),
    output_shapes=((), (None,)))

ds_series
<FlatMapDataset element_spec=(TensorSpec(shape=(), dtype=tf.int32, name=None), TensorSpec(shape=(None,), dtype=tf.float32, name=None))>
अब इसे नियमित tf.data.Dataset की तरह इस्तेमाल किया जा सकता है। ध्यान दें कि एक चर आकार वाले डेटासेट को बैच करते समय, आपको Dataset.padded_batch का उपयोग करने की आवश्यकता होती है।
ds_series_batch = ds_series.shuffle(20).padded_batch(10)

ids, sequence_batch = next(iter(ds_series_batch))
print(ids.numpy())
print()
print(sequence_batch.numpy())
[ 8 10 18  1  5 19 22 17 21 25]

[[-0.6098  0.1366 -2.15   -0.9329  0.      0.    ]
 [ 1.0295 -0.033  -0.0388  0.      0.      0.    ]
 [-0.1137  0.3552  0.4363 -0.2487 -1.1329  0.    ]
 [ 0.      0.      0.      0.      0.      0.    ]
 [-1.0466  0.624  -1.7705  1.4214  0.9143 -0.62  ]
 [-0.9502  1.7256  0.5895  0.7237  1.5397  0.    ]
 [ 0.3747  1.2967  0.      0.      0.      0.    ]
 [-0.4839  0.292  -0.7909 -0.7535  0.4591 -1.3952]
 [-0.0468  0.0039 -1.1185 -1.294   0.      0.    ]
 [-0.1679 -0.3375  0.      0.      0.      0.    ]]
अधिक यथार्थवादी उदाहरण के लिए, preprocessing.image.ImageDataGenerator को tf.data.Dataset के रूप में लपेटने का प्रयास करें।
पहले डेटा डाउनलोड करें:
flowers = tf.keras.utils.get_file(
    'flower_photos',
    'https://storage.googleapis.com/download.tensorflow.org/example_images/flower_photos.tgz',
    untar=True)
Downloading data from https://storage.googleapis.com/download.tensorflow.org/example_images/flower_photos.tgz
228818944/228813984 [==============================] - 10s 0us/step
228827136/228813984 [==============================] - 10s 0us/step
छवि बनाएं। image.ImageDataGenerator
img_gen = tf.keras.preprocessing.image.ImageDataGenerator(rescale=1./255, rotation_range=20)
images, labels = next(img_gen.flow_from_directory(flowers))
Found 3670 images belonging to 5 classes.
print(images.dtype, images.shape)
print(labels.dtype, labels.shape)
float32 (32, 256, 256, 3)
float32 (32, 5)
ds = tf.data.Dataset.from_generator(
    lambda: img_gen.flow_from_directory(flowers),
    output_types=(tf.float32, tf.float32),
    output_shapes=([32,256,256,3], [32,5])
)

ds.element_spec
(TensorSpec(shape=(32, 256, 256, 3), dtype=tf.float32, name=None),
 TensorSpec(shape=(32, 5), dtype=tf.float32, name=None))
for images, label in ds.take(1):
  print('images.shape: ', images.shape)
  print('labels.shape: ', labels.shape)
Found 3670 images belonging to 5 classes.
images.shape:  (32, 256, 256, 3)
labels.shape:  (32, 5)
TFRecord डेटा की खपत
एंड-टू-एंड उदाहरण के लिए लोडिंग TFRecords देखें।
tf.data API विभिन्न प्रकार के फ़ाइल स्वरूपों का समर्थन करता है ताकि आप बड़े डेटासेट को संसाधित कर सकें जो मेमोरी में फिट नहीं होते हैं। उदाहरण के लिए, TFRecord फ़ाइल प्रारूप एक साधारण रिकॉर्ड-उन्मुख बाइनरी प्रारूप है जिसका उपयोग कई TensorFlow एप्लिकेशन प्रशिक्षण डेटा के लिए करते हैं। tf.data.TFRecordDataset वर्ग आपको इनपुट पाइपलाइन के हिस्से के रूप में एक या अधिक TFRecord फ़ाइलों की सामग्री को स्ट्रीम करने में सक्षम बनाता है।
यहां फ़्रेंच स्ट्रीट नेम साइन्स (FSNS) से परीक्षण फ़ाइल का उपयोग करते हुए एक उदाहरण दिया गया है।
# Creates a dataset that reads all of the examples from two files.
fsns_test_file = tf.keras.utils.get_file("fsns.tfrec", "https://storage.googleapis.com/download.tensorflow.org/data/fsns-20160927/testdata/fsns-00000-of-00001")
Downloading data from https://storage.googleapis.com/download.tensorflow.org/data/fsns-20160927/testdata/fsns-00000-of-00001
7905280/7904079 [==============================] - 1s 0us/step
7913472/7904079 [==============================] - 1s 0us/step
TFRecordDataset प्रारंभकर्ता के लिए filenames तर्क या तो एक स्ट्रिंग, स्ट्रिंग्स की एक सूची या स्ट्रिंग्स का tf.Tensor हो सकता है। इसलिए यदि आपके पास प्रशिक्षण और सत्यापन उद्देश्यों के लिए फाइलों के दो सेट हैं, तो आप एक फ़ैक्टरी विधि बना सकते हैं जो डेटासेट का उत्पादन करती है, फ़ाइल नाम को इनपुट तर्क के रूप में लेती है:
dataset = tf.data.TFRecordDataset(filenames = [fsns_test_file])
dataset
<TFRecordDatasetV2 element_spec=TensorSpec(shape=(), dtype=tf.string, name=None)>
कई TensorFlow प्रोजेक्ट अपनी TFRecord फ़ाइलों में क्रमबद्ध tf.train.Example .उदाहरण रिकॉर्ड का उपयोग करते हैं। इनका निरीक्षण करने से पहले इन्हें डीकोड करने की आवश्यकता है:
raw_example = next(iter(dataset))
parsed = tf.train.Example.FromString(raw_example.numpy())

parsed.features.feature['image/text']
bytes_list {
  value: "Rue Perreyon"
}
टेक्स्ट डेटा की खपत
एंड टू एंड उदाहरण के लिए लोडिंग टेक्स्ट देखें।
कई डेटासेट एक या अधिक टेक्स्ट फ़ाइलों के रूप में वितरित किए जाते हैं। tf.data.TextLineDataset एक या अधिक टेक्स्ट फ़ाइलों से लाइनें निकालने का एक आसान तरीका प्रदान करता है। एक या अधिक फ़ाइल नामों को देखते हुए, एक TextLineDataset उन फ़ाइलों की प्रति पंक्ति एक स्ट्रिंग-मूल्यवान तत्व उत्पन्न करेगा।
directory_url = 'https://storage.googleapis.com/download.tensorflow.org/data/illiad/'
file_names = ['cowper.txt', 'derby.txt', 'butler.txt']

file_paths = [
    tf.keras.utils.get_file(file_name, directory_url + file_name)
    for file_name in file_names
]
Downloading data from https://storage.googleapis.com/download.tensorflow.org/data/illiad/cowper.txt
819200/815980 [==============================] - 0s 0us/step
827392/815980 [==============================] - 0s 0us/step
Downloading data from https://storage.googleapis.com/download.tensorflow.org/data/illiad/derby.txt
811008/809730 [==============================] - 0s 0us/step
819200/809730 [==============================] - 0s 0us/step
Downloading data from https://storage.googleapis.com/download.tensorflow.org/data/illiad/butler.txt
811008/807992 [==============================] - 0s 0us/step
819200/807992 [==============================] - 0s 0us/step
dataset = tf.data.TextLineDataset(file_paths)
यहाँ पहली फ़ाइल की पहली कुछ पंक्तियाँ हैं:
for line in dataset.take(5):
  print(line.numpy())
b"\xef\xbb\xbfAchilles sing, O Goddess! Peleus' son;"
b'His wrath pernicious, who ten thousand woes'
b"Caused to Achaia's host, sent many a soul"
b'Illustrious into Ades premature,'
b'And Heroes gave (so stood the will of Jove)'
फ़ाइलों के बीच वैकल्पिक पंक्तियों के लिए Dataset.interleave का उपयोग करें। इससे फाइलों को एक साथ फेरबदल करना आसान हो जाता है। यहाँ प्रत्येक अनुवाद की पहली, दूसरी और तीसरी पंक्तियाँ हैं:
files_ds = tf.data.Dataset.from_tensor_slices(file_paths)
lines_ds = files_ds.interleave(tf.data.TextLineDataset, cycle_length=3)

for i, line in enumerate(lines_ds.take(9)):
  if i % 3 == 0:
    print()
  print(line.numpy())
b"\xef\xbb\xbfAchilles sing, O Goddess! Peleus' son;"
b"\xef\xbb\xbfOf Peleus' son, Achilles, sing, O Muse,"
b'\xef\xbb\xbfSing, O goddess, the anger of Achilles son of Peleus, that brought'

b'His wrath pernicious, who ten thousand woes'
b'The vengeance, deep and deadly; whence to Greece'
b'countless ills upon the Achaeans. Many a brave soul did it send'

b"Caused to Achaia's host, sent many a soul"
b'Unnumbered ills arose; which many a soul'
b'hurrying down to Hades, and many a hero did it yield a prey to dogs and'
डिफ़ॉल्ट रूप से, एक TextLineDataset प्रत्येक फ़ाइल की प्रत्येक पंक्ति उत्पन्न करता है, जो वांछनीय नहीं हो सकता है, उदाहरण के लिए, यदि फ़ाइल हेडर लाइन से शुरू होती है, या इसमें टिप्पणियां होती हैं। इन पंक्तियों को Dataset.skip() या Dataset.filter() रूपांतरणों का उपयोग करके हटाया जा सकता है। यहां, आप पहली पंक्ति को छोड़ देते हैं, फिर केवल बचे लोगों को खोजने के लिए फ़िल्टर करते हैं।
titanic_file = tf.keras.utils.get_file("train.csv", "https://storage.googleapis.com/tf-datasets/titanic/train.csv")
titanic_lines = tf.data.TextLineDataset(titanic_file)
Downloading data from https://storage.googleapis.com/tf-datasets/titanic/train.csv
32768/30874 [===============================] - 0s 0us/step
40960/30874 [=======================================] - 0s 0us/step
for line in titanic_lines.take(10):
  print(line.numpy())
b'survived,sex,age,n_siblings_spouses,parch,fare,class,deck,embark_town,alone'
b'0,male,22.0,1,0,7.25,Third,unknown,Southampton,n'
b'1,female,38.0,1,0,71.2833,First,C,Cherbourg,n'
b'1,female,26.0,0,0,7.925,Third,unknown,Southampton,y'
b'1,female,35.0,1,0,53.1,First,C,Southampton,n'
b'0,male,28.0,0,0,8.4583,Third,unknown,Queenstown,y'
b'0,male,2.0,3,1,21.075,Third,unknown,Southampton,n'
b'1,female,27.0,0,2,11.1333,Third,unknown,Southampton,n'
b'1,female,14.0,1,0,30.0708,Second,unknown,Cherbourg,n'
b'1,female,4.0,1,1,16.7,Third,G,Southampton,n'
76 l10n-
def survived(line):
  return tf.not_equal(tf.strings.substr(line, 0, 1), "0")

survivors = titanic_lines.skip(1).filter(survived)
for line in survivors.take(10):
  print(line.numpy())
b'1,female,38.0,1,0,71.2833,First,C,Cherbourg,n'
b'1,female,26.0,0,0,7.925,Third,unknown,Southampton,y'
b'1,female,35.0,1,0,53.1,First,C,Southampton,n'
b'1,female,27.0,0,2,11.1333,Third,unknown,Southampton,n'
b'1,female,14.0,1,0,30.0708,Second,unknown,Cherbourg,n'
b'1,female,4.0,1,1,16.7,Third,G,Southampton,n'
b'1,male,28.0,0,0,13.0,Second,unknown,Southampton,y'
b'1,female,28.0,0,0,7.225,Third,unknown,Cherbourg,y'
b'1,male,28.0,0,0,35.5,First,A,Southampton,y'
b'1,female,38.0,1,5,31.3875,Third,unknown,Southampton,n'
सीएसवी डेटा की खपत
अधिक उदाहरणों के लिए सीएसवी फ़ाइलें लोड करना, और पंडों के डेटाफ़्रेम लोड करना देखें।
सादा पाठ में सारणीबद्ध डेटा संग्रहीत करने के लिए CSV फ़ाइल स्वरूप एक लोकप्रिय प्रारूप है।
उदाहरण के लिए:
titanic_file = tf.keras.utils.get_file("train.csv", "https://storage.googleapis.com/tf-datasets/titanic/train.csv")
df = pd.read_csv(titanic_file)
df.head()
यदि आपका डेटा स्मृति में फिट बैठता है तो वही Dataset.from_tensor_slices विधि शब्दकोशों पर काम करती है, जिससे इस डेटा को आसानी से आयात किया जा सकता है:
titanic_slices = tf.data.Dataset.from_tensor_slices(dict(df))

for feature_batch in titanic_slices.take(1):
  for key, value in feature_batch.items():
    print("  {!r:20s}: {}".format(key, value))
'survived'          : 0
  'sex'               : b'male'
  'age'               : 22.0
  'n_siblings_spouses': 1
  'parch'             : 0
  'fare'              : 7.25
  'class'             : b'Third'
  'deck'              : b'unknown'
  'embark_town'       : b'Southampton'
  'alone'             : b'n'
आवश्यकतानुसार डिस्क से लोड करना एक अधिक स्केलेबल दृष्टिकोण है।
tf.data मॉड्यूल RFC 4180 का अनुपालन करने वाली एक या अधिक CSV फ़ाइलों से रिकॉर्ड निकालने के तरीके प्रदान करता है।
experimental.make_csv_dataset .make_csv_dataset फ़ंक्शन csv फ़ाइलों के सेट को पढ़ने के लिए उच्च स्तरीय इंटरफ़ेस है। यह उपयोग को सरल बनाने के लिए कॉलम प्रकार के अनुमान और कई अन्य सुविधाओं का समर्थन करता है, जैसे बैचिंग और शफलिंग।
titanic_batches = tf.data.experimental.make_csv_dataset(
    titanic_file, batch_size=4,
    label_name="survived")
for feature_batch, label_batch in titanic_batches.take(1):
  print("'survived': {}".format(label_batch))
  print("features:")
  for key, value in feature_batch.items():
    print("  {!r:20s}: {}".format(key, value))
'survived': [1 0 0 0]
features:
  'sex'               : [b'female' b'female' b'male' b'male']
  'age'               : [32. 28. 37. 50.]
  'n_siblings_spouses': [0 3 0 0]
  'parch'             : [0 1 1 0]
  'fare'              : [13.     25.4667 29.7    13.    ]
  'class'             : [b'Second' b'Third' b'First' b'Second']
  'deck'              : [b'unknown' b'unknown' b'C' b'unknown']
  'embark_town'       : [b'Southampton' b'Southampton' b'Cherbourg' b'Southampton']
  'alone'             : [b'y' b'n' b'n' b'y']
यदि आपको केवल कॉलम के सबसेट की आवश्यकता है तो आप select_columns तर्क का उपयोग कर सकते हैं।
titanic_batches = tf.data.experimental.make_csv_dataset(
    titanic_file, batch_size=4,
    label_name="survived", select_columns=['class', 'fare', 'survived'])
for feature_batch, label_batch in titanic_batches.take(1):
  print("'survived': {}".format(label_batch))
  for key, value in feature_batch.items():
    print("  {!r:20s}: {}".format(key, value))
'survived': [0 1 1 0]
  'fare'              : [ 7.05 15.5  26.25  8.05]
  'class'             : [b'Third' b'Third' b'Second' b'Third']
एक निम्न-स्तरीय experimental.CsvDataset भी है। CsvDataset वर्ग जो महीन दानेदार नियंत्रण प्रदान करता है। यह कॉलम प्रकार के अनुमान का समर्थन नहीं करता है। इसके बजाय आपको प्रत्येक कॉलम का प्रकार निर्दिष्ट करना होगा।
titanic_types  = [tf.int32, tf.string, tf.float32, tf.int32, tf.int32, tf.float32, tf.string, tf.string, tf.string, tf.string]
dataset = tf.data.experimental.CsvDataset(titanic_file, titanic_types , header=True)

for line in dataset.take(10):
  print([item.numpy() for item in line])
[0, b'male', 22.0, 1, 0, 7.25, b'Third', b'unknown', b'Southampton', b'n']
[1, b'female', 38.0, 1, 0, 71.2833, b'First', b'C', b'Cherbourg', b'n']
[1, b'female', 26.0, 0, 0, 7.925, b'Third', b'unknown', b'Southampton', b'y']
[1, b'female', 35.0, 1, 0, 53.1, b'First', b'C', b'Southampton', b'n']
[0, b'male', 28.0, 0, 0, 8.4583, b'Third', b'unknown', b'Queenstown', b'y']
[0, b'male', 2.0, 3, 1, 21.075, b'Third', b'unknown', b'Southampton', b'n']
[1, b'female', 27.0, 0, 2, 11.1333, b'Third', b'unknown', b'Southampton', b'n']
[1, b'female', 14.0, 1, 0, 30.0708, b'Second', b'unknown', b'Cherbourg', b'n']
[1, b'female', 4.0, 1, 1, 16.7, b'Third', b'G', b'Southampton', b'n']
[0, b'male', 20.0, 0, 0, 8.05, b'Third', b'unknown', b'Southampton', b'y']
यदि कुछ कॉलम खाली हैं, तो यह निम्न-स्तरीय इंटरफ़ेस आपको कॉलम प्रकारों के बजाय डिफ़ॉल्ट मान प्रदान करने की अनुमति देता है।
%%writefile missing.csv
1,2,3,4
,2,3,4
1,,3,4
1,2,,4
1,2,3,
,,,
Writing missing.csv
# Creates a dataset that reads all of the records from two CSV files, each with
# four float columns which may have missing values.

record_defaults = [999,999,999,999]
dataset = tf.data.experimental.CsvDataset("missing.csv", record_defaults)
dataset = dataset.map(lambda *items: tf.stack(items))
dataset
<MapDataset element_spec=TensorSpec(shape=(4,), dtype=tf.int32, name=None)>
for line in dataset:
  print(line.numpy())
[1 2 3 4]
[999   2   3   4]
[  1 999   3   4]
[  1   2 999   4]
[  1   2   3 999]
[999 999 999 999]
डिफ़ॉल्ट रूप से, एक CsvDataset फ़ाइल की प्रत्येक पंक्ति के प्रत्येक कॉलम को उत्पन्न करता है, जो वांछनीय नहीं हो सकता है, उदाहरण के लिए यदि फ़ाइल हेडर लाइन से शुरू होती है जिसे अनदेखा किया जाना चाहिए, या यदि इनपुट में कुछ कॉलम आवश्यक नहीं हैं। इन पंक्तियों और क्षेत्रों को क्रमशः header और select_cols तर्कों के साथ हटाया जा सकता है।
# Creates a dataset that reads all of the records from two CSV files with
# headers, extracting float data from columns 2 and 4.
record_defaults = [999, 999] # Only provide defaults for the selected columns
dataset = tf.data.experimental.CsvDataset("missing.csv", record_defaults, select_cols=[1, 3])
dataset = dataset.map(lambda *items: tf.stack(items))
dataset
<MapDataset element_spec=TensorSpec(shape=(2,), dtype=tf.int32, name=None)>
for line in dataset:
  print(line.numpy())
[2 4]
[2 4]
[999   4]
[2 4]
[  2 999]
[999 999]
फाइलों का उपभोग करना
फाइलों के एक सेट के रूप में वितरित कई डेटासेट हैं, जहां प्रत्येक फाइल एक उदाहरण है।
flowers_root = tf.keras.utils.get_file(
    'flower_photos',
    'https://storage.googleapis.com/download.tensorflow.org/example_images/flower_photos.tgz',
    untar=True)
flowers_root = pathlib.Path(flowers_root)
रूट निर्देशिका में प्रत्येक वर्ग के लिए एक निर्देशिका होती है:
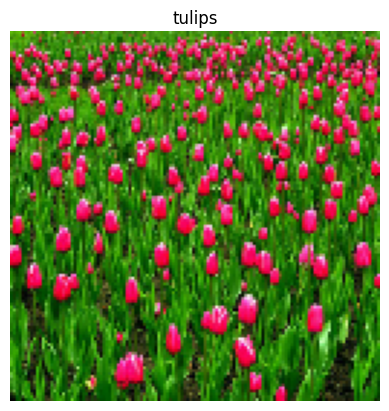
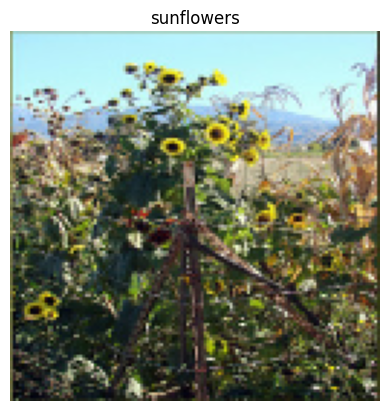
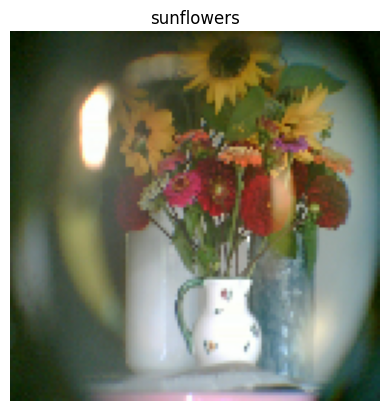
for item in flowers_root.glob("*"):
  print(item.name)
sunflowers
daisy
LICENSE.txt
roses
tulips
dandelion
प्रत्येक वर्ग निर्देशिका में फ़ाइलें उदाहरण हैं:
list_ds = tf.data.Dataset.list_files(str(flowers_root/'*/*'))

for f in list_ds.take(5):
  print(f.numpy())
b'/home/kbuilder/.keras/datasets/flower_photos/sunflowers/5018120483_cc0421b176_m.jpg'
b'/home/kbuilder/.keras/datasets/flower_photos/dandelion/8642679391_0805b147cb_m.jpg'
b'/home/kbuilder/.keras/datasets/flower_photos/sunflowers/8266310743_02095e782d_m.jpg'
b'/home/kbuilder/.keras/datasets/flower_photos/tulips/13176521023_4d7cc74856_m.jpg'
b'/home/kbuilder/.keras/datasets/flower_photos/dandelion/19437578578_6ab1b3c984.jpg'
tf.io.read_file फ़ंक्शन का उपयोग करके डेटा पढ़ें और पथ से लेबल निकालें, लौटने (image, label) जोड़े:
def process_path(file_path):
  label = tf.strings.split(file_path, os.sep)[-2]
  return tf.io.read_file(file_path), label

labeled_ds = list_ds.map(process_path)
for image_raw, label_text in labeled_ds.take(1):
  print(repr(image_raw.numpy()[:100]))
  print()
  print(label_text.numpy())
b'\xff\xd8\xff\xe0\x00\x10JFIF\x00\x01\x01\x00\x00\x01\x00\x01\x00\x00\xff\xe2\x0cXICC_PROFILE\x00\x01\x01\x00\x00\x0cHLino\x02\x10\x00\x00mntrRGB XYZ \x07\xce\x00\x02\x00\t\x00\x06\x001\x00\x00acspMSFT\x00\x00\x00\x00IEC sRGB\x00\x00\x00\x00\x00\x00'

b'daisy'
डेटासेट तत्वों को बैचना
सरल बैचिंग
बैचिंग का सबसे सरल रूप एक एकल तत्व में डेटासेट के लगातार n तत्वों को ढेर करता है। Dataset.batch() रूपांतरण ठीक यही करता है, tf.stack() ऑपरेटर के समान बाधाओं के साथ, तत्वों के प्रत्येक घटक पर लागू होता है: यानी प्रत्येक घटक i के लिए, सभी तत्वों में ठीक उसी आकार का टेंसर होना चाहिए।
inc_dataset = tf.data.Dataset.range(100)
dec_dataset = tf.data.Dataset.range(0, -100, -1)
dataset = tf.data.Dataset.zip((inc_dataset, dec_dataset))
batched_dataset = dataset.batch(4)

for batch in batched_dataset.take(4):
  print([arr.numpy() for arr in batch])
[array([0, 1, 2, 3]), array([ 0, -1, -2, -3])]
[array([4, 5, 6, 7]), array([-4, -5, -6, -7])]
[array([ 8,  9, 10, 11]), array([ -8,  -9, -10, -11])]
[array([12, 13, 14, 15]), array([-12, -13, -14, -15])]
जबकि tf.data आकार जानकारी को प्रचारित करने का प्रयास करता है, Dataset.batch की डिफ़ॉल्ट सेटिंग्स का परिणाम अज्ञात बैच आकार में होता है क्योंकि अंतिम बैच पूर्ण नहीं हो सकता है। आकृति में None नोट करें:
batched_dataset
<BatchDataset element_spec=(TensorSpec(shape=(None,), dtype=tf.int64, name=None), TensorSpec(shape=(None,), dtype=tf.int64, name=None))>
उस अंतिम बैच को अनदेखा करने के लिए drop_remainder तर्क का उपयोग करें, और पूर्ण आकार का प्रचार प्राप्त करें:
batched_dataset = dataset.batch(7, drop_remainder=True)
batched_dataset
<BatchDataset element_spec=(TensorSpec(shape=(7,), dtype=tf.int64, name=None), TensorSpec(shape=(7,), dtype=tf.int64, name=None))>
पैडिंग के साथ बैचिंग टेंसर
उपरोक्त नुस्खा उन टेंसरों के लिए काम करता है जिनका आकार समान होता है। हालांकि, कई मॉडल (जैसे अनुक्रम मॉडल) इनपुट डेटा के साथ काम करते हैं जिनका आकार अलग-अलग हो सकता है (उदाहरण के लिए अलग-अलग लंबाई के अनुक्रम)। इस मामले को संभालने के लिए, Dataset.padded_batch परिवर्तन आपको एक या अधिक आयामों को निर्दिष्ट करके अलग-अलग आकार के टेंसरों को बैचने में सक्षम बनाता है जिसमें उन्हें गद्देदार किया जा सकता है।
dataset = tf.data.Dataset.range(100)
dataset = dataset.map(lambda x: tf.fill([tf.cast(x, tf.int32)], x))
dataset = dataset.padded_batch(4, padded_shapes=(None,))

for batch in dataset.take(2):
  print(batch.numpy())
  print()
[[0 0 0]
 [1 0 0]
 [2 2 0]
 [3 3 3]]

[[4 4 4 4 0 0 0]
 [5 5 5 5 5 0 0]
 [6 6 6 6 6 6 0]
 [7 7 7 7 7 7 7]]
Dataset.padded_batch परिवर्तन आपको प्रत्येक घटक के प्रत्येक आयाम के लिए अलग-अलग पैडिंग सेट करने की अनुमति देता है, और यह चर-लंबाई (उपरोक्त उदाहरण में None द्वारा दर्शाया गया) या स्थिर-लंबाई हो सकता है। पैडिंग मान को ओवरराइड करना भी संभव है, जो डिफ़ॉल्ट रूप से 0 है।
प्रशिक्षण कार्यप्रवाह
कई युगों को संसाधित करना
tf.data API एक ही डेटा के कई युगों को संसाधित करने के दो मुख्य तरीके प्रदान करता है।
कई युगों में डेटासेट पर पुनरावृति करने का सबसे सरल तरीका है Dataset.repeat() परिवर्तन का उपयोग करना। सबसे पहले, टाइटैनिक डेटा का डेटासेट बनाएं:
titanic_file = tf.keras.utils.get_file("train.csv", "https://storage.googleapis.com/tf-datasets/titanic/train.csv")
titanic_lines = tf.data.TextLineDataset(titanic_file)
def plot_batch_sizes(ds):
  batch_sizes = [batch.shape[0] for batch in ds]
  plt.bar(range(len(batch_sizes)), batch_sizes)
  plt.xlabel('Batch number')
  plt.ylabel('Batch size')
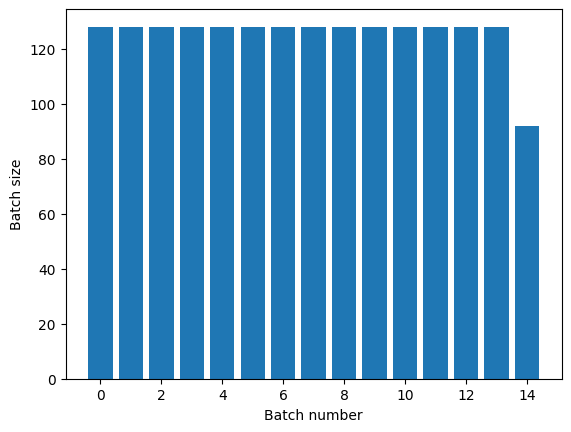
Dataset.repeat() परिवर्तन को बिना किसी तर्क के लागू करना इनपुट को अनिश्चित काल तक दोहराएगा।
Dataset.repeat परिवर्तन एक युग के अंत और अगले युग की शुरुआत के संकेत के बिना अपने तर्कों को जोड़ता है। इस वजह से Dataset.batch के बाद लागू किया गया Dataset.repeat उन बैचों को देगा जो युग की सीमाओं को फैलाते हैं:
titanic_batches = titanic_lines.repeat(3).batch(128)
plot_batch_sizes(titanic_batches)
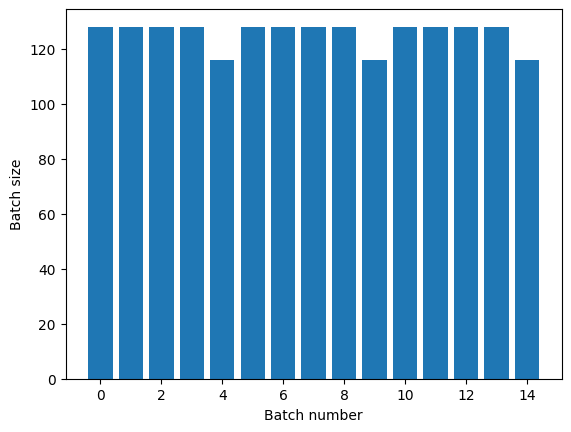
यदि आपको स्पष्ट युग पृथक्करण की आवश्यकता है, तो Dataset.batch को दोहराने से पहले रखें:
titanic_batches = titanic_lines.batch(128).repeat(3)

plot_batch_sizes(titanic_batches)
यदि आप प्रत्येक युग के अंत में एक कस्टम गणना (उदाहरण के लिए आंकड़े एकत्र करने के लिए) करना चाहते हैं तो प्रत्येक युग पर डेटासेट पुनरावृत्ति को पुनरारंभ करना सबसे आसान है:
epochs = 3
dataset = titanic_lines.batch(128)

for epoch in range(epochs):
  for batch in dataset:
    print(batch.shape)
  print("End of epoch: ", epoch)
(128,)
(128,)
(128,)
(128,)
(116,)
End of epoch:  0
(128,)
(128,)
(128,)
(128,)
(116,)
End of epoch:  1
(128,)
(128,)
(128,)
(128,)
(116,)
End of epoch:  2
इनपुट डेटा को बेतरतीब ढंग से फेरबदल करना
Dataset.shuffle() परिवर्तन एक निश्चित आकार के बफर को बनाए रखता है और अगले तत्व को समान रूप से यादृच्छिक रूप से उस बफर से चुनता है।
डेटासेट में एक इंडेक्स जोड़ें ताकि आप प्रभाव देख सकें:
lines = tf.data.TextLineDataset(titanic_file)
counter = tf.data.experimental.Counter()

dataset = tf.data.Dataset.zip((counter, lines))
dataset = dataset.shuffle(buffer_size=100)
dataset = dataset.batch(20)
dataset
<BatchDataset element_spec=(TensorSpec(shape=(None,), dtype=tf.int64, name=None), TensorSpec(shape=(None,), dtype=tf.string, name=None))>
चूंकि buffer_size 100 है, और बैच का आकार 20 है, पहले बैच में 120 से अधिक इंडेक्स वाले कोई तत्व नहीं हैं।
n,line_batch = next(iter(dataset))
print(n.numpy())
[ 52  94  22  70  63  96  56 102  38  16  27 104  89  43  41  68  42  61
 112   8]
जैसा कि Dataset.batch के साथ Dataset.batch के सापेक्ष Dataset.repeat मायने रखता है।
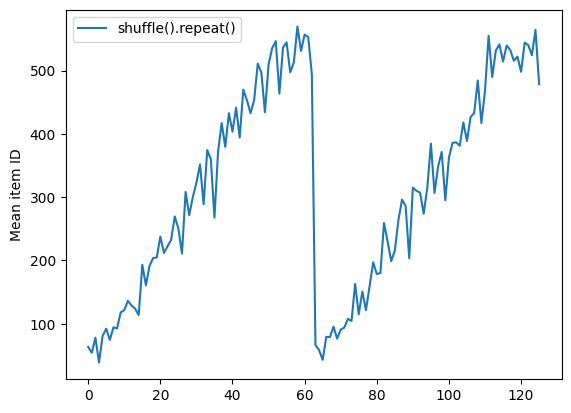
Dataset.shuffle एक युग के अंत का संकेत नहीं देता जब तक कि फेरबदल बफ़र खाली न हो। इसलिए दोहराव से पहले रखा गया फेरबदल अगले युग में जाने से पहले एक युग के प्रत्येक तत्व को दिखाएगा:
dataset = tf.data.Dataset.zip((counter, lines))
shuffled = dataset.shuffle(buffer_size=100).batch(10).repeat(2)

print("Here are the item ID's near the epoch boundary:\n")
for n, line_batch in shuffled.skip(60).take(5):
  print(n.numpy())
Here are the item ID's near the epoch boundary:

[509 595 537 550 555 591 480 627 482 519]
[522 619 538 581 569 608 531 558 461 496]
[548 489 379 607 611 622 234 525]
[ 59  38   4  90  73  84  27  51 107  12]
[77 72 91 60  7 62 92 47 70 67]
shuffle_repeat = [n.numpy().mean() for n, line_batch in shuffled]
plt.plot(shuffle_repeat, label="shuffle().repeat()")
plt.ylabel("Mean item ID")
plt.legend()
<matplotlib.legend.Legend at 0x7f7e7061c650>
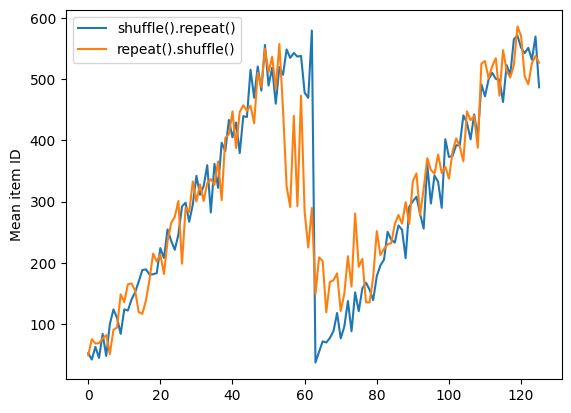
लेकिन एक फेरबदल से पहले एक दोहराव युग की सीमाओं को एक साथ मिलाता है:
dataset = tf.data.Dataset.zip((counter, lines))
shuffled = dataset.repeat(2).shuffle(buffer_size=100).batch(10)

print("Here are the item ID's near the epoch boundary:\n")
for n, line_batch in shuffled.skip(55).take(15):
  print(n.numpy())
Here are the item ID's near the epoch boundary:

[  6   8 528 604  13 492 308 441 569 475]
[  5 626 615 568  20 554 520 454  10 607]
[510 542   0 363  32 446 395 588  35   4]
[  7  15  28  23  39 559 585  49 252 556]
[581 617  25  43  26 548  29 460  48  41]
[ 19  64  24 300 612 611  36  63  69  57]
[287 605  21 512 442  33  50  68 608  47]
[625  90  91 613  67  53 606 344  16  44]
[453 448  89  45 465   2  31 618 368 105]
[565   3 586 114  37 464  12 627  30 621]
[ 82 117  72  75  84  17 571 610  18 600]
[107 597 575  88 623  86 101  81 456 102]
[122  79  51  58  80  61 367  38 537 113]
[ 71  78 598 152 143 620 100 158 133 130]
[155 151 144 135 146 121  83  27 103 134]
repeat_shuffle = [n.numpy().mean() for n, line_batch in shuffled]

plt.plot(shuffle_repeat, label="shuffle().repeat()")
plt.plot(repeat_shuffle, label="repeat().shuffle()")
plt.ylabel("Mean item ID")
plt.legend()
<matplotlib.legend.Legend at 0x7f7e706013d0>
प्रीप्रोसेसिंग डेटा
Dataset.map(f) रूपांतरण इनपुट डेटासेट के प्रत्येक तत्व के लिए दिए गए फ़ंक्शन f को लागू करके एक नया डेटासेट तैयार करता है। यह map() फ़ंक्शन पर आधारित है जो आमतौर पर कार्यात्मक प्रोग्रामिंग भाषाओं में सूचियों (और अन्य संरचनाओं) पर लागू होता है। फ़ंक्शन f tf.Tensor ऑब्जेक्ट लेता है जो इनपुट में एकल तत्व का प्रतिनिधित्व करता है, और tf.Tensor ऑब्जेक्ट देता है जो नए डेटासेट में एकल तत्व का प्रतिनिधित्व करेगा। इसका कार्यान्वयन एक तत्व को दूसरे में बदलने के लिए मानक TensorFlow संचालन का उपयोग करता है।
इस खंड में Dataset.map() का उपयोग करने के सामान्य उदाहरण शामिल हैं।
छवि डेटा को डिकोड करना और उसका आकार बदलना
वास्तविक दुनिया छवि डेटा पर एक तंत्रिका नेटवर्क को प्रशिक्षित करते समय, विभिन्न आकारों की छवियों को एक सामान्य आकार में परिवर्तित करना अक्सर आवश्यक होता है, ताकि उन्हें एक निश्चित आकार में बैच किया जा सके।
फूल फ़ाइल नाम डेटासेट का पुनर्निर्माण करें:
list_ds = tf.data.Dataset.list_files(str(flowers_root/'*/*'))
डेटासेट तत्वों में हेरफेर करने वाला एक फ़ंक्शन लिखें।
# Reads an image from a file, decodes it into a dense tensor, and resizes it
# to a fixed shape.
def parse_image(filename):
  parts = tf.strings.split(filename, os.sep)
  label = parts[-2]

  image = tf.io.read_file(filename)
  image = tf.io.decode_jpeg(image)
  image = tf.image.convert_image_dtype(image, tf.float32)
  image = tf.image.resize(image, [128, 128])
  return image, label
परीक्षण करें कि यह काम करता है।
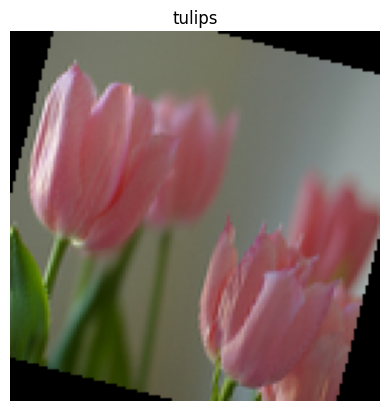
file_path = next(iter(list_ds))
image, label = parse_image(file_path)

def show(image, label):
  plt.figure()
  plt.imshow(image)
  plt.title(label.numpy().decode('utf-8'))
  plt.axis('off')

show(image, label)
इसे डेटासेट पर मैप करें।
images_ds = list_ds.map(parse_image)

for image, label in images_ds.take(2):
  show(image, label)
मनमाना पायथन तर्क लागू करना
प्रदर्शन कारणों से, जब भी संभव हो अपने डेटा को प्रीप्रोसेस करने के लिए TensorFlow संचालन का उपयोग करें। हालांकि, कभी-कभी आपके इनपुट डेटा को पार्स करते समय बाहरी पायथन पुस्तकालयों को कॉल करना उपयोगी होता है। आप Dataset.map() रूपांतरण में tf.py_function() ऑपरेशन का उपयोग कर सकते हैं।
उदाहरण के लिए, यदि आप एक यादृच्छिक रोटेशन लागू करना चाहते हैं, तो tf.image मॉड्यूल में केवल tf.image.rot90 है, जो छवि वृद्धि के लिए बहुत उपयोगी नहीं है।
tf.py_function प्रदर्शित करने के लिए, इसके बजाय scipy.ndimage.rotate फ़ंक्शन का उपयोग करके देखें:
import scipy.ndimage as ndimage

def random_rotate_image(image):
  image = ndimage.rotate(image, np.random.uniform(-30, 30), reshape=False)
  return image
image, label = next(iter(images_ds))
image = random_rotate_image(image)
show(image, label)
Clipping input data to the valid range for imshow with RGB data ([0..1] for floats or [0..255] for integers).
Dataset.map के साथ इस Dataset.from_generator का उपयोग करने के लिए।
def tf_random_rotate_image(image, label):
  im_shape = image.shape
  [image,] = tf.py_function(random_rotate_image, [image], [tf.float32])
  image.set_shape(im_shape)
  return image, label
rot_ds = images_ds.map(tf_random_rotate_image)

for image, label in rot_ds.take(2):
  show(image, label)
Clipping input data to the valid range for imshow with RGB data ([0..1] for floats or [0..255] for integers).
Clipping input data to the valid range for imshow with RGB data ([0..1] for floats or [0..255] for integers).
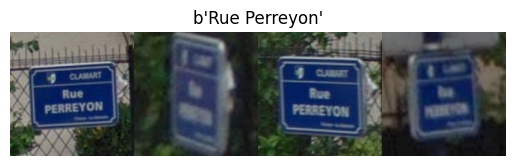
पार्सिंग tf.Example प्रोटोकॉल बफर संदेश
कई इनपुट पाइपलाइन tf.train.Example प्रोटोकॉल बफ़र संदेशों को TFRecord प्रारूप से निकालती हैं। प्रत्येक tf.train.Example रिकॉर्ड में एक या अधिक "सुविधाएँ" होती हैं, और इनपुट पाइपलाइन आमतौर पर इन सुविधाओं को टेंसर में बदल देती है।
fsns_test_file = tf.keras.utils.get_file("fsns.tfrec", "https://storage.googleapis.com/download.tensorflow.org/data/fsns-20160927/testdata/fsns-00000-of-00001")
dataset = tf.data.TFRecordDataset(filenames = [fsns_test_file])
dataset
<TFRecordDatasetV2 element_spec=TensorSpec(shape=(), dtype=tf.string, name=None)>
आप डेटा को समझने के लिए tf.data.Dataset protos के साथ tf.train.Example के बाहर काम कर सकते हैं:
raw_example = next(iter(dataset))
parsed = tf.train.Example.FromString(raw_example.numpy())

feature = parsed.features.feature
raw_img = feature['image/encoded'].bytes_list.value[0]
img = tf.image.decode_png(raw_img)
plt.imshow(img)
plt.axis('off')
_ = plt.title(feature["image/text"].bytes_list.value[0])
raw_example = next(iter(dataset))
def tf_parse(eg):
  example = tf.io.parse_example(
      eg[tf.newaxis], {
          'image/encoded': tf.io.FixedLenFeature(shape=(), dtype=tf.string),
          'image/text': tf.io.FixedLenFeature(shape=(), dtype=tf.string)
      })
  return example['image/encoded'][0], example['image/text'][0]
img, txt = tf_parse(raw_example)
print(txt.numpy())
print(repr(img.numpy()[:20]), "...")
b'Rue Perreyon'
b'\x89PNG\r\n\x1a\n\x00\x00\x00\rIHDR\x00\x00\x02X' ...
decoded = dataset.map(tf_parse)
decoded
<MapDataset element_spec=(TensorSpec(shape=(), dtype=tf.string, name=None), TensorSpec(shape=(), dtype=tf.string, name=None))>
image_batch, text_batch = next(iter(decoded.batch(10)))
image_batch.shape
TensorShape([10])
समय श्रृंखला विंडोिंग
एंड टू एंड टाइम सीरीज़ उदाहरण के लिए देखें: टाइम सीरीज़ फोरकास्टिंग ।
समय श्रृंखला डेटा को अक्सर समय अक्ष के साथ व्यवस्थित किया जाता है।
प्रदर्शित करने के लिए एक साधारण Dataset.range का उपयोग करें:
range_ds = tf.data.Dataset.range(100000)
आमतौर पर, इस प्रकार के डेटा पर आधारित मॉडल एक सन्निहित समय टुकड़ा चाहते हैं।
डेटा को बैच करने का सबसे आसान तरीका होगा:
batch का उपयोग करना
batches = range_ds.batch(10, drop_remainder=True)

for batch in batches.take(5):
  print(batch.numpy())
[0 1 2 3 4 5 6 7 8 9]
[10 11 12 13 14 15 16 17 18 19]
[20 21 22 23 24 25 26 27 28 29]
[30 31 32 33 34 35 36 37 38 39]
[40 41 42 43 44 45 46 47 48 49]
या भविष्य में एक कदम आगे की भविष्यवाणी करने के लिए, आप सुविधाओं और लेबल को एक दूसरे के सापेक्ष एक कदम से स्थानांतरित कर सकते हैं:
def dense_1_step(batch):
  # Shift features and labels one step relative to each other.
  return batch[:-1], batch[1:]

predict_dense_1_step = batches.map(dense_1_step)

for features, label in predict_dense_1_step.take(3):
  print(features.numpy(), " => ", label.numpy())
[0 1 2 3 4 5 6 7 8]  =>  [1 2 3 4 5 6 7 8 9]
[10 11 12 13 14 15 16 17 18]  =>  [11 12 13 14 15 16 17 18 19]
[20 21 22 23 24 25 26 27 28]  =>  [21 22 23 24 25 26 27 28 29]
एक निश्चित ऑफसेट के बजाय पूरी विंडो की भविष्यवाणी करने के लिए आप बैचों को दो भागों में विभाजित कर सकते हैं:
batches = range_ds.batch(15, drop_remainder=True)

def label_next_5_steps(batch):
  return (batch[:-5],   # Inputs: All except the last 5 steps
          batch[-5:])   # Labels: The last 5 steps

predict_5_steps = batches.map(label_next_5_steps)

for features, label in predict_5_steps.take(3):
  print(features.numpy(), " => ", label.numpy())
[0 1 2 3 4 5 6 7 8 9]  =>  [10 11 12 13 14]
[15 16 17 18 19 20 21 22 23 24]  =>  [25 26 27 28 29]
[30 31 32 33 34 35 36 37 38 39]  =>  [40 41 42 43 44]
एक बैच की सुविधाओं और दूसरे के लेबल के बीच कुछ ओवरलैप की अनुमति देने के लिए, Dataset.zip का उपयोग करें:
feature_length = 10
label_length = 3

features = range_ds.batch(feature_length, drop_remainder=True)
labels = range_ds.batch(feature_length).skip(1).map(lambda labels: labels[:label_length])

predicted_steps = tf.data.Dataset.zip((features, labels))

for features, label in predicted_steps.take(5):
  print(features.numpy(), " => ", label.numpy())
[0 1 2 3 4 5 6 7 8 9]  =>  [10 11 12]
[10 11 12 13 14 15 16 17 18 19]  =>  [20 21 22]
[20 21 22 23 24 25 26 27 28 29]  =>  [30 31 32]
[30 31 32 33 34 35 36 37 38 39]  =>  [40 41 42]
[40 41 42 43 44 45 46 47 48 49]  =>  [50 51 52]
window का उपयोग करना
Dataset.batch कार्यों का उपयोग करते समय, ऐसी परिस्थितियाँ होती हैं जहाँ आपको बेहतर नियंत्रण की आवश्यकता हो सकती है। Dataset.window विधि आपको पूर्ण नियंत्रण देती है, लेकिन इसके लिए कुछ देखभाल की आवश्यकता होती है: यह Datasets का Dataset देता है। विवरण के लिए डेटासेट संरचना देखें।
window_size = 5

windows = range_ds.window(window_size, shift=1)
for sub_ds in windows.take(5):
  print(sub_ds)
<_VariantDataset element_spec=TensorSpec(shape=(), dtype=tf.int64, name=None)>
<_VariantDataset element_spec=TensorSpec(shape=(), dtype=tf.int64, name=None)>
<_VariantDataset element_spec=TensorSpec(shape=(), dtype=tf.int64, name=None)>
<_VariantDataset element_spec=TensorSpec(shape=(), dtype=tf.int64, name=None)>
<_VariantDataset element_spec=TensorSpec(shape=(), dtype=tf.int64, name=None)>
Dataset.flat_map विधि डेटासेट का एक डेटासेट ले सकती है और उसे एकल डेटासेट में समतल कर सकती है:
for x in windows.flat_map(lambda x: x).take(30):
   print(x.numpy(), end=' ')
0 1 2 3 4 1 2 3 4 5 2 3 4 5 6 3 4 5 6 7 4 5 6 7 8 5 6 7 8 9
लगभग सभी मामलों में, आप पहले डेटासेट को .batch करना चाहेंगे:
def sub_to_batch(sub):
  return sub.batch(window_size, drop_remainder=True)

for example in windows.flat_map(sub_to_batch).take(5):
  print(example.numpy())
[0 1 2 3 4]
[1 2 3 4 5]
[2 3 4 5 6]
[3 4 5 6 7]
[4 5 6 7 8]
अब, आप देख सकते हैं कि shift तर्क नियंत्रित करता है कि प्रत्येक विंडो कितनी आगे बढ़ती है।
इसे एक साथ रखकर आप यह फ़ंक्शन लिख सकते हैं:
def make_window_dataset(ds, window_size=5, shift=1, stride=1):
  windows = ds.window(window_size, shift=shift, stride=stride)

  def sub_to_batch(sub):
    return sub.batch(window_size, drop_remainder=True)

  windows = windows.flat_map(sub_to_batch)
  return windows
ds = make_window_dataset(range_ds, window_size=10, shift = 5, stride=3)

for example in ds.take(10):
  print(example.numpy())
[ 0  3  6  9 12 15 18 21 24 27]
[ 5  8 11 14 17 20 23 26 29 32]
[10 13 16 19 22 25 28 31 34 37]
[15 18 21 24 27 30 33 36 39 42]
[20 23 26 29 32 35 38 41 44 47]
[25 28 31 34 37 40 43 46 49 52]
[30 33 36 39 42 45 48 51 54 57]
[35 38 41 44 47 50 53 56 59 62]
[40 43 46 49 52 55 58 61 64 67]
[45 48 51 54 57 60 63 66 69 72]
फिर पहले की तरह लेबल निकालना आसान है:
dense_labels_ds = ds.map(dense_1_step)

for inputs,labels in dense_labels_ds.take(3):
  print(inputs.numpy(), "=>", labels.numpy())
[ 0  3  6  9 12 15 18 21 24] => [ 3  6  9 12 15 18 21 24 27]
[ 5  8 11 14 17 20 23 26 29] => [ 8 11 14 17 20 23 26 29 32]
[10 13 16 19 22 25 28 31 34] => [13 16 19 22 25 28 31 34 37]
रीसेंपलिंग
बहुत वर्ग-असंतुलित डेटासेट के साथ काम करते समय, आप डेटासेट को फिर से नमूना करना चाह सकते हैं। tf.data ऐसा करने के लिए दो तरीके प्रदान करता है। क्रेडिट कार्ड धोखाधड़ी डेटासेट इस तरह की समस्या का एक अच्छा उदाहरण है।
zip_path = tf.keras.utils.get_file(
    origin='https://storage.googleapis.com/download.tensorflow.org/data/creditcard.zip',
    fname='creditcard.zip',
    extract=True)

csv_path = zip_path.replace('.zip', '.csv')
Downloading data from https://storage.googleapis.com/download.tensorflow.org/data/creditcard.zip
69156864/69155632 [==============================] - 2s 0us/step
69165056/69155632 [==============================] - 2s 0us/step
creditcard_ds = tf.data.experimental.make_csv_dataset(
    csv_path, batch_size=1024, label_name="Class",
    # Set the column types: 30 floats and an int.
    column_defaults=[float()]*30+[int()])
अब, वर्गों के वितरण की जाँच करें, यह अत्यधिक विषम है:
def count(counts, batch):
  features, labels = batch
  class_1 = labels == 1
  class_1 = tf.cast(class_1, tf.int32)

  class_0 = labels == 0
  class_0 = tf.cast(class_0, tf.int32)

  counts['class_0'] += tf.reduce_sum(class_0)
  counts['class_1'] += tf.reduce_sum(class_1)

  return counts
counts = creditcard_ds.take(10).reduce(
    initial_state={'class_0': 0, 'class_1': 0},
    reduce_func = count)

counts = np.array([counts['class_0'].numpy(),
                   counts['class_1'].numpy()]).astype(np.float32)

fractions = counts/counts.sum()
print(fractions)
[0.9956 0.0044]
असंतुलित डेटासेट के साथ प्रशिक्षण का एक सामान्य तरीका इसे संतुलित करना है। tf.data में कुछ विधियाँ शामिल हैं जो इस वर्कफ़्लो को सक्षम करती हैं:
डेटासेट नमूनाकरण
डेटासेट को फिर से नमूना करने का एक तरीका sample_from_datasets का उपयोग करना है। यह तब अधिक लागू होता है जब आपके पास एक अलग डेटा होता है। प्रत्येक वर्ग के लिए data.Dataset ।
यहां, क्रेडिट कार्ड धोखाधड़ी डेटा से उन्हें उत्पन्न करने के लिए बस फ़िल्टर का उपयोग करें:
negative_ds = (
  creditcard_ds
    .unbatch()
    .filter(lambda features, label: label==0)
    .repeat())
positive_ds = (
  creditcard_ds
    .unbatch()
    .filter(lambda features, label: label==1)
    .repeat())
for features, label in positive_ds.batch(10).take(1):
  print(label.numpy())
[1 1 1 1 1 1 1 1 1 1]
tf.data.Dataset.sample_from_datasets का उपयोग करने के लिए डेटासेट पास करें, और प्रत्येक के लिए वजन:
balanced_ds = tf.data.Dataset.sample_from_datasets(
    [negative_ds, positive_ds], [0.5, 0.5]).batch(10)
अब डेटासेट प्रत्येक वर्ग के उदाहरण 50/50 संभावना के साथ तैयार करता है:
for features, labels in balanced_ds.take(10):
  print(labels.numpy())
[1 0 1 0 1 0 1 1 1 1]
[0 0 1 1 0 1 1 1 1 1]
[1 1 1 1 0 0 1 0 1 0]
[1 1 1 0 1 0 0 1 1 1]
[0 1 0 1 1 1 0 1 1 0]
[0 1 0 0 0 1 0 0 0 0]
[1 1 1 1 1 0 0 1 1 0]
[0 0 0 1 0 1 1 1 0 0]
[0 0 1 1 1 1 0 1 1 1]
[1 0 0 1 1 1 1 0 1 1]
अस्वीकृति पुन: नमूनाकरण
उपरोक्त Dataset.sample_from_datasets दृष्टिकोण के साथ एक समस्या यह है कि इसे प्रति वर्ग एक अलग tf.data.Dataset की आवश्यकता है। आप उन दो डेटासेट को बनाने के लिए Dataset.filter का उपयोग कर सकते हैं, लेकिन इसके परिणामस्वरूप सभी डेटा दो बार लोड हो जाते हैं।
data.Dataset.rejection_resample विधि को किसी डेटासेट पर पुनर्संतुलन के लिए लागू किया जा सकता है, जबकि इसे केवल एक बार लोड किया जा सकता है। संतुलन हासिल करने के लिए तत्वों को डेटासेट से हटा दिया जाएगा।
data.Dataset.rejection_resample एक class_func तर्क लेता है। यह class_func प्रत्येक डेटासेट तत्व पर लागू होता है, और इसका उपयोग यह निर्धारित करने के लिए किया जाता है कि संतुलन के प्रयोजनों के लिए एक उदाहरण किस वर्ग का है।
यहां लक्ष्य योग्य वितरण को संतुलित करना है, और creditcard_ds के तत्व पहले से ही (features, label) जोड़े हैं। तो class_func को केवल उन लेबलों को वापस करने की आवश्यकता है:
def class_func(features, label):
  return label
पुन: नमूनाकरण विधि व्यक्तिगत उदाहरणों से संबंधित है, इसलिए इस मामले में आपको उस पद्धति को लागू करने से पहले डेटासेट को unbatch करना होगा।
विधि को लक्ष्य वितरण की आवश्यकता होती है, और वैकल्पिक रूप से इनपुट के रूप में प्रारंभिक वितरण अनुमान की आवश्यकता होती है।
resample_ds = (
    creditcard_ds
    .unbatch()
    .rejection_resample(class_func, target_dist=[0.5,0.5],
                        initial_dist=fractions)
    .batch(10))
WARNING:tensorflow:From /tmpfs/src/tf_docs_env/lib/python3.7/site-packages/tensorflow/python/data/ops/dataset_ops.py:5797: Print (from tensorflow.python.ops.logging_ops) is deprecated and will be removed after 2018-08-20.
Instructions for updating:
Use tf.print instead of tf.Print. Note that tf.print returns a no-output operator that directly prints the output. Outside of defuns or eager mode, this operator will not be executed unless it is directly specified in session.run or used as a control dependency for other operators. This is only a concern in graph mode. Below is an example of how to ensure tf.print executes in graph mode:
10एन-प्लेसहोल्डर190
rejection_resample विधि रिटर्न (class, example) जोड़े जहां class class_func का आउटपुट है। इस मामले में, example पहले से ही एक (feature, label) जोड़ी थी, इसलिए लेबल की अतिरिक्त कॉपी को छोड़ने के लिए map का उपयोग करें:
balanced_ds = resample_ds.map(lambda extra_label, features_and_label: features_and_label)
अब डेटासेट प्रत्येक वर्ग के उदाहरण 50/50 संभावना के साथ तैयार करता है:
for features, labels in balanced_ds.take(10):
  print(labels.numpy())
Proportion of examples rejected by sampler is high: [0.995605469][0.995605469 0.00439453125][0 1]
Proportion of examples rejected by sampler is high: [0.995605469][0.995605469 0.00439453125][0 1]
Proportion of examples rejected by sampler is high: [0.995605469][0.995605469 0.00439453125][0 1]
Proportion of examples rejected by sampler is high: [0.995605469][0.995605469 0.00439453125][0 1]
Proportion of examples rejected by sampler is high: [0.995605469][0.995605469 0.00439453125][0 1]
Proportion of examples rejected by sampler is high: [0.995605469][0.995605469 0.00439453125][0 1]
Proportion of examples rejected by sampler is high: [0.995605469][0.995605469 0.00439453125][0 1]
Proportion of examples rejected by sampler is high: [0.995605469][0.995605469 0.00439453125][0 1]
Proportion of examples rejected by sampler is high: [0.995605469][0.995605469 0.00439453125][0 1]
Proportion of examples rejected by sampler is high: [0.995605469][0.995605469 0.00439453125][0 1]
[0 1 1 1 0 1 1 0 1 1]
[1 1 0 1 0 0 0 0 1 1]
[1 1 1 1 0 0 0 0 1 1]
[1 0 0 1 0 0 1 0 1 1]
[1 0 0 0 0 1 0 0 0 0]
[1 0 0 1 1 0 1 1 1 0]
[1 1 0 0 0 0 0 0 0 1]
[0 0 1 0 0 0 1 0 1 1]
[0 1 0 1 0 1 0 0 0 1]
[0 0 0 0 0 0 0 0 1 1]
इटरेटर चेकपॉइंटिंग
Tensorflow चौकियों को लेने का समर्थन करता है ताकि जब आपकी प्रशिक्षण प्रक्रिया फिर से शुरू हो जाए तो यह अपनी अधिकांश प्रगति को पुनर्प्राप्त करने के लिए नवीनतम चेकपॉइंट को पुनर्स्थापित कर सके। मॉडल चर को चेकपॉइंट करने के अलावा, आप डेटासेट इटरेटर की प्रगति की जांच भी कर सकते हैं। यह उपयोगी हो सकता है यदि आपके पास एक बड़ा डेटासेट है और प्रत्येक पुनरारंभ पर शुरुआत से डेटासेट प्रारंभ नहीं करना चाहते हैं। ध्यान दें कि इटरेटर चौकियां बड़ी हो सकती हैं, क्योंकि shuffle और prefetch जैसे परिवर्तनों के लिए इटरेटर के भीतर बफरिंग तत्वों की आवश्यकता होती है।
अपने इटरेटर को चेकपॉइंट में शामिल करने के लिए, इटरेटर को tf.train.Checkpoint कंस्ट्रक्टर को पास करें।
range_ds = tf.data.Dataset.range(20)

iterator = iter(range_ds)
ckpt = tf.train.Checkpoint(step=tf.Variable(0), iterator=iterator)
manager = tf.train.CheckpointManager(ckpt, '/tmp/my_ckpt', max_to_keep=3)

print([next(iterator).numpy() for _ in range(5)])

save_path = manager.save()

print([next(iterator).numpy() for _ in range(5)])

ckpt.restore(manager.latest_checkpoint)

print([next(iterator).numpy() for _ in range(5)])
[0, 1, 2, 3, 4]
[5, 6, 7, 8, 9]
[5, 6, 7, 8, 9]
tf.keras के साथ tf.data का उपयोग करना
tf.keras API मशीन लर्निंग मॉडल बनाने और निष्पादित करने के कई पहलुओं को सरल करता है। इसके .fit( .fit() और .evaluate() और .predict() API इनपुट के रूप में डेटासेट का समर्थन करते हैं। यहाँ एक त्वरित डेटासेट और मॉडल सेटअप है:
train, test = tf.keras.datasets.fashion_mnist.load_data()

images, labels = train
images = images/255.0
labels = labels.astype(np.int32)
fmnist_train_ds = tf.data.Dataset.from_tensor_slices((images, labels))
fmnist_train_ds = fmnist_train_ds.shuffle(5000).batch(32)

model = tf.keras.Sequential([
  tf.keras.layers.Flatten(),
  tf.keras.layers.Dense(10)
])

model.compile(optimizer='adam',
              loss=tf.keras.losses.SparseCategoricalCrossentropy(from_logits=True),
              metrics=['accuracy'])
Model.fit और Model.evaluate के लिए (feature, label) जोड़े का एक डेटासेट पास करना आवश्यक है:
model.fit(fmnist_train_ds, epochs=2)
Epoch 1/2
1875/1875 [==============================] - 4s 2ms/step - loss: 0.5984 - accuracy: 0.7973
Epoch 2/2
1875/1875 [==============================] - 4s 2ms/step - loss: 0.4607 - accuracy: 0.8430
<keras.callbacks.History at 0x7f7e70283110>
यदि आप एक अनंत डेटासेट पास करते हैं, उदाहरण के लिए Dataset.repeat() को कॉल करके, तो आपको बस steps_per_epoch तर्क को भी पास करना होगा:
model.fit(fmnist_train_ds.repeat(), epochs=2, steps_per_epoch=20)
Epoch 1/2
20/20 [==============================] - 0s 2ms/step - loss: 0.4574 - accuracy: 0.8672
Epoch 2/2
20/20 [==============================] - 0s 2ms/step - loss: 0.4216 - accuracy: 0.8562
<keras.callbacks.History at 0x7f7e144948d0>
मूल्यांकन के लिए आप मूल्यांकन चरणों की संख्या पास कर सकते हैं:
loss, accuracy = model.evaluate(fmnist_train_ds)
print("Loss :", loss)
print("Accuracy :", accuracy)
1875/1875 [==============================] - 4s 2ms/step - loss: 0.4350 - accuracy: 0.8524
Loss : 0.4350026249885559
Accuracy : 0.8524333238601685
लंबे डेटासेट के लिए, मूल्यांकन करने के लिए चरणों की संख्या सेट करें:
loss, accuracy = model.evaluate(fmnist_train_ds.repeat(), steps=10)
print("Loss :", loss)
print("Accuracy :", accuracy)
10/10 [==============================] - 0s 2ms/step - loss: 0.4345 - accuracy: 0.8687
Loss : 0.43447819352149963
Accuracy : 0.8687499761581421
Model.predict को कॉल करते समय लेबल की आवश्यकता नहीं होती है।
predict_ds = tf.data.Dataset.from_tensor_slices(images).batch(32)
result = model.predict(predict_ds, steps = 10)
print(result.shape)
(320, 10)
लेकिन यदि आप कोई डेटासेट पास करते हैं तो लेबल को नज़रअंदाज़ कर दिया जाता है:
result = model.predict(fmnist_train_ds, steps = 10)
print(result.shape)
(320, 10)