
| | |  गिटहब पर देखें गिटहब पर देखें | | |
यह Colab एक जनरेटिव एडवरसैरियल नेटवर्क (GAN) पर आधारित TF हब मॉड्यूल के उपयोग को प्रदर्शित करता है। मॉड्यूल एन-आयामी वैक्टर से मैप करता है, जिसे गुप्त स्थान कहा जाता है, आरजीबी छवियों के लिए।
दो उदाहरण दिए गए हैं:
- अव्यक्त अंतरिक्ष से छवियों का मिलान, और
- लक्ष्य छवि को देखते हुए, ढाल वंश का उपयोग कर एक अव्यक्त वेक्टर कि लक्ष्य छवि के लिए इसी तरह एक छवि उत्पन्न करता है खोजने के लिए।
वैकल्पिक पूर्वापेक्षाएँ
- साथ परिचित निम्न स्तर Tensorflow अवधारणाओं ।
- उत्पादक विरोधात्मक नेटवर्क विकिपीडिया पर।
- प्रगतिशील Gans पर पेपर: प्रगतिशील बेहतर गुणवत्ता, स्थिरता, और रूपांतर के लिए Gans के बढ़ते ।
अधिक मॉडल
यहाँ आप वर्तमान पर होस्ट सभी मॉडलों पा सकते हैं tfhub.dev कि छवियों उत्पन्न कर सकते हैं।
सेट अप
# Install imageio for creating animations.pip -q install imageiopip -q install scikit-imagepip install git+https://github.com/tensorflow/docs
आयात और कार्य परिभाषाएँ
from absl import logging

import imageio
import PIL.Image
import matplotlib.pyplot as plt
import numpy as np

import tensorflow as tf
tf.random.set_seed(0)

import tensorflow_hub as hub
from tensorflow_docs.vis import embed
import time

try:
  from google.colab import files
except ImportError:
  pass

from IPython import display
from skimage import transform

# We could retrieve this value from module.get_input_shapes() if we didn't know
# beforehand which module we will be using.
latent_dim = 512


# Interpolates between two vectors that are non-zero and don't both lie on a
# line going through origin. First normalizes v2 to have the same norm as v1.
# Then interpolates between the two vectors on the hypersphere.
def interpolate_hypersphere(v1, v2, num_steps):
  v1_norm = tf.norm(v1)
  v2_norm = tf.norm(v2)
  v2_normalized = v2 * (v1_norm / v2_norm)

  vectors = []
  for step in range(num_steps):
    interpolated = v1 + (v2_normalized - v1) * step / (num_steps - 1)
    interpolated_norm = tf.norm(interpolated)
    interpolated_normalized = interpolated * (v1_norm / interpolated_norm)
    vectors.append(interpolated_normalized)
  return tf.stack(vectors)

# Simple way to display an image.
def display_image(image):
  image = tf.constant(image)
  image = tf.image.convert_image_dtype(image, tf.uint8)
  return PIL.Image.fromarray(image.numpy())

# Given a set of images, show an animation.
def animate(images):
  images = np.array(images)
  converted_images = np.clip(images * 255, 0, 255).astype(np.uint8)
  imageio.mimsave('./animation.gif', converted_images)
  return embed.embed_file('./animation.gif')

logging.set_verbosity(logging.ERROR)
गुप्त स्थान प्रक्षेप
यादृच्छिक वैक्टर
दो बेतरतीब ढंग से आरंभिक वैक्टर के बीच गुप्त स्थान प्रक्षेप। हम एक TF हब मॉड्यूल का उपयोग करेगा progan-128 है जिसमें पूर्व-प्रशिक्षित प्रगतिशील GAN शामिल हैं।
progan = hub.load("https://tfhub.dev/google/progan-128/1").signatures['default']
def interpolate_between_vectors():
  v1 = tf.random.normal([latent_dim])
  v2 = tf.random.normal([latent_dim])

  # Creates a tensor with 25 steps of interpolation between v1 and v2.
  vectors = interpolate_hypersphere(v1, v2, 50)

  # Uses module to generate images from the latent space.
  interpolated_images = progan(vectors)['default']

  return interpolated_images

interpolated_images = interpolate_between_vectors()
animate(interpolated_images)
गुप्त स्थान में निकटतम वेक्टर ढूँढना
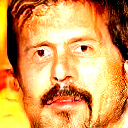
एक लक्ष्य छवि को ठीक करें। एक उदाहरण के रूप में मॉड्यूल से उत्पन्न एक छवि का उपयोग करें या अपना खुद का अपलोड करें।
image_from_module_space = True  # @param { isTemplate:true, type:"boolean" }

def get_module_space_image():
  vector = tf.random.normal([1, latent_dim])
  images = progan(vector)['default'][0]
  return images

def upload_image():
  uploaded = files.upload()
  image = imageio.imread(uploaded[list(uploaded.keys())[0]])
  return transform.resize(image, [128, 128])

if image_from_module_space:
  target_image = get_module_space_image()
else:
  target_image = upload_image()

display_image(target_image)
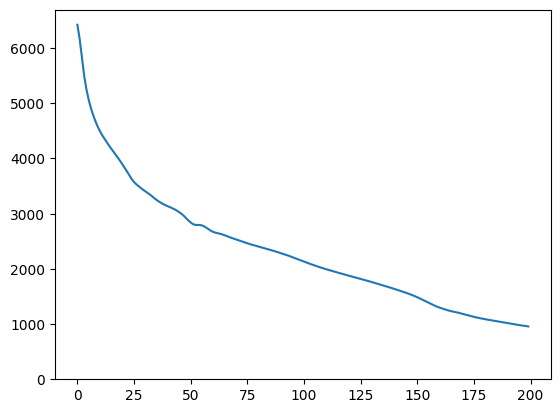
लक्ष्य छवि और एक गुप्त स्थान चर द्वारा उत्पन्न छवि के बीच एक हानि फ़ंक्शन को परिभाषित करने के बाद, हम नुकसान को कम करने वाले चर मानों को खोजने के लिए ग्रेडिएंट डिसेंट का उपयोग कर सकते हैं।
tf.random.set_seed(42)
initial_vector = tf.random.normal([1, latent_dim])
display_image(progan(initial_vector)['default'][0])

def find_closest_latent_vector(initial_vector, num_optimization_steps,
                               steps_per_image):
  images = []
  losses = []

  vector = tf.Variable(initial_vector)
  optimizer = tf.optimizers.Adam(learning_rate=0.01)
  loss_fn = tf.losses.MeanAbsoluteError(reduction="sum")

  for step in range(num_optimization_steps):
    if (step % 100)==0:
      print()
    print('.', end='')
    with tf.GradientTape() as tape:
      image = progan(vector.read_value())['default'][0]
      if (step % steps_per_image) == 0:
        images.append(image.numpy())
      target_image_difference = loss_fn(image, target_image[:,:,:3])
      # The latent vectors were sampled from a normal distribution. We can get
      # more realistic images if we regularize the length of the latent vector to
      # the average length of vector from this distribution.
      regularizer = tf.abs(tf.norm(vector) - np.sqrt(latent_dim))

      loss = target_image_difference + regularizer
      losses.append(loss.numpy())
    grads = tape.gradient(loss, [vector])
    optimizer.apply_gradients(zip(grads, [vector]))

  return images, losses


num_optimization_steps=200
steps_per_image=5
images, loss = find_closest_latent_vector(initial_vector, num_optimization_steps, steps_per_image)
....................................................................................................
....................................................................................................
plt.plot(loss)
plt.ylim([0,max(plt.ylim())])
(0.0, 6696.301751708985)
animate(np.stack(images))

परिणाम की तुलना लक्ष्य से करें:
display_image(np.concatenate([images[-1], target_image], axis=1))

उपरोक्त उदाहरण के साथ खेलना
यदि छवि मॉड्यूल स्थान से है, तो अवतरण त्वरित है और एक उचित नमूने में परिवर्तित हो जाता है। एक छवि है कि मॉड्यूल अंतरिक्ष से नहीं है करने के लिए उतरते बाहर की कोशिश करो। वंश केवल तभी अभिसरण करेगा जब छवि प्रशिक्षण छवियों के स्थान के काफी करीब हो।
इसे तेजी से और अधिक यथार्थवादी छवि में कैसे उतारा जाए? कोई कोशिश कर सकता है:
- छवि अंतर पर विभिन्न नुकसान का उपयोग करना, उदाहरण के लिए द्विघात,
- अव्यक्त वेक्टर पर विभिन्न नियमितकर्ता का उपयोग करना,
- एकाधिक रनों में एक यादृच्छिक वेक्टर से प्रारंभ करना,
- आदि।