
 GitHub でソースを表示 GitHub でソースを表示 |
import tensorflow as tf
import numpy as np
2024-01-11 18:52:42.092406: E external/local_xla/xla/stream_executor/cuda/cuda_dnn.cc:9261] Unable to register cuDNN factory: Attempting to register factory for plugin cuDNN when one has already been registered
2024-01-11 18:52:42.092450: E external/local_xla/xla/stream_executor/cuda/cuda_fft.cc:607] Unable to register cuFFT factory: Attempting to register factory for plugin cuFFT when one has already been registered
2024-01-11 18:52:42.094012: E external/local_xla/xla/stream_executor/cuda/cuda_blas.cc:1515] Unable to register cuBLAS factory: Attempting to register factory for plugin cuBLAS when one has already been registered
テンソルは dtype と呼ばれる均一型の多次元配列です。サポートされているすべての dtypes は、tf.dtypes.DType で確認できます。
NumPy をよく知っているのであれば、テンソルは(どちらかと言えば)np.arrays のようなものです。
すべてのテンソルは、Python の数値や文字列と同じように不変です。つまり、テンソルのコンテンツを更新することは不可能で、新しいテンソルのみを作成できます。
基礎
まずは、基本的なテンソルを作成します。
次は、「スカラー」または「階数 0」のテンソルです。スカラーには単一の値のみが含まれ、「軸」は存在しません。
# This will be an int32 tensor by default; see "dtypes" below.
rank_0_tensor = tf.constant(4)
print(rank_0_tensor)
tf.Tensor(4, shape=(), dtype=int32)
「ベクトル」または「階数 1」テンソルは、値のリストとして考えられます。1 ベクトルは 1 つの軸です。
# Let's make this a float tensor.
rank_1_tensor = tf.constant([2.0, 3.0, 4.0])
print(rank_1_tensor)
tf.Tensor([2. 3. 4.], shape=(3,), dtype=float32)
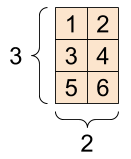
「行列」または「階数 2」テンソルには軸が 2 つあります。
# If you want to be specific, you can set the dtype (see below) at creation time
rank_2_tensor = tf.constant([[1, 2],
                             [3, 4],
                             [5, 6]], dtype=tf.float16)
print(rank_2_tensor)
tf.Tensor(
[[1. 2.]
 [3. 4.]
 [5. 6.]], shape=(3, 2), dtype=float16)
スカラー, 形状: [] |
ベクトル, 形状: [3] |
行列, 形状: [3, 2] |
|---|---|---|
 |
 |
 |
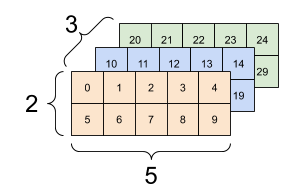
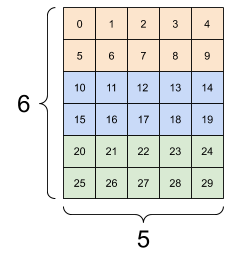
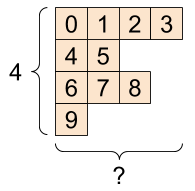
テンソルにはさらに軸がある場合があります。次は、3 軸のテンソルです。
# There can be an arbitrary number of
# axes (sometimes called "dimensions")
rank_3_tensor = tf.constant([
  [[0, 1, 2, 3, 4],
   [5, 6, 7, 8, 9]],
  [[10, 11, 12, 13, 14],
   [15, 16, 17, 18, 19]],
  [[20, 21, 22, 23, 24],
   [25, 26, 27, 28, 29]],])

print(rank_3_tensor)
tf.Tensor(
[[[ 0  1  2  3  4]
  [ 5  6  7  8  9]]

 [[10 11 12 13 14]
  [15 16 17 18 19]]

 [[20 21 22 23 24]
  [25 26 27 28 29]]], shape=(3, 2, 5), dtype=int32)
3 軸以上のテンソルを視覚化する方法はたくさんあります。
3 軸テンソル, 形状: [3, 2, 5] |
||
|---|---|---|
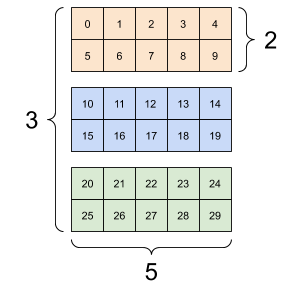 |
 |
 |
np.array または tensor.numpy メソッドを使用して、テンソルを NumPy 配列に変換できます。
np.array(rank_2_tensor)
array([[1., 2.],
       [3., 4.],
       [5., 6.]], dtype=float16)
rank_2_tensor.numpy()
array([[1., 2.],
       [3., 4.],
       [5., 6.]], dtype=float16)
テンソルには、通常、浮動小数点型や整数型が含まれますが、次のようなほかの型も含まれます。
- 複素数
- 文字列
基本の tf.Tensor クラスには、「矩形」を成すテンソルが必要です。つまり各要素は、各軸に沿って同じサイズになります。ただし、次のように、異なる形状を処理できる特殊なテンソルもあります。
- 不規則(以下の RaggedTensor を参照)
- スパース(以下の SparseTensor を参照)
テンソルには、加算、要素ごとの乗算、および行列の乗算などの基本的な計算を実行できます。
a = tf.constant([[1, 2],
                 [3, 4]])
b = tf.constant([[1, 1],
                 [1, 1]]) # Could have also said `tf.ones([2,2], dtype=tf.int32)`

print(tf.add(a, b), "\n")
print(tf.multiply(a, b), "\n")
print(tf.matmul(a, b), "\n")
tf.Tensor(
[[2 3]
 [4 5]], shape=(2, 2), dtype=int32)

tf.Tensor(
[[1 2]
 [3 4]], shape=(2, 2), dtype=int32)

tf.Tensor(
[[3 3]
 [7 7]], shape=(2, 2), dtype=int32)
print(a + b, "\n") # element-wise addition
print(a * b, "\n") # element-wise multiplication
print(a @ b, "\n") # matrix multiplication
tf.Tensor(
[[2 3]
 [4 5]], shape=(2, 2), dtype=int32)

tf.Tensor(
[[1 2]
 [3 4]], shape=(2, 2), dtype=int32)

tf.Tensor(
[[3 3]
 [7 7]], shape=(2, 2), dtype=int32)
テンソルはあらゆる種類の演算(または「Ops」)に使用されます。
c = tf.constant([[4.0, 5.0], [10.0, 1.0]])

# Find the largest value
print(tf.reduce_max(c))
# Find the index of the largest value
print(tf.math.argmax(c))
# Compute the softmax
print(tf.nn.softmax(c))
tf.Tensor(10.0, shape=(), dtype=float32)
tf.Tensor([1 0], shape=(2,), dtype=int64)
tf.Tensor(
[[2.6894143e-01 7.3105854e-01]
 [9.9987662e-01 1.2339458e-04]], shape=(2, 2), dtype=float32)
注意: 通常、TensorFlow 関数が Tensor を入力として期待する場合、関数は tf.convert_to_tensor を使用して Tensor に変換できるものをすべて受け入れます。例については、以下をご覧ください。
tf.convert_to_tensor([1,2,3])
<tf.Tensor: shape=(3,), dtype=int32, numpy=array([1, 2, 3], dtype=int32)>
tf.reduce_max([1,2,3])
<tf.Tensor: shape=(), dtype=int32, numpy=3>
tf.reduce_max(np.array([1,2,3]))
<tf.Tensor: shape=(), dtype=int64, numpy=3>
形状について
テンソルには形状があり、次のような用語が使用されます。
- 形状: テンソルの各軸の長さ(要素の数)。
- 階数: テンソルの軸数。スカラーは階数 0、ベクトルは階数 1、行列は階数 2 となります。
- 軸または次元: テンソルの特定の次元。
- サイズ: 形状ベクトルの要素の積である、テンソル内の項目の総数。
注意: 「2 次元のテンソル」と記述されることもありますが、階数 2 のテンソルは、通常 2 次元形状ではありません。
テンソルと tf.TensorShape オブジェクトには、次にアクセスするための便利なプロパティがあります。
rank_4_tensor = tf.zeros([3, 2, 4, 5])
階数 4 テンソル, 形状: [3, 2, 4, 5] |
|
|---|---|

|
 |
print("Type of every element:", rank_4_tensor.dtype)
print("Number of axes:", rank_4_tensor.ndim)
print("Shape of tensor:", rank_4_tensor.shape)
print("Elements along axis 0 of tensor:", rank_4_tensor.shape[0])
print("Elements along the last axis of tensor:", rank_4_tensor.shape[-1])
print("Total number of elements (3*2*4*5): ", tf.size(rank_4_tensor).numpy())
Type of every element: <dtype: 'float32'>
Number of axes: 4
Shape of tensor: (3, 2, 4, 5)
Elements along axis 0 of tensor: 3
Elements along the last axis of tensor: 5
Total number of elements (3*2*4*5):  120
ただし、Tensor.ndim および Tensor.shape 属性は Tensor オブジェクトを返さないことに注意してください。Tensor が必要な場合は、tf.rank または tf.shape 関数を使用します。この違いは微妙ですが、グラフを作成するときに重要になる場合があります(後で作成します)。
tf.rank(rank_4_tensor)
<tf.Tensor: shape=(), dtype=int32, numpy=4>
tf.shape(rank_4_tensor)
<tf.Tensor: shape=(4,), dtype=int32, numpy=array([3, 2, 4, 5], dtype=int32)>
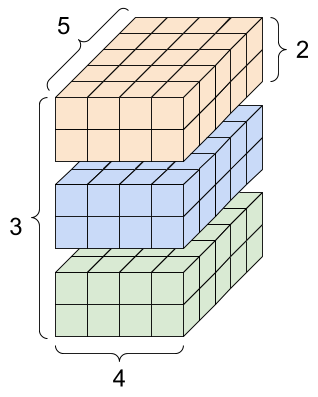
軸は通常、そのインデックスで参照されますが、それぞれの意味を常に把握しておく必要があります。多くの場合、軸はグローバルからローカルに順序付けられています。バッチ軸を先頭に、空間次元、そして最後に各位置の特徴量が続きます。こうすることで、特徴ベクトルは連続したメモリ領域となります。
| 典型的な軸の順序 |
|---|
 |
インデックス作成
単軸のインデックス作成
TensorFlow は、Python でのリストまたは文字列のインデックス作成と同様の標準的な Python インデックス作成ルールや NumPy インデックス作成の基本ルールを使用しています。
- インデックスは
0から開始 - 負のインデックスは後ろ側から逆順に数える
- スライスにコロン
:を使用 -start:stop:step
rank_1_tensor = tf.constant([0, 1, 1, 2, 3, 5, 8, 13, 21, 34])
print(rank_1_tensor.numpy())
[ 0 1 1 2 3 5 8 13 21 34]
スカラーを使用してインデックスを作成すると、軸が削除されます。
print("First:", rank_1_tensor[0].numpy())
print("Second:", rank_1_tensor[1].numpy())
print("Last:", rank_1_tensor[-1].numpy())
First: 0
Second: 1
Last: 34
: スライスを使用してインデックスを作成すると、軸が維持されます。
print("Everything:", rank_1_tensor[:].numpy())
print("Before 4:", rank_1_tensor[:4].numpy())
print("From 4 to the end:", rank_1_tensor[4:].numpy())
print("From 2, before 7:", rank_1_tensor[2:7].numpy())
print("Every other item:", rank_1_tensor[::2].numpy())
print("Reversed:", rank_1_tensor[::-1].numpy())
Everything: [ 0  1  1  2  3  5  8 13 21 34]
Before 4: [0 1 1 2]
From 4 to the end: [ 3  5  8 13 21 34]
From 2, before 7: [1 2 3 5 8]
Every other item: [ 0  1  3  8 21]
Reversed: [34 21 13  8  5  3  2  1  1  0]
多軸のインデックス作成
階数の高いテンソルは、複数のインデックスを渡してインデックス化されます。
単軸とまったく同じルールが各軸に個別に適用されます。
print(rank_2_tensor.numpy())
[[1. 2.]
 [3. 4.]
 [5. 6.]]
各インデックスに整数を渡すと、結果はスカラーになります。
# Pull out a single value from a 2-rank tensor
print(rank_2_tensor[1, 1].numpy())
4.0
整数とスライスを任意に組み合わせてインデックスを作成することができます。
# Get row and column tensors
print("Second row:", rank_2_tensor[1, :].numpy())
print("Second column:", rank_2_tensor[:, 1].numpy())
print("Last row:", rank_2_tensor[-1, :].numpy())
print("First item in last column:", rank_2_tensor[0, -1].numpy())
print("Skip the first row:")
print(rank_2_tensor[1:, :].numpy(), "\n")
Second row: [3. 4.]
Second column: [2. 4. 6.]
Last row: [5. 6.]
First item in last column: 2.0
Skip the first row:
[[3. 4.]
 [5. 6.]]
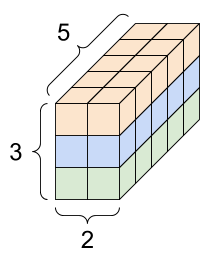
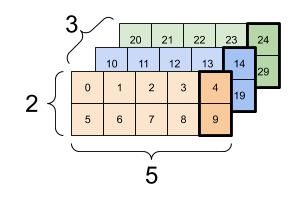
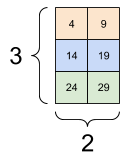
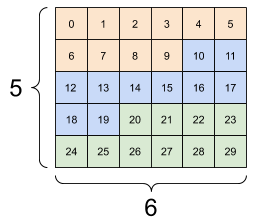
次は、3 軸テンソルを使用した例です。
print(rank_3_tensor[:, :, 4])
tf.Tensor(
[[ 4  9]
 [14 19]
 [24 29]], shape=(3, 2), dtype=int32)
| バッチ内の各例のすべての位置で最後の特徴量を選択する | |
|---|---|
 |
 |
テンソル内の複数の個別の要素にインデックス作成を適用する方法については、テンソルのスライスガイドをご覧ください。
形状の操作
テンソルの形状変更は非常に便利です。
# Shape returns a `TensorShape` object that shows the size along each axis
x = tf.constant([[1], [2], [3]])
print(x.shape)
(3, 1)
# You can convert this object into a Python list, too
print(x.shape.as_list())
[3, 1]
テンソルを新しい形状に変更できます。tf.reshape 演算は、基盤のデータを複製する必要がないため、素早く簡単に行えます。
# You can reshape a tensor to a new shape.
# Note that you're passing in a list
reshaped = tf.reshape(x, [1, 3])
print(x.shape)
print(reshaped.shape)
(3, 1)
(1, 3)
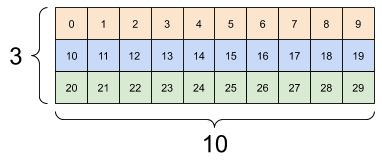
データはレイアウトをメモリに維持したまま、同じデータにポイントする新しいテンソルが要求された形状で作成されます。TensorFlow は C 形式の「行優先」メモリ順序付けを使用しており、右端のインデックスの増分は、メモリ内の 1 ステップに相当します。
print(rank_3_tensor)
tf.Tensor(
[[[ 0  1  2  3  4]
  [ 5  6  7  8  9]]

 [[10 11 12 13 14]
  [15 16 17 18 19]]

 [[20 21 22 23 24]
  [25 26 27 28 29]]], shape=(3, 2, 5), dtype=int32)
テンソルをフラット化すると、どの順序でメモリにレイアウトされているかを確認できます。
# A `-1` passed in the `shape` argument says "Whatever fits".
print(tf.reshape(rank_3_tensor, [-1]))
tf.Tensor(
[ 0  1  2  3  4  5  6  7  8  9 10 11 12 13 14 15 16 17 18 19 20 21 22 23
 24 25 26 27 28 29], shape=(30,), dtype=int32)
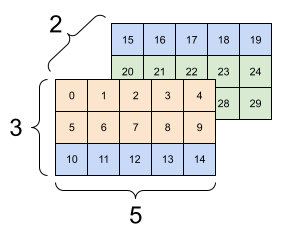
通常、tf.reshape の唯一合理的な使用は、隣接する軸を結合または分割する(または 1 を追加/削除する)ことです。
この 3x2x5 のテンソルでは、スライスは混合しないため、(3x2)x5 または 3x(2x5) に形状を変更するのが合理的です。
print(tf.reshape(rank_3_tensor, [3*2, 5]), "\n")
print(tf.reshape(rank_3_tensor, [3, -1]))
tf.Tensor(
[[ 0  1  2  3  4]
 [ 5  6  7  8  9]
 [10 11 12 13 14]
 [15 16 17 18 19]
 [20 21 22 23 24]
 [25 26 27 28 29]], shape=(6, 5), dtype=int32)

tf.Tensor(
[[ 0  1  2  3  4  5  6  7  8  9]
 [10 11 12 13 14 15 16 17 18 19]
 [20 21 22 23 24 25 26 27 28 29]], shape=(3, 10), dtype=int32)
| 形状変更の成功例。 | ||
|---|---|---|
 |
 |
 |
形状変更は要素の総数が等しい新しい形状で「機能」しますが、軸の順を守らなければ役に立ちません。
tf.reshape では軸の交換は機能しないため、それを行うには tf.transpose が必要です。
# Bad examples: don't do this

# You can't reorder axes with reshape.
print(tf.reshape(rank_3_tensor, [2, 3, 5]), "\n")

# This is a mess
print(tf.reshape(rank_3_tensor, [5, 6]), "\n")

# This doesn't work at all
try:
  tf.reshape(rank_3_tensor, [7, -1])
except Exception as e:
  print(f"{type(e).__name__}: {e}")
tf.Tensor(
[[[ 0  1  2  3  4]
  [ 5  6  7  8  9]
  [10 11 12 13 14]]

 [[15 16 17 18 19]
  [20 21 22 23 24]
  [25 26 27 28 29]]], shape=(2, 3, 5), dtype=int32)

tf.Tensor(
[[ 0  1  2  3  4  5]
 [ 6  7  8  9 10 11]
 [12 13 14 15 16 17]
 [18 19 20 21 22 23]
 [24 25 26 27 28 29]], shape=(5, 6), dtype=int32)

InvalidArgumentError: { {function_node __wrapped__Reshape_device_/job:localhost/replica:0/task:0/device:GPU:0} } Input to reshape is a tensor with 30 values, but the requested shape requires a multiple of 7 [Op:Reshape]
| 形状変更の失敗例。 | ||
|---|---|---|
 |
 |
 |
不完全に指定された形状を実行することができます。その形状には None(軸の長さが不明)が含まれているか、形状が None(テンソルの階数が不明)であるかのいずれかです。
tf.RaggedTensor を除き、このような形状は TensorFlow の象徴的なグラフ構築 API のコンテキストでのみ発生します。
DTypes をさらに詳しく
tf.Tensor のデータ型を検査するには、Tensor.dtype プロパティを使用します。
Python オブジェクトから tf.Tensor を作成する場合、オプションとしてデータ型を指定できます。
指定しない場合は、TensorFlow によってデータを表すデータ型が選択されます。TensorFlow は Python の整数値を tf.int32 と Python 浮動小数点数を tf.float32 に変換します。そうでない場合は、TensorFlow は NumPy が配列に変換する場合と同じルールを使用します。
型から型にキャストすることができます。
the_f64_tensor = tf.constant([2.2, 3.3, 4.4], dtype=tf.float64)
the_f16_tensor = tf.cast(the_f64_tensor, dtype=tf.float16)
# Now, cast to an uint8 and lose the decimal precision
the_u8_tensor = tf.cast(the_f16_tensor, dtype=tf.uint8)
print(the_u8_tensor)
tf.Tensor([2 3 4], shape=(3,), dtype=uint8)
ブロードキャスト
ブロードキャストは、NumPy の相当する特徴量から得た概念です。簡単に言えば、ある条件下において、より小さなテンソルに複合演算を実行する場合、より大きなテンソルに適合するように自動的に「引き延ばされる」ということです。
最も単純で一般的な事例としては、テンソルをスカラーに加算または乗算する場合が挙げられます。その場合、スカラーはもう片方の引数と同じ形状になるようにブロードキャストされます。
x = tf.constant([1, 2, 3])

y = tf.constant(2)
z = tf.constant([2, 2, 2])
# All of these are the same computation
print(tf.multiply(x, 2))
print(x * y)
print(x * z)
tf.Tensor([2 4 6], shape=(3,), dtype=int32)
tf.Tensor([2 4 6], shape=(3,), dtype=int32)
tf.Tensor([2 4 6], shape=(3,), dtype=int32)
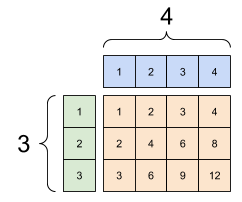
同様に、長さ 1 の軸を別の引数に一致するように引き延ばすことができます。両方の引数を同一の計算で引き延ばすことができます。
この場合、3x1 の行列は、要素ごとに 1x4 の行列と乗算され、3x4 の行列が生成されます。最初の 1 はオプションであることに注意してください。形状 y は [4] です。
# These are the same computations
x = tf.reshape(x,[3,1])
y = tf.range(1, 5)
print(x, "\n")
print(y, "\n")
print(tf.multiply(x, y))
tf.Tensor(
[[1]
 [2]
 [3]], shape=(3, 1), dtype=int32)

tf.Tensor([1 2 3 4], shape=(4,), dtype=int32)

tf.Tensor(
[[ 1  2  3  4]
 [ 2  4  6  8]
 [ 3  6  9 12]], shape=(3, 4), dtype=int32)
ブロードキャストの加算: [3, 1] 掛け [1, 4] により、[3,4] を生成 |
|---|
 |
次は、ブロードキャストを使用しない同一の演算です。
x_stretch = tf.constant([[1, 1, 1, 1],
                         [2, 2, 2, 2],
                         [3, 3, 3, 3]])

y_stretch = tf.constant([[1, 2, 3, 4],
                         [1, 2, 3, 4],
                         [1, 2, 3, 4]])

print(x_stretch * y_stretch)  # Again, operator overloading
tf.Tensor(
[[ 1  2  3  4]
 [ 2  4  6  8]
 [ 3  6  9 12]], shape=(3, 4), dtype=int32)
ブロードキャスト演算によってメモリ内の拡張したテンソルが実体化されることがないため、ほとんどの場合、ブロードキャストは時間と空間係数の両方です。
tf.broadcast_to を使用して、ブロードキャストがどのようなものであるかを確認します。
print(tf.broadcast_to(tf.constant([1, 2, 3]), [3, 3]))
tf.Tensor(
[[1 2 3]
 [1 2 3]
 [1 2 3]], shape=(3, 3), dtype=int32)
たとえば数学的演算とは異なり、broadcast_to はメモリを節約する上で特に何も行いません。ここでは、テンソルの実体化が行われています。
さらに複雑化することができます。Jake VanderPlas の書籍『Python Data Science Handbook』のこのセクションでは、(やはり NumPy を使った)ブロードキャストのコツがさらに紹介されています。
tf.convert_to_tensor
tf.matmul や tf.reshape といったほとんどの演算は、クラス tf.Tensor の引数を取りますが、上記の例では、テンソルのような形状の Python オブジェクトを渡すことがよくあります。
すべてではありませんが、ほとんどの演算は、非テンソル引数に対して convert_to_tensor を呼び出します。変換のレジストリがあり、NumPy の ndarray、TensorShape、Python リスト、tf.Variable といったほとんどのオブジェクトクラスは、自動的に変換されます。
詳細について、または、テンソルに自動変換する独自の型がある場合は、tf.register_tensor_conversion_function をご覧ください。
不規則なテンソル
軸に合わせて要素の数が変化するテンソルは「不規則」と呼ばれています。不規則なデータには、tf.ragged.RaggedTensor を使用してください。
たとえば、次の形状は通常のテンソルとして表現することはできません。
tf.RaggedTensor, 形状: [4, None] |
|---|
 |
ragged_list = [
    [0, 1, 2, 3],
    [4, 5],
    [6, 7, 8],
    [9]]
try:
  tensor = tf.constant(ragged_list)
except Exception as e:
  print(f"{type(e).__name__}: {e}")
ValueError: Can't convert non-rectangular Python sequence to Tensor.
代わりに、tf.ragged.constant を使用して tf.RaggedTensor を作成します。
ragged_tensor = tf.ragged.constant(ragged_list)
print(ragged_tensor)
<tf.RaggedTensor [[0, 1, 2, 3], [4, 5], [6, 7, 8], [9]]>
tf.RaggedTensor の形状には不明な長さの軸が含まれます。
print(ragged_tensor.shape)
(4, None)
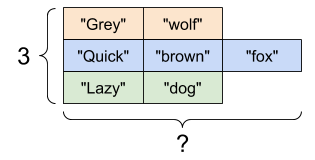
文字列型テンソル
tf.string は dtype であるため、テンソルで文字列(可変長バイト配列)としてデータを表すことができます。
文字列はアトミックであり、Python 文字列のようにインデックスを作成することはできません。文字列の長さはテンソルの軸の 1 つではありません。これらを操作するための関数については、tf.strings をご覧ください。
次はスカラー文字列のテンソルです。
# Tensors can be strings, too here is a scalar string.
scalar_string_tensor = tf.constant("Gray wolf")
print(scalar_string_tensor)
tf.Tensor(b'Gray wolf', shape=(), dtype=string)
そして、ベクトルの文字列です。
文字列ベクトル, 形状: [3,] |
|---|
 |
# If you have three string tensors of different lengths, this is OK.
tensor_of_strings = tf.constant(["Gray wolf",
                                 "Quick brown fox",
                                 "Lazy dog"])
# Note that the shape is (3,). The string length is not included.
print(tensor_of_strings)
tf.Tensor([b'Gray wolf' b'Quick brown fox' b'Lazy dog'], shape=(3,), dtype=string)
上記の出力では、プレフィクス b は tf.string dtype が unicode 文字列でなくバイト文字列であることを示します。TensorFlow での Unicode テキストの使用については、「Unicode チュートリアル」 をご覧ください。
Unicode 文字を渡した場合、utf-8 で暗号化されます。
tf.constant("🥳👍")
<tf.Tensor: shape=(), dtype=string, numpy=b'\xf0\x9f\xa5\xb3\xf0\x9f\x91\x8d'>
文字列の基本的な関数は、tf.strings.split などの tf.strings を使って見つけることができます。
# You can use split to split a string into a set of tensors
print(tf.strings.split(scalar_string_tensor, sep=" "))
tf.Tensor([b'Gray' b'wolf'], shape=(2,), dtype=string)
# ...but it turns into a `RaggedTensor` if you split up a tensor of strings,
# as each string might be split into a different number of parts.
print(tf.strings.split(tensor_of_strings))
<tf.RaggedTensor [[b'Gray', b'wolf'], [b'Quick', b'brown', b'fox'], [b'Lazy', b'dog']]>
3 文字列分割, 形状: [3, None] |
|---|
 |
そして tf.strings.to_number:
text = tf.constant("1 10 100")
print(tf.strings.to_number(tf.strings.split(text, " ")))
tf.Tensor([ 1. 10. 100.], shape=(3,), dtype=float32)
tf.cast を使用して文字列テンソルを数値に変換することはできませんが、バイトに変換してから数字に変換することができます。
byte_strings = tf.strings.bytes_split(tf.constant("Duck"))
byte_ints = tf.io.decode_raw(tf.constant("Duck"), tf.uint8)
print("Byte strings:", byte_strings)
print("Bytes:", byte_ints)
Byte strings: tf.Tensor([b'D' b'u' b'c' b'k'], shape=(4,), dtype=string)
Bytes: tf.Tensor([ 68 117  99 107], shape=(4,), dtype=uint8)
# Or split it up as unicode and then decode it
unicode_bytes = tf.constant("アヒル 🦆")
unicode_char_bytes = tf.strings.unicode_split(unicode_bytes, "UTF-8")
unicode_values = tf.strings.unicode_decode(unicode_bytes, "UTF-8")

print("\nUnicode bytes:", unicode_bytes)
print("\nUnicode chars:", unicode_char_bytes)
print("\nUnicode values:", unicode_values)
Unicode bytes: tf.Tensor(b'\xe3\x82\xa2\xe3\x83\x92\xe3\x83\xab \xf0\x9f\xa6\x86', shape=(), dtype=string)

Unicode chars: tf.Tensor([b'\xe3\x82\xa2' b'\xe3\x83\x92' b'\xe3\x83\xab' b' ' b'\xf0\x9f\xa6\x86'], shape=(5,), dtype=string)

Unicode values: tf.Tensor([ 12450  12498  12523     32 129414], shape=(5,), dtype=int32)
TensorFlow ではすべての生のバイトに、tf.string dtype が使用されています。tf.io モジュールには、画像の解読や csv の解析など、データとバイトを変換する関数が含まれています。
スパーステンソル
非常に広い埋め込みスペースであるかのうように、データがスパースである場合があります。TensorFlow は、スパースデータを効率的に保管できるように、tf.sparse.SparseTensor と関連する演算をサポートしています。
tf.SparseTensor, 形状: [3, 4] |
|---|
 |
# Sparse tensors store values by index in a memory-efficient manner
sparse_tensor = tf.sparse.SparseTensor(indices=[[0, 0], [1, 2]],
                                       values=[1, 2],
                                       dense_shape=[3, 4])
print(sparse_tensor, "\n")

# You can convert sparse tensors to dense
print(tf.sparse.to_dense(sparse_tensor))
SparseTensor(indices=tf.Tensor(
[[0 0]
 [1 2]], shape=(2, 2), dtype=int64), values=tf.Tensor([1 2], shape=(2,), dtype=int32), dense_shape=tf.Tensor([3 4], shape=(2,), dtype=int64))

tf.Tensor(
[[1 0 0 0]
 [0 0 2 0]
 [0 0 0 0]], shape=(3, 4), dtype=int32)