
| | |  GitHub에서 보기 GitHub에서 보기 | | |
이 튜토리얼에는 일반 텍스트 IMDB 영화 리뷰 데이터 세트에 대한 감정 분석을 수행하기 위해 BERT를 미세 조정하는 완전한 코드가 포함되어 있습니다. 모델을 훈련하는 것 외에도 텍스트를 적절한 형식으로 사전 처리하는 방법을 배우게 됩니다.
이 노트북에서 수행할 작업은 다음과 같습니다.
- IMDB 데이터세트 로드
- TensorFlow Hub에서 BERT 모델 로드
- BERT와 분류기를 결합하여 고유한 모델 구축
- 자신의 모델을 훈련하고 그 일부로 BERT를 미세 조정합니다.
- 모델을 저장하고 문장을 분류하는 데 사용
당신은 IMDB 데이터 세트로 작업에 새로운 경우, 참조하시기 바랍니다 기본 텍스트 분류 자세한 내용은.
BERT 소개
BERT 및 기타 변압기 인코더 아키텍처는 NLP의 다양한 작업 (자연 언어 처리)에 격렬하게 성공했다. 그들은 딥 러닝 모델에 사용하기에 적합한 자연어의 벡터 공간 표현을 계산합니다. BERT 모델 제품군은 Transformer 인코더 아키텍처를 사용하여 이전 및 이후의 모든 토큰의 전체 컨텍스트에서 입력 텍스트의 각 토큰을 처리하므로 이름: Bidirectional Encoder Representations from Transformers.
BERT 모델은 일반적으로 대량의 텍스트에 대해 사전 학습된 다음 특정 작업에 맞게 미세 조정됩니다.
설정
# A dependency of the preprocessing for BERT inputspip install -q -U tensorflow-text
당신의 AdamW 최적화 사용 tensorflow / 모델 .
pip install -q tf-models-official
import os
import shutil

import tensorflow as tf
import tensorflow_hub as hub
import tensorflow_text as text
from official.nlp import optimization  # to create AdamW optimizer

import matplotlib.pyplot as plt

tf.get_logger().setLevel('ERROR')
/tmpfs/src/tf_docs_env/lib/python3.7/site-packages/pkg_resources/__init__.py:119: PkgResourcesDeprecationWarning: 0.18ubuntu0.18.04.1 is an invalid version and will not be supported in a future release
  PkgResourcesDeprecationWarning,
감정 분석
이 노트북은 검토의 텍스트를 기반으로 양 또는 음으로 분류 영화 리뷰,에 감정 분석 모델을 훈련한다.
당신은 사용할 것이다 대형 영화 리뷰 데이터 세트 로부터 5 만 개 영화 리뷰의 텍스트가 들어 인터넷 영화 데이터베이스 .
IMDB 데이터세트 다운로드
데이터 세트를 다운로드하여 추출한 다음 디렉터리 구조를 살펴보겠습니다.
url = 'https://ai.stanford.edu/~amaas/data/sentiment/aclImdb_v1.tar.gz'

dataset = tf.keras.utils.get_file('aclImdb_v1.tar.gz', url,
                                  untar=True, cache_dir='.',
                                  cache_subdir='')

dataset_dir = os.path.join(os.path.dirname(dataset), 'aclImdb')

train_dir = os.path.join(dataset_dir, 'train')

# remove unused folders to make it easier to load the data
remove_dir = os.path.join(train_dir, 'unsup')
shutil.rmtree(remove_dir)
Downloading data from https://ai.stanford.edu/~amaas/data/sentiment/aclImdb_v1.tar.gz
84131840/84125825 [==============================] - 7s 0us/step
84140032/84125825 [==============================] - 7s 0us/step
다음으로, 당신은 사용 text_dataset_from_directory 레이블 생성 유틸리티를 tf.data.Dataset .
IMDB 데이터셋은 이미 훈련과 테스트로 나누어져 있지만 검증 세트가 부족합니다. 의를 사용하여 훈련 데이터의 80:20 분할을 사용하여 검증 세트 만들어 보자 validation_split 아래 인수를.
AUTOTUNE = tf.data.AUTOTUNE
batch_size = 32
seed = 42

raw_train_ds = tf.keras.utils.text_dataset_from_directory(
    'aclImdb/train',
    batch_size=batch_size,
    validation_split=0.2,
    subset='training',
    seed=seed)

class_names = raw_train_ds.class_names
train_ds = raw_train_ds.cache().prefetch(buffer_size=AUTOTUNE)

val_ds = tf.keras.utils.text_dataset_from_directory(
    'aclImdb/train',
    batch_size=batch_size,
    validation_split=0.2,
    subset='validation',
    seed=seed)

val_ds = val_ds.cache().prefetch(buffer_size=AUTOTUNE)

test_ds = tf.keras.utils.text_dataset_from_directory(
    'aclImdb/test',
    batch_size=batch_size)

test_ds = test_ds.cache().prefetch(buffer_size=AUTOTUNE)
Found 25000 files belonging to 2 classes.
Using 20000 files for training.
Found 25000 files belonging to 2 classes.
Using 5000 files for validation.
Found 25000 files belonging to 2 classes.
몇 가지 리뷰를 살펴보겠습니다.
for text_batch, label_batch in train_ds.take(1):
  for i in range(3):
    print(f'Review: {text_batch.numpy()[i]}')
    label = label_batch.numpy()[i]
    print(f'Label : {label} ({class_names[label]})')
Review: b'"Pandemonium" is a horror movie spoof that comes off more stupid than funny. Believe me when I tell you, I love comedies. Especially comedy spoofs. "Airplane", "The Naked Gun" trilogy, "Blazing Saddles", "High Anxiety", and "Spaceballs" are some of my favorite comedies that spoof a particular genre. "Pandemonium" is not up there with those films. Most of the scenes in this movie had me sitting there in stunned silence because the movie wasn\'t all that funny. There are a few laughs in the film, but when you watch a comedy, you expect to laugh a lot more than a few times and that\'s all this film has going for it. Geez, "Scream" had more laughs than this film and that was more of a horror film. How bizarre is that?<br /><br />*1/2 (out of four)'
Label : 0 (neg)
Review: b"David Mamet is a very interesting and a very un-equal director. His first movie 'House of Games' was the one I liked best, and it set a series of films with characters whose perspective of life changes as they get into complicated situations, and so does the perspective of the viewer.<br /><br />So is 'Homicide' which from the title tries to set the mind of the viewer to the usual crime drama. The principal characters are two cops, one Jewish and one Irish who deal with a racially charged area. The murder of an old Jewish shop owner who proves to be an ancient veteran of the Israeli Independence war triggers the Jewish identity in the mind and heart of the Jewish detective.<br /><br />This is were the flaws of the film are the more obvious. The process of awakening is theatrical and hard to believe, the group of Jewish militants is operatic, and the way the detective eventually walks to the final violent confrontation is pathetic. The end of the film itself is Mamet-like smart, but disappoints from a human emotional perspective.<br /><br />Joe Mantegna and William Macy give strong performances, but the flaws of the story are too evident to be easily compensated."
Label : 0 (neg)
Review: b'Great documentary about the lives of NY firefighters during the worst terrorist attack of all time.. That reason alone is why this should be a must see collectors item.. What shocked me was not only the attacks, but the"High Fat Diet" and physical appearance of some of these firefighters. I think a lot of Doctors would agree with me that,in the physical shape they were in, some of these firefighters would NOT of made it to the 79th floor carrying over 60 lbs of gear. Having said that i now have a greater respect for firefighters and i realize becoming a firefighter is a life altering job. The French have a history of making great documentary\'s and that is what this is, a Great Documentary.....'
Label : 1 (pos)
2021-12-01 12:17:32.795514: W tensorflow/core/kernels/data/cache_dataset_ops.cc:768] The calling iterator did not fully read the dataset being cached. In order to avoid unexpected truncation of the dataset, the partially cached contents of the dataset  will be discarded. This can happen if you have an input pipeline similar to `dataset.cache().take(k).repeat()`. You should use `dataset.take(k).cache().repeat()` instead.
TensorFlow Hub에서 모델 로드
여기에서 TensorFlow Hub에서 로드할 BERT 모델을 선택하고 미세 조정할 수 있습니다. 여러 BERT 모델을 사용할 수 있습니다.
- BERT-자료 , Uncased 및 7 개 개의 모델 원래 BERT 저자가 발표 한 훈련 무게.
- 작은 BERTs은 당신이 속도, 크기와 품질 사이의 트레이드 오프를 탐색 할 수 있습니다 동일한 일반적인 아키텍처하지만 적은 및 / 또는 작은 변압기 블록을 가지고있다.
- ALBERT : 층간 파라미터를 공유 모델 크기 (아니라 계산 시간)을 감소 "A 라이트 BERT"의 네 개의 다른 크기.
- BERT 전문가 : 팔 개 모델 모두는 BERT 기반 아키텍처를 가지고 있지만 대상 작업과 더 밀접하게 정렬하기 위해, 다른 사전 교육 도메인 사이에서 선택을 제공합니다.
- 일렉트라는 (세 가지 다른 크기) BERT와 같은 구조를 가지고 있지만, 셋업에서 판별으로 사전 교육을받은 가도록 유사한 제너 적대적 네트워크 (GAN).
- - 토킹 헤즈 주목하고 정문 겔루 [BERT와 베이스 , 대형는 상기 변압기의 코어 아키텍처 두 개선을 갖는다.
TensorFlow Hub의 모델 문서에는 연구 문헌에 대한 자세한 내용과 참조가 있습니다. 위의 링크를 따라, 또는 클릭 tfhub.dev 다음 셀의 실행 후 인쇄 URL.
제안은 미세 조정이 더 빠르기 때문에 Small BERT(더 적은 수의 매개변수 사용)로 시작하는 것입니다. 작은 모델을 좋아하지만 정확도는 더 높으면 ALBERT가 다음 옵션이 될 수 있습니다. 더 나은 정확도를 원한다면 클래식 BERT 크기 중 하나를 선택하거나 Electra, Talking Heads 또는 BERT Expert와 같은 최근 개선 사항 중 하나를 선택하십시오.
이외에도 아래에 사용할 수있는 모델에서, 거기에 여러 버전의 더 크고 더 나은 정확도를 얻을 수있는 모델이 있지만 미세 조정 단일 GPU에있을 너무 크다. 당신은에 그렇게 할 수있을 것입니다 TPU의 colab에 BERT를 사용하여 해결 GLUE 작업 .
아래 코드에서 tfhub.dev URL을 전환하면 이러한 모델을 시도하기에 충분하다는 것을 알 수 있습니다. 두 모델 간의 모든 차이점이 TF Hub의 저장된 모델에 캡슐화되어 있기 때문입니다.
미세 조정할 BERT 모델 선택
bert_model_name = 'small_bert/bert_en_uncased_L-4_H-512_A-8'

map_name_to_handle = {
    'bert_en_uncased_L-12_H-768_A-12':
        'https://tfhub.dev/tensorflow/bert_en_uncased_L-12_H-768_A-12/3',
    'bert_en_cased_L-12_H-768_A-12':
        'https://tfhub.dev/tensorflow/bert_en_cased_L-12_H-768_A-12/3',
    'bert_multi_cased_L-12_H-768_A-12':
        'https://tfhub.dev/tensorflow/bert_multi_cased_L-12_H-768_A-12/3',
    'small_bert/bert_en_uncased_L-2_H-128_A-2':
        'https://tfhub.dev/tensorflow/small_bert/bert_en_uncased_L-2_H-128_A-2/1',
    'small_bert/bert_en_uncased_L-2_H-256_A-4':
        'https://tfhub.dev/tensorflow/small_bert/bert_en_uncased_L-2_H-256_A-4/1',
    'small_bert/bert_en_uncased_L-2_H-512_A-8':
        'https://tfhub.dev/tensorflow/small_bert/bert_en_uncased_L-2_H-512_A-8/1',
    'small_bert/bert_en_uncased_L-2_H-768_A-12':
        'https://tfhub.dev/tensorflow/small_bert/bert_en_uncased_L-2_H-768_A-12/1',
    'small_bert/bert_en_uncased_L-4_H-128_A-2':
        'https://tfhub.dev/tensorflow/small_bert/bert_en_uncased_L-4_H-128_A-2/1',
    'small_bert/bert_en_uncased_L-4_H-256_A-4':
        'https://tfhub.dev/tensorflow/small_bert/bert_en_uncased_L-4_H-256_A-4/1',
    'small_bert/bert_en_uncased_L-4_H-512_A-8':
        'https://tfhub.dev/tensorflow/small_bert/bert_en_uncased_L-4_H-512_A-8/1',
    'small_bert/bert_en_uncased_L-4_H-768_A-12':
        'https://tfhub.dev/tensorflow/small_bert/bert_en_uncased_L-4_H-768_A-12/1',
    'small_bert/bert_en_uncased_L-6_H-128_A-2':
        'https://tfhub.dev/tensorflow/small_bert/bert_en_uncased_L-6_H-128_A-2/1',
    'small_bert/bert_en_uncased_L-6_H-256_A-4':
        'https://tfhub.dev/tensorflow/small_bert/bert_en_uncased_L-6_H-256_A-4/1',
    'small_bert/bert_en_uncased_L-6_H-512_A-8':
        'https://tfhub.dev/tensorflow/small_bert/bert_en_uncased_L-6_H-512_A-8/1',
    'small_bert/bert_en_uncased_L-6_H-768_A-12':
        'https://tfhub.dev/tensorflow/small_bert/bert_en_uncased_L-6_H-768_A-12/1',
    'small_bert/bert_en_uncased_L-8_H-128_A-2':
        'https://tfhub.dev/tensorflow/small_bert/bert_en_uncased_L-8_H-128_A-2/1',
    'small_bert/bert_en_uncased_L-8_H-256_A-4':
        'https://tfhub.dev/tensorflow/small_bert/bert_en_uncased_L-8_H-256_A-4/1',
    'small_bert/bert_en_uncased_L-8_H-512_A-8':
        'https://tfhub.dev/tensorflow/small_bert/bert_en_uncased_L-8_H-512_A-8/1',
    'small_bert/bert_en_uncased_L-8_H-768_A-12':
        'https://tfhub.dev/tensorflow/small_bert/bert_en_uncased_L-8_H-768_A-12/1',
    'small_bert/bert_en_uncased_L-10_H-128_A-2':
        'https://tfhub.dev/tensorflow/small_bert/bert_en_uncased_L-10_H-128_A-2/1',
    'small_bert/bert_en_uncased_L-10_H-256_A-4':
        'https://tfhub.dev/tensorflow/small_bert/bert_en_uncased_L-10_H-256_A-4/1',
    'small_bert/bert_en_uncased_L-10_H-512_A-8':
        'https://tfhub.dev/tensorflow/small_bert/bert_en_uncased_L-10_H-512_A-8/1',
    'small_bert/bert_en_uncased_L-10_H-768_A-12':
        'https://tfhub.dev/tensorflow/small_bert/bert_en_uncased_L-10_H-768_A-12/1',
    'small_bert/bert_en_uncased_L-12_H-128_A-2':
        'https://tfhub.dev/tensorflow/small_bert/bert_en_uncased_L-12_H-128_A-2/1',
    'small_bert/bert_en_uncased_L-12_H-256_A-4':
        'https://tfhub.dev/tensorflow/small_bert/bert_en_uncased_L-12_H-256_A-4/1',
    'small_bert/bert_en_uncased_L-12_H-512_A-8':
        'https://tfhub.dev/tensorflow/small_bert/bert_en_uncased_L-12_H-512_A-8/1',
    'small_bert/bert_en_uncased_L-12_H-768_A-12':
        'https://tfhub.dev/tensorflow/small_bert/bert_en_uncased_L-12_H-768_A-12/1',
    'albert_en_base':
        'https://tfhub.dev/tensorflow/albert_en_base/2',
    'electra_small':
        'https://tfhub.dev/google/electra_small/2',
    'electra_base':
        'https://tfhub.dev/google/electra_base/2',
    'experts_pubmed':
        'https://tfhub.dev/google/experts/bert/pubmed/2',
    'experts_wiki_books':
        'https://tfhub.dev/google/experts/bert/wiki_books/2',
    'talking-heads_base':
        'https://tfhub.dev/tensorflow/talkheads_ggelu_bert_en_base/1',
}

map_model_to_preprocess = {
    'bert_en_uncased_L-12_H-768_A-12':
        'https://tfhub.dev/tensorflow/bert_en_uncased_preprocess/3',
    'bert_en_cased_L-12_H-768_A-12':
        'https://tfhub.dev/tensorflow/bert_en_cased_preprocess/3',
    'small_bert/bert_en_uncased_L-2_H-128_A-2':
        'https://tfhub.dev/tensorflow/bert_en_uncased_preprocess/3',
    'small_bert/bert_en_uncased_L-2_H-256_A-4':
        'https://tfhub.dev/tensorflow/bert_en_uncased_preprocess/3',
    'small_bert/bert_en_uncased_L-2_H-512_A-8':
        'https://tfhub.dev/tensorflow/bert_en_uncased_preprocess/3',
    'small_bert/bert_en_uncased_L-2_H-768_A-12':
        'https://tfhub.dev/tensorflow/bert_en_uncased_preprocess/3',
    'small_bert/bert_en_uncased_L-4_H-128_A-2':
        'https://tfhub.dev/tensorflow/bert_en_uncased_preprocess/3',
    'small_bert/bert_en_uncased_L-4_H-256_A-4':
        'https://tfhub.dev/tensorflow/bert_en_uncased_preprocess/3',
    'small_bert/bert_en_uncased_L-4_H-512_A-8':
        'https://tfhub.dev/tensorflow/bert_en_uncased_preprocess/3',
    'small_bert/bert_en_uncased_L-4_H-768_A-12':
        'https://tfhub.dev/tensorflow/bert_en_uncased_preprocess/3',
    'small_bert/bert_en_uncased_L-6_H-128_A-2':
        'https://tfhub.dev/tensorflow/bert_en_uncased_preprocess/3',
    'small_bert/bert_en_uncased_L-6_H-256_A-4':
        'https://tfhub.dev/tensorflow/bert_en_uncased_preprocess/3',
    'small_bert/bert_en_uncased_L-6_H-512_A-8':
        'https://tfhub.dev/tensorflow/bert_en_uncased_preprocess/3',
    'small_bert/bert_en_uncased_L-6_H-768_A-12':
        'https://tfhub.dev/tensorflow/bert_en_uncased_preprocess/3',
    'small_bert/bert_en_uncased_L-8_H-128_A-2':
        'https://tfhub.dev/tensorflow/bert_en_uncased_preprocess/3',
    'small_bert/bert_en_uncased_L-8_H-256_A-4':
        'https://tfhub.dev/tensorflow/bert_en_uncased_preprocess/3',
    'small_bert/bert_en_uncased_L-8_H-512_A-8':
        'https://tfhub.dev/tensorflow/bert_en_uncased_preprocess/3',
    'small_bert/bert_en_uncased_L-8_H-768_A-12':
        'https://tfhub.dev/tensorflow/bert_en_uncased_preprocess/3',
    'small_bert/bert_en_uncased_L-10_H-128_A-2':
        'https://tfhub.dev/tensorflow/bert_en_uncased_preprocess/3',
    'small_bert/bert_en_uncased_L-10_H-256_A-4':
        'https://tfhub.dev/tensorflow/bert_en_uncased_preprocess/3',
    'small_bert/bert_en_uncased_L-10_H-512_A-8':
        'https://tfhub.dev/tensorflow/bert_en_uncased_preprocess/3',
    'small_bert/bert_en_uncased_L-10_H-768_A-12':
        'https://tfhub.dev/tensorflow/bert_en_uncased_preprocess/3',
    'small_bert/bert_en_uncased_L-12_H-128_A-2':
        'https://tfhub.dev/tensorflow/bert_en_uncased_preprocess/3',
    'small_bert/bert_en_uncased_L-12_H-256_A-4':
        'https://tfhub.dev/tensorflow/bert_en_uncased_preprocess/3',
    'small_bert/bert_en_uncased_L-12_H-512_A-8':
        'https://tfhub.dev/tensorflow/bert_en_uncased_preprocess/3',
    'small_bert/bert_en_uncased_L-12_H-768_A-12':
        'https://tfhub.dev/tensorflow/bert_en_uncased_preprocess/3',
    'bert_multi_cased_L-12_H-768_A-12':
        'https://tfhub.dev/tensorflow/bert_multi_cased_preprocess/3',
    'albert_en_base':
        'https://tfhub.dev/tensorflow/albert_en_preprocess/3',
    'electra_small':
        'https://tfhub.dev/tensorflow/bert_en_uncased_preprocess/3',
    'electra_base':
        'https://tfhub.dev/tensorflow/bert_en_uncased_preprocess/3',
    'experts_pubmed':
        'https://tfhub.dev/tensorflow/bert_en_uncased_preprocess/3',
    'experts_wiki_books':
        'https://tfhub.dev/tensorflow/bert_en_uncased_preprocess/3',
    'talking-heads_base':
        'https://tfhub.dev/tensorflow/bert_en_uncased_preprocess/3',
}

tfhub_handle_encoder = map_name_to_handle[bert_model_name]
tfhub_handle_preprocess = map_model_to_preprocess[bert_model_name]

print(f'BERT model selected           : {tfhub_handle_encoder}')
print(f'Preprocess model auto-selected: {tfhub_handle_preprocess}')
BERT model selected           : https://tfhub.dev/tensorflow/small_bert/bert_en_uncased_L-4_H-512_A-8/1
Preprocess model auto-selected: https://tfhub.dev/tensorflow/bert_en_uncased_preprocess/3
전처리 모델
텍스트 입력은 BERT에 입력되기 전에 숫자 토큰 ID로 변환되고 여러 텐서로 정렬되어야 합니다. TensorFlow Hub는 위에서 설명한 각 BERT 모델에 대해 일치하는 전처리 모델을 제공하며, 이는 TF.text 라이브러리의 TF 작업을 사용하여 이 변환을 구현합니다. 텍스트를 사전 처리하기 위해 TensorFlow 모델 외부에서 순수 Python 코드를 실행할 필요는 없습니다.
전처리 모델은 위에 인쇄된 URL에서 읽을 수 있는 BERT 모델의 문서에서 참조하는 모델이어야 합니다. 위의 드롭다운에서 BERT 모델의 경우 전처리 모델이 자동으로 선택됩니다.
bert_preprocess_model = hub.KerasLayer(tfhub_handle_preprocess)
일부 텍스트에 대한 전처리 모델을 시도하고 출력을 살펴보겠습니다.
text_test = ['this is such an amazing movie!']
text_preprocessed = bert_preprocess_model(text_test)

print(f'Keys       : {list(text_preprocessed.keys())}')
print(f'Shape      : {text_preprocessed["input_word_ids"].shape}')
print(f'Word Ids   : {text_preprocessed["input_word_ids"][0, :12]}')
print(f'Input Mask : {text_preprocessed["input_mask"][0, :12]}')
print(f'Type Ids   : {text_preprocessed["input_type_ids"][0, :12]}')
Keys       : ['input_word_ids', 'input_mask', 'input_type_ids']
Shape      : (1, 128)
Word Ids   : [ 101 2023 2003 2107 2019 6429 3185  999  102    0    0    0]
Input Mask : [1 1 1 1 1 1 1 1 1 0 0 0]
Type Ids   : [0 0 0 0 0 0 0 0 0 0 0 0]
당신이 볼 수 있듯이, 지금 당신은 BERT 모델 (사용하는 것이 전처리에서 3 개 출력이 input_words_id , input_mask 및 input_type_ids ).
기타 중요한 사항:
- 입력은 128개의 토큰으로 잘립니다. 토큰의 수는 사용자 정의 할 수 있습니다, 당신은에 대한 자세한 내용을 볼 수 있습니다 TPU의 colab에 BERT를 사용하여 해결 GLUE 작업을 .
-
input_type_ids이 단일 문장 입력이기 때문에 하나 개의 값 (0)을 갖는다. 여러 문장 입력의 경우 각 입력에 대해 하나의 숫자가 있습니다.
이 텍스트 전처리기는 TensorFlow 모델이므로 모델에 직접 포함될 수 있습니다.
BERT 모델 사용
BERT를 자신의 모델에 적용하기 전에 출력을 살펴보겠습니다. TF Hub에서 로드하고 반환된 값을 확인합니다.
bert_model = hub.KerasLayer(tfhub_handle_encoder)
bert_results = bert_model(text_preprocessed)

print(f'Loaded BERT: {tfhub_handle_encoder}')
print(f'Pooled Outputs Shape:{bert_results["pooled_output"].shape}')
print(f'Pooled Outputs Values:{bert_results["pooled_output"][0, :12]}')
print(f'Sequence Outputs Shape:{bert_results["sequence_output"].shape}')
print(f'Sequence Outputs Values:{bert_results["sequence_output"][0, :12]}')
Loaded BERT: https://tfhub.dev/tensorflow/small_bert/bert_en_uncased_L-4_H-512_A-8/1
Pooled Outputs Shape:(1, 512)
Pooled Outputs Values:[ 0.76262873  0.99280983 -0.1861186   0.36673835  0.15233682  0.65504444
  0.9681154  -0.9486272   0.00216158 -0.9877732   0.0684272  -0.9763061 ]
Sequence Outputs Shape:(1, 128, 512)
Sequence Outputs Values:[[-0.28946388  0.3432126   0.33231565 ...  0.21300787  0.7102078
  -0.05771166]
 [-0.28742015  0.31981024 -0.2301858  ...  0.58455074 -0.21329722
   0.7269209 ]
 [-0.66157013  0.6887685  -0.87432927 ...  0.10877253 -0.26173282
   0.47855264]
 ...
 [-0.2256118  -0.28925604 -0.07064401 ...  0.4756601   0.8327715
   0.40025353]
 [-0.29824278 -0.27473143 -0.05450511 ...  0.48849759  1.0955356
   0.18163344]
 [-0.44378197  0.00930723  0.07223766 ...  0.1729009   1.1833246
   0.07897988]]
BERT 모델은 3 중요한 키 맵을 반환 : pooled_output , sequence_output , encoder_outputs :
-
pooled_output전체적으로 각각의 입력 순서를 나타낸다. 형상은[batch_size, H]. 이것은 전체 영화 리뷰에 대한 임베딩으로 생각할 수 있습니다. -
sequence_output컨텍스트 토큰 각각의 입력을 나타낸다. 형상은[batch_size, seq_length, H]. 이것을 영화 리뷰의 모든 토큰에 대한 컨텍스트 임베딩으로 생각할 수 있습니다. -
encoder_outputs의 중간 활성화되어L트랜스포머 블록.outputs["encoder_outputs"][i]형상의 텐서[batch_size, seq_length, 1024]에 대한 i 번째 트랜스포머 블록의 출력을,0 <= i < L. 목록의 마지막 값은 동일하다sequence_output.
미세 조정을 위해 당신이 사용하려는 pooled_output 배열을.
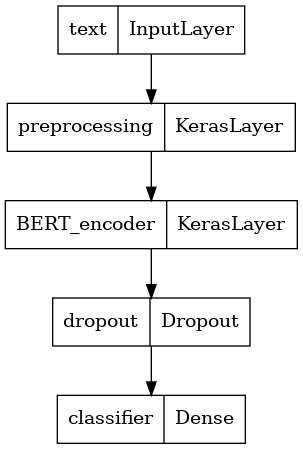
모델 정의
전처리 모델, 선택된 BERT 모델, 하나의 Dense 및 Dropout 레이어를 사용하여 매우 간단한 미세 조정 모델을 생성합니다.
def build_classifier_model():
  text_input = tf.keras.layers.Input(shape=(), dtype=tf.string, name='text')
  preprocessing_layer = hub.KerasLayer(tfhub_handle_preprocess, name='preprocessing')
  encoder_inputs = preprocessing_layer(text_input)
  encoder = hub.KerasLayer(tfhub_handle_encoder, trainable=True, name='BERT_encoder')
  outputs = encoder(encoder_inputs)
  net = outputs['pooled_output']
  net = tf.keras.layers.Dropout(0.1)(net)
  net = tf.keras.layers.Dense(1, activation=None, name='classifier')(net)
  return tf.keras.Model(text_input, net)
모델이 전처리 모델의 출력으로 실행되는지 확인합시다.
classifier_model = build_classifier_model()
bert_raw_result = classifier_model(tf.constant(text_test))
print(tf.sigmoid(bert_raw_result))
tf.Tensor([[0.6749899]], shape=(1, 1), dtype=float32)
물론 모델이 아직 훈련되지 않았기 때문에 출력은 의미가 없습니다.
모델의 구조를 살펴보자.
tf.keras.utils.plot_model(classifier_model)
모델 교육
이제 전처리 모듈, BERT 인코더, 데이터 및 분류기를 포함하여 모델을 훈련하는 데 필요한 모든 부분이 있습니다.
손실 기능
이 이진 분류 문제는 상기 모델은 확률 (단일 단위 층)를 출력하므로, 사용 것이다 losses.BinaryCrossentropy 손실 함수.
loss = tf.keras.losses.BinaryCrossentropy(from_logits=True)
metrics = tf.metrics.BinaryAccuracy()
옵티마이저
미세 조정을 위해 BERT가 원래 훈련된 것과 동일한 최적화 프로그램인 "Adaptive Moments"(Adam)를 사용하겠습니다. 이 최적화는, 예측 손실을 최소화로도 알려져 중량 붕괴 (사용하지 순간)에서 정규화를 수행 AdamW .
학습 속도 (들어 init_lr 단계 (훈련의 처음 10 % 이상 선형 워밍업 단계로 시작 개념적인 초기 학습 속도의 선형 붕괴 : BERT는 훈련 사전으로), 동일한 스케줄을 사용합니다 num_warmup_steps ). BERT 논문에 따르면 초기 학습률은 미세 조정을 위해 더 작습니다(5e-5, 3e-5, 2e-5 중 최고).
epochs = 5
steps_per_epoch = tf.data.experimental.cardinality(train_ds).numpy()
num_train_steps = steps_per_epoch * epochs
num_warmup_steps = int(0.1*num_train_steps)

init_lr = 3e-5
optimizer = optimization.create_optimizer(init_lr=init_lr,
                                          num_train_steps=num_train_steps,
                                          num_warmup_steps=num_warmup_steps,
                                          optimizer_type='adamw')
BERT 모델 로드 및 학습
은 Using classifier_model 이전에 생성을, 당신은 손실, 메트릭 및 최적화와 모델을 컴파일 할 수 있습니다.
classifier_model.compile(optimizer=optimizer,
                         loss=loss,
                         metrics=metrics)
print(f'Training model with {tfhub_handle_encoder}')
history = classifier_model.fit(x=train_ds,
                               validation_data=val_ds,
                               epochs=epochs)
Training model with https://tfhub.dev/tensorflow/small_bert/bert_en_uncased_L-4_H-512_A-8/1
Epoch 1/5
625/625 [==============================] - 91s 138ms/step - loss: 0.4776 - binary_accuracy: 0.7513 - val_loss: 0.3791 - val_binary_accuracy: 0.8380
Epoch 2/5
625/625 [==============================] - 85s 136ms/step - loss: 0.3266 - binary_accuracy: 0.8547 - val_loss: 0.3659 - val_binary_accuracy: 0.8486
Epoch 3/5
625/625 [==============================] - 86s 138ms/step - loss: 0.2521 - binary_accuracy: 0.8928 - val_loss: 0.3975 - val_binary_accuracy: 0.8518
Epoch 4/5
625/625 [==============================] - 86s 137ms/step - loss: 0.1910 - binary_accuracy: 0.9269 - val_loss: 0.4180 - val_binary_accuracy: 0.8522
Epoch 5/5
625/625 [==============================] - 86s 137ms/step - loss: 0.1509 - binary_accuracy: 0.9433 - val_loss: 0.4641 - val_binary_accuracy: 0.8522
모델 평가
모델이 어떻게 작동하는지 봅시다. 두 개의 값이 반환됩니다. 손실(오류를 나타내는 숫자, 값이 낮을수록 좋음) 및 정확도.
loss, accuracy = classifier_model.evaluate(test_ds)

print(f'Loss: {loss}')
print(f'Accuracy: {accuracy}')
782/782 [==============================] - 61s 78ms/step - loss: 0.4495 - binary_accuracy: 0.8554
Loss: 0.4494614601135254
Accuracy: 0.8553599715232849
시간 경과에 따른 정확도 및 손실 플로팅
에 기초 History 에 의해 반환 된 객체 model.fit() . 비교를 위해 훈련 및 검증 손실과 훈련 및 검증 정확도를 플롯할 수 있습니다.
history_dict = history.history
print(history_dict.keys())

acc = history_dict['binary_accuracy']
val_acc = history_dict['val_binary_accuracy']
loss = history_dict['loss']
val_loss = history_dict['val_loss']

epochs = range(1, len(acc) + 1)
fig = plt.figure(figsize=(10, 6))
fig.tight_layout()

plt.subplot(2, 1, 1)
# r is for "solid red line"
plt.plot(epochs, loss, 'r', label='Training loss')
# b is for "solid blue line"
plt.plot(epochs, val_loss, 'b', label='Validation loss')
plt.title('Training and validation loss')
# plt.xlabel('Epochs')
plt.ylabel('Loss')
plt.legend()

plt.subplot(2, 1, 2)
plt.plot(epochs, acc, 'r', label='Training acc')
plt.plot(epochs, val_acc, 'b', label='Validation acc')
plt.title('Training and validation accuracy')
plt.xlabel('Epochs')
plt.ylabel('Accuracy')
plt.legend(loc='lower right')
dict_keys(['loss', 'binary_accuracy', 'val_loss', 'val_binary_accuracy'])
<matplotlib.legend.Legend at 0x7fee7cdb4450>
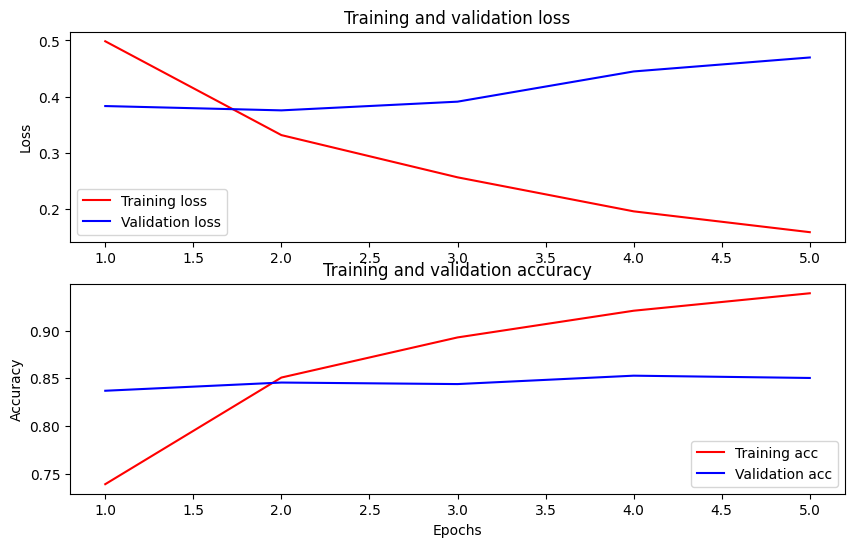
이 플롯에서 빨간색 선은 훈련 손실과 정확도를 나타내고 파란색 선은 검증 손실과 정확도를 나타냅니다.
추론을 위해 내보내기
이제 나중에 사용할 수 있도록 미세 조정된 모델을 저장하기만 하면 됩니다.
dataset_name = 'imdb'
saved_model_path = './{}_bert'.format(dataset_name.replace('/', '_'))

classifier_model.save(saved_model_path, include_optimizer=False)
2021-12-01 12:26:06.207608: W tensorflow/python/util/util.cc:368] Sets are not currently considered sequences, but this may change in the future, so consider avoiding using them.
WARNING:absl:Found untraced functions such as restored_function_body, restored_function_body, restored_function_body, restored_function_body, restored_function_body while saving (showing 5 of 310). These functions will not be directly callable after loading.
모델을 다시 로드하여 아직 메모리에 있는 모델과 나란히 시도할 수 있습니다.
reloaded_model = tf.saved_model.load(saved_model_path)
여기에서 원하는 문장에 대해 모델을 테스트할 수 있습니다. 아래의 예제 변수에 추가하기만 하면 됩니다.
def print_my_examples(inputs, results):
  result_for_printing = \
    [f'input: {inputs[i]:<30} : score: {results[i][0]:.6f}'
                         for i in range(len(inputs))]
  print(*result_for_printing, sep='\n')
  print()


examples = [
    'this is such an amazing movie!',  # this is the same sentence tried earlier
    'The movie was great!',
    'The movie was meh.',
    'The movie was okish.',
    'The movie was terrible...'
]

reloaded_results = tf.sigmoid(reloaded_model(tf.constant(examples)))
original_results = tf.sigmoid(classifier_model(tf.constant(examples)))

print('Results from the saved model:')
print_my_examples(examples, reloaded_results)
print('Results from the model in memory:')
print_my_examples(examples, original_results)
Results from the saved model:
input: this is such an amazing movie! : score: 0.999521
input: The movie was great!           : score: 0.997015
input: The movie was meh.             : score: 0.988535
input: The movie was okish.           : score: 0.079138
input: The movie was terrible...      : score: 0.001622

Results from the model in memory:
input: this is such an amazing movie! : score: 0.999521
input: The movie was great!           : score: 0.997015
input: The movie was meh.             : score: 0.988535
input: The movie was okish.           : score: 0.079138
input: The movie was terrible...      : score: 0.001622
당신이 모델에 사용하려는 경우 TF 서빙을 , 그것의 이름을 서명 중 하나를 통해 SavedModel를 호출합니다 기억 해요. Python에서는 다음과 같이 테스트할 수 있습니다.
serving_results = reloaded_model \
            .signatures['serving_default'](tf.constant(examples))

serving_results = tf.sigmoid(serving_results['classifier'])

print_my_examples(examples, serving_results)
input: this is such an amazing movie! : score: 0.999521
input: The movie was great!           : score: 0.997015
input: The movie was meh.             : score: 0.988535
input: The movie was okish.           : score: 0.079138
input: The movie was terrible...      : score: 0.001622
다음 단계
다음 단계로, 당신은 시도 할 수 TPU 튜토리얼에 BERT를 사용하여 GLUE 작업을 해결 TPU와 쇼 당신 어떻게 여러 개의 입력과 작업을 실행.