
 GitHubで表示 GitHubで表示 |
YAMNet は、笑い声、動物の吠える声、サイレン音などを含む 521 種の音声イベントを予測できるトレーニング済みのディープニューラルネットワークです。
このチュートリアルでは次の方法について学ぶことができます:
- YAMNetをロードし、推論に利用する
- YAMNetのエンベディングを利用した新しいモデルを作成し、猫と犬の音を分類する
- 作成したモデルを評価しエクスポートする
TensorFlow およびその他のライブラリのインポート
まず、TensorFlow I / Oをインストールすることから始めます。これにより、オーディオファイルをディスクから簡単にロードできるようになります。
pip install -q "tensorflow==2.11.*"# tensorflow_io 0.28 is compatible with TensorFlow 2.11pip install -q "tensorflow_io==0.28.*"
import os

from IPython import display
import matplotlib.pyplot as plt
import numpy as np
import pandas as pd

import tensorflow as tf
import tensorflow_hub as hub
import tensorflow_io as tfio
2024-01-11 22:04:30.617491: W tensorflow/compiler/xla/stream_executor/platform/default/dso_loader.cc:64] Could not load dynamic library 'libcudart.so.11.0'; dlerror: libcudart.so.11.0: cannot open shared object file: No such file or directory
2024-01-11 22:04:31.269076: W tensorflow/compiler/xla/stream_executor/platform/default/dso_loader.cc:64] Could not load dynamic library 'libnvinfer.so.7'; dlerror: libnvinfer.so.7: cannot open shared object file: No such file or directory
2024-01-11 22:04:31.269179: W tensorflow/compiler/xla/stream_executor/platform/default/dso_loader.cc:64] Could not load dynamic library 'libnvinfer_plugin.so.7'; dlerror: libnvinfer_plugin.so.7: cannot open shared object file: No such file or directory
2024-01-11 22:04:31.269189: W tensorflow/compiler/tf2tensorrt/utils/py_utils.cc:38] TF-TRT Warning: Cannot dlopen some TensorRT libraries. If you would like to use Nvidia GPU with TensorRT, please make sure the missing libraries mentioned above are installed properly.
YAMNetについて
YAMNet は、MobileNetV1 という深さ方向に分離可能な畳み込みアーキテクチャを使用するトレーニング済みのニューラルネットワークです。音声の波形を入力として使用し、AudioSet コーパスの 521 種の各音声イベントに対して個別の予測を行えます。
内部的には、モデルは音声信号から「フレーム」を抽出し、これらのフレームをバッチ処理します。このバージョンのモデルは長さが 0.96 秒のフレームを使用し、0.48 秒ごとに 1 つのフレームを抽出します。
モデルは、値域 [-1.0, +1.0] の単精度 16 kHz サンプルとして表される、任意の長さの波形を、1-D float32 テンソルまたは NumPy 配列で受け入れます。このチュートリアルには、WAV ファイルをサポートされたフォーマットに変換するのに役立つコードが含まれています。
モデルは、クラススコア、埋め込み(転移学習に使用)、およびログメルスペクトログラムを含む 3 つの出力を返します。詳細については、こちらをご覧ください。
YAMNet には、高レベル特徴量抽出器(1,024 次元埋め込み出力)としての特定の使用方法があります。ベース(YAMNet)モデルの入力特徴量を使用して、それらを、1 つの tf.keras.layers.Dense という非表示レイヤーで構成されるより浅いモデルにフィードします。その後、ネットワークを多数のラベル付きデータを使ったりエンドツーエンドでトレーニングすることなく、少量のデータで音声分類トレーニングを行います。(これはTensorFlow Hub を使った画像分類の転移学習に似ています。詳しくはそちらをご覧ください。)
それでは、モデルをテストし、音声の分類結果を確認してみましょう。その後、データの前処理パイプラインを構築していきます。
TensorFlowハブからYAMNetを読み込む
Tensorflow Hub にある事前トレーニング済みの YAMNet を使用して、サウンドファイルから埋め込みを抽出します。
TensorFlow Hubからモデルをロードするのは簡単です。モデルを選択し、そのURLをコピー、そして load関数を使用します。
注意: モデルからドキュメントを読み取るには、ブラウザにモデルの URL を入力してください。
yamnet_model_handle = 'https://tfhub.dev/google/yamnet/1'
yamnet_model = hub.load(yamnet_model_handle)
2024-01-11 22:04:33.491270: W tensorflow/compiler/xla/stream_executor/platform/default/dso_loader.cc:64] Could not load dynamic library 'libcudart.so.11.0'; dlerror: libcudart.so.11.0: cannot open shared object file: No such file or directory
2024-01-11 22:04:33.491378: W tensorflow/compiler/xla/stream_executor/platform/default/dso_loader.cc:64] Could not load dynamic library 'libcublas.so.11'; dlerror: libcublas.so.11: cannot open shared object file: No such file or directory
2024-01-11 22:04:33.491445: W tensorflow/compiler/xla/stream_executor/platform/default/dso_loader.cc:64] Could not load dynamic library 'libcublasLt.so.11'; dlerror: libcublasLt.so.11: cannot open shared object file: No such file or directory
2024-01-11 22:04:33.491506: W tensorflow/compiler/xla/stream_executor/platform/default/dso_loader.cc:64] Could not load dynamic library 'libcufft.so.10'; dlerror: libcufft.so.10: cannot open shared object file: No such file or directory
2024-01-11 22:04:33.549501: W tensorflow/compiler/xla/stream_executor/platform/default/dso_loader.cc:64] Could not load dynamic library 'libcusparse.so.11'; dlerror: libcusparse.so.11: cannot open shared object file: No such file or directory
2024-01-11 22:04:33.549698: W tensorflow/core/common_runtime/gpu/gpu_device.cc:1934] Cannot dlopen some GPU libraries. Please make sure the missing libraries mentioned above are installed properly if you would like to use GPU. Follow the guide at https://www.tensorflow.org/install/gpu for how to download and setup the required libraries for your platform.
Skipping registering GPU devices...
モデルが読み込まれたら、YAMNet の基本的な使用に関するチュートリアルに従って、推論を実行するサンプル WAV ファイルをダウンロードします。
testing_wav_file_name = tf.keras.utils.get_file('miaow_16k.wav',
                                                'https://storage.googleapis.com/audioset/miaow_16k.wav',
                                                cache_dir='./',
                                                cache_subdir='test_data')

print(testing_wav_file_name)
Downloading data from https://storage.googleapis.com/audioset/miaow_16k.wav
215546/215546 [==============================] - 0s 0us/step
./test_data/miaow_16k.wav
音声ファイルの読み込む関数が必要です。この関数は、後でトレーニングデータを操作する際にも使用します。(音声ファイルとラベルの読み取りに関する詳細は、単純な音声の認識をご覧ください。)
注意: load_wav_16k_mono から返される wav_data はすでに [-1.0, 1.0] の値域に正規化されています(詳細は、TF Hub にある YAMNet のドキュメントをご覧ください)。
# Utility functions for loading audio files and making sure the sample rate is correct.

@tf.function
def load_wav_16k_mono(filename):
    """ Load a WAV file, convert it to a float tensor, resample to 16 kHz single-channel audio. """
    file_contents = tf.io.read_file(filename)
    wav, sample_rate = tf.audio.decode_wav(
          file_contents,
          desired_channels=1)
    wav = tf.squeeze(wav, axis=-1)
    sample_rate = tf.cast(sample_rate, dtype=tf.int64)
    wav = tfio.audio.resample(wav, rate_in=sample_rate, rate_out=16000)
    return wav
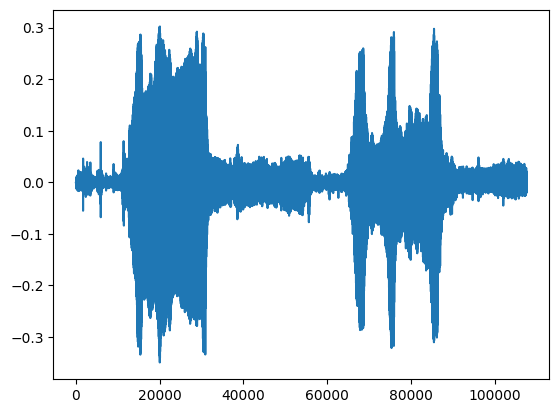
testing_wav_data = load_wav_16k_mono(testing_wav_file_name)

_ = plt.plot(testing_wav_data)

# Play the audio file.
display.Audio(testing_wav_data, rate=16000)
WARNING:tensorflow:From /tmpfs/src/tf_docs_env/lib/python3.9/site-packages/tensorflow/python/autograph/pyct/static_analysis/liveness.py:83: Analyzer.lamba_check (from tensorflow.python.autograph.pyct.static_analysis.liveness) is deprecated and will be removed after 2023-09-23.
Instructions for updating:
Lambda fuctions will be no more assumed to be used in the statement where they are used, or at least in the same block. https://github.com/tensorflow/tensorflow/issues/56089
WARNING:tensorflow:Using a while_loop for converting IO>AudioResample cause there is no registered converter for this op.
WARNING:tensorflow:Using a while_loop for converting IO>AudioResample cause there is no registered converter for this op.
クラスマッピングのロード
読み込むクラス名は YAMNet が認識できるものであることが重要です。マッピングファイルは CSV 形式で yamnet_model.class_map_path() にあります。
class_map_path = yamnet_model.class_map_path().numpy().decode('utf-8')
class_names =list(pd.read_csv(class_map_path)['display_name'])

for name in class_names[:20]:
  print(name)
print('...')
Speech
Child speech, kid speaking
Conversation
Narration, monologue
Babbling
Speech synthesizer
Shout
Bellow
Whoop
Yell
Children shouting
Screaming
Whispering
Laughter
Baby laughter
Giggle
Snicker
Belly laugh
Chuckle, chortle
Crying, sobbing
...
推論の実行
YAMNet は、フレームレベルのクラススコア(フレームごとに 521 個のスコア)を提供します。クリップレベルでの予測を決定するために、スコアをフレーム全体でクラスごとに集計することができます(平均または最大集計などを使用します)。これは、scores_np.mean(axis=0) によって以下のように行われます。最後に、クリップレベルで最高スコアのクラスを見つけるには、521 個の集計スコアの最大値を取得します。
scores, embeddings, spectrogram = yamnet_model(testing_wav_data)
class_scores = tf.reduce_mean(scores, axis=0)
top_class = tf.math.argmax(class_scores)
inferred_class = class_names[top_class]

print(f'The main sound is: {inferred_class}')
print(f'The embeddings shape: {embeddings.shape}')
The main sound is: Animal
The embeddings shape: (13, 1024)
注意: モデルは動物の声や音を正しく推論しました。このチュートリアルでの目標は、モデルの特定のクラスの精度を上げることです。また、モデルがフレームごとに 1 つの埋め込み(計 13 個の埋め込み)を生成したことにも注意してください。
ESC-50 dataset
ESC-50 データセット(Piczak, 2015)は、5 秒の長さの環境音声データが 2,000 個含まれるラベル付きのコレクションです。データセットは 50 個のクラスと、クラス当たり 40 個の Example で構成されています。
データセットをダウンロードして抽出します。
_ = tf.keras.utils.get_file('esc-50.zip',
                        'https://github.com/karoldvl/ESC-50/archive/master.zip',
                        cache_dir='./',
                        cache_subdir='datasets',
                        extract=True)
Downloading data from https://github.com/karoldvl/ESC-50/archive/master.zip
   8192/Unknown - 0s 0us/step
データの観察
各ファイルのメタデータは次のcsvファイルで指定されています。 ./datasets/ESC-50-master/meta/esc50.csv
また、すべてのオーディオファイルは次のディレクトリにあります。.datasets/ESC-50-master/audio/
マッピングを使用して pandas DataFrame を作成し、それを使用してデータをよりわかりやすく表示します。
esc50_csv = './datasets/ESC-50-master/meta/esc50.csv'
base_data_path = './datasets/ESC-50-master/audio/'

pd_data = pd.read_csv(esc50_csv)
pd_data.head()
データのフィルタリング
データが DataFrame に格納されたので、変換を適用しましょう。
- 行をフィルタリングして、選択したクラス(
dogとcat)のみを使用します。他のクラスを使用する場合は、ここで選択してください。 - 後での読み込み作業を簡単に行えるように、ファイル名をフルパスに変更します。
- ターゲットを特定の範囲内に変更します。この例では、
dogは0の位置のままですが、catは元の5の値から1に変わります。
my_classes = ['dog', 'cat']
map_class_to_id = {'dog':0, 'cat':1}

filtered_pd = pd_data[pd_data.category.isin(my_classes)]

class_id = filtered_pd['category'].apply(lambda name: map_class_to_id[name])
filtered_pd = filtered_pd.assign(target=class_id)

full_path = filtered_pd['filename'].apply(lambda row: os.path.join(base_data_path, row))
filtered_pd = filtered_pd.assign(filename=full_path)

filtered_pd.head(10)
オーディオファイルのロードとエンベディングの取得
ここでは、load_wav_16k_mono を適用して、モデルに使用する WAV データを準備します。
WAV データから埋め込みを抽出すると、形状 (N, 1024) の配列が得られます。N は、YAMNet が検出したフレーム数です(音声の 0.48 秒あたり 1 フレーム)。
このモデルは角フレームを 1 つの入力として使用するため、1 行当たり 1つのフレームを持つ新しい列を作成する必要があります。また、新しい行を正しく反映させるために、ラベルと fold 列を拡張する必要もあります。
拡張された fold 列には元の値が保持されます。分割を行う際に異なる Split に同じ音声が含まれてしまう可能性があり、検証とテストのステップの効果が低くなってしまうため、フレームを混ぜることはできません。
filenames = filtered_pd['filename']
targets = filtered_pd['target']
folds = filtered_pd['fold']

main_ds = tf.data.Dataset.from_tensor_slices((filenames, targets, folds))
main_ds.element_spec
(TensorSpec(shape=(), dtype=tf.string, name=None),
 TensorSpec(shape=(), dtype=tf.int64, name=None),
 TensorSpec(shape=(), dtype=tf.int64, name=None))
def load_wav_for_map(filename, label, fold):
  return load_wav_16k_mono(filename), label, fold

main_ds = main_ds.map(load_wav_for_map)
main_ds.element_spec
WARNING:tensorflow:Using a while_loop for converting IO>AudioResample cause there is no registered converter for this op.
WARNING:tensorflow:Using a while_loop for converting IO>AudioResample cause there is no registered converter for this op.
(TensorSpec(shape=<unknown>, dtype=tf.float32, name=None),
 TensorSpec(shape=(), dtype=tf.int64, name=None),
 TensorSpec(shape=(), dtype=tf.int64, name=None))
# applies the embedding extraction model to a wav data
def extract_embedding(wav_data, label, fold):
  ''' run YAMNet to extract embedding from the wav data '''
  scores, embeddings, spectrogram = yamnet_model(wav_data)
  num_embeddings = tf.shape(embeddings)[0]
  return (embeddings,
            tf.repeat(label, num_embeddings),
            tf.repeat(fold, num_embeddings))

# extract embedding
main_ds = main_ds.map(extract_embedding).unbatch()
main_ds.element_spec
(TensorSpec(shape=(1024,), dtype=tf.float32, name=None),
 TensorSpec(shape=(), dtype=tf.int64, name=None),
 TensorSpec(shape=(), dtype=tf.int64, name=None))
データの分割
fold 列を使って、データセットをテストセット、検証セット、テストセットに分割します。
ESC-50 は、同じ元のソースが必ず同じ fold に含まれるように、5 つの均一なサイズの相互検証 fold に構成されます。詳細は、『ESC: Dataset for Environmental Sound Classification』論文をご覧ください。
最後のステップでは、データセットから fold 列を削除します。この列は、トレーニング中に使用されません。
cached_ds = main_ds.cache()
train_ds = cached_ds.filter(lambda embedding, label, fold: fold < 4)
val_ds = cached_ds.filter(lambda embedding, label, fold: fold == 4)
test_ds = cached_ds.filter(lambda embedding, label, fold: fold == 5)

# remove the folds column now that it's not needed anymore
remove_fold_column = lambda embedding, label, fold: (embedding, label)

train_ds = train_ds.map(remove_fold_column)
val_ds = val_ds.map(remove_fold_column)
test_ds = test_ds.map(remove_fold_column)

train_ds = train_ds.cache().shuffle(1000).batch(32).prefetch(tf.data.AUTOTUNE)
val_ds = val_ds.cache().batch(32).prefetch(tf.data.AUTOTUNE)
test_ds = test_ds.cache().batch(32).prefetch(tf.data.AUTOTUNE)
モデルの作成
ここまでで、ほとんどの作業を終えました!次は、1 つの非表示レイヤーと 2 つの出力でサウンドから犬と猫を識別する非常に単純な Sequential モデルを定義します。
my_model = tf.keras.Sequential([
    tf.keras.layers.Input(shape=(1024), dtype=tf.float32,
                          name='input_embedding'),
    tf.keras.layers.Dense(512, activation='relu'),
    tf.keras.layers.Dense(len(my_classes))
], name='my_model')

my_model.summary()
Model: "my_model"
_________________________________________________________________
 Layer (type)                Output Shape              Param #
=================================================================
 dense (Dense)               (None, 512)               524800

 dense_1 (Dense)             (None, 2)                 1026

=================================================================
Total params: 525,826
Trainable params: 525,826
Non-trainable params: 0
_________________________________________________________________
my_model.compile(loss=tf.keras.losses.SparseCategoricalCrossentropy(from_logits=True),
                 optimizer="adam",
                 metrics=['accuracy'])

callback = tf.keras.callbacks.EarlyStopping(monitor='loss',
                                            patience=3,
                                            restore_best_weights=True)
history = my_model.fit(train_ds,
                       epochs=20,
                       validation_data=val_ds,
                       callbacks=callback)
Epoch 1/20
15/15 [==============================] - 5s 42ms/step - loss: 0.8131 - accuracy: 0.8417 - val_loss: 0.2044 - val_accuracy: 0.9187
Epoch 2/20
15/15 [==============================] - 0s 5ms/step - loss: 0.3020 - accuracy: 0.8979 - val_loss: 0.2040 - val_accuracy: 0.9187
Epoch 3/20
15/15 [==============================] - 0s 5ms/step - loss: 0.2816 - accuracy: 0.8792 - val_loss: 0.4987 - val_accuracy: 0.8813
Epoch 4/20
15/15 [==============================] - 0s 5ms/step - loss: 0.2214 - accuracy: 0.9125 - val_loss: 0.3479 - val_accuracy: 0.8750
Epoch 5/20
15/15 [==============================] - 0s 5ms/step - loss: 0.4764 - accuracy: 0.9042 - val_loss: 0.5966 - val_accuracy: 0.8750
Epoch 6/20
15/15 [==============================] - 0s 5ms/step - loss: 0.7090 - accuracy: 0.9250 - val_loss: 0.2190 - val_accuracy: 0.8813
Epoch 7/20
15/15 [==============================] - 0s 5ms/step - loss: 0.4463 - accuracy: 0.9229 - val_loss: 0.8711 - val_accuracy: 0.8750
テストデータに対して evaluate メソッドを実行し、過学習がないことを確認しましょう。
loss, accuracy = my_model.evaluate(test_ds)

print("Loss: ", loss)
print("Accuracy: ", accuracy)
5/5 [==============================] - 0s 5ms/step - loss: 0.4955 - accuracy: 0.8125
Loss:  0.4955436587333679
Accuracy:  0.8125
チェック完了です!
モデルのテスト
次に、先程例として視聴したデータに、YAMNetを適用して取得したエンベディングを用いて、モデルを試してみましょう。
scores, embeddings, spectrogram = yamnet_model(testing_wav_data)
result = my_model(embeddings).numpy()

inferred_class = my_classes[result.mean(axis=0).argmax()]
print(f'The main sound is: {inferred_class}')
The main sound is: cat
WAV ファイルを入力として直接取れつ形式でモデルを保存する
現状、モデルにエンベディングを入力として与えると、モデルは機能します。
ただし、実世界のシナリオでは、音声データを直接入力として使用したいものです。
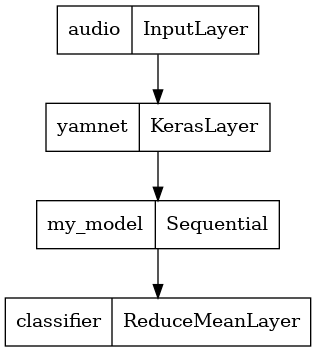
そのようにするには、YAMNet とここで作成したモデルを合わせて、他のアプリケーションにエクスポートできる単一のモデルにします。
モデルの結果を使いやすくするために、最終レイヤーを reduce_mean 演算にします。このモデルをサービングに使用する場合(これについては、チュートリアルの後の方で説明します)、最終レイヤーの名前が必要になります。これを定義しない場合、TensorFlow はインクリメンタルで名前を自動的に定義するため、モデルをトレーニングするたびに名前が変化し、テストが困難になります。生の TensorFlow 演算を使用する際にレイヤーに名前を付けることはできません。この問題に対処するには、reduce_mean を適用するカスタムレイヤーを作成し、'classifier' と名付けます。
class ReduceMeanLayer(tf.keras.layers.Layer):
  def __init__(self, axis=0, **kwargs):
    super(ReduceMeanLayer, self).__init__(**kwargs)
    self.axis = axis

  def call(self, input):
    return tf.math.reduce_mean(input, axis=self.axis)
saved_model_path = './dogs_and_cats_yamnet'

input_segment = tf.keras.layers.Input(shape=(), dtype=tf.float32, name='audio')
embedding_extraction_layer = hub.KerasLayer(yamnet_model_handle,
                                            trainable=False, name='yamnet')
_, embeddings_output, _ = embedding_extraction_layer(input_segment)
serving_outputs = my_model(embeddings_output)
serving_outputs = ReduceMeanLayer(axis=0, name='classifier')(serving_outputs)
serving_model = tf.keras.Model(input_segment, serving_outputs)
serving_model.save(saved_model_path, include_optimizer=False)
WARNING:tensorflow:Compiled the loaded model, but the compiled metrics have yet to be built. `model.compile_metrics` will be empty until you train or evaluate the model.
WARNING:tensorflow:Compiled the loaded model, but the compiled metrics have yet to be built. `model.compile_metrics` will be empty until you train or evaluate the model.
WARNING:absl:Found untraced functions such as _update_step_xla while saving (showing 1 of 1). These functions will not be directly callable after loading.
INFO:tensorflow:Assets written to: ./dogs_and_cats_yamnet/assets
INFO:tensorflow:Assets written to: ./dogs_and_cats_yamnet/assets
tf.keras.utils.plot_model(serving_model)
保存したモデルをロードして、期待どおりに機能することを確認します。
reloaded_model = tf.saved_model.load(saved_model_path)
さて、最後のテストです。サウンドデータに対して、モデルは正しい結果を返すでしょうか?
reloaded_results = reloaded_model(testing_wav_data)
cat_or_dog = my_classes[tf.math.argmax(reloaded_results)]
print(f'The main sound is: {cat_or_dog}')
The main sound is: cat
新しいモデルをサービング設定で試したい場合は、「serving_default」シグネチャを使用できます。
serving_results = reloaded_model.signatures['serving_default'](testing_wav_data)
cat_or_dog = my_classes[tf.math.argmax(serving_results['classifier'])]
print(f'The main sound is: {cat_or_dog}')
The main sound is: cat
(任意)付加的ないくつかのテスト
モデルの準備が完了しました。
テストデータセットのYAMNetと比較してみましょう。
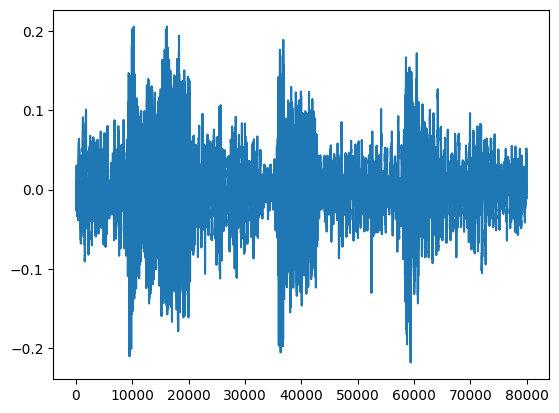
test_pd = filtered_pd.loc[filtered_pd['fold'] == 5]
row = test_pd.sample(1)
filename = row['filename'].item()
print(filename)
waveform = load_wav_16k_mono(filename)
print(f'Waveform values: {waveform}')
_ = plt.plot(waveform)

display.Audio(waveform, rate=16000)
./datasets/ESC-50-master/audio/5-169983-A-5.wav
WARNING:tensorflow:Using a while_loop for converting IO>AudioResample cause there is no registered converter for this op.
WARNING:tensorflow:Using a while_loop for converting IO>AudioResample cause there is no registered converter for this op.
Waveform values: [-5.5530812e-08  1.5579258e-07 -1.3647924e-07 ... -1.0891285e-02
 -1.0113415e-02 -9.4338730e-03]
# Run the model, check the output.
scores, embeddings, spectrogram = yamnet_model(waveform)
class_scores = tf.reduce_mean(scores, axis=0)
top_class = tf.math.argmax(class_scores)
inferred_class = class_names[top_class]
top_score = class_scores[top_class]
print(f'[YAMNet] The main sound is: {inferred_class} ({top_score})')

reloaded_results = reloaded_model(waveform)
your_top_class = tf.math.argmax(reloaded_results)
your_inferred_class = my_classes[your_top_class]
class_probabilities = tf.nn.softmax(reloaded_results, axis=-1)
your_top_score = class_probabilities[your_top_class]
print(f'[Your model] The main sound is: {your_inferred_class} ({your_top_score})')
[YAMNet] The main sound is: Animal (0.583878219127655)
[Your model] The main sound is: cat (0.9891097545623779)
次のステップ
犬と猫のサウンドを分類するモデルを作成しました。同じ考え方で別のデータセットを使用すると、鳥の鳴き声に基づく鳥の音響識別器を構築するといったことが可能になります。
ソーシャルメディアで皆さんのプロジェクトを TensorFlow チームに知らせてください!