
 GitHub でソースを表示 GitHub でソースを表示 |
MoViNet (Mobile Video Networks)は、ストリーミング動画の推論をサポートする効率的な一連の動画分類モデルを提供しています。このチュートリアルでは、事前トレーニング済みの MoviNet モデルを使用して、特に UCF101 データセットからの行動認識タスク用に動画を分類します。事前トレーニング済みのモデルは、過去に大規模なデータセットでトレーニングされたものを保存したネットワークです。MoviNet についての詳細は、2021 年に発表された Kondratyuk, D. et al による論文 MoViNets: Mobile Video Networks for Efficient Video Recognition をご覧ください。このチュートリアルでは、以下の内容を学習します。
- 事前トレーニング済みの MoviNet モデルをダウンロードする方法を学習します。
- MoviNet モデルの畳み込みベースを凍結することで、新しい分類器を備えた事前トレーニング済みのモデルを使用して新しいモデルを作成します。
- 分類器のヘッドを新しいデータセットのラベル数に置き換えます。
- UCF101 データセットで、移転学習を実行します。
このチュートリアルでは、official/projects/movinet からモデルをダウンロードします。このリポジトリには、TF Hub が TensorFlow 2 SavedModel 形式で使用する一連の MoviNet モデルが含まれます。
この転移学習チュートリアルは、TensorFlow 動画チュートリアルシリーズの第 3 部です。他に、以下の 3 つのチュートリアルがあります。
- 動画データを読み込む: このチュートリアルでは、このドキュメントで使用されているほとんどのコードが説明されています。特に、
FrameGeneratorクラスでデータを前処理して読み込む方法について、より詳しく説明されています。 - 動画分類用の 3D CNN モデルを構築する。このチュートリアルは、3D データの空間と時間の側面を分解する (2+1)D CNN が使用されています。MRI スキャンなどの体積データを使用している場合は、(2+1)D CNN ではなく、3D CNN を使用することを検討してください。
- MoviNet でストリーミングの行動認識を実行する: TF Hub で提供されている MoviNet モデルについて説明されています。
セットアップ
まず、ZIP ファイルの内容を検査するための remotezip、進捗バーを使用するための tqdm、動画ファイルを処理するための OpenCV(opencv-python と opencv-python-headless のバージョンが同じであることを確認してください)、および事前トレーニング済みの MoviNet モデルをダウンロードするための TensorFlow モデル(tf-models-official)を含む、必要なライブラリのインストールとインポートを行います。TensorFlow モデルパッケージは、TensorFlow の高レベル API を使用するモデルのコレクションです。
pip install remotezip tqdm opencv-python==4.5.2.52 opencv-python-headless==4.5.2.52 tf-models-officialimport tqdm
import random
import pathlib
import itertools
import collections
import cv2
import numpy as np
import remotezip as rz
import seaborn as sns
import matplotlib.pyplot as plt
import keras
import tensorflow as tf
import tensorflow_hub as hub
from tensorflow.keras import layers
from tensorflow.keras.optimizers import Adam
from tensorflow.keras.losses import SparseCategoricalCrossentropy
# Import the MoViNet model from TensorFlow Models (tf-models-official) for the MoViNet model
from official.projects.movinet.modeling import movinet
from official.projects.movinet.modeling import movinet_model
2024-01-11 20:18:28.764589: E external/local_xla/xla/stream_executor/cuda/cuda_dnn.cc:9261] Unable to register cuDNN factory: Attempting to register factory for plugin cuDNN when one has already been registered
2024-01-11 20:18:28.764633: E external/local_xla/xla/stream_executor/cuda/cuda_fft.cc:607] Unable to register cuFFT factory: Attempting to register factory for plugin cuFFT when one has already been registered
2024-01-11 20:18:28.766277: E external/local_xla/xla/stream_executor/cuda/cuda_blas.cc:1515] Unable to register cuBLAS factory: Attempting to register factory for plugin cuBLAS when one has already been registered
データを読み込む
以下の非表示セルは、UCF-101 データセットからデータスライスをダウンロードして tf.data.Dataset に読み込むヘルパー関数を定義します。このコードの詳細は、動画データの読み込みチュートリアルをご覧ください。
ここでは、非表示ブロックの最後にある FrameGenerator クラスが最も重要なユーティリティです。TensorFlow データパイプラインにデータをフィードでキルイテレート可能なオブジェクトを作成します。特に、このクラスには、エンコードされたラベルとともに動画フレームを読み込む Python ジェネレータが含まれます。このジェネレータ(__call__)関数は、frames_from_video_file とフレームセットに関連するラベルのワンホットエンコードのベクトルを生成します。
def list_files_per_class(zip_url):
  """
    List the files in each class of the dataset given the zip URL.

    Args:
      zip_url: URL from which the files can be unzipped.

    Return:
      files: List of files in each of the classes.
  """
  files = []
  with rz.RemoteZip(URL) as zip:
    for zip_info in zip.infolist():
      files.append(zip_info.filename)
  return files

def get_class(fname):
  """
    Retrieve the name of the class given a filename.

    Args:
      fname: Name of the file in the UCF101 dataset.

    Return:
      Class that the file belongs to.
  """
  return fname.split('_')[-3]

def get_files_per_class(files):
  """
    Retrieve the files that belong to each class.

    Args:
      files: List of files in the dataset.

    Return:
      Dictionary of class names (key) and files (values).
  """
  files_for_class = collections.defaultdict(list)
  for fname in files:
    class_name = get_class(fname)
    files_for_class[class_name].append(fname)
  return files_for_class

def download_from_zip(zip_url, to_dir, file_names):
  """
    Download the contents of the zip file from the zip URL.

    Args:
      zip_url: Zip URL containing data.
      to_dir: Directory to download data to.
      file_names: Names of files to download.
  """
  with rz.RemoteZip(zip_url) as zip:
    for fn in tqdm.tqdm(file_names):
      class_name = get_class(fn)
      zip.extract(fn, str(to_dir / class_name))
      unzipped_file = to_dir / class_name / fn

      fn = pathlib.Path(fn).parts[-1]
      output_file = to_dir / class_name / fn
      unzipped_file.rename(output_file,)

def split_class_lists(files_for_class, count):
  """
    Returns the list of files belonging to a subset of data as well as the remainder of
    files that need to be downloaded.

    Args:
      files_for_class: Files belonging to a particular class of data.
      count: Number of files to download.

    Return:
      split_files: Files belonging to the subset of data.
      remainder: Dictionary of the remainder of files that need to be downloaded.
  """
  split_files = []
  remainder = {}
  for cls in files_for_class:
    split_files.extend(files_for_class[cls][:count])
    remainder[cls] = files_for_class[cls][count:]
  return split_files, remainder

def download_ufc_101_subset(zip_url, num_classes, splits, download_dir):
  """
    Download a subset of the UFC101 dataset and split them into various parts, such as
    training, validation, and test.

    Args:
      zip_url: Zip URL containing data.
      num_classes: Number of labels.
      splits: Dictionary specifying the training, validation, test, etc. (key) division of data
              (value is number of files per split).
      download_dir: Directory to download data to.

    Return:
      dir: Posix path of the resulting directories containing the splits of data.
  """
  files = list_files_per_class(zip_url)
  for f in files:
    tokens = f.split('/')
    if len(tokens) <= 2:
      files.remove(f) # Remove that item from the list if it does not have a filename

  files_for_class = get_files_per_class(files)

  classes = list(files_for_class.keys())[:num_classes]

  for cls in classes:
    new_files_for_class = files_for_class[cls]
    random.shuffle(new_files_for_class)
    files_for_class[cls] = new_files_for_class

  # Only use the number of classes you want in the dictionary
  files_for_class = {x: files_for_class[x] for x in list(files_for_class)[:num_classes]}

  dirs = {}
  for split_name, split_count in splits.items():
    print(split_name, ":")
    split_dir = download_dir / split_name
    split_files, files_for_class = split_class_lists(files_for_class, split_count)
    download_from_zip(zip_url, split_dir, split_files)
    dirs[split_name] = split_dir

  return dirs

def format_frames(frame, output_size):
  """
    Pad and resize an image from a video.

    Args:
      frame: Image that needs to resized and padded.
      output_size: Pixel size of the output frame image.

    Return:
      Formatted frame with padding of specified output size.
  """
  frame = tf.image.convert_image_dtype(frame, tf.float32)
  frame = tf.image.resize_with_pad(frame, *output_size)
  return frame

def frames_from_video_file(video_path, n_frames, output_size = (224,224), frame_step = 15):
  """
    Creates frames from each video file present for each category.

    Args:
      video_path: File path to the video.
      n_frames: Number of frames to be created per video file.
      output_size: Pixel size of the output frame image.

    Return:
      An NumPy array of frames in the shape of (n_frames, height, width, channels).
  """
  # Read each video frame by frame
  result = []
  src = cv2.VideoCapture(str(video_path))

  video_length = src.get(cv2.CAP_PROP_FRAME_COUNT)

  need_length = 1 + (n_frames - 1) * frame_step

  if need_length > video_length:
    start = 0
  else:
    max_start = video_length - need_length
    start = random.randint(0, max_start + 1)

  src.set(cv2.CAP_PROP_POS_FRAMES, start)
  # ret is a boolean indicating whether read was successful, frame is the image itself
  ret, frame = src.read()
  result.append(format_frames(frame, output_size))

  for _ in range(n_frames - 1):
    for _ in range(frame_step):
      ret, frame = src.read()
    if ret:
      frame = format_frames(frame, output_size)
      result.append(frame)
    else:
      result.append(np.zeros_like(result[0]))
  src.release()
  result = np.array(result)[..., [2, 1, 0]]

  return result

class FrameGenerator:
  def __init__(self, path, n_frames, training = False):
    """ Returns a set of frames with their associated label.

      Args:
        path: Video file paths.
        n_frames: Number of frames.
        training: Boolean to determine if training dataset is being created.
    """
    self.path = path
    self.n_frames = n_frames
    self.training = training
    self.class_names = sorted(set(p.name for p in self.path.iterdir() if p.is_dir()))
    self.class_ids_for_name = dict((name, idx) for idx, name in enumerate(self.class_names))

  def get_files_and_class_names(self):
    video_paths = list(self.path.glob('*/*.avi'))
    classes = [p.parent.name for p in video_paths]
    return video_paths, classes

  def __call__(self):
    video_paths, classes = self.get_files_and_class_names()

    pairs = list(zip(video_paths, classes))

    if self.training:
      random.shuffle(pairs)

    for path, name in pairs:
      video_frames = frames_from_video_file(path, self.n_frames)
      label = self.class_ids_for_name[name] # Encode labels
      yield video_frames, label
URL = 'https://storage.googleapis.com/thumos14_files/UCF101_videos.zip'
download_dir = pathlib.Path('./UCF101_subset/')
subset_paths = download_ufc_101_subset(URL,
                        num_classes = 10,
                        splits = {"train": 30, "test": 20},
                        download_dir = download_dir)
train :
100%|██████████| 300/300 [00:21<00:00, 14.23it/s]
test :
100%|██████████| 200/200 [00:12<00:00, 15.54it/s]
トレーニングとテストのデータセットを作成します。
batch_size = 8
num_frames = 8

output_signature = (tf.TensorSpec(shape = (None, None, None, 3), dtype = tf.float32),
                    tf.TensorSpec(shape = (), dtype = tf.int16))

train_ds = tf.data.Dataset.from_generator(FrameGenerator(subset_paths['train'], num_frames, training = True),
                                          output_signature = output_signature)
train_ds = train_ds.batch(batch_size)

test_ds = tf.data.Dataset.from_generator(FrameGenerator(subset_paths['test'], num_frames),
                                         output_signature = output_signature)
test_ds = test_ds.batch(batch_size)
ここで生成されるラベルは、クラスのエンコーディングを表します。たとえば、'ApplyEyeMakeup' は整数にマッピングされます。トレーニングデータのラベルを見て、データセットが十分にシャッフルされていることを確認します。
for frames, labels in train_ds.take(10):
  print(labels)
tf.Tensor([5 9 2 7 4 9 3 8], shape=(8,), dtype=int16)
tf.Tensor([8 3 5 4 8 8 9 5], shape=(8,), dtype=int16)
tf.Tensor([4 4 2 3 8 2 1 1], shape=(8,), dtype=int16)
tf.Tensor([2 4 3 1 3 0 8 9], shape=(8,), dtype=int16)
tf.Tensor([8 2 0 5 6 5 2 9], shape=(8,), dtype=int16)
tf.Tensor([6 6 9 7 3 0 8 3], shape=(8,), dtype=int16)
tf.Tensor([2 4 1 8 0 8 4 5], shape=(8,), dtype=int16)
tf.Tensor([3 6 9 9 0 5 6 1], shape=(8,), dtype=int16)
tf.Tensor([4 1 3 8 7 1 8 0], shape=(8,), dtype=int16)
tf.Tensor([5 7 8 2 4 1 7 8], shape=(8,), dtype=int16)
データの形状を確認します。
print(f"Shape: {frames.shape}")
print(f"Label: {labels.shape}")
Shape: (8, 8, 224, 224, 3)
Label: (8,)
MoViNets とは?
前にも述べたとおり、MoViNets は、アクション認識などのタスクでビデオのストリーミングやオンライン推論に使用されるビデオ分類モデルです。アクション認識向けに動画データを分類するには、MoViNets を使用することを検討してください。
動画全体またはフレームごとのストリーミングに対して実行するには、2D フレームベースの分類器が有効でシンプルです。時間的なコンテキストを考慮できないため、精度が制限され、フレームごとに一貫性のない出力が得られる可能性があります。
シンプル 3D CNN は、双方向の時間コンテキストを使用して、精度と時間の一貫性を高めることができます。 これらのネットワークはより多くのリソースを必要とする可能性があり、将来を見据えているため、データのストリーミングには使用できません。
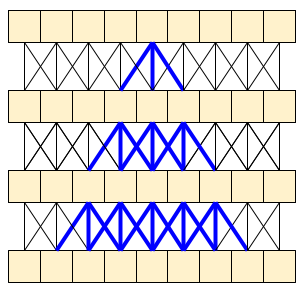
MoViNet アーキテクチャは、時間軸に沿って「因果論的」な 3D 畳み込みを使用しています(padding="causal" を使った layers.Conv1D など)。これにより、両方のアプローチのいくつかのメリットが得られますが、主に効率的なストリーミングが可能になります。
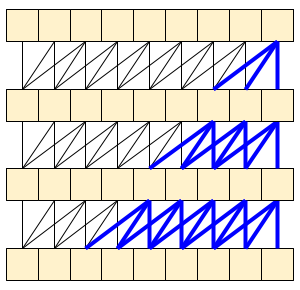
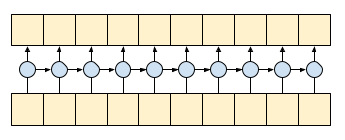
コーザル(因果論的)畳み込みでは、時間 t の出力を、確実に時間 t までの入力のみを使って計算できます。このことがストリーミングの効率をどれ程高められるかを示すために、おそらく使い慣れている RNN というより単純な例から始めることにしましょう。RNN は状態を時間の経過とともに渡します。
gru = layers.GRU(units=4, return_sequences=True, return_state=True)

inputs = tf.random.normal(shape=[1, 10, 8]) # (batch, sequence, channels)

result, state = gru(inputs) # Run it all at once
RNN の return_sequences=True 引数を設定して、計算の最後に状態を戻すように指定します。こうすることで、一時停止して停止した場所から再開しても、まったく同じ結果を得られるようになります。
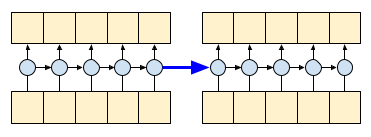
first_half, state = gru(inputs[:, :5, :])   # run the first half, and capture the state
second_half, _ = gru(inputs[:,5:, :], initial_state=state)  # Use the state to continue where you left off.

print(np.allclose(result[:, :5,:], first_half))
print(np.allclose(result[:, 5:,:], second_half))
True
True
コーザル畳み込みは、注して処理すれば、同じように使用できます。この手法は、Le Paine et al によって Fast Wavenet Generation Algorithm で使用されています。MoVinet 論文において、state は「ストリームバッファ」と呼ばれています。
この小さな状態を前方に渡していくことで、上に示した受容野全体を再計算する必要がなくなります。
事前トレーニング済みの MoviNet モデルをダウンロードする
このセクションでは、以下のことを行います。
official/projects/movinetに提供されるオープンソースコードを使用して、TensorFlow モデルから MoviNet モデルを作成します。- 事前トレーニング済みの重みを読み込みます。
- 畳み込みベース、または最終的な分類器ヘッドを除くすべてのレイヤーを凍結してファインチューニングを高速化します。
モデルを構築するには、他のモデルに対してベンチマークしたときに最も速い a0 構成から始めます。ユースケースに応じてどれが適しているかを知るには、TensorFlow Model Garden で利用可能な MoviNet モデルをご覧ください。
model_id = 'a0'
resolution = 224

tf.keras.backend.clear_session()

backbone = movinet.Movinet(model_id=model_id)
backbone.trainable = False

# Set num_classes=600 to load the pre-trained weights from the original model
model = movinet_model.MovinetClassifier(backbone=backbone, num_classes=600)
model.build([None, None, None, None, 3])

# Load pre-trained weights
!wget https://storage.googleapis.com/tf_model_garden/vision/movinet/movinet_a0_base.tar.gz -O movinet_a0_base.tar.gz -q
!tar -xvf movinet_a0_base.tar.gz

checkpoint_dir = f'movinet_{model_id}_base'
checkpoint_path = tf.train.latest_checkpoint(checkpoint_dir)
checkpoint = tf.train.Checkpoint(model=model)
status = checkpoint.restore(checkpoint_path)
status.assert_existing_objects_matched()
movinet_a0_base/
movinet_a0_base/checkpoint
movinet_a0_base/ckpt-1.data-00000-of-00001
movinet_a0_base/ckpt-1.index
<tensorflow.python.checkpoint.checkpoint.CheckpointLoadStatus at 0x7f6b0a395fd0>
分類器を構築するために、データセット内のバックボーンとクラス数を受け取る関数を作成します。build_classifier 関数は、データセット内のバックボーンとクラス数を受け取って、分類器を構築します。この場合、新しい分類器は、num_classes 出力(UCF101 のこのサブセットの 10 クラス)を取ります。
def build_classifier(batch_size, num_frames, resolution, backbone, num_classes):
  """Builds a classifier on top of a backbone model."""
  model = movinet_model.MovinetClassifier(
      backbone=backbone,
      num_classes=num_classes)
  model.build([batch_size, num_frames, resolution, resolution, 3])

  return model
model = build_classifier(batch_size, num_frames, resolution, backbone, 10)
このチュートリアルでは、tf.keras.optimizers.Adam オプティマイザと tf.keras.losses.SparseCategoricalCrossentropy 損失関数を選択します。metrics 引数を使用して、各ステップでのモデルパフォーマンスの精度を確認します。
num_epochs = 2

loss_obj = tf.keras.losses.SparseCategoricalCrossentropy(from_logits=True)

optimizer = tf.keras.optimizers.Adam(learning_rate = 0.001)

model.compile(loss=loss_obj, optimizer=optimizer, metrics=['accuracy'])
モデルをトレーニングします。2 エポック後に、トレーニングセットとテストセットの両方で高精度の低損失を確認します。
results = model.fit(train_ds,
                    validation_data=test_ds,
                    epochs=num_epochs,
                    validation_freq=1,
                    verbose=1)
Epoch 1/2
WARNING: All log messages before absl::InitializeLog() is called are written to STDERR
I0000 00:00:1705004378.923000  476492 device_compiler.h:186] Compiled cluster using XLA!  This line is logged at most once for the lifetime of the process.
2024-01-11 20:19:49.425506: W external/local_tsl/tsl/framework/bfc_allocator.cc:296] Allocator (GPU_0_bfc) ran out of memory trying to allocate 34.33GiB with freed_by_count=0. The caller indicates that this is not a failure, but this may mean that there could be performance gains if more memory were available.
2024-01-11 20:19:49.445254: W external/local_tsl/tsl/framework/bfc_allocator.cc:296] Allocator (GPU_0_bfc) ran out of memory trying to allocate 34.33GiB with freed_by_count=0. The caller indicates that this is not a failure, but this may mean that there could be performance gains if more memory were available.
38/Unknown - 62s 1s/step - loss: 0.9607 - accuracy: 0.7633
2024-01-11 20:20:28.853326: W external/local_tsl/tsl/framework/bfc_allocator.cc:296] Allocator (GPU_0_bfc) ran out of memory trying to allocate 34.05GiB with freed_by_count=0. The caller indicates that this is not a failure, but this may mean that there could be performance gains if more memory were available.
2024-01-11 20:20:28.872781: W external/local_tsl/tsl/framework/bfc_allocator.cc:296] Allocator (GPU_0_bfc) ran out of memory trying to allocate 34.05GiB with freed_by_count=0. The caller indicates that this is not a failure, but this may mean that there could be performance gains if more memory were available.
38/38 [==============================] - 90s 2s/step - loss: 0.9607 - accuracy: 0.7633 - val_loss: 0.2026 - val_accuracy: 0.9750
Epoch 2/2
38/38 [==============================] - 53s 1s/step - loss: 0.1268 - accuracy: 0.9733 - val_loss: 0.1281 - val_accuracy: 0.9750
モデルを評価する
モデルはトレーニングデータセットで高い精度を達成しました。次に、Keras Model.evaluate を使用して、テストセットで評価します。
model.evaluate(test_ds, return_dict=True)
25/25 [==============================] - 21s 848ms/step - loss: 0.1162 - accuracy: 0.9850
{'loss': 0.11623553931713104, 'accuracy': 0.9850000143051147}
モデルパフォーマンスをさらに可視化するには、混同行列を使用します。混同行列では、精度を超えて分類モデルのパフォーマンスを評価することができます。このマルチクラス分類問題の混同行列を作成するために、テストセットの実際の値と予測される値を取得します。
def get_actual_predicted_labels(dataset):
  """
    Create a list of actual ground truth values and the predictions from the model.

    Args:
      dataset: An iterable data structure, such as a TensorFlow Dataset, with features and labels.

    Return:
      Ground truth and predicted values for a particular dataset.
  """
  actual = [labels for _, labels in dataset.unbatch()]
  predicted = model.predict(dataset)

  actual = tf.stack(actual, axis=0)
  predicted = tf.concat(predicted, axis=0)
  predicted = tf.argmax(predicted, axis=1)

  return actual, predicted
def plot_confusion_matrix(actual, predicted, labels, ds_type):
  cm = tf.math.confusion_matrix(actual, predicted)
  ax = sns.heatmap(cm, annot=True, fmt='g')
  sns.set(rc={'figure.figsize':(12, 12)})
  sns.set(font_scale=1.4)
  ax.set_title('Confusion matrix of action recognition for ' + ds_type)
  ax.set_xlabel('Predicted Action')
  ax.set_ylabel('Actual Action')
  plt.xticks(rotation=90)
  plt.yticks(rotation=0)
  ax.xaxis.set_ticklabels(labels)
  ax.yaxis.set_ticklabels(labels)
fg = FrameGenerator(subset_paths['train'], num_frames, training = True)
label_names = list(fg.class_ids_for_name.keys())
actual, predicted = get_actual_predicted_labels(test_ds)
plot_confusion_matrix(actual, predicted, label_names, 'test')
25/25 [==============================] - 27s 810ms/step
次のステップ
MoviNet モデルと様々な TensorFlow API(移転学習用の API など)の知識をいくらか得たので、このチュートリアルのコードを自分のデータセットで使用してみましょう。データは動画データに限る必要はありません。MRI スキャンなどの体積データを 3D CNN で使用することも可能です。Brain MRI-based 3D Convolutional Neural Networks for Classification of Schizophrenia and Controls で言及されている NUSDAT と IMH データセットを MRI データのソースとして使用することができます。
特に、このチュートリアルや、他の動画データと分類チュートリアルで使用された FrameGenerator クラスを使うと、モデルにデータを読み込みやすくなります。
TensorFlow での動画の操作についての詳細は、以下のチュートリアルをご覧ください。