
 GitHub에서 보기 GitHub에서 보기 |
주의: pip로 python 패키지를 설치하는 외에도 이 노트북에서는 sudo apt install을 사용하여 시스템 패키지unzip을 설치합니다.
이 colab은 비 영어/현지어로 텍스트를 분류하기 위해 Tensorflow Hub를 사용하는 데모입니다. 여기에서는 Bangla를 현지어로 선택하고 사전 훈련된 단어 임베딩을 사용하여 Bangla 뉴스 기사를 5가지 범주로 분류하는 다중 클래스 분류 작업을 해결합니다. Bangla용 사전 훈련 임베딩은 157개 언어에 대해 사전 훈련된 단어 벡터를 게시한 Facebook 라이브러리인 fastText에서 가져옵니다.
먼저 TF-Hub의 사전 훈련된 임베딩 exporter를 사용하여 단어 임베딩을 텍스트 임베딩 모듈로 변환한 다음, Tensorflow의 사용자 친화적인 상위 수준 API인 tf.keras로 분류자를 훈련하는 모듈을 사용하여 딥 러닝 모델을 빌드합니다. 여기에서 fastText 임베딩을 사용하더라도 다른 작업에서 사전 훈련된 다른 임베딩을 내보내고 Tensorflow Hub를 사용하여 신속하게 결과를 얻을 수 있습니다.
설정
# https://github.com/pypa/setuptools/issues/1694#issuecomment-466010982pip install gdown --no-use-pep517
sudo apt-get install -y unzipReading package lists... Building dependency tree... Reading state information... unzip is already the newest version (6.0-25ubuntu1.1). The following packages were automatically installed and are no longer required: libatasmart4 libblockdev-fs2 libblockdev-loop2 libblockdev-part-err2 libblockdev-part2 libblockdev-swap2 libblockdev-utils2 libblockdev2 libparted-fs-resize0 Use 'sudo apt autoremove' to remove them. 0 upgraded, 0 newly installed, 0 to remove and 170 not upgraded.
import os

import tensorflow as tf
import tensorflow_hub as hub

import gdown
import numpy as np
from sklearn.metrics import classification_report
import matplotlib.pyplot as plt
import seaborn as sns
2022-12-14 22:32:00.433726: W tensorflow/compiler/xla/stream_executor/platform/default/dso_loader.cc:64] Could not load dynamic library 'libnvinfer.so.7'; dlerror: libnvinfer.so.7: cannot open shared object file: No such file or directory
2022-12-14 22:32:00.433836: W tensorflow/compiler/xla/stream_executor/platform/default/dso_loader.cc:64] Could not load dynamic library 'libnvinfer_plugin.so.7'; dlerror: libnvinfer_plugin.so.7: cannot open shared object file: No such file or directory
2022-12-14 22:32:00.433847: W tensorflow/compiler/tf2tensorrt/utils/py_utils.cc:38] TF-TRT Warning: Cannot dlopen some TensorRT libraries. If you would like to use Nvidia GPU with TensorRT, please make sure the missing libraries mentioned above are installed properly.
데이터세트
다양한 Bangla 뉴스 포털에서 수집한 약 3,76,226개의 기사가 있고 경제, 국내, 국제, 스포츠 및 엔터테인먼트의 5가지 범주로 분류된 BARD(Bangla Article Dataset)를 사용합니다. 이 (bit.ly/BARD_DATASET) 링크가 가리키는 Google 드라이브 파일을 이 GitHub 리포지토리에서 다운로드합니다.
gdown.download(
    url='https://drive.google.com/uc?id=1Ag0jd21oRwJhVFIBohmX_ogeojVtapLy',
    output='bard.zip',
    quiet=True
)
'bard.zip'
unzip -qo bard.zip사전 훈련된 단어 벡터를 TF-Hub 모듈로 내보내기
TF-Hub는 여기에서 단어 임베딩을 TF-Hub 텍스트 임베딩 모듈로 변환하기 위한 몇 가지 유용한 스크립트를 제공합니다. Bangla 또는 다른 언어 모듈을 만들려면 임베딩 단어 .txt 또는 .vec 파일을 export_v2.py와 동일한 디렉터리로 다운로드하고 스크립트를 실행하기만 하면 됩니다.
Exporter는 임베딩 벡터를 읽고 Tensorflow SavedModel로 내보냅니다. SavedModel에는 가중치와 그래프를 포함한 완전한 TensorFlow 프로그램이 포함되어 있습니다. TF-Hub는 SavedModel을 텍스트 분류를 위한 모델을 빌드하는 데 사용할 모듈로 로드할 수 있습니다. 모델을 빌드하기 위해 tf.keras를 사용하므로 TF-Hub 모듈이 Keras 레이어로 사용할 래퍼를 제공하는 hub.KerasLayer를 사용할 것입니다.
먼저 fastText에서 단어 임베딩을 가져오고 TF-Hub 리포지토리에서 임베딩 exporter를 가져옵니다.
curl -O https://dl.fbaipublicfiles.com/fasttext/vectors-crawl/cc.bn.300.vec.gzcurl -O https://raw.githubusercontent.com/tensorflow/hub/master/examples/text_embeddings_v2/export_v2.pygunzip -qf cc.bn.300.vec.gz --k
% Total    % Received % Xferd  Average Speed   Time    Time     Time  Current
                                 Dload  Upload   Total   Spent    Left  Speed
100  840M  100  840M    0     0  35.2M      0  0:00:23  0:00:23 --:--:-- 38.2M
  % Total    % Received % Xferd  Average Speed   Time    Time     Time  Current
                                 Dload  Upload   Total   Spent    Left  Speed
100  7469  100  7469    0     0  45542      0 --:--:-- --:--:-- --:--:-- 45542
그런 다음 임베딩 파일에서 Exporter 스크립트를 실행합니다. fastText 임베딩에는 헤더 행이 있고 크기가 상당히 크기 때문에(모듈로 변환한 후 Bangla의 경우 약 3.3GB) 첫 번째 행을 무시하고 처음 100,000개의 토큰만 텍스트 임베딩 모듈로 내보냅니다.
python export_v2.py --embedding_file=cc.bn.300.vec --export_path=text_module --num_lines_to_ignore=1 --num_lines_to_use=1000002022-12-14 22:33:22.833612: W tensorflow/compiler/xla/stream_executor/platform/default/dso_loader.cc:64] Could not load dynamic library 'libnvinfer.so.7'; dlerror: libnvinfer.so.7: cannot open shared object file: No such file or directory 2022-12-14 22:33:22.833707: W tensorflow/compiler/xla/stream_executor/platform/default/dso_loader.cc:64] Could not load dynamic library 'libnvinfer_plugin.so.7'; dlerror: libnvinfer_plugin.so.7: cannot open shared object file: No such file or directory 2022-12-14 22:33:22.833717: W tensorflow/compiler/tf2tensorrt/utils/py_utils.cc:38] TF-TRT Warning: Cannot dlopen some TensorRT libraries. If you would like to use Nvidia GPU with TensorRT, please make sure the missing libraries mentioned above are installed properly. INFO:tensorflow:Assets written to: text_module/assets I1214 22:33:38.019392 140325052233536 builder_impl.py:797] Assets written to: text_module/assets
module_path = "text_module"
embedding_layer = hub.KerasLayer(module_path, trainable=False)
WARNING:tensorflow:Please fix your imports. Module tensorflow.python.training.tracking.data_structures has been moved to tensorflow.python.trackable.data_structures. The old module will be deleted in version 2.11.
텍스트 임베딩 모듈은 문자열의 1D 텐서에 있는 문장 배치를 입력으로 받아 문장에 해당하는 형상의 임베딩 벡터(batch_size, embedding_dim)를 출력합니다. 공백으로 분할하여 입력을 전처리합니다. 단어 임베딩은 sqrtn sqrtn combiner를 사용하여 문장 임베딩에 결합됩니다(여기 참조). 데모를 위해 Bangla 단어 목록을 입력으로 전달하고 해당 임베딩 벡터를 얻습니다.
embedding_layer(['বাস', 'বসবাস', 'ট্রেন', 'যাত্রী', 'ট্রাক'])
<tf.Tensor: shape=(5, 300), dtype=float64, numpy=
array([[ 0.0462, -0.0355,  0.0129, ...,  0.0025, -0.0966,  0.0216],
       [-0.0631, -0.0051,  0.085 , ...,  0.0249, -0.0149,  0.0203],
       [ 0.1371, -0.069 , -0.1176, ...,  0.029 ,  0.0508, -0.026 ],
       [ 0.0532, -0.0465, -0.0504, ...,  0.02  , -0.0023,  0.0011],
       [ 0.0908, -0.0404, -0.0536, ..., -0.0275,  0.0528,  0.0253]])>
Tensorflow 데이터세트로 변환하기
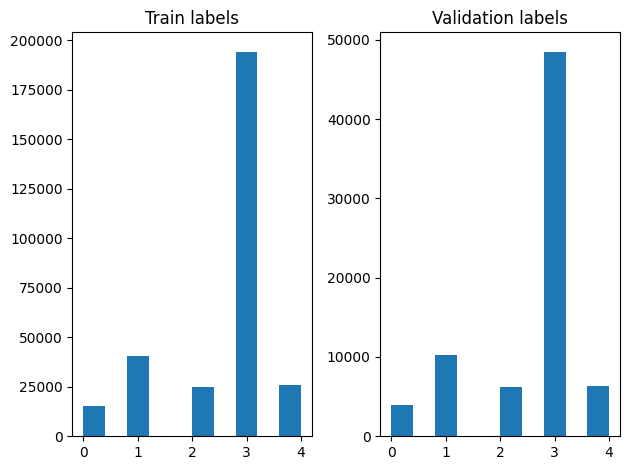
데이터세트가 정말 크기 때문에 메모리에 전체 데이터세트를 로드하는 대신 Tensorflow 데이터세트 기능을 사용하여 일괄적으로 런타임에 샘플을 생성하는 데 생성기를 사용합니다. 데이터세트는 또한 매우 불균형적이므로 생성기를 사용하기 전에 데이터세트를 셔플합니다.
dir_names = ['economy', 'sports', 'entertainment', 'state', 'international']

file_paths = []
labels = []
for i, dir in enumerate(dir_names):
  file_names = ["/".join([dir, name]) for name in os.listdir(dir)]
  file_paths += file_names
  labels += [i] * len(os.listdir(dir))

np.random.seed(42)
permutation = np.random.permutation(len(file_paths))

file_paths = np.array(file_paths)[permutation]
labels = np.array(labels)[permutation]
셔플한 후 훈련 및 검증 예제에서 레이블 분포를 확인할 수 있습니다.
train_frac = 0.8
train_size = int(len(file_paths) * train_frac)
# plot training vs validation distribution
plt.subplot(1, 2, 1)
plt.hist(labels[0:train_size])
plt.title("Train labels")
plt.subplot(1, 2, 2)
plt.hist(labels[train_size:])
plt.title("Validation labels")
plt.tight_layout()
생성기를 사용하여 데이터세트를 생성하려면 먼저 file_paths에서 각 기사를 읽고 레이블 배열에서 레이블을 읽어 각 스텝에서 하나의 훈련 예제를 생성하는 생성기 함수를 작성합니다. 이 생성기 함수를 tf.data.Dataset.from_generator 메서드에 전달하고 출력 유형을 지정합니다. 각 훈련 예제는 tf.string 데이터 형식의 기사와 원-핫 인코딩된 레이블을 포함하는 튜플입니다. tf.data.Dataset.skip 및 tf.data.Dataset.take 메서드를 사용하여 80-20의 훈련-검증 분할로 데이터세트를 분할합니다.
def load_file(path, label):
    return tf.io.read_file(path), label
def make_datasets(train_size):
  batch_size = 256

  train_files = file_paths[:train_size]
  train_labels = labels[:train_size]
  train_ds = tf.data.Dataset.from_tensor_slices((train_files, train_labels))
  train_ds = train_ds.map(load_file).shuffle(5000)
  train_ds = train_ds.batch(batch_size).prefetch(tf.data.AUTOTUNE)

  test_files = file_paths[train_size:]
  test_labels = labels[train_size:]
  test_ds = tf.data.Dataset.from_tensor_slices((test_files, test_labels))
  test_ds = test_ds.map(load_file)
  test_ds = test_ds.batch(batch_size).prefetch(tf.data.AUTOTUNE)


  return train_ds, test_ds
train_data, validation_data = make_datasets(train_size)
모델 훈련 및 평가
keras에서 다른 레이어로 사용하기 위해 모듈 주위에 래퍼를 이미 추가했으므로 레이어의 선형 스택인 작은 순차 모델을 만들 수 있습니다. 다른 레이어와 마찬가지로 model.add로 텍스트 임베딩 모듈을 추가할 수 있습니다. 손실과 옵티마이저를 지정하여 모델을 컴파일하고 10개 epoch 동안 훈련합니다. tf.keras API는 Tensorflow 데이터세트를 입력으로 처리할 수 있으므로 모델 훈련을 위해 데이터세트 인스턴스를 fit 메서드로 전달할 수 있습니다. 생성기 함수를 사용하기 때문에 tf.data가 샘플을 생성하고 배치 처리하여 모델에 공급하는 작업을 처리합니다.
모델
def create_model():
  model = tf.keras.Sequential([
    tf.keras.layers.Input(shape=[], dtype=tf.string),
    embedding_layer,
    tf.keras.layers.Dense(64, activation="relu"),
    tf.keras.layers.Dense(16, activation="relu"),
    tf.keras.layers.Dense(5),
  ])
  model.compile(loss=tf.losses.SparseCategoricalCrossentropy(from_logits=True),
      optimizer="adam", metrics=['accuracy'])
  return model
model = create_model()
# Create earlystopping callback
early_stopping_callback = tf.keras.callbacks.EarlyStopping(monitor='val_loss', min_delta=0, patience=3)
WARNING:tensorflow:From /tmpfs/src/tf_docs_env/lib/python3.9/site-packages/tensorflow/python/autograph/pyct/static_analysis/liveness.py:83: Analyzer.lamba_check (from tensorflow.python.autograph.pyct.static_analysis.liveness) is deprecated and will be removed after 2023-09-23.
Instructions for updating:
Lambda fuctions will be no more assumed to be used in the statement where they are used, or at least in the same block. https://github.com/tensorflow/tensorflow/issues/56089
훈련
history = model.fit(train_data,
                    validation_data=validation_data,
                    epochs=5,
                    callbacks=[early_stopping_callback])
Epoch 1/5
1176/1176 [==============================] - 29s 23ms/step - loss: 0.2171 - accuracy: 0.9270 - val_loss: 0.1492 - val_accuracy: 0.9480
Epoch 2/5
1176/1176 [==============================] - 27s 23ms/step - loss: 0.1383 - accuracy: 0.9510 - val_loss: 0.1335 - val_accuracy: 0.9516
Epoch 3/5
1176/1176 [==============================] - 27s 23ms/step - loss: 0.1265 - accuracy: 0.9550 - val_loss: 0.1280 - val_accuracy: 0.9524
Epoch 4/5
1176/1176 [==============================] - 27s 23ms/step - loss: 0.1196 - accuracy: 0.9564 - val_loss: 0.1238 - val_accuracy: 0.9544
Epoch 5/5
1176/1176 [==============================] - 27s 23ms/step - loss: 0.1148 - accuracy: 0.9580 - val_loss: 0.1198 - val_accuracy: 0.9558
평가
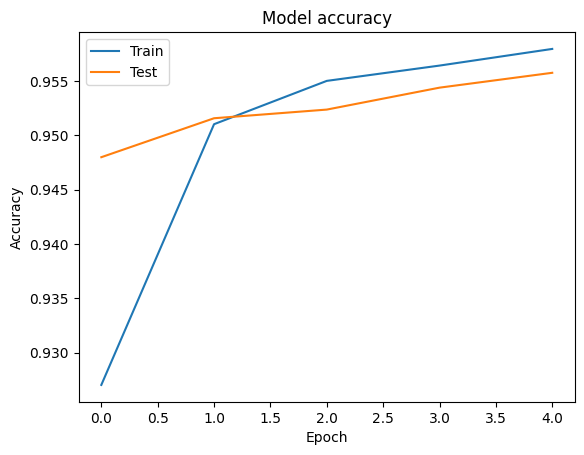
각 epoch에 대한 손실 및 정확도 값을 포함하는 tf.keras.Model.fit 메서드에서 반환된 tf.keras.callbacks.History 객체를 사용하여 훈련 및 검증 데이터에 대한 정확도와 손실 곡선을 시각화할 수 있습니다.
# Plot training & validation accuracy values
plt.plot(history.history['accuracy'])
plt.plot(history.history['val_accuracy'])
plt.title('Model accuracy')
plt.ylabel('Accuracy')
plt.xlabel('Epoch')
plt.legend(['Train', 'Test'], loc='upper left')
plt.show()
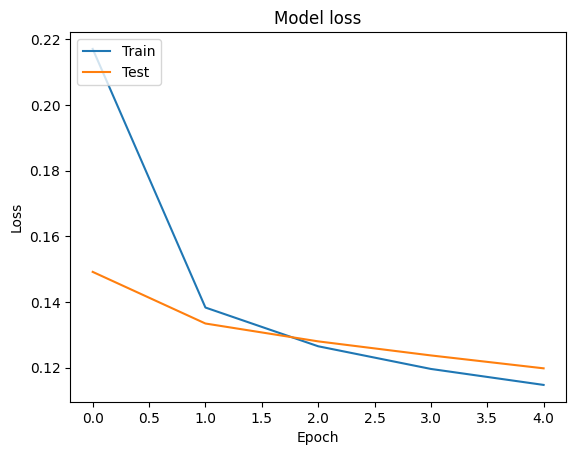
# Plot training & validation loss values
plt.plot(history.history['loss'])
plt.plot(history.history['val_loss'])
plt.title('Model loss')
plt.ylabel('Loss')
plt.xlabel('Epoch')
plt.legend(['Train', 'Test'], loc='upper left')
plt.show()
예측
검증 데이터에 대한 예측값을 얻고 혼동 행렬을 확인하여 5개 클래스 각각에 대한 모델의 성능을 확인할 수 있습니다. tf.keras.Model.predict 메서드는 각 클래스에 대한 확률에 대해 n-d 배열을 반환하므로 np.argmax를 사용하여 이를 클래스 레이블로 변환할 수 있습니다.
y_pred = model.predict(validation_data)
294/294 [==============================] - 5s 17ms/step
y_pred = np.argmax(y_pred, axis=1)
samples = file_paths[0:3]
for i, sample in enumerate(samples):
  f = open(sample)
  text = f.read()
  print(text[0:100])
  print("True Class: ", sample.split("/")[0])
  print("Predicted Class: ", dir_names[y_pred[i]])
  f.close()
গত বছরের নভেম্বর মাসে রাজু চৌধুরীর ‘এক মিনিট’ ছবির শুটিংয়ে অংশ নেন শিরিন শিলা। এর মধ্যে নতুন আর কে
True Class:  entertainment
Predicted Class:  state

চট্টগ্রাম কেন্দ্রীয় কারাগারে পানির হাহাকারে থাকা বন্দীদের খোঁজ নিতে গতকাল বুধবার ভিড় করেছে তাঁদের
True Class:  state
Predicted Class:  state

ফুটবল মাঠে আতঙ্কের নতুন নাম আতশবাজি! প্রতিপক্ষ খেলোয়াড়দের লক্ষ্য করে আতশবাজি ছোড়ার কারণে বন্ধ হয়ে
True Class:  sports
Predicted Class:  state
성능 비교
이제 labels에서 검증 데이터의 올바른 레이블을 가져와 예측값과 비교하고 classification_report를 생성합니다.
y_true = np.array(labels[train_size:])
print(classification_report(y_true, y_pred, target_names=dir_names))
precision    recall  f1-score   support

      economy       0.82      0.78      0.80      3897
       sports       0.98      0.98      0.98     10204
entertainment       0.91      0.94      0.92      6256
        state       0.97      0.97      0.97     48512
international       0.91      0.94      0.92      6377

     accuracy                           0.96     75246
    macro avg       0.92      0.92      0.92     75246
 weighted avg       0.96      0.96      0.96     75246
또한 모델의 성능을 0.96 정밀도를 가진 원본 논문에서 얻은 공개 결과와 비교할 수 있습니다. 원래 저자는 구두점 및 숫자를 삭제하고 가장 빈번한 25개의 제외어를 제거하는 등 데이터세트에 수행된 많은 전처리 스텝을 설명했습니다. classification_report에서 볼 수 있듯이 전처리 없이 5개 epoch 동안만 훈련한 후에도 0.96의 정밀도와 정확도가 얻어집니다!
이 예제에서는 임베딩 모듈에서 Keras 레이어를 만들 때 매개변수 trainable=False를 설정했습니다. 이것은 임베딩 가중치가 훈련 중에 업데이트되지 않음을 의미합니다. 이 데이터세트에서 단 두 번의 epoch로 약 97%의 정확도에 도달하려면 True로 설정해 보세요.