
 GitHub에서 보기 GitHub에서 보기 |
소개
이미지 분류 모델에는 수백만 개의 매개변수가 있습니다. 처음부터 훈련하려면 레이블이 지정된 많은 훈련 데이터와 많은 컴퓨팅 성능이 필요합니다. 전이 학습은 관련 작업에서 이미 훈련된 모델 조각을 가져와 새 모델에서 재사용함으로써 이러한 많은 자원 소모를 줄이는 기술입니다.
이 Colab은 이미지 특성 추출을 위해 TensorFlow Hub에서 사전 훈련된 TF2 SavedModel(훨씬 크고 더 일반적인 ImageNet 데이터세트에서 훈련됨)을 사용하여 5종의 꽃을 분류하기 위한 Keras 모델을 빌드하는 방법을 보여줍니다. 선택적으로, 특성 extractor를 새로 추가된 분류자와 함께 훈련("미세 조정")할 수 있습니다.
이것 말고 도구를 찾고 있습니까?
본 내용은 TensorFlow 코딩 튜토리얼입니다. TensorFlow 또는 TF Lite 모델을 빌드하는 도구를 원하는 경우 PIP 패키지 tensorflow-hub[make_image_classifier]를 통해 설치되거나 이 TF Lite colab에 있는 make_image_classifier 명령줄 도구를 살펴보세요.
설정
import itertools
import os

import matplotlib.pylab as plt
import numpy as np

import tensorflow as tf
import tensorflow_hub as hub

print("TF version:", tf.__version__)
print("Hub version:", hub.__version__)
print("GPU is", "available" if tf.config.list_physical_devices('GPU') else "NOT AVAILABLE")
2022-12-14 21:02:18.667701: W tensorflow/compiler/xla/stream_executor/platform/default/dso_loader.cc:64] Could not load dynamic library 'libnvinfer.so.7'; dlerror: libnvinfer.so.7: cannot open shared object file: No such file or directory
2022-12-14 21:02:18.667812: W tensorflow/compiler/xla/stream_executor/platform/default/dso_loader.cc:64] Could not load dynamic library 'libnvinfer_plugin.so.7'; dlerror: libnvinfer_plugin.so.7: cannot open shared object file: No such file or directory
2022-12-14 21:02:18.667822: W tensorflow/compiler/tf2tensorrt/utils/py_utils.cc:38] TF-TRT Warning: Cannot dlopen some TensorRT libraries. If you would like to use Nvidia GPU with TensorRT, please make sure the missing libraries mentioned above are installed properly.
TF version: 2.11.0
Hub version: 0.12.0
GPU is available
사용할 TF2 SavedModel 모듈 선택하기
처음 시작하는 경우 https://tfhub.dev/google/imagenet/mobilenet_v2_100_224/feature_vector/4를 사용하세요. 동일한 URL을 코드에 사용하여 SavedModel을 식별하고 브라우저에서 설명서를 표시할 수 있습니다. 참고로 TF1 Hub 형식의 모델은 여기서 작동하지 않습니다.
여기에서 이미지 특성 벡터를 생성하는 더 많은 TF2 모델을 찾을 수 있습니다.
시도할 수 있는 여러 모델이 있습니다. 아래 셀에서 다른 모델을 선택하고 노트북을 사용하기만 하면 됩니다.
model_name = "efficientnetv2-xl-21k" # @param ['efficientnetv2-s', 'efficientnetv2-m', 'efficientnetv2-l', 'efficientnetv2-s-21k', 'efficientnetv2-m-21k', 'efficientnetv2-l-21k', 'efficientnetv2-xl-21k', 'efficientnetv2-b0-21k', 'efficientnetv2-b1-21k', 'efficientnetv2-b2-21k', 'efficientnetv2-b3-21k', 'efficientnetv2-s-21k-ft1k', 'efficientnetv2-m-21k-ft1k', 'efficientnetv2-l-21k-ft1k', 'efficientnetv2-xl-21k-ft1k', 'efficientnetv2-b0-21k-ft1k', 'efficientnetv2-b1-21k-ft1k', 'efficientnetv2-b2-21k-ft1k', 'efficientnetv2-b3-21k-ft1k', 'efficientnetv2-b0', 'efficientnetv2-b1', 'efficientnetv2-b2', 'efficientnetv2-b3', 'efficientnet_b0', 'efficientnet_b1', 'efficientnet_b2', 'efficientnet_b3', 'efficientnet_b4', 'efficientnet_b5', 'efficientnet_b6', 'efficientnet_b7', 'bit_s-r50x1', 'inception_v3', 'inception_resnet_v2', 'resnet_v1_50', 'resnet_v1_101', 'resnet_v1_152', 'resnet_v2_50', 'resnet_v2_101', 'resnet_v2_152', 'nasnet_large', 'nasnet_mobile', 'pnasnet_large', 'mobilenet_v2_100_224', 'mobilenet_v2_130_224', 'mobilenet_v2_140_224', 'mobilenet_v3_small_100_224', 'mobilenet_v3_small_075_224', 'mobilenet_v3_large_100_224', 'mobilenet_v3_large_075_224']

model_handle_map = {
  "efficientnetv2-s": "https://tfhub.dev/google/imagenet/efficientnet_v2_imagenet1k_s/feature_vector/2",
  "efficientnetv2-m": "https://tfhub.dev/google/imagenet/efficientnet_v2_imagenet1k_m/feature_vector/2",
  "efficientnetv2-l": "https://tfhub.dev/google/imagenet/efficientnet_v2_imagenet1k_l/feature_vector/2",
  "efficientnetv2-s-21k": "https://tfhub.dev/google/imagenet/efficientnet_v2_imagenet21k_s/feature_vector/2",
  "efficientnetv2-m-21k": "https://tfhub.dev/google/imagenet/efficientnet_v2_imagenet21k_m/feature_vector/2",
  "efficientnetv2-l-21k": "https://tfhub.dev/google/imagenet/efficientnet_v2_imagenet21k_l/feature_vector/2",
  "efficientnetv2-xl-21k": "https://tfhub.dev/google/imagenet/efficientnet_v2_imagenet21k_xl/feature_vector/2",
  "efficientnetv2-b0-21k": "https://tfhub.dev/google/imagenet/efficientnet_v2_imagenet21k_b0/feature_vector/2",
  "efficientnetv2-b1-21k": "https://tfhub.dev/google/imagenet/efficientnet_v2_imagenet21k_b1/feature_vector/2",
  "efficientnetv2-b2-21k": "https://tfhub.dev/google/imagenet/efficientnet_v2_imagenet21k_b2/feature_vector/2",
  "efficientnetv2-b3-21k": "https://tfhub.dev/google/imagenet/efficientnet_v2_imagenet21k_b3/feature_vector/2",
  "efficientnetv2-s-21k-ft1k": "https://tfhub.dev/google/imagenet/efficientnet_v2_imagenet21k_ft1k_s/feature_vector/2",
  "efficientnetv2-m-21k-ft1k": "https://tfhub.dev/google/imagenet/efficientnet_v2_imagenet21k_ft1k_m/feature_vector/2",
  "efficientnetv2-l-21k-ft1k": "https://tfhub.dev/google/imagenet/efficientnet_v2_imagenet21k_ft1k_l/feature_vector/2",
  "efficientnetv2-xl-21k-ft1k": "https://tfhub.dev/google/imagenet/efficientnet_v2_imagenet21k_ft1k_xl/feature_vector/2",
  "efficientnetv2-b0-21k-ft1k": "https://tfhub.dev/google/imagenet/efficientnet_v2_imagenet21k_ft1k_b0/feature_vector/2",
  "efficientnetv2-b1-21k-ft1k": "https://tfhub.dev/google/imagenet/efficientnet_v2_imagenet21k_ft1k_b1/feature_vector/2",
  "efficientnetv2-b2-21k-ft1k": "https://tfhub.dev/google/imagenet/efficientnet_v2_imagenet21k_ft1k_b2/feature_vector/2",
  "efficientnetv2-b3-21k-ft1k": "https://tfhub.dev/google/imagenet/efficientnet_v2_imagenet21k_ft1k_b3/feature_vector/2",
  "efficientnetv2-b0": "https://tfhub.dev/google/imagenet/efficientnet_v2_imagenet1k_b0/feature_vector/2",
  "efficientnetv2-b1": "https://tfhub.dev/google/imagenet/efficientnet_v2_imagenet1k_b1/feature_vector/2",
  "efficientnetv2-b2": "https://tfhub.dev/google/imagenet/efficientnet_v2_imagenet1k_b2/feature_vector/2",
  "efficientnetv2-b3": "https://tfhub.dev/google/imagenet/efficientnet_v2_imagenet1k_b3/feature_vector/2",
  "efficientnet_b0": "https://tfhub.dev/tensorflow/efficientnet/b0/feature-vector/1",
  "efficientnet_b1": "https://tfhub.dev/tensorflow/efficientnet/b1/feature-vector/1",
  "efficientnet_b2": "https://tfhub.dev/tensorflow/efficientnet/b2/feature-vector/1",
  "efficientnet_b3": "https://tfhub.dev/tensorflow/efficientnet/b3/feature-vector/1",
  "efficientnet_b4": "https://tfhub.dev/tensorflow/efficientnet/b4/feature-vector/1",
  "efficientnet_b5": "https://tfhub.dev/tensorflow/efficientnet/b5/feature-vector/1",
  "efficientnet_b6": "https://tfhub.dev/tensorflow/efficientnet/b6/feature-vector/1",
  "efficientnet_b7": "https://tfhub.dev/tensorflow/efficientnet/b7/feature-vector/1",
  "bit_s-r50x1": "https://tfhub.dev/google/bit/s-r50x1/1",
  "inception_v3": "https://tfhub.dev/google/imagenet/inception_v3/feature-vector/4",
  "inception_resnet_v2": "https://tfhub.dev/google/imagenet/inception_resnet_v2/feature-vector/4",
  "resnet_v1_50": "https://tfhub.dev/google/imagenet/resnet_v1_50/feature-vector/4",
  "resnet_v1_101": "https://tfhub.dev/google/imagenet/resnet_v1_101/feature-vector/4",
  "resnet_v1_152": "https://tfhub.dev/google/imagenet/resnet_v1_152/feature-vector/4",
  "resnet_v2_50": "https://tfhub.dev/google/imagenet/resnet_v2_50/feature-vector/4",
  "resnet_v2_101": "https://tfhub.dev/google/imagenet/resnet_v2_101/feature-vector/4",
  "resnet_v2_152": "https://tfhub.dev/google/imagenet/resnet_v2_152/feature-vector/4",
  "nasnet_large": "https://tfhub.dev/google/imagenet/nasnet_large/feature_vector/4",
  "nasnet_mobile": "https://tfhub.dev/google/imagenet/nasnet_mobile/feature_vector/4",
  "pnasnet_large": "https://tfhub.dev/google/imagenet/pnasnet_large/feature_vector/4",
  "mobilenet_v2_100_224": "https://tfhub.dev/google/imagenet/mobilenet_v2_100_224/feature_vector/4",
  "mobilenet_v2_130_224": "https://tfhub.dev/google/imagenet/mobilenet_v2_130_224/feature_vector/4",
  "mobilenet_v2_140_224": "https://tfhub.dev/google/imagenet/mobilenet_v2_140_224/feature_vector/4",
  "mobilenet_v3_small_100_224": "https://tfhub.dev/google/imagenet/mobilenet_v3_small_100_224/feature_vector/5",
  "mobilenet_v3_small_075_224": "https://tfhub.dev/google/imagenet/mobilenet_v3_small_075_224/feature_vector/5",
  "mobilenet_v3_large_100_224": "https://tfhub.dev/google/imagenet/mobilenet_v3_large_100_224/feature_vector/5",
  "mobilenet_v3_large_075_224": "https://tfhub.dev/google/imagenet/mobilenet_v3_large_075_224/feature_vector/5",
}

model_image_size_map = {
  "efficientnetv2-s": 384,
  "efficientnetv2-m": 480,
  "efficientnetv2-l": 480,
  "efficientnetv2-b0": 224,
  "efficientnetv2-b1": 240,
  "efficientnetv2-b2": 260,
  "efficientnetv2-b3": 300,
  "efficientnetv2-s-21k": 384,
  "efficientnetv2-m-21k": 480,
  "efficientnetv2-l-21k": 480,
  "efficientnetv2-xl-21k": 512,
  "efficientnetv2-b0-21k": 224,
  "efficientnetv2-b1-21k": 240,
  "efficientnetv2-b2-21k": 260,
  "efficientnetv2-b3-21k": 300,
  "efficientnetv2-s-21k-ft1k": 384,
  "efficientnetv2-m-21k-ft1k": 480,
  "efficientnetv2-l-21k-ft1k": 480,
  "efficientnetv2-xl-21k-ft1k": 512,
  "efficientnetv2-b0-21k-ft1k": 224,
  "efficientnetv2-b1-21k-ft1k": 240,
  "efficientnetv2-b2-21k-ft1k": 260,
  "efficientnetv2-b3-21k-ft1k": 300,
  "efficientnet_b0": 224,
  "efficientnet_b1": 240,
  "efficientnet_b2": 260,
  "efficientnet_b3": 300,
  "efficientnet_b4": 380,
  "efficientnet_b5": 456,
  "efficientnet_b6": 528,
  "efficientnet_b7": 600,
  "inception_v3": 299,
  "inception_resnet_v2": 299,
  "nasnet_large": 331,
  "pnasnet_large": 331,
}

model_handle = model_handle_map.get(model_name)
pixels = model_image_size_map.get(model_name, 224)

print(f"Selected model: {model_name} : {model_handle}")

IMAGE_SIZE = (pixels, pixels)
print(f"Input size {IMAGE_SIZE}")

BATCH_SIZE = 16
Selected model: efficientnetv2-xl-21k : https://tfhub.dev/google/imagenet/efficientnet_v2_imagenet21k_xl/feature_vector/2
Input size (512, 512)
Flowers 데이터세트 설정하기
입력은 선택한 모듈에 맞게 적절한 크기로 조정됩니다. 데이터세트 확대(즉, 읽을 때마다 이미지의 임의 왜곡)로 특히 미세 조정할 때 훈련이 개선됩니다.
data_dir = tf.keras.utils.get_file(
    'flower_photos',
    'https://storage.googleapis.com/download.tensorflow.org/example_images/flower_photos.tgz',
    untar=True)
Downloading data from https://storage.googleapis.com/download.tensorflow.org/example_images/flower_photos.tgz
228813984/228813984 [==============================] - 1s 0us/step
def build_dataset(subset):
  return tf.keras.preprocessing.image_dataset_from_directory(
      data_dir,
      validation_split=.20,
      subset=subset,
      label_mode="categorical",
      # Seed needs to provided when using validation_split and shuffle = True.
      # A fixed seed is used so that the validation set is stable across runs.
      seed=123,
      image_size=IMAGE_SIZE,
      batch_size=1)

train_ds = build_dataset("training")
class_names = tuple(train_ds.class_names)
train_size = train_ds.cardinality().numpy()
train_ds = train_ds.unbatch().batch(BATCH_SIZE)
train_ds = train_ds.repeat()

normalization_layer = tf.keras.layers.Rescaling(1. / 255)
preprocessing_model = tf.keras.Sequential([normalization_layer])
do_data_augmentation = False
if do_data_augmentation:
  preprocessing_model.add(
      tf.keras.layers.RandomRotation(40))
  preprocessing_model.add(
      tf.keras.layers.RandomTranslation(0, 0.2))
  preprocessing_model.add(
      tf.keras.layers.RandomTranslation(0.2, 0))
  # Like the old tf.keras.preprocessing.image.ImageDataGenerator(),
  # image sizes are fixed when reading, and then a random zoom is applied.
  # If all training inputs are larger than image_size, one could also use
  # RandomCrop with a batch size of 1 and rebatch later.
  preprocessing_model.add(
      tf.keras.layers.RandomZoom(0.2, 0.2))
  preprocessing_model.add(
      tf.keras.layers.RandomFlip(mode="horizontal"))
train_ds = train_ds.map(lambda images, labels:
                        (preprocessing_model(images), labels))

val_ds = build_dataset("validation")
valid_size = val_ds.cardinality().numpy()
val_ds = val_ds.unbatch().batch(BATCH_SIZE)
val_ds = val_ds.map(lambda images, labels:
                    (normalization_layer(images), labels))
Found 3670 files belonging to 5 classes.
Using 2936 files for training.
WARNING:tensorflow:From /tmpfs/src/tf_docs_env/lib/python3.9/site-packages/tensorflow/python/autograph/pyct/static_analysis/liveness.py:83: Analyzer.lamba_check (from tensorflow.python.autograph.pyct.static_analysis.liveness) is deprecated and will be removed after 2023-09-23.
Instructions for updating:
Lambda fuctions will be no more assumed to be used in the statement where they are used, or at least in the same block. https://github.com/tensorflow/tensorflow/issues/56089
Found 3670 files belonging to 5 classes.
Using 734 files for validation.
모델 정의하기
Hub 모듈을 사용하여 feature_extractor_layer 위에 선형 분류자를 배치하기만 하면 됩니다.
속도를 높이기 위해 훈련할 수 없는 feature_extractor_layer로 시작하지만 정확성을 높이기 위해 미세 조정을 사용할 수도 있습니다.
do_fine_tuning = False
print("Building model with", model_handle)
model = tf.keras.Sequential([
    # Explicitly define the input shape so the model can be properly
    # loaded by the TFLiteConverter
    tf.keras.layers.InputLayer(input_shape=IMAGE_SIZE + (3,)),
    hub.KerasLayer(model_handle, trainable=do_fine_tuning),
    tf.keras.layers.Dropout(rate=0.2),
    tf.keras.layers.Dense(len(class_names),
                          kernel_regularizer=tf.keras.regularizers.l2(0.0001))
])
model.build((None,)+IMAGE_SIZE+(3,))
model.summary()
Building model with https://tfhub.dev/google/imagenet/efficientnet_v2_imagenet21k_xl/feature_vector/2
WARNING:tensorflow:Please fix your imports. Module tensorflow.python.training.tracking.data_structures has been moved to tensorflow.python.trackable.data_structures. The old module will be deleted in version 2.11.
Model: "sequential_1"
_________________________________________________________________
 Layer (type)                Output Shape              Param #
=================================================================
 keras_layer (KerasLayer)    (None, 1280)              207615832

 dropout (Dropout)           (None, 1280)              0

 dense (Dense)               (None, 5)                 6405

=================================================================
Total params: 207,622,237
Trainable params: 6,405
Non-trainable params: 207,615,832
_________________________________________________________________
모델 훈련하기
model.compile(
  optimizer=tf.keras.optimizers.SGD(learning_rate=0.005, momentum=0.9),
  loss=tf.keras.losses.CategoricalCrossentropy(from_logits=True, label_smoothing=0.1),
  metrics=['accuracy'])
steps_per_epoch = train_size // BATCH_SIZE
validation_steps = valid_size // BATCH_SIZE
hist = model.fit(
    train_ds,
    epochs=5, steps_per_epoch=steps_per_epoch,
    validation_data=val_ds,
    validation_steps=validation_steps).history
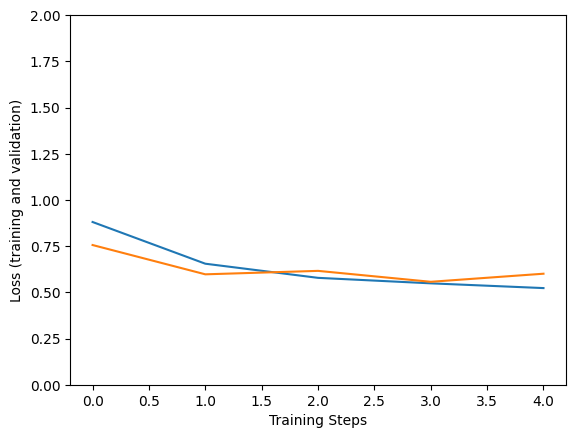
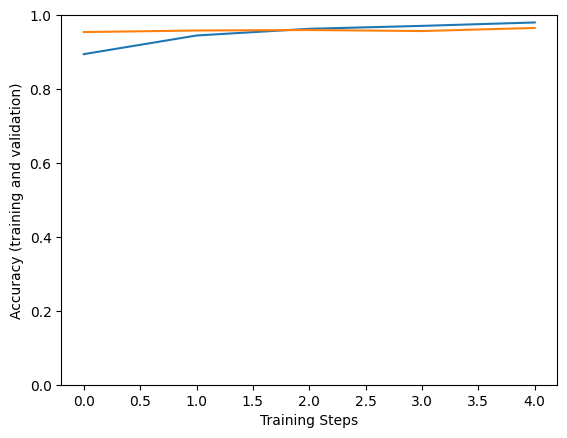
Epoch 1/5
183/183 [==============================] - 186s 843ms/step - loss: 0.8805 - accuracy: 0.8945 - val_loss: 0.7559 - val_accuracy: 0.9542
Epoch 2/5
183/183 [==============================] - 150s 817ms/step - loss: 0.6549 - accuracy: 0.9449 - val_loss: 0.5974 - val_accuracy: 0.9583
Epoch 3/5
183/183 [==============================] - 149s 816ms/step - loss: 0.5783 - accuracy: 0.9630 - val_loss: 0.6161 - val_accuracy: 0.9597
Epoch 4/5
183/183 [==============================] - 149s 816ms/step - loss: 0.5486 - accuracy: 0.9709 - val_loss: 0.5569 - val_accuracy: 0.9569
Epoch 5/5
183/183 [==============================] - 149s 816ms/step - loss: 0.5229 - accuracy: 0.9801 - val_loss: 0.6007 - val_accuracy: 0.9653
plt.figure()
plt.ylabel("Loss (training and validation)")
plt.xlabel("Training Steps")
plt.ylim([0,2])
plt.plot(hist["loss"])
plt.plot(hist["val_loss"])

plt.figure()
plt.ylabel("Accuracy (training and validation)")
plt.xlabel("Training Steps")
plt.ylim([0,1])
plt.plot(hist["accuracy"])
plt.plot(hist["val_accuracy"])
[<matplotlib.lines.Line2D at 0x7f7b22f05370>]
검증 데이터의 이미지에서 모델을 사용해 보세요.
x, y = next(iter(val_ds))
image = x[0, :, :, :]
true_index = np.argmax(y[0])
plt.imshow(image)
plt.axis('off')
plt.show()

# Expand the validation image to (1, 224, 224, 3) before predicting the label
prediction_scores = model.predict(np.expand_dims(image, axis=0))
predicted_index = np.argmax(prediction_scores)
print("True label: " + class_names[true_index])
print("Predicted label: " + class_names[predicted_index])
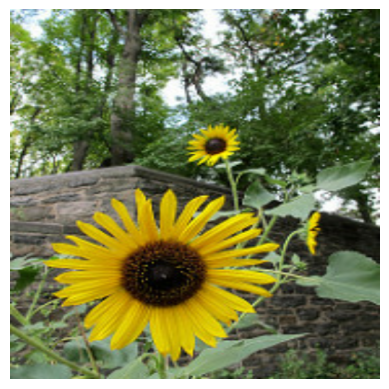
1/1 [==============================] - 5s 5s/step
True label: sunflowers
Predicted label: sunflowers
마지막으로, 훈련한 모델을 다음과 같이 TF Serving 또는 TF Lite(모바일)에 배포하기 위해 저장할 수 있습니다.
saved_model_path = f"/tmp/saved_flowers_model_{model_name}"
tf.saved_model.save(model, saved_model_path)
WARNING:absl:Found untraced functions such as restored_function_body, restored_function_body, restored_function_body, restored_function_body, restored_function_body while saving (showing 5 of 1594). These functions will not be directly callable after loading.
INFO:tensorflow:Assets written to: /tmp/saved_flowers_model_efficientnetv2-xl-21k/assets
INFO:tensorflow:Assets written to: /tmp/saved_flowers_model_efficientnetv2-xl-21k/assets
선택 사항: TensorFlow Lite에 배포
TensorFlow Lite를 사용하면 TensorFlow 모델을 모바일 및 IoT 기기에 배포할 수 있습니다. 아래 코드는 훈련한 모델을 TF Lite로 변환하고 TensorFlow 모델 최적화 도구 키트의 훈련 후 도구를 적용하는 방법을 보여줍니다. 마지막으로, TF Lite Interpreter에서 모델을 실행하여 결과 품질을 검사합니다.
- 최적화 없이 변환하면 이전과 동일한 결과가 제공됩니다(최대 반올림 오차 포함).
- 데이터 없이 최적화를 이용해 변환하면 모델 가중치가 8bit로 양자화되지만 추론은 여전히 신경망 활성화에 부동 소수점 계산을 사용합니다. 그러면 모델 크기가 거의 4배 감소하고 모바일 기기의 CPU 대기 시간이 향상됩니다.
- 또한, 양자화 범위를 보정하기 위해 작은 참조 데이터세트가 제공되는 경우 신경망 활성화 계산도 8bit 정수로 양자화할 수 있습니다. 그 결과, 모바일 기기에서 추론 속도가 빨라지고 EdgeTPU와 같은 가속기에서 실행할 수 있습니다.
Optimization settings
optimize_lite_model = False
num_calibration_examples = 60
representative_dataset = None
if optimize_lite_model and num_calibration_examples:
  # Use a bounded number of training examples without labels for calibration.
  # TFLiteConverter expects a list of input tensors, each with batch size 1.
  representative_dataset = lambda: itertools.islice(
      ([image[None, ...]] for batch, _ in train_ds for image in batch),
      num_calibration_examples)

converter = tf.lite.TFLiteConverter.from_saved_model(saved_model_path)
if optimize_lite_model:
  converter.optimizations = [tf.lite.Optimize.DEFAULT]
  if representative_dataset:  # This is optional, see above.
    converter.representative_dataset = representative_dataset
lite_model_content = converter.convert()

with open(f"/tmp/lite_flowers_model_{model_name}.tflite", "wb") as f:
  f.write(lite_model_content)
print("Wrote %sTFLite model of %d bytes." %
      ("optimized " if optimize_lite_model else "", len(lite_model_content)))
2022-12-14 21:17:29.083085: W tensorflow/compiler/mlir/lite/python/tf_tfl_flatbuffer_helpers.cc:362] Ignored output_format.
2022-12-14 21:17:29.083128: W tensorflow/compiler/mlir/lite/python/tf_tfl_flatbuffer_helpers.cc:365] Ignored drop_control_dependency.
Wrote TFLite model of 826217852 bytes.
interpreter = tf.lite.Interpreter(model_content=lite_model_content)
# This little helper wraps the TFLite Interpreter as a numpy-to-numpy function.
def lite_model(images):
  interpreter.allocate_tensors()
  interpreter.set_tensor(interpreter.get_input_details()[0]['index'], images)
  interpreter.invoke()
  return interpreter.get_tensor(interpreter.get_output_details()[0]['index'])
num_eval_examples = 50
eval_dataset = ((image, label)  # TFLite expects batch size 1.
                for batch in train_ds
                for (image, label) in zip(*batch))
count = 0
count_lite_tf_agree = 0
count_lite_correct = 0
for image, label in eval_dataset:
  probs_lite = lite_model(image[None, ...])[0]
  probs_tf = model(image[None, ...]).numpy()[0]
  y_lite = np.argmax(probs_lite)
  y_tf = np.argmax(probs_tf)
  y_true = np.argmax(label)
  count +=1
  if y_lite == y_tf: count_lite_tf_agree += 1
  if y_lite == y_true: count_lite_correct += 1
  if count >= num_eval_examples: break
print("TFLite model agrees with original model on %d of %d examples (%g%%)." %
      (count_lite_tf_agree, count, 100.0 * count_lite_tf_agree / count))
print("TFLite model is accurate on %d of %d examples (%g%%)." %
      (count_lite_correct, count, 100.0 * count_lite_correct / count))
INFO: Created TensorFlow Lite XNNPACK delegate for CPU.
TFLite model agrees with original model on 50 of 50 examples (100%).
TFLite model is accurate on 48 of 50 examples (96%).