
개요
TFMA(TensorFlow Model Analysis)는 모델 평가를 수행하기 위한 라이브러리입니다.
- 대상 : 기계 학습 엔지니어 또는 데이터 과학자
- 누구 : TensorFlow 모델을 분석하고 이해하고 싶습니다.
- TFX 파이프라인의 독립형 라이브러리 또는 구성요소 입니다 .
- that : 훈련에서 정의된 동일한 측정 항목에 대해 분산 방식으로 대량의 데이터에 대한 모델을 평가합니다. 이러한 측정항목은 데이터 조각에 대해 비교되고 Jupyter 또는 Colab 노트북에서 시각화됩니다.
- 달리 : 모델 내부 검사를 제공하는 텐서보드와 같은 일부 모델 내부 검사 도구
TFMA는 Apache Beam을 사용하여 대량의 데이터에 대해 분산 방식으로 계산을 수행합니다. 다음 섹션에서는 기본 TFMA 평가 파이프라인을 설정하는 방법을 설명합니다. 기본 구현에 대한 자세한 내용은 아키텍처를 참조하세요.
바로 시작하고 싶다면 Colab 노트북을 확인하세요.
이 페이지는 tensorflow.org 에서도 볼 수 있습니다.
지원되는 모델 유형
TFMA는 텐서플로우 기반 모델을 지원하도록 설계되었지만 다른 프레임워크도 지원하도록 쉽게 확장할 수 있습니다. 역사적으로 TFMA에서는 TFMA를 사용하기 위해 EvalSavedModel 을 생성해야 했지만 최신 버전의 TFMA는 사용자의 요구에 따라 여러 유형의 모델을 지원합니다. EvalSavedModel 설정은 tf.estimator 기반 모델이 사용되고 사용자 정의 훈련 시간 측정항목이 필요한 경우에만 필요합니다.
이제 TFMA는 제공 모델을 기반으로 실행되므로 TFMA는 학습 시 추가된 측정항목을 더 이상 자동으로 평가하지 않습니다. 이 경우의 예외는 keras 모델이 사용되는 경우입니다. keras는 저장된 모델과 함께 사용된 측정항목을 저장하기 때문입니다. 그러나 이것이 어려운 요구 사항인 경우 최신 TFMA는 이전 버전과 호환되므로 EvalSavedModel TFMA 파이프라인에서 계속 실행할 수 있습니다.
다음 표에는 기본적으로 지원되는 모델이 요약되어 있습니다.
| 모델 유형 | 훈련 시간 측정항목 | 훈련 후 지표 |
|---|---|---|
| TF2(케라스) | 와이* | 와이 |
| TF2(일반) | 해당 없음 | 와이 |
| EvalSavedModel(추정자) | 와이 | 와이 |
| 없음(pd.DataFrame 등) | 해당 없음 | 와이 |
- 훈련 시간 지표는 훈련 시간에 정의되고 모델(TFMA EvalSavedModel 또는 keras 저장 모델)과 함께 저장된 지표를 나타냅니다. 훈련 후 지표는
tfma.MetricConfig통해 추가된 지표를 나타냅니다. - 일반 TF2 모델은 추론에 사용할 수 있고 keras나 추정기를 기반으로 하지 않는 서명을 내보내는 사용자 지정 모델입니다.
다양한 모델 유형을 설정하고 구성하는 방법에 대한 자세한 내용은 FAQ를 참조하세요.
설정
평가를 실행하기 전에 약간의 설정이 필요합니다. 먼저, 평가할 모델, 지표 및 조각에 대한 사양을 제공하는 tfma.EvalConfig 객체를 정의해야 합니다. 두 번째로 평가 중에 사용할 실제 모델을 가리키는 tfma.EvalSharedModel 을 생성해야 합니다. 이것이 정의되면 적절한 데이터 세트와 함께 tfma.run_model_analysis 호출하여 평가가 수행됩니다. 자세한 내용은 설정 가이드를 참조하세요.
TFX 파이프라인 내에서 실행하는 경우 TFX 평가기 구성요소로 실행되도록 TFMA를 구성하는 방법은 TFX 가이드를 참조하세요.
예
단일 모델 평가
다음은 tfma.run_model_analysis 사용하여 제공 모델에 대한 평가를 수행합니다. 필요한 다양한 설정에 대한 설명은 설정 가이드를 참조하세요.
# Run in a Jupyter Notebook.
from google.protobuf import text_format

eval_config = text_format.Parse("""
  ## Model information
  model_specs {
    # This assumes a serving model with a "serving_default" signature.
    label_key: "label"
    example_weight_key: "weight"
  }
  ## Post export metric information
  metrics_specs {
    # This adds AUC as a post training metric. If the model has built in
    # training metrics which also contains AUC, this metric will replace it.
    metrics { class_name: "AUC" }
    # ... other post training metrics ...

    # Plots are also configured here...
    metrics { class_name: "ConfusionMatrixPlot" }
  }
  ## Slicing information
  slicing_specs {}  # overall slice
  slicing_specs {
    feature_keys: ["age"]
  }
""", tfma.EvalConfig())

eval_shared_model = tfma.default_eval_shared_model(
    eval_saved_model_path='/path/to/saved/model', eval_config=eval_config)

eval_result = tfma.run_model_analysis(
    eval_shared_model=eval_shared_model,
    eval_config=eval_config,
    # This assumes your data is a TFRecords file containing records in the
    # tf.train.Example format.
    data_location='/path/to/file/containing/tfrecords',
    output_path='/path/for/output')

tfma.view.render_slicing_metrics(eval_result)
분산 평가를 위해서는 분산 실행기를 사용하여 Apache Beam 파이프라인을 구성하세요. 파이프라인에서 평가를 위해 tfma.ExtractEvaluateAndWriteResults 를 사용하고 결과를 작성합니다. tfma.load_eval_result 사용하여 시각화를 위해 결과를 로드할 수 있습니다.
예를 들어:
# To run the pipeline.
from google.protobuf import text_format
from tfx_bsl.tfxio import tf_example_record

eval_config = text_format.Parse("""
  ## Model information
  model_specs {
    # This assumes a serving model with a "serving_default" signature.
    label_key: "label"
    example_weight_key: "weight"
  }
  ## Post export metric information
  metrics_specs {
    # This adds AUC and as a post training metric. If the model has built in
    # training metrics which also contains AUC, this metric will replace it.
    metrics { class_name: "AUC" }
    # ... other post training metrics ...

    # Plots are also configured here...
    metrics { class_name: "ConfusionMatrixPlot" }
  }
  ## Slicing information
  slicing_specs {}  # overall slice
  slicing_specs {
    feature_keys: ["age"]
  }
""", tfma.EvalConfig())

eval_shared_model = tfma.default_eval_shared_model(
    eval_saved_model_path='/path/to/saved/model', eval_config=eval_config)

output_path = '/path/for/output'

tfx_io = tf_example_record.TFExampleRecord(
    file_pattern=data_location, raw_record_column_name=tfma.ARROW_INPUT_COLUMN)

with beam.Pipeline(runner=...) as p:
  _ = (p
       # You can change the source as appropriate, e.g. read from BigQuery.
       # This assumes your data is a TFRecords file containing records in the
       # tf.train.Example format. If using EvalSavedModel then use the following
       # instead: 'ReadData' >> beam.io.ReadFromTFRecord(file_pattern=...)
       | 'ReadData' >> tfx_io.BeamSource()
       | 'ExtractEvaluateAndWriteResults' >>
       tfma.ExtractEvaluateAndWriteResults(
            eval_shared_model=eval_shared_model,
            eval_config=eval_config,
            output_path=output_path))

# To load and visualize results.
# Note that this code should be run in a Jupyter Notebook.
result = tfma.load_eval_result(output_path)
tfma.view.render_slicing_metrics(result)
모델 검증
후보 및 기준에 대해 모델 검증을 수행하려면 임계값 설정을 포함하도록 구성을 업데이트하고 두 모델을 tfma.run_model_analysis 에 전달합니다.
예를 들어:
# Run in a Jupyter Notebook.
from google.protobuf import text_format

eval_config = text_format.Parse("""
  ## Model information
  model_specs {
    # This assumes a serving model with a "serving_default" signature.
    label_key: "label"
    example_weight_key: "weight"
  }
  ## Post export metric information
  metrics_specs {
    # This adds AUC and as a post training metric. If the model has built in
    # training metrics which also contains AUC, this metric will replace it.
    metrics {
      class_name: "AUC"
      threshold {
        value_threshold {
          lower_bound { value: 0.9 }
        }
        change_threshold {
          direction: HIGHER_IS_BETTER
          absolute { value: -1e-10 }
        }
      }
    }
    # ... other post training metrics ...

    # Plots are also configured here...
    metrics { class_name: "ConfusionMatrixPlot" }
  }
  ## Slicing information
  slicing_specs {}  # overall slice
  slicing_specs {
    feature_keys: ["age"]
  }
""", tfma.EvalConfig())

eval_shared_models = [
  tfma.default_eval_shared_model(
      model_name=tfma.CANDIDATE_KEY,
      eval_saved_model_path='/path/to/saved/candiate/model',
      eval_config=eval_config),
  tfma.default_eval_shared_model(
      model_name=tfma.BASELINE_KEY,
      eval_saved_model_path='/path/to/saved/baseline/model',
      eval_config=eval_config),
]

output_path = '/path/for/output'

eval_result = tfma.run_model_analysis(
    eval_shared_models,
    eval_config=eval_config,
    # This assumes your data is a TFRecords file containing records in the
    # tf.train.Example format.
    data_location='/path/to/file/containing/tfrecords',
    output_path=output_path)

tfma.view.render_slicing_metrics(eval_result)
tfma.load_validation_result(output_path)
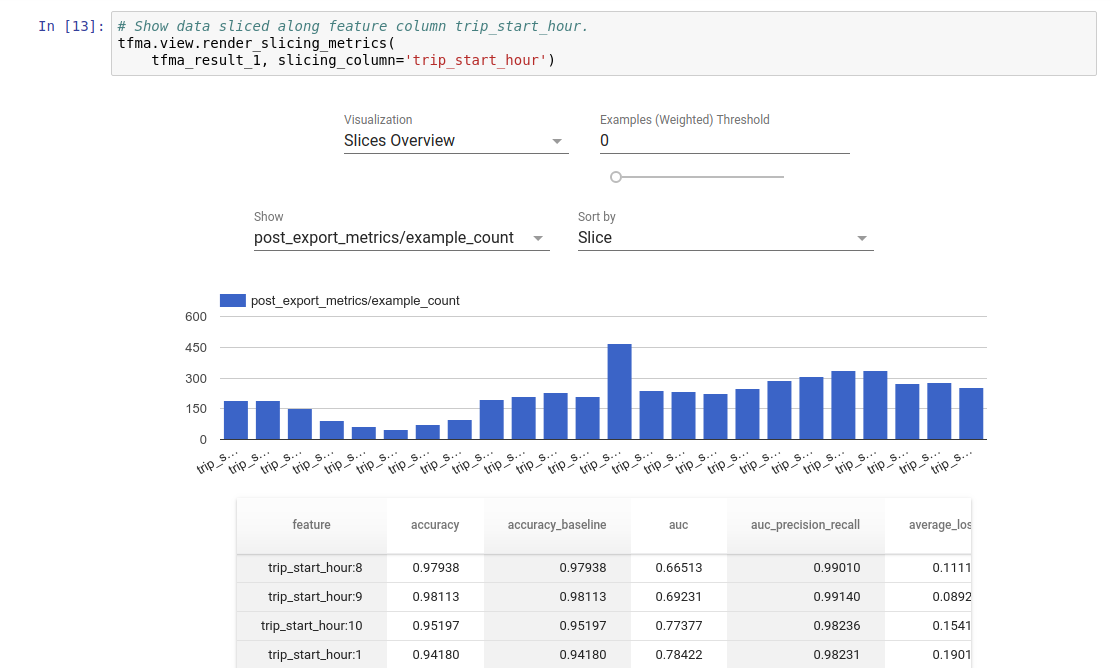
심상
TFMA 평가 결과는 TFMA에 포함된 프런트엔드 구성 요소를 사용하여 Jupyter 노트북에서 시각화할 수 있습니다. 예를 들어:
 .
.