
ตัวตรวจจับวัตถุสามารถระบุได้ว่าอาจมีวัตถุชุดใดอยู่และให้ข้อมูลเกี่ยวกับตำแหน่งภายในภาพหรือสตรีมวิดีโอที่กำหนด เครื่องตรวจจับวัตถุได้รับการฝึกอบรมให้ตรวจจับการมีอยู่และตำแหน่งของวัตถุหลายประเภท ตัวอย่างเช่น แบบจำลองอาจได้รับการฝึกฝนด้วยรูปภาพที่มีผลไม้หลายชิ้น พร้อมด้วย ป้ายกำกับ ที่ระบุประเภทของผลไม้ที่เป็นตัวแทน (เช่น แอปเปิ้ล กล้วย หรือสตรอเบอร์รี่) และข้อมูลระบุว่าแต่ละวัตถุจะปรากฏที่ใด รูปภาพ. ดู การแนะนำการตรวจจับวัตถุ สำหรับข้อมูลเพิ่มเติมเกี่ยวกับเครื่องตรวจจับวัตถุ
ใช้ Task Library ObjectDetector API เพื่อปรับใช้ตัวตรวจจับวัตถุแบบกำหนดเองหรือตัวตรวจจับที่ได้รับการฝึกล่วงหน้าในแอปมือถือของคุณ
คุณสมบัติหลักของ ObjectDetector API
การประมวลผลภาพอินพุต รวมถึงการหมุน การปรับขนาด และการแปลงพื้นที่สี
ป้ายชื่อสถานที่แผนที่
เกณฑ์คะแนนเพื่อกรองผลลัพธ์
ผลการตรวจจับ Top-k
ติดป้ายกำกับรายการที่อนุญาตและรายการที่ปฏิเสธ
รุ่นเครื่องตรวจจับวัตถุที่รองรับ
รับประกันว่าโมเดลต่อไปนี้จะเข้ากันได้กับ ObjectDetector API
โมเดลการตรวจจับวัตถุที่ได้รับการฝึกล่วงหน้าบน TensorFlow Hub
โมเดลที่สร้างโดย AutoML Vision Edge Object Detection
โมเดลที่สร้างโดย TensorFlow Lite Model Maker สำหรับเครื่องตรวจจับวัตถุ
โมเดลแบบกำหนดเองที่ตรงตาม ข้อกำหนดความเข้ากันได้ของโมเดล
เรียกใช้การอนุมานใน Java
ดู แอปอ้างอิง Object Detection สำหรับตัวอย่างวิธีใช้ ObjectDetector ในแอป Android
ขั้นตอนที่ 1: นำเข้าการพึ่งพา Gradle และการตั้งค่าอื่นๆ
คัดลอกไฟล์โมเดล .tflite ไปยังไดเร็กทอรีทรัพย์สินของโมดูล Android ที่จะเรียกใช้โมเดล ระบุว่าไม่ควรบีบอัดไฟล์ และเพิ่มไลบรารี TensorFlow Lite ลงในไฟล์ build.gradle ของโมดูล:
android {
    // Other settings

    // Specify tflite file should not be compressed for the app apk
    aaptOptions {
        noCompress "tflite"
    }
}

dependencies {
    // Other dependencies

    // Import the Task Vision Library dependency (NNAPI is included)
    implementation 'org.tensorflow:tensorflow-lite-task-vision'
    // Import the GPU delegate plugin Library for GPU inference
    implementation 'org.tensorflow:tensorflow-lite-gpu-delegate-plugin'
}
ขั้นตอนที่ 2: การใช้แบบจำลอง
// Initialization
ObjectDetectorOptions options =
    ObjectDetectorOptions.builder()
        .setBaseOptions(BaseOptions.builder().useGpu().build())
        .setMaxResults(1)
        .build();
ObjectDetector objectDetector =
    ObjectDetector.createFromFileAndOptions(
        context, modelFile, options);

// Run inference
List<Detection> results = objectDetector.detect(image);
ดู ซอร์สโค้ดและ javadoc สำหรับตัวเลือกเพิ่มเติมในการกำหนดค่า ObjectDetector
เรียกใช้การอนุมานใน iOS
ขั้นตอนที่ 1: ติดตั้งการอ้างอิง
Task Library รองรับการติดตั้งโดยใช้ CocoaPods ตรวจสอบให้แน่ใจว่าติดตั้ง CocoaPods บนระบบของคุณแล้ว โปรดดู คู่มือการติดตั้ง CocoaPods สำหรับคำแนะนำ
โปรดดู คู่มือ CocoaPods สำหรับรายละเอียดเกี่ยวกับการเพิ่มพ็อดในโปรเจ็กต์ Xcode
เพิ่มพ็อด TensorFlowLiteTaskVision ใน Podfile
target 'MyAppWithTaskAPI' do
  use_frameworks!
  pod 'TensorFlowLiteTaskVision'
end
ตรวจสอบให้แน่ใจว่าโมเดล .tflite ที่คุณจะใช้ในการอนุมานมีอยู่ใน App Bundle ของคุณ
ขั้นตอนที่ 2: การใช้แบบจำลอง
สวิฟท์
// Imports
import TensorFlowLiteTaskVision

// Initialization
guard let modelPath = Bundle.main.path(forResource: "ssd_mobilenet_v1",
                                            ofType: "tflite") else { return }

let options = ObjectDetectorOptions(modelPath: modelPath)

// Configure any additional options:
// options.classificationOptions.maxResults = 3

let detector = try ObjectDetector.detector(options: options)

// Convert the input image to MLImage.
// There are other sources for MLImage. For more details, please see:
// https://developers.google.com/ml-kit/reference/ios/mlimage/api/reference/Classes/GMLImage
guard let image = UIImage (named: "cats_and_dogs.jpg"), let mlImage = MLImage(image: image) else { return }

// Run inference
let detectionResult = try detector.detect(mlImage: mlImage)
วัตถุประสงค์ ค
// Imports
#import <TensorFlowLiteTaskVision/TensorFlowLiteTaskVision.h>

// Initialization
NSString *modelPath = [[NSBundle mainBundle] pathForResource:@"ssd_mobilenet_v1" ofType:@"tflite"];

TFLObjectDetectorOptions *options = [[TFLObjectDetectorOptions alloc] initWithModelPath:modelPath];

// Configure any additional options:
// options.classificationOptions.maxResults = 3;

TFLObjectDetector *detector = [TFLObjectDetector objectDetectorWithOptions:options
                                                                     error:nil];

// Convert the input image to MLImage.
UIImage *image = [UIImage imageNamed:@"dogs.jpg"];

// There are other sources for GMLImage. For more details, please see:
// https://developers.google.com/ml-kit/reference/ios/mlimage/api/reference/Classes/GMLImage
GMLImage *gmlImage = [[GMLImage alloc] initWithImage:image];

// Run inference
TFLDetectionResult *detectionResult = [detector detectWithGMLImage:gmlImage error:nil];
ดู ซอร์สโค้ด สำหรับตัวเลือกเพิ่มเติมในการกำหนดค่า TFLObjectDetector
เรียกใช้การอนุมานใน Python
ขั้นตอนที่ 1: ติดตั้งแพ็คเกจ pip
pip install tflite-support
ขั้นตอนที่ 2: การใช้แบบจำลอง
# Imports
from tflite_support.task import vision
from tflite_support.task import core
from tflite_support.task import processor

# Initialization
base_options = core.BaseOptions(file_name=model_path)
detection_options = processor.DetectionOptions(max_results=2)
options = vision.ObjectDetectorOptions(base_options=base_options, detection_options=detection_options)
detector = vision.ObjectDetector.create_from_options(options)

# Alternatively, you can create an object detector in the following manner:
# detector = vision.ObjectDetector.create_from_file(model_path)

# Run inference
image = vision.TensorImage.create_from_file(image_path)
detection_result = detector.detect(image)
ดู ซอร์สโค้ด สำหรับตัวเลือกเพิ่มเติมในการกำหนดค่า ObjectDetector
เรียกใช้การอนุมานใน C ++
// Initialization
ObjectDetectorOptions options;
options.mutable_base_options()->mutable_model_file()->set_file_name(model_path);
std::unique_ptr<ObjectDetector> object_detector = ObjectDetector::CreateFromOptions(options).value();

// Create input frame_buffer from your inputs, `image_data` and `image_dimension`.
// See more information here: tensorflow_lite_support/cc/task/vision/utils/frame_buffer_common_utils.h
std::unique_ptr<FrameBuffer> frame_buffer = CreateFromRgbRawBuffer(
      image_data, image_dimension);

// Run inference
const DetectionResult result = object_detector->Detect(*frame_buffer).value();
ดู ซอร์สโค้ด สำหรับตัวเลือกเพิ่มเติมในการกำหนดค่า ObjectDetector
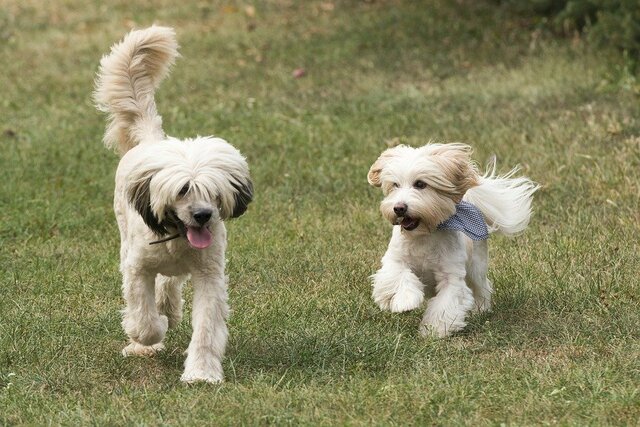
ตัวอย่างผลลัพธ์
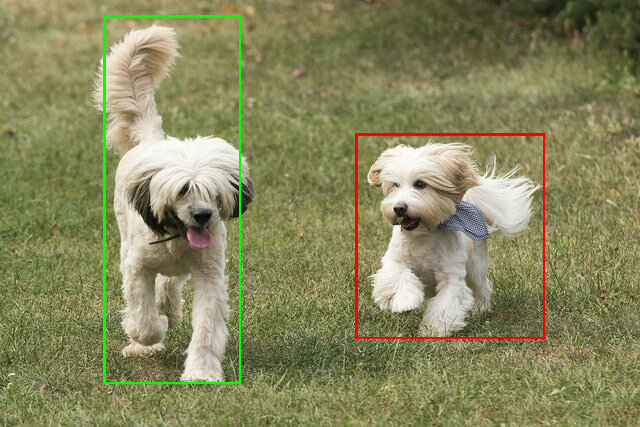
นี่คือตัวอย่างผลการตรวจจับของ ssd mobilenet v1 จาก TensorFlow Hub
Results:
 Detection #0 (red):
  Box: (x: 355, y: 133, w: 190, h: 206)
  Top-1 class:
   index       : 17
   score       : 0.73828
   class name  : dog
 Detection #1 (green):
  Box: (x: 103, y: 15, w: 138, h: 369)
  Top-1 class:
   index       : 17
   score       : 0.73047
   class name  : dog
แสดงขอบเขตกล่องบนภาพที่นำเข้า:
ลองใช้ เครื่องมือสาธิต CLI ง่ายๆ สำหรับ ObjectDetector ด้วยโมเดลและข้อมูลการทดสอบของคุณเอง
ข้อกำหนดความเข้ากันได้ของโมเดล
ObjectDetector API คาดว่าจะมีโมเดล TFLite พร้อมด้วย ข้อมูลเมตาของโมเดล TFLite ที่บังคับ ดูตัวอย่างการสร้างข้อมูลเมตาสำหรับตัวตรวจจับวัตถุโดยใช้ TensorFlow Lite Metadata Writer API
รุ่นเครื่องตรวจจับวัตถุที่เข้ากันได้ควรเป็นไปตามข้อกำหนดต่อไปนี้:
อินพุตอิมเมจเทนเซอร์: (kTfLiteUInt8/kTfLiteFloat32)
- อินพุตรูปภาพขนาด
[batch x height x width x channels] - ไม่รองรับการอนุมานแบบแบตช์ (
batchต้องเป็น 1) - รองรับเฉพาะอินพุต RGB (
channelsต้องเป็น 3) - หากประเภทเป็น kTfLiteFloat32 จำเป็นต้องแนบ NormalizationOptions กับข้อมูลเมตาเพื่อทำให้อินพุตเป็นมาตรฐาน
- อินพุตรูปภาพขนาด
เทนเซอร์เอาท์พุตต้องเป็น 4 เอาท์พุตของ
DetectionPostProcessop เช่น:- เทนเซอร์ตำแหน่ง (kTfLiteFloat32)
- เทนเซอร์ขนาด
[1 x num_results x 4]อาร์เรย์ภายในที่แสดงถึงกล่องขอบเขตในรูปแบบ [บน ซ้าย ขวา ล่าง] - จำเป็นต้องแนบ BoundingBoxProperties กับข้อมูลเมตา และต้องระบุ
type=BOUNDARIESและ `coordinate_type=RATIO
- เทนเซอร์ขนาด
คลาสเทนเซอร์ (kTfLiteFloat32)
- เทนเซอร์ขนาด
[1 x num_results]แต่ละค่าแสดงถึงดัชนีจำนวนเต็มของคลาส - คุณสามารถแนบแผนผังป้ายกำกับเสริม (แต่แนะนำ) เป็น AssociatedFile-s ที่มีประเภท TENSOR_VALUE_LABELS โดยมีหนึ่งป้ายกำกับต่อบรรทัด ดู ตัวอย่างไฟล์ป้ายกำกับ AssociatedFile แรกดังกล่าว (ถ้ามี) จะใช้ในการกรอกฟิลด์
class_nameของผลลัพธ์ ฟิลด์display_nameถูกกรอกจาก AssociatedFile (ถ้ามี) ซึ่งมีโลแคลตรงกับฟิลด์display_names_localeของObjectDetectorOptionsที่ใช้ในเวลาสร้าง ("en" โดยค่าเริ่มต้น เช่น ภาษาอังกฤษ) หากไม่มีสิ่งใดเลย ระบบจะกรอกเฉพาะฟิลด์indexของผลลัพธ์เท่านั้น
- เทนเซอร์ขนาด
คะแนนเทนเซอร์ (kTfLiteFloat32)
- เทนเซอร์ขนาด
[1 x num_results]แต่ละค่าแสดงถึงคะแนนของวัตถุที่ตรวจพบ
- เทนเซอร์ขนาด
จำนวนเทนเซอร์ตรวจจับ (kTfLiteFloat32)
- จำนวนเต็ม num_results เป็นเมตริกซ์ขนาด
[1]
- จำนวนเต็ม num_results เป็นเมตริกซ์ขนาด
- เทนเซอร์ตำแหน่ง (kTfLiteFloat32)