
| | |  गिटहब पर देखें गिटहब पर देखें | | |
YAMNet एक पूर्व-प्रशिक्षित गहरा तंत्रिका नेटवर्क है जो 521 कक्षाओं से ऑडियो घटनाओं की भविष्यवाणी कर सकता है, जैसे हँसी, भौंकना, या जलपरी।
इस ट्यूटोरियल में आप सीखेंगे कि कैसे:
- अनुमान के लिए YAMNet मॉडल लोड करें और उसका उपयोग करें।
- बिल्ली और कुत्ते की ध्वनियों को वर्गीकृत करने के लिए YAMNet एम्बेडिंग का उपयोग करके एक नया मॉडल बनाएं।
- अपने मॉडल का मूल्यांकन और निर्यात करें।
TensorFlow और अन्य पुस्तकालयों को आयात करें
TensorFlow I/O स्थापित करके प्रारंभ करें, जिससे आपके लिए डिस्क से ऑडियो फ़ाइलें लोड करना आसान हो जाएगा।
pip install tensorflow_io
import os

from IPython import display
import matplotlib.pyplot as plt
import numpy as np
import pandas as pd

import tensorflow as tf
import tensorflow_hub as hub
import tensorflow_io as tfio
यमनेट के बारे में
YAMNet एक पूर्व-प्रशिक्षित तंत्रिका नेटवर्क है जो MobileNetV1 को गहराई से अलग करने योग्य कनवल्शन आर्किटेक्चर को नियोजित करता है। यह इनपुट के रूप में एक ऑडियो तरंग का उपयोग कर सकता है और ऑडियोसेट कॉर्पस से 521 ऑडियो घटनाओं में से प्रत्येक के लिए स्वतंत्र भविष्यवाणियां कर सकता है।
आंतरिक रूप से, मॉडल ऑडियो सिग्नल से "फ़्रेम" निकालता है और इन फ़्रेमों के बैचों को संसाधित करता है। मॉडल का यह संस्करण 0.96 सेकेंड लंबे फ्रेम का उपयोग करता है और प्रत्येक 0.48 सेकेंड में एक फ्रेम निकालता है।
मॉडल एक 1-डी फ्लोट32 टेंसर या न्यूमपी सरणी को स्वीकार करता है जिसमें मनमानी लंबाई की तरंग होती है, जिसे सिंगल-चैनल (मोनो) 16 किलोहर्ट्ज़ नमूने के रूप में [-1.0, +1.0] श्रेणी में दर्शाया जाता है। इस ट्यूटोरियल में WAV फ़ाइलों को समर्थित प्रारूप में बदलने में आपकी मदद करने के लिए कोड है।
मॉडल 3 आउटपुट देता है, जिसमें क्लास स्कोर, एम्बेडिंग (जिसे आप ट्रांसफर लर्निंग के लिए उपयोग करेंगे), और लॉग मेल स्पेक्ट्रोग्राम शामिल हैं। आप यहां अधिक विवरण पा सकते हैं।
YAMNet का एक विशिष्ट उपयोग एक उच्च-स्तरीय फीचर एक्सट्रैक्टर के रूप में है - 1,024-आयामी एम्बेडिंग आउटपुट। आप आधार (YAMNet) मॉडल की इनपुट सुविधाओं का उपयोग करेंगे और उन्हें अपने उथले मॉडल में फीड करेंगे जिसमें एक छिपी हुई tf.keras.layers.Dense परत होगी। फिर, आप बहुत सारे लेबल वाले डेटा और एंड-टू-एंड प्रशिक्षण की आवश्यकता के बिना ऑडियो वर्गीकरण के लिए डेटा की एक छोटी राशि पर नेटवर्क को प्रशिक्षित करेंगे। (यह अधिक जानकारी के लिए TensorFlow हब के साथ छवि वर्गीकरण के लिए स्थानांतरण सीखने के समान है।)
सबसे पहले, आप मॉडल का परीक्षण करेंगे और ऑडियो वर्गीकृत करने के परिणाम देखेंगे। फिर आप डेटा प्री-प्रोसेसिंग पाइपलाइन का निर्माण करेंगे।
TensorFlow हब से YAMNet लोड हो रहा है
आप ध्वनि फ़ाइलों से एम्बेडिंग निकालने के लिए Tensorflow हब से एक पूर्व-प्रशिक्षित YAMNet का उपयोग करने जा रहे हैं।
TensorFlow हब से एक मॉडल लोड करना सीधा है: मॉडल चुनें, उसका URL कॉपी करें, और load फ़ंक्शन का उपयोग करें।
yamnet_model_handle = 'https://tfhub.dev/google/yamnet/1'
yamnet_model = hub.load(yamnet_model_handle)
लोड किए गए मॉडल के साथ, आप YAMNet मूल उपयोग ट्यूटोरियल का अनुसरण कर सकते हैं और अनुमान को चलाने के लिए एक नमूना WAV फ़ाइल डाउनलोड कर सकते हैं।
testing_wav_file_name = tf.keras.utils.get_file('miaow_16k.wav',
                                                'https://storage.googleapis.com/audioset/miaow_16k.wav',
                                                cache_dir='./',
                                                cache_subdir='test_data')

print(testing_wav_file_name)
Downloading data from https://storage.googleapis.com/audioset/miaow_16k.wav
221184/215546 [==============================] - 0s 0us/step
229376/215546 [===============================] - 0s 0us/step
./test_data/miaow_16k.wav
आपको ऑडियो फ़ाइलों को लोड करने के लिए एक फ़ंक्शन की आवश्यकता होगी, जिसका उपयोग बाद में प्रशिक्षण डेटा के साथ काम करते समय भी किया जाएगा। (ऑडियो फ़ाइलों और उनके लेबल को साधारण ऑडियो पहचान में पढ़ने के बारे में और जानें।
# Utility functions for loading audio files and making sure the sample rate is correct.

@tf.function
def load_wav_16k_mono(filename):
    """ Load a WAV file, convert it to a float tensor, resample to 16 kHz single-channel audio. """
    file_contents = tf.io.read_file(filename)
    wav, sample_rate = tf.audio.decode_wav(
          file_contents,
          desired_channels=1)
    wav = tf.squeeze(wav, axis=-1)
    sample_rate = tf.cast(sample_rate, dtype=tf.int64)
    wav = tfio.audio.resample(wav, rate_in=sample_rate, rate_out=16000)
    return wav
testing_wav_data = load_wav_16k_mono(testing_wav_file_name)

_ = plt.plot(testing_wav_data)

# Play the audio file.
display.Audio(testing_wav_data,rate=16000)
2022-01-26 08:07:19.084427: W tensorflow_io/core/kernels/audio_video_mp3_kernels.cc:271] libmp3lame.so.0 or lame functions are not available
WARNING:tensorflow:Using a while_loop for converting IO>AudioResample
WARNING:tensorflow:Using a while_loop for converting IO>AudioResample

क्लास मैपिंग लोड करें
उन वर्ग नामों को लोड करना महत्वपूर्ण है जिन्हें YAMNet पहचानने में सक्षम है। मानचित्रण फ़ाइल CSV प्रारूप में yamnet_model.class_map_path() पर मौजूद है।
class_map_path = yamnet_model.class_map_path().numpy().decode('utf-8')
class_names =list(pd.read_csv(class_map_path)['display_name'])

for name in class_names[:20]:
  print(name)
print('...')
Speech
Child speech, kid speaking
Conversation
Narration, monologue
Babbling
Speech synthesizer
Shout
Bellow
Whoop
Yell
Children shouting
Screaming
Whispering
Laughter
Baby laughter
Giggle
Snicker
Belly laugh
Chuckle, chortle
Crying, sobbing
...
अनुमान चलाएँ
YAMNet फ़्रेम-स्तरीय क्लास-स्कोर प्रदान करता है (अर्थात, प्रत्येक फ़्रेम के लिए 521 स्कोर)। क्लिप-स्तरीय पूर्वानुमानों को निर्धारित करने के लिए, स्कोर को प्रति-वर्ग फ़्रेमों में एकत्रित किया जा सकता है (उदाहरण के लिए, माध्य या अधिकतम एकत्रीकरण का उपयोग करके)। यह नीचे scores_np.mean(axis=0) द्वारा किया जाता है। अंत में, क्लिप-स्तर पर शीर्ष-स्कोर वाले वर्ग को खोजने के लिए, आप अधिकतम 521 कुल स्कोर लेते हैं।
scores, embeddings, spectrogram = yamnet_model(testing_wav_data)
class_scores = tf.reduce_mean(scores, axis=0)
top_class = tf.argmax(class_scores)
inferred_class = class_names[top_class]

print(f'The main sound is: {inferred_class}')
print(f'The embeddings shape: {embeddings.shape}')
The main sound is: Animal
The embeddings shape: (13, 1024)
ESC-50 डेटासेट
ESC-50 डेटासेट ( Piczak, 2015 ) 2,000 पांच-सेकंड लंबी पर्यावरणीय ऑडियो रिकॉर्डिंग का एक लेबल संग्रह है। डेटासेट में प्रति वर्ग 40 उदाहरणों के साथ 50 वर्ग होते हैं।
डेटासेट डाउनलोड करें और इसे निकालें।
_ = tf.keras.utils.get_file('esc-50.zip',
                        'https://github.com/karoldvl/ESC-50/archive/master.zip',
                        cache_dir='./',
                        cache_subdir='datasets',
                        extract=True)
Downloading data from https://github.com/karoldvl/ESC-50/archive/master.zip
645103616/Unknown - 47s 0us/step
डेटा का अन्वेषण करें
प्रत्येक फ़ाइल के लिए मेटाडेटा csv फ़ाइल में ./datasets/ESC-50-master/meta/esc50.csv पर निर्दिष्ट है
और सभी ऑडियो फ़ाइलें ./datasets/ESC-50-master/audio/ में हैं
आप मैपिंग के साथ एक पांडा DataFrame और इसका उपयोग डेटा को स्पष्ट रूप से देखने के लिए करेंगे।
esc50_csv = './datasets/ESC-50-master/meta/esc50.csv'
base_data_path = './datasets/ESC-50-master/audio/'

pd_data = pd.read_csv(esc50_csv)
pd_data.head()
डेटा फ़िल्टर करें
अब जब डेटा DataFrame में संग्रहीत हो गया है, तो कुछ परिवर्तन लागू करें:
- पंक्तियों को फ़िल्टर करें और केवल चयनित वर्गों -
dogऔरcatका उपयोग करें। यदि आप किसी अन्य वर्ग का उपयोग करना चाहते हैं, तो यह वह जगह है जहाँ आप उन्हें चुन सकते हैं। - पूरा पथ प्राप्त करने के लिए फ़ाइल नाम में संशोधन करें। इससे बाद में लोडिंग आसान हो जाएगी।
- एक विशिष्ट सीमा के भीतर होने के लिए लक्ष्य बदलें। इस उदाहरण में,
dog0पर रहेगा, लेकिनcat5के मूल मान के बजाय1हो जाएगी।
my_classes = ['dog', 'cat']
map_class_to_id = {'dog':0, 'cat':1}

filtered_pd = pd_data[pd_data.category.isin(my_classes)]

class_id = filtered_pd['category'].apply(lambda name: map_class_to_id[name])
filtered_pd = filtered_pd.assign(target=class_id)

full_path = filtered_pd['filename'].apply(lambda row: os.path.join(base_data_path, row))
filtered_pd = filtered_pd.assign(filename=full_path)

filtered_pd.head(10)
ऑडियो फ़ाइलें लोड करें और एम्बेडिंग पुनर्प्राप्त करें
यहां आप load_wav_16k_mono लागू करेंगे और मॉडल के लिए WAV डेटा तैयार करेंगे।
WAV डेटा से एम्बेडिंग निकालते समय, आपको आकार की एक सरणी (N, 1024) मिलती है, जहां N YAMNet को मिले फ़्रेमों की संख्या है (ऑडियो के प्रत्येक 0.48 सेकंड के लिए एक)।
आपका मॉडल प्रत्येक फ्रेम को एक इनपुट के रूप में उपयोग करेगा। इसलिए, आपको एक नया कॉलम बनाने की जरूरत है जिसमें प्रति पंक्ति एक फ्रेम हो। इन नई पंक्तियों को उचित रूप से प्रतिबिंबित करने के लिए आपको लेबल और fold कॉलम का विस्तार करने की भी आवश्यकता है।
विस्तारित fold स्तंभ मूल मान रखता है। आप फ़्रेम को मिक्स नहीं कर सकते हैं, क्योंकि स्प्लिट्स करते समय, आप एक ही ऑडियो के कुछ हिस्सों को अलग-अलग स्प्लिट्स पर रख सकते हैं, जो आपके सत्यापन और परीक्षण चरणों को कम प्रभावी बना देगा।
filenames = filtered_pd['filename']
targets = filtered_pd['target']
folds = filtered_pd['fold']

main_ds = tf.data.Dataset.from_tensor_slices((filenames, targets, folds))
main_ds.element_spec
(TensorSpec(shape=(), dtype=tf.string, name=None),
 TensorSpec(shape=(), dtype=tf.int64, name=None),
 TensorSpec(shape=(), dtype=tf.int64, name=None))
def load_wav_for_map(filename, label, fold):
  return load_wav_16k_mono(filename), label, fold

main_ds = main_ds.map(load_wav_for_map)
main_ds.element_spec
WARNING:tensorflow:Using a while_loop for converting IO>AudioResample
WARNING:tensorflow:Using a while_loop for converting IO>AudioResample
(TensorSpec(shape=<unknown>, dtype=tf.float32, name=None),
 TensorSpec(shape=(), dtype=tf.int64, name=None),
 TensorSpec(shape=(), dtype=tf.int64, name=None))
# applies the embedding extraction model to a wav data
def extract_embedding(wav_data, label, fold):
  ''' run YAMNet to extract embedding from the wav data '''
  scores, embeddings, spectrogram = yamnet_model(wav_data)
  num_embeddings = tf.shape(embeddings)[0]
  return (embeddings,
            tf.repeat(label, num_embeddings),
            tf.repeat(fold, num_embeddings))

# extract embedding
main_ds = main_ds.map(extract_embedding).unbatch()
main_ds.element_spec
(TensorSpec(shape=(1024,), dtype=tf.float32, name=None),
 TensorSpec(shape=(), dtype=tf.int64, name=None),
 TensorSpec(shape=(), dtype=tf.int64, name=None))
डेटा विभाजित करें
डेटासेट को ट्रेन, सत्यापन और परीक्षण सेट में विभाजित करने के लिए आप fold कॉलम का उपयोग करेंगे।
ESC-50 को पांच समान आकार के क्रॉस-सत्यापन fold में व्यवस्थित किया गया है, जैसे कि एक ही मूल स्रोत से क्लिप हमेशा एक ही fold में होते हैं - ESC में और अधिक जानकारी प्राप्त करें: पर्यावरणीय ध्वनि वर्गीकरण पेपर के लिए डेटासेट ।
अंतिम चरण डेटासेट से fold कॉलम को हटाना है क्योंकि आप प्रशिक्षण के दौरान इसका उपयोग नहीं करने जा रहे हैं।
cached_ds = main_ds.cache()
train_ds = cached_ds.filter(lambda embedding, label, fold: fold < 4)
val_ds = cached_ds.filter(lambda embedding, label, fold: fold == 4)
test_ds = cached_ds.filter(lambda embedding, label, fold: fold == 5)

# remove the folds column now that it's not needed anymore
remove_fold_column = lambda embedding, label, fold: (embedding, label)

train_ds = train_ds.map(remove_fold_column)
val_ds = val_ds.map(remove_fold_column)
test_ds = test_ds.map(remove_fold_column)

train_ds = train_ds.cache().shuffle(1000).batch(32).prefetch(tf.data.AUTOTUNE)
val_ds = val_ds.cache().batch(32).prefetch(tf.data.AUTOTUNE)
test_ds = test_ds.cache().batch(32).prefetch(tf.data.AUTOTUNE)
अपना मॉडल बनाएं
आपने ज्यादातर काम किया! इसके बाद, ध्वनियों से बिल्लियों और कुत्तों को पहचानने के लिए एक छिपी हुई परत और दो आउटपुट के साथ एक बहुत ही सरल अनुक्रमिक मॉडल को परिभाषित करें।
my_model = tf.keras.Sequential([
    tf.keras.layers.Input(shape=(1024), dtype=tf.float32,
                          name='input_embedding'),
    tf.keras.layers.Dense(512, activation='relu'),
    tf.keras.layers.Dense(len(my_classes))
], name='my_model')

my_model.summary()
Model: "my_model"
_________________________________________________________________
 Layer (type)                Output Shape              Param #
=================================================================
 dense (Dense)               (None, 512)               524800

 dense_1 (Dense)             (None, 2)                 1026

=================================================================
Total params: 525,826
Trainable params: 525,826
Non-trainable params: 0
_________________________________________________________________
my_model.compile(loss=tf.keras.losses.SparseCategoricalCrossentropy(from_logits=True),
                 optimizer="adam",
                 metrics=['accuracy'])

callback = tf.keras.callbacks.EarlyStopping(monitor='loss',
                                            patience=3,
                                            restore_best_weights=True)
history = my_model.fit(train_ds,
                       epochs=20,
                       validation_data=val_ds,
                       callbacks=callback)
Epoch 1/20
15/15 [==============================] - 6s 49ms/step - loss: 0.7811 - accuracy: 0.8229 - val_loss: 0.4866 - val_accuracy: 0.9125
Epoch 2/20
15/15 [==============================] - 0s 18ms/step - loss: 0.3385 - accuracy: 0.8938 - val_loss: 0.2185 - val_accuracy: 0.8813
Epoch 3/20
15/15 [==============================] - 0s 18ms/step - loss: 0.3091 - accuracy: 0.9021 - val_loss: 0.4290 - val_accuracy: 0.8813
Epoch 4/20
15/15 [==============================] - 0s 18ms/step - loss: 0.5354 - accuracy: 0.9062 - val_loss: 0.2074 - val_accuracy: 0.9125
Epoch 5/20
15/15 [==============================] - 0s 18ms/step - loss: 0.4651 - accuracy: 0.9333 - val_loss: 0.6857 - val_accuracy: 0.8813
Epoch 6/20
15/15 [==============================] - 0s 18ms/step - loss: 0.2489 - accuracy: 0.9167 - val_loss: 0.3640 - val_accuracy: 0.8750
Epoch 7/20
15/15 [==============================] - 0s 17ms/step - loss: 0.2020 - accuracy: 0.9292 - val_loss: 0.2158 - val_accuracy: 0.9125
Epoch 8/20
15/15 [==============================] - 0s 16ms/step - loss: 0.4550 - accuracy: 0.9208 - val_loss: 0.9893 - val_accuracy: 0.8750
Epoch 9/20
15/15 [==============================] - 0s 17ms/step - loss: 0.3434 - accuracy: 0.9354 - val_loss: 0.2670 - val_accuracy: 0.8813
Epoch 10/20
15/15 [==============================] - 0s 17ms/step - loss: 0.2864 - accuracy: 0.9208 - val_loss: 0.5122 - val_accuracy: 0.8813
आइए परीक्षण डेटा पर evaluate विधि चलाएं ताकि यह सुनिश्चित हो सके कि कोई ओवरफिटिंग नहीं है।
loss, accuracy = my_model.evaluate(test_ds)

print("Loss: ", loss)
print("Accuracy: ", accuracy)
5/5 [==============================] - 0s 9ms/step - loss: 0.2526 - accuracy: 0.9000
Loss:  0.25257644057273865
Accuracy:  0.8999999761581421
तुमने यह किया!
अपने मॉडल का परीक्षण करें
इसके बाद, केवल YAMNet का उपयोग करके पिछले परीक्षण से एम्बेडिंग पर अपने मॉडल का प्रयास करें।
scores, embeddings, spectrogram = yamnet_model(testing_wav_data)
result = my_model(embeddings).numpy()

inferred_class = my_classes[result.mean(axis=0).argmax()]
print(f'The main sound is: {inferred_class}')
The main sound is: cat
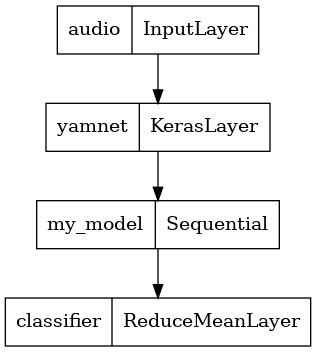
एक मॉडल सहेजें जो सीधे WAV फ़ाइल को इनपुट के रूप में ले सकता है
जब आप इसे इनपुट के रूप में एम्बेडिंग देते हैं तो आपका मॉडल काम करता है।
वास्तविक दुनिया के परिदृश्य में, आप प्रत्यक्ष इनपुट के रूप में ऑडियो डेटा का उपयोग करना चाहेंगे।
ऐसा करने के लिए, आप अपने मॉडल के साथ YAMNet को एक एकल मॉडल में संयोजित करेंगे जिसे आप अन्य अनुप्रयोगों के लिए निर्यात कर सकते हैं।
मॉडल के परिणाम का उपयोग करना आसान बनाने के लिए, अंतिम परत एक reduce_mean ऑपरेशन होगी। सेवा के लिए इस मॉडल का उपयोग करते समय (जिसके बारे में आप बाद में ट्यूटोरियल में जानेंगे), आपको अंतिम परत के नाम की आवश्यकता होगी। यदि आप एक को परिभाषित नहीं करते हैं, तो TensorFlow एक वृद्धिशील को स्वतः परिभाषित कर देगा जिससे परीक्षण करना कठिन हो जाता है, क्योंकि जब भी आप मॉडल को प्रशिक्षित करते हैं तो यह हर बार बदलता रहेगा। कच्चे TensorFlow ऑपरेशन का उपयोग करते समय, आप इसे एक नाम निर्दिष्ट नहीं कर सकते। इस समस्या को हल करने के लिए, आप एक कस्टम लेयर बनाएंगे जो reduce_mean लागू करती है और इसे 'classifier' हैं।
class ReduceMeanLayer(tf.keras.layers.Layer):
  def __init__(self, axis=0, **kwargs):
    super(ReduceMeanLayer, self).__init__(**kwargs)
    self.axis = axis

  def call(self, input):
    return tf.math.reduce_mean(input, axis=self.axis)
saved_model_path = './dogs_and_cats_yamnet'

input_segment = tf.keras.layers.Input(shape=(), dtype=tf.float32, name='audio')
embedding_extraction_layer = hub.KerasLayer(yamnet_model_handle,
                                            trainable=False, name='yamnet')
_, embeddings_output, _ = embedding_extraction_layer(input_segment)
serving_outputs = my_model(embeddings_output)
serving_outputs = ReduceMeanLayer(axis=0, name='classifier')(serving_outputs)
serving_model = tf.keras.Model(input_segment, serving_outputs)
serving_model.save(saved_model_path, include_optimizer=False)
WARNING:tensorflow:Compiled the loaded model, but the compiled metrics have yet to be built. `model.compile_metrics` will be empty until you train or evaluate the model.
WARNING:tensorflow:Compiled the loaded model, but the compiled metrics have yet to be built. `model.compile_metrics` will be empty until you train or evaluate the model.
2022-01-26 08:08:33.807036: W tensorflow/python/util/util.cc:368] Sets are not currently considered sequences, but this may change in the future, so consider avoiding using them.
INFO:tensorflow:Assets written to: ./dogs_and_cats_yamnet/assets
INFO:tensorflow:Assets written to: ./dogs_and_cats_yamnet/assets
tf.keras.utils.plot_model(serving_model)
अपने सहेजे गए मॉडल को यह सत्यापित करने के लिए लोड करें कि यह अपेक्षा के अनुरूप काम करता है।
reloaded_model = tf.saved_model.load(saved_model_path)
और अंतिम परीक्षण के लिए: कुछ ध्वनि डेटा दिया गया है, क्या आपका मॉडल सही परिणाम देता है?
reloaded_results = reloaded_model(testing_wav_data)
cat_or_dog = my_classes[tf.argmax(reloaded_results)]
print(f'The main sound is: {cat_or_dog}')
The main sound is: cat
यदि आप अपने नए मॉडल को एक सर्विंग सेटअप पर आज़माना चाहते हैं, तो आप 'serving_default' हस्ताक्षर का उपयोग कर सकते हैं।
serving_results = reloaded_model.signatures['serving_default'](testing_wav_data)
cat_or_dog = my_classes[tf.argmax(serving_results['classifier'])]
print(f'The main sound is: {cat_or_dog}')
The main sound is: cat
(वैकल्पिक) कुछ और परीक्षण
मॉडल तैयार है।
आइए इसकी तुलना परीक्षण डेटासेट पर YAMNet से करें।
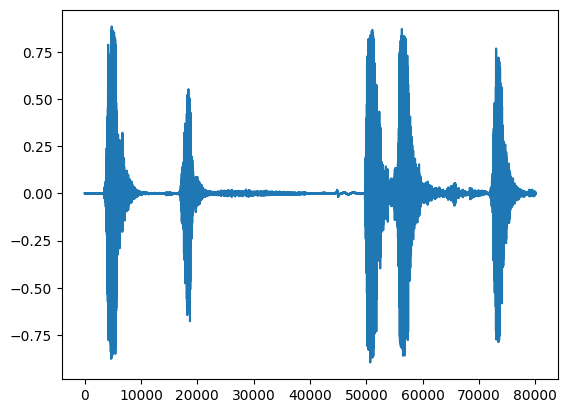
test_pd = filtered_pd.loc[filtered_pd['fold'] == 5]
row = test_pd.sample(1)
filename = row['filename'].item()
print(filename)
waveform = load_wav_16k_mono(filename)
print(f'Waveform values: {waveform}')
_ = plt.plot(waveform)

display.Audio(waveform, rate=16000)
./datasets/ESC-50-master/audio/5-214759-A-5.wav
WARNING:tensorflow:Using a while_loop for converting IO>AudioResample
WARNING:tensorflow:Using a while_loop for converting IO>AudioResample
Waveform values: [ 3.2084468e-09 -7.7704687e-09 -1.2222010e-08 ...  2.2788899e-02
  1.0315948e-02 -3.4766860e-02]
# Run the model, check the output.
scores, embeddings, spectrogram = yamnet_model(waveform)
class_scores = tf.reduce_mean(scores, axis=0)
top_class = tf.argmax(class_scores)
inferred_class = class_names[top_class]
top_score = class_scores[top_class]
print(f'[YAMNet] The main sound is: {inferred_class} ({top_score})')

reloaded_results = reloaded_model(waveform)
your_top_class = tf.argmax(reloaded_results)
your_inferred_class = my_classes[your_top_class]
class_probabilities = tf.nn.softmax(reloaded_results, axis=-1)
your_top_score = class_probabilities[your_top_class]
print(f'[Your model] The main sound is: {your_inferred_class} ({your_top_score})')
[YAMNet] The main sound is: Silence (0.500638484954834)
[Your model] The main sound is: cat (0.9981643557548523)
अगले कदम
आपने एक मॉडल बनाया है जो कुत्तों या बिल्लियों की आवाज़ों को वर्गीकृत कर सकता है। एक ही विचार और एक अलग डेटासेट के साथ आप कोशिश कर सकते हैं, उदाहरण के लिए, पक्षियों के गायन के आधार पर एक ध्वनिक पहचानकर्ता बनाना।
सोशल मीडिया पर TensorFlow टीम के साथ अपना प्रोजेक्ट साझा करें!