
| | |  Xem nguồn trên GitHub Xem nguồn trên GitHub | |
Máy tính xách tay này trình bày bản dịch hình ảnh sang hình ảnh không được ghép nối bằng cách sử dụng GAN có điều kiện, như được mô tả trong Dịch hình ảnh sang hình ảnh không được ghép nối bằng cách sử dụng Mạng đối phương nhất quán theo chu kỳ , còn được gọi là CycleGAN. Bài báo đề xuất một phương pháp có thể nắm bắt các đặc điểm của một miền ảnh và tìm ra cách những đặc điểm này có thể được dịch sang miền ảnh khác, tất cả đều không có bất kỳ ví dụ đào tạo ghép nối nào.
Sổ tay này giả định rằng bạn đã quen thuộc với Pix2Pix, bạn có thể tìm hiểu về điều này trong hướng dẫn về Pix2Pix . Mã cho CycleGAN cũng tương tự, sự khác biệt chính là một chức năng mất bổ sung và việc sử dụng dữ liệu đào tạo chưa được ghép nối.
CycleGAN sử dụng mất tính nhất quán chu kỳ để cho phép đào tạo mà không cần dữ liệu được ghép nối. Nói cách khác, nó có thể dịch từ miền này sang miền khác mà không cần ánh xạ 1-1 giữa miền nguồn và miền đích.
Điều này mở ra khả năng thực hiện nhiều tác vụ thú vị như chỉnh sửa ảnh, chỉnh màu ảnh, chuyển kiểu, v.v. Tất cả những gì bạn cần là nguồn và tập dữ liệu đích (đơn giản là một thư mục hình ảnh).
Thiết lập đường dẫn đầu vào
Cài đặt gói tensorflow_examples cho phép nhập trình tạo và dấu phân biệt.
pip install git+https://github.com/tensorflow/examples.git
import tensorflow as tf
import tensorflow_datasets as tfds
from tensorflow_examples.models.pix2pix import pix2pix

import os
import time
import matplotlib.pyplot as plt
from IPython.display import clear_output

AUTOTUNE = tf.data.AUTOTUNE
Đường ống đầu vào
Hướng dẫn này đào tạo một mô hình để dịch từ hình ảnh ngựa sang hình ảnh ngựa vằn. Bạn có thể tìm thấy bộ dữ liệu này và những bộ tương tự ở đây .
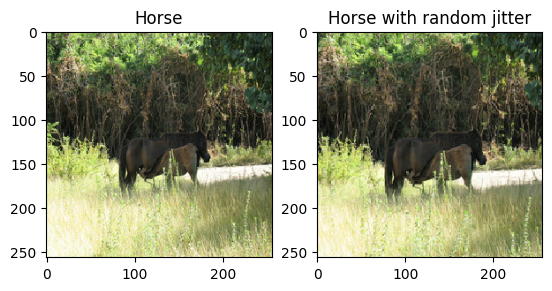
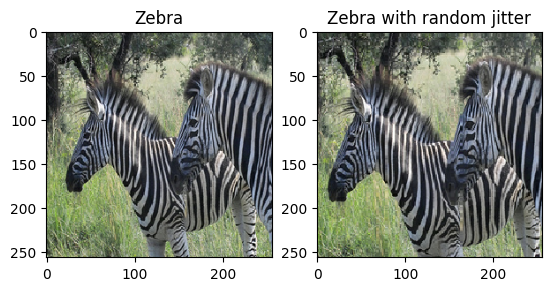
Như đã đề cập trong bài báo , hãy áp dụng chế độ rung và phản chiếu ngẫu nhiên cho tập dữ liệu đào tạo. Đây là một số kỹ thuật nâng cao hình ảnh để tránh trang bị quá nhiều.
Điều này tương tự như những gì đã được thực hiện trong pix2pix
- Trong chế độ rung ngẫu nhiên, hình ảnh được thay đổi kích thước thành
286 x 286và sau đó được cắt ngẫu nhiên thành256 x 256. - Trong phản chiếu ngẫu nhiên, hình ảnh được lật ngẫu nhiên theo chiều ngang, tức là từ trái sang phải.
dataset, metadata = tfds.load('cycle_gan/horse2zebra',
                              with_info=True, as_supervised=True)

train_horses, train_zebras = dataset['trainA'], dataset['trainB']
test_horses, test_zebras = dataset['testA'], dataset['testB']
BUFFER_SIZE = 1000
BATCH_SIZE = 1
IMG_WIDTH = 256
IMG_HEIGHT = 256
def random_crop(image):
  cropped_image = tf.image.random_crop(
      image, size=[IMG_HEIGHT, IMG_WIDTH, 3])

  return cropped_image
# normalizing the images to [-1, 1]
def normalize(image):
  image = tf.cast(image, tf.float32)
  image = (image / 127.5) - 1
  return image
def random_jitter(image):
  # resizing to 286 x 286 x 3
  image = tf.image.resize(image, [286, 286],
                          method=tf.image.ResizeMethod.NEAREST_NEIGHBOR)

  # randomly cropping to 256 x 256 x 3
  image = random_crop(image)

  # random mirroring
  image = tf.image.random_flip_left_right(image)

  return image
def preprocess_image_train(image, label):
  image = random_jitter(image)
  image = normalize(image)
  return image
def preprocess_image_test(image, label):
  image = normalize(image)
  return image
train_horses = train_horses.cache().map(
    preprocess_image_train, num_parallel_calls=AUTOTUNE).shuffle(
    BUFFER_SIZE).batch(BATCH_SIZE)

train_zebras = train_zebras.cache().map(
    preprocess_image_train, num_parallel_calls=AUTOTUNE).shuffle(
    BUFFER_SIZE).batch(BATCH_SIZE)

test_horses = test_horses.map(
    preprocess_image_test, num_parallel_calls=AUTOTUNE).cache().shuffle(
    BUFFER_SIZE).batch(BATCH_SIZE)

test_zebras = test_zebras.map(
    preprocess_image_test, num_parallel_calls=AUTOTUNE).cache().shuffle(
    BUFFER_SIZE).batch(BATCH_SIZE)
sample_horse = next(iter(train_horses))
sample_zebra = next(iter(train_zebras))
2022-01-26 02:38:15.762422: W tensorflow/core/kernels/data/cache_dataset_ops.cc:768] The calling iterator did not fully read the dataset being cached. In order to avoid unexpected truncation of the dataset, the partially cached contents of the dataset  will be discarded. This can happen if you have an input pipeline similar to `dataset.cache().take(k).repeat()`. You should use `dataset.take(k).cache().repeat()` instead.
2022-01-26 02:38:19.927846: W tensorflow/core/kernels/data/cache_dataset_ops.cc:768] The calling iterator did not fully read the dataset being cached. In order to avoid unexpected truncation of the dataset, the partially cached contents of the dataset  will be discarded. This can happen if you have an input pipeline similar to `dataset.cache().take(k).repeat()`. You should use `dataset.take(k).cache().repeat()` instead.
plt.subplot(121)
plt.title('Horse')
plt.imshow(sample_horse[0] * 0.5 + 0.5)

plt.subplot(122)
plt.title('Horse with random jitter')
plt.imshow(random_jitter(sample_horse[0]) * 0.5 + 0.5)
<matplotlib.image.AxesImage at 0x7f7cf83e0050>
plt.subplot(121)
plt.title('Zebra')
plt.imshow(sample_zebra[0] * 0.5 + 0.5)

plt.subplot(122)
plt.title('Zebra with random jitter')
plt.imshow(random_jitter(sample_zebra[0]) * 0.5 + 0.5)
<matplotlib.image.AxesImage at 0x7f7cf8139490>
Nhập và sử dụng lại các mô hình Pix2Pix
Nhập bộ tạo và bộ phân biệt được sử dụng trong Pix2Pix thông qua gói tensorflow_examples đã cài đặt.
Kiến trúc mô hình được sử dụng trong hướng dẫn này rất giống với kiến trúc được sử dụng trong pix2pix . Một số khác biệt là:
- Cyclegan sử dụng chuẩn hóa phiên bản thay vì chuẩn hóa hàng loạt .
- Giấy CycleGAN sử dụng trình tạo dựa trên
resnetđược sửa đổi. Hướng dẫn này sử dụng trình tạounetđã được sửa đổi để đơn giản hơn.
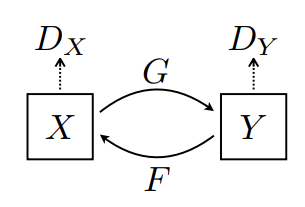
Có 2 bộ tạo (G và F) và 2 bộ phân biệt (X và Y) đang được đào tạo ở đây.
- Trình tạo
Ghọc cách biến đổi hình ảnhXthành hình ảnhY\((G: X -> Y)\) - Máy phát điện
Fhọc cách biến đổi hình ảnhYthành hình ảnhX\((F: Y -> X)\) - Discriminator
D_Xhọc cách phân biệt giữa hình ảnhXvà hình ảnh được tạo raX(F(Y)). - Kẻ phân biệt
D_Yhọc cách phân biệt giữa hình ảnhYvà hình ảnh được tạo raY(G(X)).
OUTPUT_CHANNELS = 3

generator_g = pix2pix.unet_generator(OUTPUT_CHANNELS, norm_type='instancenorm')
generator_f = pix2pix.unet_generator(OUTPUT_CHANNELS, norm_type='instancenorm')

discriminator_x = pix2pix.discriminator(norm_type='instancenorm', target=False)
discriminator_y = pix2pix.discriminator(norm_type='instancenorm', target=False)
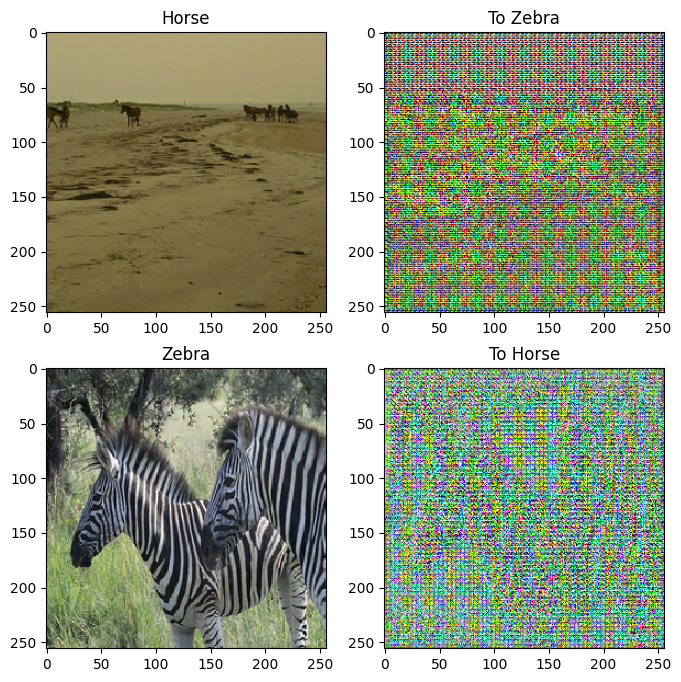
to_zebra = generator_g(sample_horse)
to_horse = generator_f(sample_zebra)
plt.figure(figsize=(8, 8))
contrast = 8

imgs = [sample_horse, to_zebra, sample_zebra, to_horse]
title = ['Horse', 'To Zebra', 'Zebra', 'To Horse']

for i in range(len(imgs)):
  plt.subplot(2, 2, i+1)
  plt.title(title[i])
  if i % 2 == 0:
    plt.imshow(imgs[i][0] * 0.5 + 0.5)
  else:
    plt.imshow(imgs[i][0] * 0.5 * contrast + 0.5)
plt.show()
WARNING:matplotlib.image:Clipping input data to the valid range for imshow with RGB data ([0..1] for floats or [0..255] for integers).
WARNING:matplotlib.image:Clipping input data to the valid range for imshow with RGB data ([0..1] for floats or [0..255] for integers).
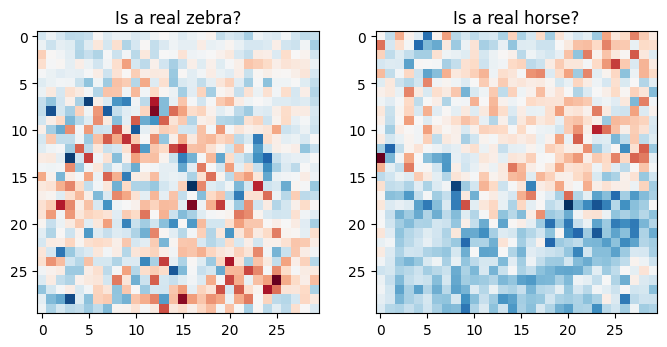
plt.figure(figsize=(8, 8))

plt.subplot(121)
plt.title('Is a real zebra?')
plt.imshow(discriminator_y(sample_zebra)[0, ..., -1], cmap='RdBu_r')

plt.subplot(122)
plt.title('Is a real horse?')
plt.imshow(discriminator_x(sample_horse)[0, ..., -1], cmap='RdBu_r')

plt.show()
Mất chức năng
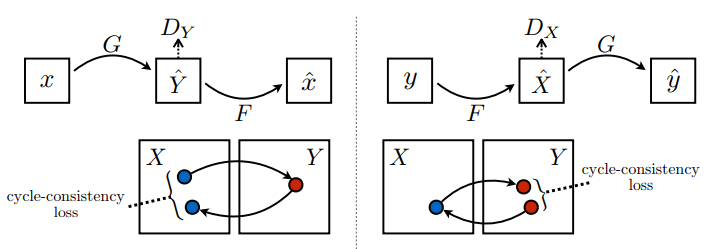
Trong CycleGAN, không có dữ liệu được ghép nối nào để huấn luyện, do đó không có gì đảm bảo rằng đầu vào x và cặp y mục tiêu là có ý nghĩa trong quá trình huấn luyện. Do đó, để thực thi rằng mạng học được ánh xạ chính xác, các tác giả đề xuất sự mất nhất quán chu trình.
Suy hao bộ phân biệt và suy hao bộ tạo tương tự như suy hao được sử dụng trong pix2pix .
LAMBDA = 10
loss_obj = tf.keras.losses.BinaryCrossentropy(from_logits=True)
def discriminator_loss(real, generated):
  real_loss = loss_obj(tf.ones_like(real), real)

  generated_loss = loss_obj(tf.zeros_like(generated), generated)

  total_disc_loss = real_loss + generated_loss

  return total_disc_loss * 0.5
def generator_loss(generated):
  return loss_obj(tf.ones_like(generated), generated)
Tính nhất quán của chu kỳ có nghĩa là kết quả phải gần với đầu vào ban đầu. Ví dụ: nếu một người dịch một câu từ tiếng Anh sang tiếng Pháp, và sau đó dịch ngược lại từ tiếng Pháp sang tiếng Anh, thì câu kết quả phải giống với câu gốc.
Trong chu kỳ mất nhất quán,
- Hình ảnh \(X\) được chuyển qua trình tạo \(G\) mang lại hình ảnh được tạo \(\hat{Y}\).
- Hình ảnh đã tạo \(\hat{Y}\) được chuyển qua trình tạo \(F\) để tạo ra hình ảnh theo chu kỳ \(\hat{X}\).
- Sai số tuyệt đối trung bình được tính giữa \(X\) và \(\hat{X}\).
\[forward\ cycle\ consistency\ loss: X -> G(X) -> F(G(X)) \sim \hat{X}\]
\[backward\ cycle\ consistency\ loss: Y -> F(Y) -> G(F(Y)) \sim \hat{Y}\]
def calc_cycle_loss(real_image, cycled_image):
  loss1 = tf.reduce_mean(tf.abs(real_image - cycled_image))

  return LAMBDA * loss1
Như được hiển thị ở trên, trình tạo \(G\) chịu trách nhiệm dịch hình ảnh \(X\) sang hình ảnh \(Y\). Mất danh tính nói rằng, nếu bạn cung cấp hình ảnh \(Y\) cho trình tạo \(G\), nó sẽ mang lại hình ảnh thực \(Y\) hoặc hình ảnh nào đó gần với hình ảnh \(Y\).
Nếu bạn chạy mô hình ngựa vằn trên ngựa hoặc mô hình ngựa vằn trên ngựa vằn, nó không nên sửa đổi hình ảnh nhiều vì hình ảnh đã chứa lớp đích.
\[Identity\ loss = |G(Y) - Y| + |F(X) - X|\]
def identity_loss(real_image, same_image):
  loss = tf.reduce_mean(tf.abs(real_image - same_image))
  return LAMBDA * 0.5 * loss
Khởi tạo trình tối ưu hóa cho tất cả các trình tạo và trình phân biệt.
generator_g_optimizer = tf.keras.optimizers.Adam(2e-4, beta_1=0.5)
generator_f_optimizer = tf.keras.optimizers.Adam(2e-4, beta_1=0.5)

discriminator_x_optimizer = tf.keras.optimizers.Adam(2e-4, beta_1=0.5)
discriminator_y_optimizer = tf.keras.optimizers.Adam(2e-4, beta_1=0.5)
Trạm kiểm soát
checkpoint_path = "./checkpoints/train"

ckpt = tf.train.Checkpoint(generator_g=generator_g,
                           generator_f=generator_f,
                           discriminator_x=discriminator_x,
                           discriminator_y=discriminator_y,
                           generator_g_optimizer=generator_g_optimizer,
                           generator_f_optimizer=generator_f_optimizer,
                           discriminator_x_optimizer=discriminator_x_optimizer,
                           discriminator_y_optimizer=discriminator_y_optimizer)

ckpt_manager = tf.train.CheckpointManager(ckpt, checkpoint_path, max_to_keep=5)

# if a checkpoint exists, restore the latest checkpoint.
if ckpt_manager.latest_checkpoint:
  ckpt.restore(ckpt_manager.latest_checkpoint)
  print ('Latest checkpoint restored!!')
Tập huấn
EPOCHS = 40
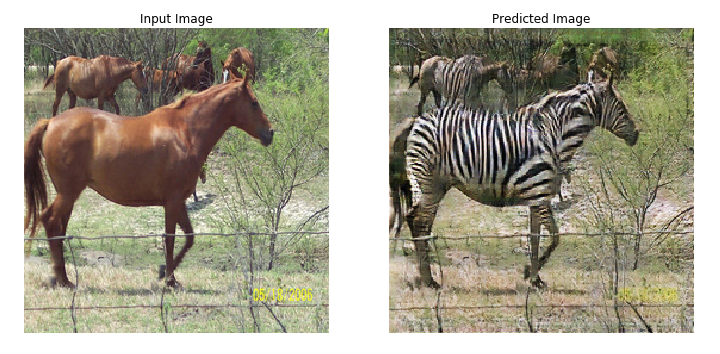
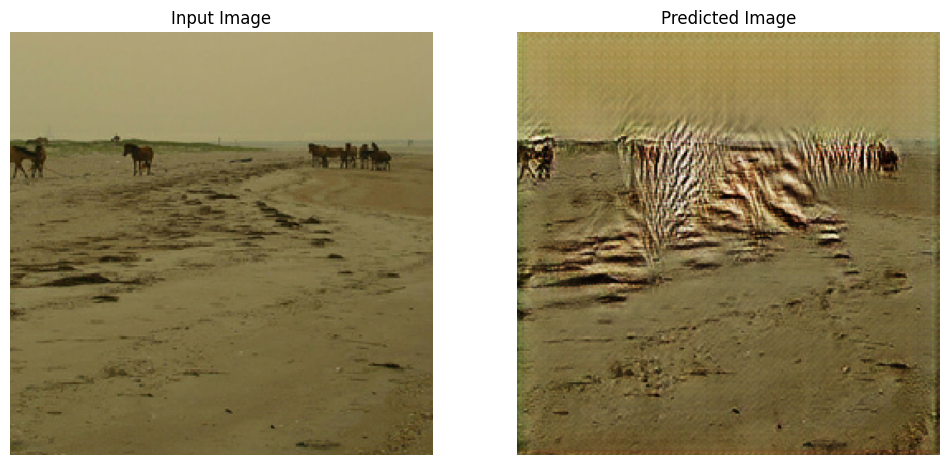
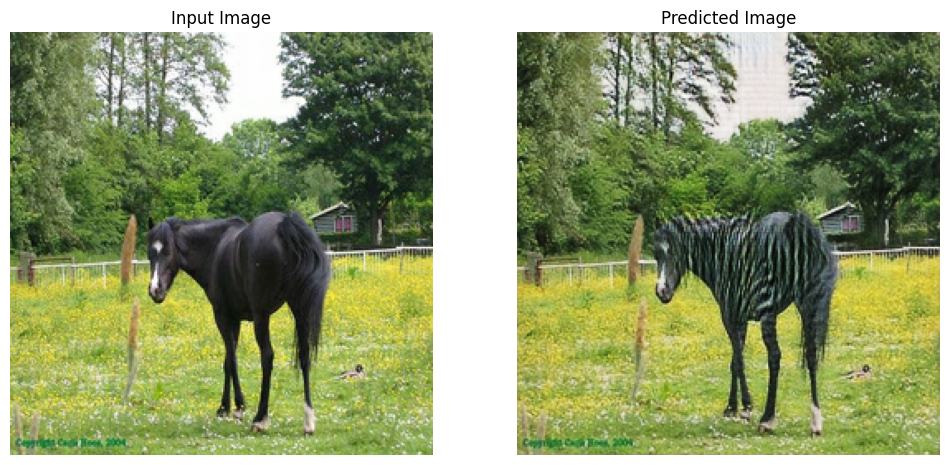
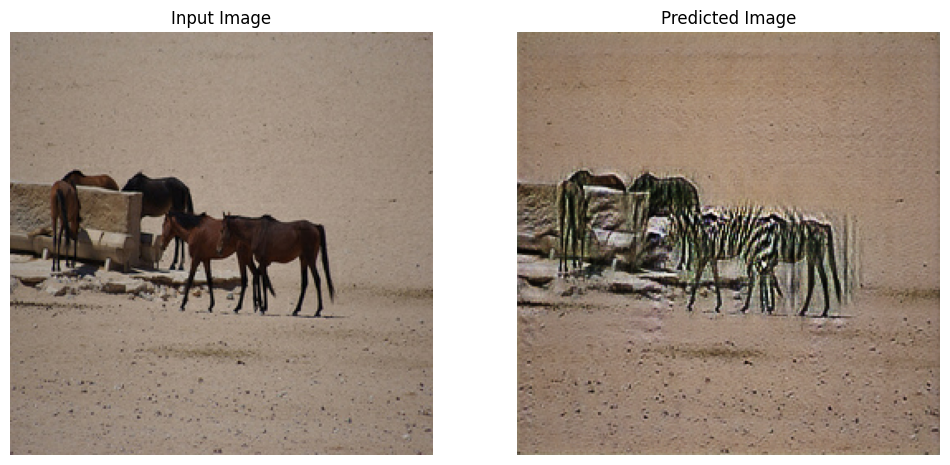
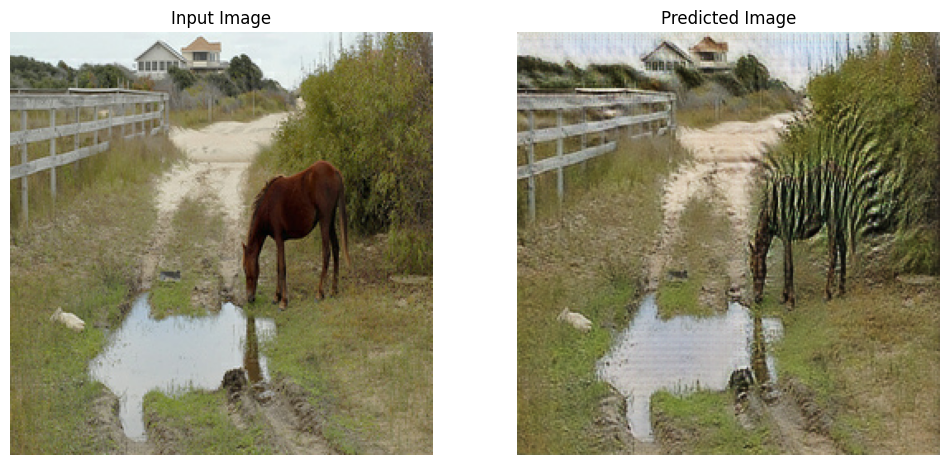
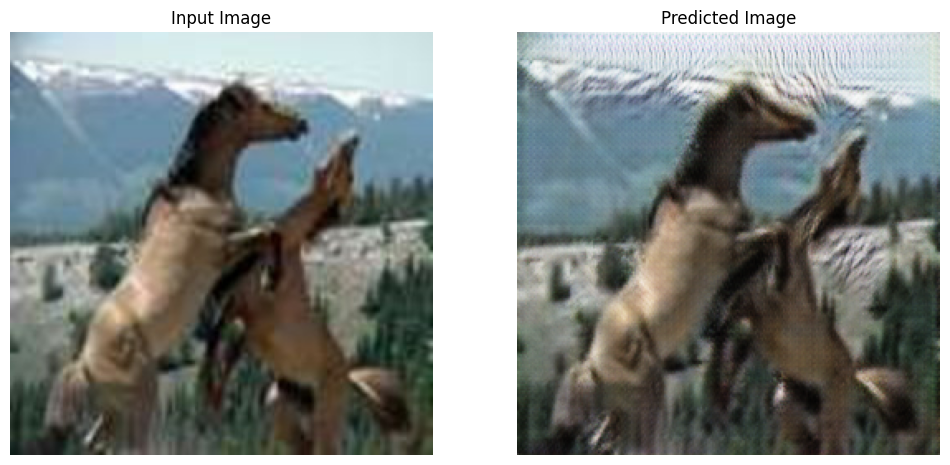
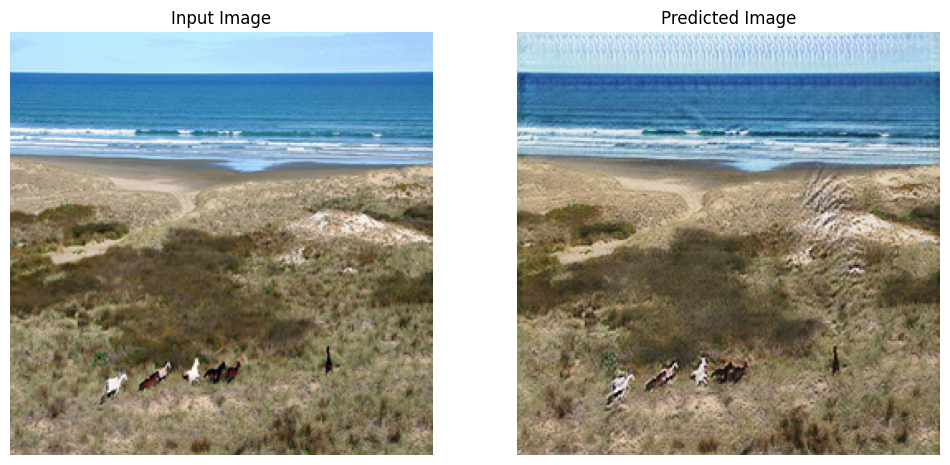
def generate_images(model, test_input):
  prediction = model(test_input)

  plt.figure(figsize=(12, 12))

  display_list = [test_input[0], prediction[0]]
  title = ['Input Image', 'Predicted Image']

  for i in range(2):
    plt.subplot(1, 2, i+1)
    plt.title(title[i])
    # getting the pixel values between [0, 1] to plot it.
    plt.imshow(display_list[i] * 0.5 + 0.5)
    plt.axis('off')
  plt.show()
Mặc dù vòng lặp đào tạo trông phức tạp, nó bao gồm bốn bước cơ bản:
- Nhận các dự đoán.
- Tính toán sự mất mát.
- Tính toán các gradient bằng cách sử dụng backpropagation.
- Áp dụng các gradient cho trình tối ưu hóa.
@tf.function
def train_step(real_x, real_y):
  # persistent is set to True because the tape is used more than
  # once to calculate the gradients.
  with tf.GradientTape(persistent=True) as tape:
    # Generator G translates X -> Y
    # Generator F translates Y -> X.

    fake_y = generator_g(real_x, training=True)
    cycled_x = generator_f(fake_y, training=True)

    fake_x = generator_f(real_y, training=True)
    cycled_y = generator_g(fake_x, training=True)

    # same_x and same_y are used for identity loss.
    same_x = generator_f(real_x, training=True)
    same_y = generator_g(real_y, training=True)

    disc_real_x = discriminator_x(real_x, training=True)
    disc_real_y = discriminator_y(real_y, training=True)

    disc_fake_x = discriminator_x(fake_x, training=True)
    disc_fake_y = discriminator_y(fake_y, training=True)

    # calculate the loss
    gen_g_loss = generator_loss(disc_fake_y)
    gen_f_loss = generator_loss(disc_fake_x)

    total_cycle_loss = calc_cycle_loss(real_x, cycled_x) + calc_cycle_loss(real_y, cycled_y)

    # Total generator loss = adversarial loss + cycle loss
    total_gen_g_loss = gen_g_loss + total_cycle_loss + identity_loss(real_y, same_y)
    total_gen_f_loss = gen_f_loss + total_cycle_loss + identity_loss(real_x, same_x)

    disc_x_loss = discriminator_loss(disc_real_x, disc_fake_x)
    disc_y_loss = discriminator_loss(disc_real_y, disc_fake_y)

  # Calculate the gradients for generator and discriminator
  generator_g_gradients = tape.gradient(total_gen_g_loss,
                                        generator_g.trainable_variables)
  generator_f_gradients = tape.gradient(total_gen_f_loss,
                                        generator_f.trainable_variables)

  discriminator_x_gradients = tape.gradient(disc_x_loss,
                                            discriminator_x.trainable_variables)
  discriminator_y_gradients = tape.gradient(disc_y_loss,
                                            discriminator_y.trainable_variables)

  # Apply the gradients to the optimizer
  generator_g_optimizer.apply_gradients(zip(generator_g_gradients,
                                            generator_g.trainable_variables))

  generator_f_optimizer.apply_gradients(zip(generator_f_gradients,
                                            generator_f.trainable_variables))

  discriminator_x_optimizer.apply_gradients(zip(discriminator_x_gradients,
                                                discriminator_x.trainable_variables))

  discriminator_y_optimizer.apply_gradients(zip(discriminator_y_gradients,
                                                discriminator_y.trainable_variables))
for epoch in range(EPOCHS):
  start = time.time()

  n = 0
  for image_x, image_y in tf.data.Dataset.zip((train_horses, train_zebras)):
    train_step(image_x, image_y)
    if n % 10 == 0:
      print ('.', end='')
    n += 1

  clear_output(wait=True)
  # Using a consistent image (sample_horse) so that the progress of the model
  # is clearly visible.
  generate_images(generator_g, sample_horse)

  if (epoch + 1) % 5 == 0:
    ckpt_save_path = ckpt_manager.save()
    print ('Saving checkpoint for epoch {} at {}'.format(epoch+1,
                                                         ckpt_save_path))

  print ('Time taken for epoch {} is {} sec\n'.format(epoch + 1,
                                                      time.time()-start))
Saving checkpoint for epoch 40 at ./checkpoints/train/ckpt-8
Time taken for epoch 40 is 166.64579939842224 sec
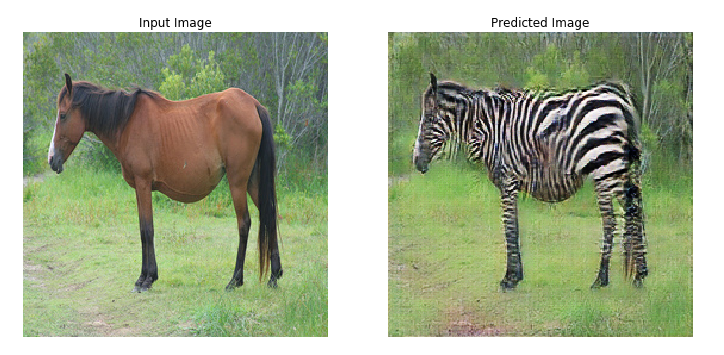
Tạo bằng cách sử dụng tập dữ liệu thử nghiệm
# Run the trained model on the test dataset
for inp in test_horses.take(5):
  generate_images(generator_g, inp)
Bước tiếp theo
Hướng dẫn này đã chỉ ra cách triển khai CycleGAN bắt đầu từ trình tạo và trình phân biệt được thực hiện trong hướng dẫn Pix2Pix . Bước tiếp theo, bạn có thể thử sử dụng một tập dữ liệu khác từ TensorFlow Datasets .
Bạn cũng có thể đào tạo số lượng kỷ nguyên lớn hơn để cải thiện kết quả hoặc bạn có thể triển khai trình tạo ResNet đã sửa đổi được sử dụng trong báo cáo thay vì trình tạo U-Net được sử dụng ở đây.