
| | |  ดูแหล่งที่มาบน GitHub ดูแหล่งที่มาบน GitHub | |
บทช่วยสอนนี้มีการใช้งาน DeepDream น้อยที่สุด ตามที่อธิบายไว้ใน บล็อกโพสต์ นี้โดย Alexander Mordvintsev
DeepDream เป็นการทดลองที่แสดงภาพรูปแบบที่เรียนรู้โดยโครงข่ายประสาทเทียม คล้ายกับเมื่อเด็กดูก้อนเมฆและพยายามตีความรูปร่างแบบสุ่ม DeepDream จะตีความและปรับปรุงรูปแบบที่เห็นในภาพมากเกินไป
ทำได้โดยการส่งต่อรูปภาพผ่านเครือข่าย จากนั้นคำนวณการไล่ระดับสีของรูปภาพตามการเปิดใช้งานของเลเยอร์เฉพาะ จากนั้นรูปภาพจะได้รับการแก้ไขเพื่อเพิ่มการเปิดใช้งานเหล่านี้ ปรับปรุงรูปแบบที่เครือข่ายมองเห็น และทำให้ได้ภาพที่เหมือนฝัน กระบวนการนี้ถูกขนานนามว่า "Inceptionism" (อ้างอิงถึง InceptionNet และ ภาพยนตร์ Inception)
มาสาธิตวิธีสร้างโครงข่ายประสาทเทียม "ความฝัน" และปรับปรุงรูปแบบเหนือจริงที่เห็นในภาพ
import tensorflow as tf
import numpy as np

import matplotlib as mpl

import IPython.display as display
import PIL.Image
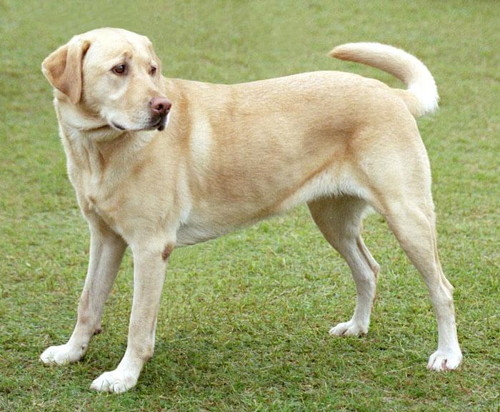
เลือกภาพที่จะฝัน-ify
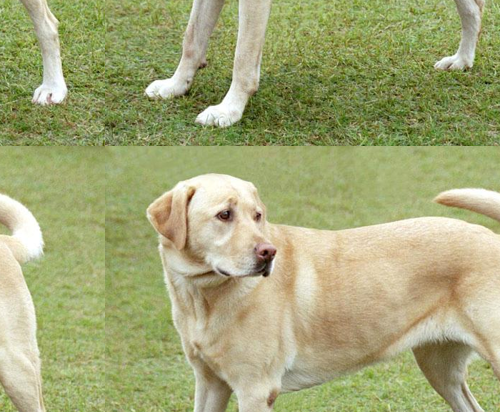
สำหรับบทช่วยสอนนี้ ให้ใช้รูปภาพของ ลาบราดอร์
url = 'https://storage.googleapis.com/download.tensorflow.org/example_images/YellowLabradorLooking_new.jpg'
# Download an image and read it into a NumPy array.
def download(url, max_dim=None):
  name = url.split('/')[-1]
  image_path = tf.keras.utils.get_file(name, origin=url)
  img = PIL.Image.open(image_path)
  if max_dim:
    img.thumbnail((max_dim, max_dim))
  return np.array(img)

# Normalize an image
def deprocess(img):
  img = 255*(img + 1.0)/2.0
  return tf.cast(img, tf.uint8)

# Display an image
def show(img):
  display.display(PIL.Image.fromarray(np.array(img)))


# Downsizing the image makes it easier to work with.
original_img = download(url, max_dim=500)
show(original_img)
display.display(display.HTML('Image cc-by: <a "href=https://commons.wikimedia.org/wiki/File:Felis_catus-cat_on_snow.jpg">Von.grzanka</a>'))
เตรียมแบบจำลองการแยกคุณลักษณะ
ดาวน์โหลดและเตรียมแบบจำลองการจัดประเภทรูปภาพที่ได้รับการฝึกอบรมล่วงหน้า คุณจะใช้ InceptionV3 ซึ่งคล้ายกับรูปแบบที่ใช้ใน DeepDream เดิม โปรดทราบว่า โมเดลที่ฝึกไว้ล่วงหน้า จะใช้งานได้ แม้ว่าคุณจะต้องปรับชื่อเลเยอร์ด้านล่างหากคุณเปลี่ยนแปลงสิ่งนี้
base_model = tf.keras.applications.InceptionV3(include_top=False, weights='imagenet')
Downloading data from https://storage.googleapis.com/tensorflow/keras-applications/inception_v3/inception_v3_weights_tf_dim_ordering_tf_kernels_notop.h5
87916544/87910968 [==============================] - 0s 0us/step
87924736/87910968 [==============================] - 0s 0us/step
แนวคิดใน DeepDream คือการเลือกเลเยอร์ (หรือเลเยอร์) และเพิ่ม "การสูญเสีย" ให้สูงสุดในลักษณะที่ภาพ "กระตุ้น" เลเยอร์มากขึ้น ความซับซ้อนของคุณสมบัติที่รวมไว้นั้นขึ้นอยู่กับเลเยอร์ที่คุณเลือก เช่น ชั้นล่างจะสร้างลายเส้นหรือรูปแบบที่เรียบง่าย ในขณะที่เลเยอร์ที่ลึกกว่าจะให้คุณสมบัติที่ซับซ้อนในภาพ หรือแม้แต่วัตถุทั้งหมด
สถาปัตยกรรม InceptionV3 มีขนาดค่อนข้างใหญ่ (สำหรับกราฟของสถาปัตยกรรมแบบจำลอง โปรดดู repo ของ การวิจัย ของ TensorFlow) สำหรับ DeepDream เลเยอร์ที่น่าสนใจคือชั้นที่เกิดการบิดเป็นเกลียว InceptionV3 มี 11 เลเยอร์เหล่านี้ ชื่อ 'mixed0' แม้ว่า 'mixed10' การใช้เลเยอร์ต่างๆ กันจะทำให้ได้ภาพที่เหมือนฝันต่างกัน เลเยอร์ที่ลึกกว่าจะตอบสนองต่อคุณสมบัติระดับสูง (เช่น ดวงตาและใบหน้า) ในขณะที่เลเยอร์ก่อนหน้าจะตอบสนองต่อคุณสมบัติที่ง่ายกว่า (เช่น ขอบ รูปร่าง และพื้นผิว) อย่าลังเลที่จะทดลองกับเลเยอร์ที่เลือกด้านล่าง แต่จำไว้ว่าเลเยอร์ที่ลึกกว่า (ที่มีดัชนีสูงกว่า) จะใช้เวลาฝึกนานขึ้นเนื่องจากการคำนวณการไล่ระดับสีนั้นลึกกว่า
# Maximize the activations of these layers
names = ['mixed3', 'mixed5']
layers = [base_model.get_layer(name).output for name in names]

# Create the feature extraction model
dream_model = tf.keras.Model(inputs=base_model.input, outputs=layers)
คำนวณการสูญเสีย
การสูญเสียเป็นผลรวมของการเปิดใช้งานในเลเยอร์ที่เลือก การสูญเสียจะถูกทำให้เป็นมาตรฐานในแต่ละชั้น ดังนั้นการมีส่วนร่วมจากชั้นที่ใหญ่ขึ้นจึงไม่มีน้ำหนักเกินชั้นที่เล็กกว่า โดยปกติ การสูญเสียคือปริมาณที่คุณต้องการลดให้น้อยที่สุดผ่านการไล่ระดับสี ใน DeepDream คุณจะเพิ่มการสูญเสียนี้ให้สูงสุดผ่านการไล่ระดับสีขึ้น
def calc_loss(img, model):
  # Pass forward the image through the model to retrieve the activations.
  # Converts the image into a batch of size 1.
  img_batch = tf.expand_dims(img, axis=0)
  layer_activations = model(img_batch)
  if len(layer_activations) == 1:
    layer_activations = [layer_activations]

  losses = []
  for act in layer_activations:
    loss = tf.math.reduce_mean(act)
    losses.append(loss)

  return  tf.reduce_sum(losses)
ไล่ระดับขึ้น
เมื่อคุณคำนวณการสูญเสียของเลเยอร์ที่เลือกแล้ว ที่เหลือก็แค่คำนวณการไล่ระดับสีตามรูปภาพ และเพิ่มลงในรูปภาพต้นฉบับ
การเพิ่มการไล่ระดับสีให้กับรูปภาพช่วยปรับปรุงรูปแบบที่เครือข่ายมองเห็นได้ ในแต่ละขั้นตอน คุณจะได้สร้างภาพที่กระตุ้นการเปิดใช้งานบางเลเยอร์ในเครือข่ายมากขึ้น
วิธีการที่ทำสิ่งนี้ ด้านล่างนี้ รวมอยู่ใน tf.function เพื่อประสิทธิภาพ มันใช้ input_signature เพื่อให้แน่ใจว่าฟังก์ชันจะไม่ย้อนกลับสำหรับขนาดภาพที่แตกต่างกันหรือค่า steps / step_size ดู คู่มือฟังก์ชันคอนกรีต สำหรับรายละเอียด
class DeepDream(tf.Module):
  def __init__(self, model):
    self.model = model

  @tf.function(
      input_signature=(
        tf.TensorSpec(shape=[None,None,3], dtype=tf.float32),
        tf.TensorSpec(shape=[], dtype=tf.int32),
        tf.TensorSpec(shape=[], dtype=tf.float32),)
  )
  def __call__(self, img, steps, step_size):
      print("Tracing")
      loss = tf.constant(0.0)
      for n in tf.range(steps):
        with tf.GradientTape() as tape:
          # This needs gradients relative to `img`
          # `GradientTape` only watches `tf.Variable`s by default
          tape.watch(img)
          loss = calc_loss(img, self.model)

        # Calculate the gradient of the loss with respect to the pixels of the input image.
        gradients = tape.gradient(loss, img)

        # Normalize the gradients.
        gradients /= tf.math.reduce_std(gradients) + 1e-8

        # In gradient ascent, the "loss" is maximized so that the input image increasingly "excites" the layers.
        # You can update the image by directly adding the gradients (because they're the same shape!)
        img = img + gradients*step_size
        img = tf.clip_by_value(img, -1, 1)

      return loss, img
deepdream = DeepDream(dream_model)
วงหลัก
def run_deep_dream_simple(img, steps=100, step_size=0.01):
  # Convert from uint8 to the range expected by the model.
  img = tf.keras.applications.inception_v3.preprocess_input(img)
  img = tf.convert_to_tensor(img)
  step_size = tf.convert_to_tensor(step_size)
  steps_remaining = steps
  step = 0
  while steps_remaining:
    if steps_remaining>100:
      run_steps = tf.constant(100)
    else:
      run_steps = tf.constant(steps_remaining)
    steps_remaining -= run_steps
    step += run_steps

    loss, img = deepdream(img, run_steps, tf.constant(step_size))

    display.clear_output(wait=True)
    show(deprocess(img))
    print ("Step {}, loss {}".format(step, loss))


  result = deprocess(img)
  display.clear_output(wait=True)
  show(result)

  return result
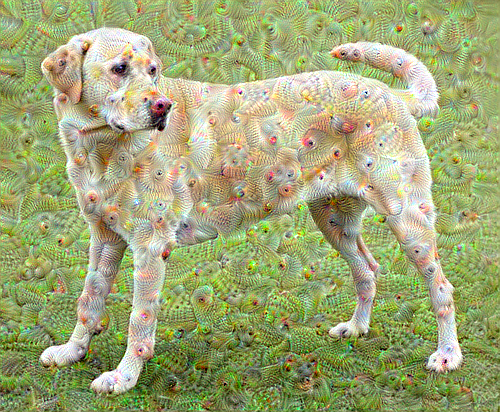
dream_img = run_deep_dream_simple(img=original_img,
                                  steps=100, step_size=0.01)
เอามันขึ้นอ็อกเทฟ
ค่อนข้างดี แต่มีปัญหาเล็กน้อยกับความพยายามครั้งแรกนี้:
- เอาต์พุตมีเสียงรบกวน (สามารถแก้ไขได้ด้วยการสูญเสีย
tf.image.total_variation) - ภาพมีความละเอียดต่ำ
- รูปแบบต่างๆ ดูเหมือนเกิดขึ้นพร้อมกันในความละเอียดเดียวกัน
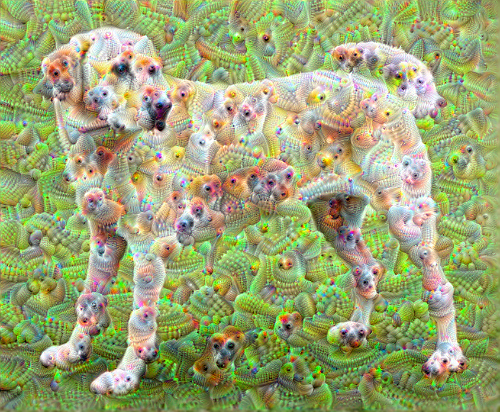
แนวทางหนึ่งที่แก้ปัญหาเหล่านี้ได้ทั้งหมดคือการใช้การขึ้นระดับการไล่ระดับสีในระดับต่างๆ วิธีนี้จะช่วยให้รูปแบบที่สร้างจากสเกลที่เล็กกว่าสามารถรวมเข้ากับรูปแบบที่สเกลที่สูงขึ้นและเติมด้วยรายละเอียดเพิ่มเติม
ในการทำเช่นนี้ คุณสามารถใช้วิธีการไล่ระดับการไล่ระดับสีก่อนหน้า จากนั้นเพิ่มขนาดของรูปภาพ (ซึ่งเรียกว่าอ็อกเทฟ) และทำซ้ำขั้นตอนนี้สำหรับหลายอ็อกเทฟ
import time
start = time.time()

OCTAVE_SCALE = 1.30

img = tf.constant(np.array(original_img))
base_shape = tf.shape(img)[:-1]
float_base_shape = tf.cast(base_shape, tf.float32)

for n in range(-2, 3):
  new_shape = tf.cast(float_base_shape*(OCTAVE_SCALE**n), tf.int32)

  img = tf.image.resize(img, new_shape).numpy()

  img = run_deep_dream_simple(img=img, steps=50, step_size=0.01)

display.clear_output(wait=True)
img = tf.image.resize(img, base_shape)
img = tf.image.convert_image_dtype(img/255.0, dtype=tf.uint8)
show(img)

end = time.time()
end-start
6.38355278968811
ทางเลือก: ขยายขนาดด้วยไทล์
สิ่งหนึ่งที่ต้องพิจารณาก็คือเมื่อรูปภาพมีขนาดเพิ่มขึ้น เวลาและหน่วยความจำที่จำเป็นในการคำนวณการไล่ระดับสีก็เช่นกัน การใช้งานอ็อกเทฟด้านบนจะไม่ทำงานกับรูปภาพขนาดใหญ่มาก หรืออ็อกเทฟหลายอ็อกเทฟ
เพื่อหลีกเลี่ยงปัญหานี้ คุณสามารถแบ่งรูปภาพออกเป็นไทล์และคำนวณการไล่ระดับสีสำหรับแต่ละไทล์
การใช้การเลื่อนแบบสุ่มกับรูปภาพก่อนการคำนวณแบบเรียงต่อกันแต่ละครั้งจะป้องกันไม่ให้ตะเข็บเรียงต่อกันปรากฏขึ้น
เริ่มต้นด้วยการใช้กะสุ่ม:
def random_roll(img, maxroll):
  # Randomly shift the image to avoid tiled boundaries.
  shift = tf.random.uniform(shape=[2], minval=-maxroll, maxval=maxroll, dtype=tf.int32)
  img_rolled = tf.roll(img, shift=shift, axis=[0,1])
  return shift, img_rolled
shift, img_rolled = random_roll(np.array(original_img), 512)
show(img_rolled)
นี่คือสิ่งที่เทียบเท่ากับฟังก์ชัน deepdream ที่กำหนดไว้ก่อนหน้านี้:
class TiledGradients(tf.Module):
  def __init__(self, model):
    self.model = model

  @tf.function(
      input_signature=(
        tf.TensorSpec(shape=[None,None,3], dtype=tf.float32),
        tf.TensorSpec(shape=[2], dtype=tf.int32),
        tf.TensorSpec(shape=[], dtype=tf.int32),)
  )
  def __call__(self, img, img_size, tile_size=512):
    shift, img_rolled = random_roll(img, tile_size)

    # Initialize the image gradients to zero.
    gradients = tf.zeros_like(img_rolled)

    # Skip the last tile, unless there's only one tile.
    xs = tf.range(0, img_size[1], tile_size)[:-1]
    if not tf.cast(len(xs), bool):
      xs = tf.constant([0])
    ys = tf.range(0, img_size[0], tile_size)[:-1]
    if not tf.cast(len(ys), bool):
      ys = tf.constant([0])

    for x in xs:
      for y in ys:
        # Calculate the gradients for this tile.
        with tf.GradientTape() as tape:
          # This needs gradients relative to `img_rolled`.
          # `GradientTape` only watches `tf.Variable`s by default.
          tape.watch(img_rolled)

          # Extract a tile out of the image.
          img_tile = img_rolled[y:y+tile_size, x:x+tile_size]
          loss = calc_loss(img_tile, self.model)

        # Update the image gradients for this tile.
        gradients = gradients + tape.gradient(loss, img_rolled)

    # Undo the random shift applied to the image and its gradients.
    gradients = tf.roll(gradients, shift=-shift, axis=[0,1])

    # Normalize the gradients.
    gradients /= tf.math.reduce_std(gradients) + 1e-8

    return gradients
get_tiled_gradients = TiledGradients(dream_model)
การนำสิ่งนี้มารวมกันจะทำให้การใช้งาน Deepdream ที่ปรับขนาดได้และตระหนักถึงอ็อกเทฟ:
def run_deep_dream_with_octaves(img, steps_per_octave=100, step_size=0.01,
                                octaves=range(-2,3), octave_scale=1.3):
  base_shape = tf.shape(img)
  img = tf.keras.utils.img_to_array(img)
  img = tf.keras.applications.inception_v3.preprocess_input(img)

  initial_shape = img.shape[:-1]
  img = tf.image.resize(img, initial_shape)
  for octave in octaves:
    # Scale the image based on the octave
    new_size = tf.cast(tf.convert_to_tensor(base_shape[:-1]), tf.float32)*(octave_scale**octave)
    new_size = tf.cast(new_size, tf.int32)
    img = tf.image.resize(img, new_size)

    for step in range(steps_per_octave):
      gradients = get_tiled_gradients(img, new_size)
      img = img + gradients*step_size
      img = tf.clip_by_value(img, -1, 1)

      if step % 10 == 0:
        display.clear_output(wait=True)
        show(deprocess(img))
        print ("Octave {}, Step {}".format(octave, step))

  result = deprocess(img)
  return result
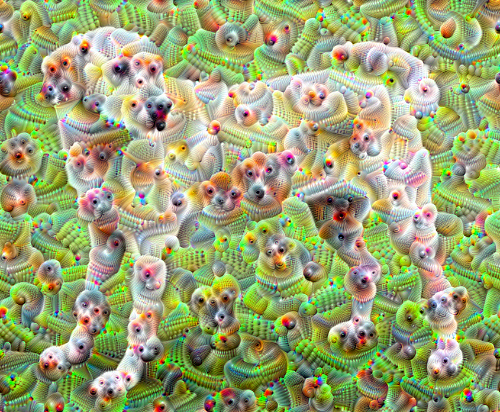
img = run_deep_dream_with_octaves(img=original_img, step_size=0.01)

display.clear_output(wait=True)
img = tf.image.resize(img, base_shape)
img = tf.image.convert_image_dtype(img/255.0, dtype=tf.uint8)
show(img)
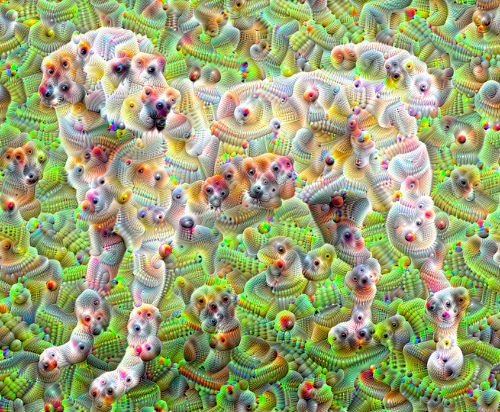
ดีขึ้นมาก! ลองเล่นกับจำนวนอ็อกเทฟ สเกลอ็อกเทฟ และเลเยอร์ที่เปิดใช้งานเพื่อเปลี่ยนรูปลักษณ์ของ DeepDream-ed
ผู้อ่านอาจสนใจ TensorFlow Lucid ซึ่งขยายแนวคิดที่นำเสนอในบทช่วยสอนนี้ เพื่อแสดงภาพและตีความโครงข่ายประสาทเทียม