
| | |  צפה במקור ב-GitHub צפה במקור ב-GitHub | |
מדריך זה מכיל יישום מינימלי של DeepDream, כפי שמתואר בפוסט זה בבלוג של אלכסנדר מורדווינצב.
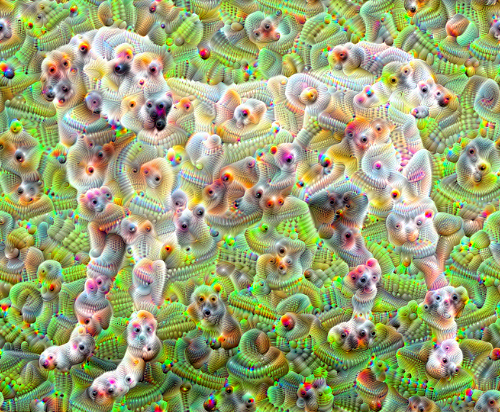
DeepDream הוא ניסוי הממחיש את הדפוסים שנלמדו על ידי רשת עצבית. בדומה כשילד מתבונן בעננים ומנסה לפרש צורות אקראיות, DeepDream מפרשת יתר על המידה ומשפרת את הדפוסים שהוא רואה בתמונה.
זה עושה זאת על ידי העברת תמונה דרך הרשת, ואז חישוב שיפוע התמונה ביחס להפעלת שכבה מסוימת. לאחר מכן, התמונה משתנה כדי להגביר את ההפעלות הללו, תוך שיפור הדפוסים הנראים על ידי הרשת, וכתוצאה מכך תמונה דמוית חלום. תהליך זה זכה לכינוי "Inceptionism" (התייחסות ל- InceptionNet , ולסרט Inception).
בואו נדגים כיצד ניתן לגרום לרשת עצבית "לחלום" ולשפר את הדפוסים הסוריאליסטיים שהיא רואה בתמונה.
import tensorflow as tf
import numpy as np

import matplotlib as mpl

import IPython.display as display
import PIL.Image
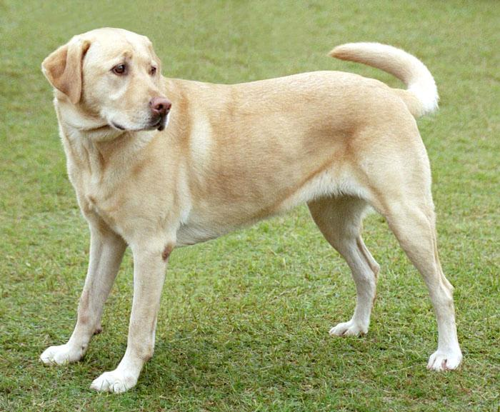
בחר תמונה לחלום
עבור הדרכה זו, הבה נשתמש בתמונה של לברדור .
url = 'https://storage.googleapis.com/download.tensorflow.org/example_images/YellowLabradorLooking_new.jpg'
# Download an image and read it into a NumPy array.
def download(url, max_dim=None):
  name = url.split('/')[-1]
  image_path = tf.keras.utils.get_file(name, origin=url)
  img = PIL.Image.open(image_path)
  if max_dim:
    img.thumbnail((max_dim, max_dim))
  return np.array(img)

# Normalize an image
def deprocess(img):
  img = 255*(img + 1.0)/2.0
  return tf.cast(img, tf.uint8)

# Display an image
def show(img):
  display.display(PIL.Image.fromarray(np.array(img)))


# Downsizing the image makes it easier to work with.
original_img = download(url, max_dim=500)
show(original_img)
display.display(display.HTML('Image cc-by: <a "href=https://commons.wikimedia.org/wiki/File:Felis_catus-cat_on_snow.jpg">Von.grzanka</a>'))
הכן את מודל חילוץ התכונות
הורד והכן מודל סיווג תמונה מיומן מראש. אתה תשתמש ב- InceptionV3 שדומה למודל ששימש במקור ב-DeepDream. שים לב שכל מודל מאומן מראש יעבוד, אם כי תצטרך להתאים את שמות השכבות למטה אם תשנה זאת.
base_model = tf.keras.applications.InceptionV3(include_top=False, weights='imagenet')
Downloading data from https://storage.googleapis.com/tensorflow/keras-applications/inception_v3/inception_v3_weights_tf_dim_ordering_tf_kernels_notop.h5
87916544/87910968 [==============================] - 0s 0us/step
87924736/87910968 [==============================] - 0s 0us/step
הרעיון ב-DeepDream הוא לבחור שכבה (או שכבות) ולמקסם את ה"הפסד" באופן שהתמונה "מרגשת" יותר ויותר את השכבות. המורכבות של התכונות המשולבות תלויה בשכבות שבחרת, כלומר, שכבות נמוכות יותר מייצרות משיכות או דפוסים פשוטים, בעוד שכבות עמוקות יותר נותנות תכונות מתוחכמות בתמונות, או אפילו אובייקטים שלמים.
ארכיטקטורת InceptionV3 היא די גדולה (לגרף של ארכיטקטורת המודל ראה מאגר המחקר של TensorFlow). עבור DeepDream, שכבות העניין הן אלה שבהן הפיתולים משורשרים. ישנן 11 שכבות אלה ב-InceptionV3, בשם 'mixed0' אם כי 'mixed10'. שימוש בשכבות שונות יביא לתמונות דמויות חלום שונות. שכבות עמוקות יותר מגיבות לתכונות ברמה גבוהה יותר (כגון עיניים ופנים), בעוד שכבות קודמות מגיבות לתכונות פשוטות יותר (כגון קצוות, צורות ומרקמים). אל תהסס להתנסות בשכבות שנבחרו למטה, אך זכור שלשכבות עמוקות יותר (אלו בעלות אינדקס גבוה יותר) ייקח זמן רב יותר להתאמן מכיוון שחישוב השיפוע הוא עמוק יותר.
# Maximize the activations of these layers
names = ['mixed3', 'mixed5']
layers = [base_model.get_layer(name).output for name in names]

# Create the feature extraction model
dream_model = tf.keras.Model(inputs=base_model.input, outputs=layers)
חשב הפסד
ההפסד הוא סכום ההפעלות בשכבות שנבחרו. ההפסד מנורמל בכל שכבה כך שהתרומה משכבות גדולות יותר אינה גוברת על שכבות קטנות יותר. בדרך כלל, אובדן הוא כמות שאתה רוצה למזער באמצעות ירידה בשיפוע. ב-DeepDream, תוכל למקסם את ההפסד הזה באמצעות עלייה בשיפוע.
def calc_loss(img, model):
  # Pass forward the image through the model to retrieve the activations.
  # Converts the image into a batch of size 1.
  img_batch = tf.expand_dims(img, axis=0)
  layer_activations = model(img_batch)
  if len(layer_activations) == 1:
    layer_activations = [layer_activations]

  losses = []
  for act in layer_activations:
    loss = tf.math.reduce_mean(act)
    losses.append(loss)

  return  tf.reduce_sum(losses)
עלייה בשיפוע
לאחר שחישבת את ההפסד עבור השכבות שנבחרו, כל מה שנותר הוא לחשב את השיפועים ביחס לתמונה, ולהוסיף אותם לתמונה המקורית.
הוספת ההדרגות לתמונה משפרת את הדפוסים הנראים על ידי הרשת. בכל שלב, תיצור תמונה שמרגשת יותר ויותר את הפעלות של שכבות מסוימות ברשת.
השיטה שעושה זאת, להלן, עטופה tf.function . לביצועים. היא משתמשת ב- input_signature כדי להבטיח שהפונקציה לא תתבצע עבור גדלי תמונה שונים או ערכי steps / step_size . עיין במדריך פונקציות בטון לפרטים.
class DeepDream(tf.Module):
  def __init__(self, model):
    self.model = model

  @tf.function(
      input_signature=(
        tf.TensorSpec(shape=[None,None,3], dtype=tf.float32),
        tf.TensorSpec(shape=[], dtype=tf.int32),
        tf.TensorSpec(shape=[], dtype=tf.float32),)
  )
  def __call__(self, img, steps, step_size):
      print("Tracing")
      loss = tf.constant(0.0)
      for n in tf.range(steps):
        with tf.GradientTape() as tape:
          # This needs gradients relative to `img`
          # `GradientTape` only watches `tf.Variable`s by default
          tape.watch(img)
          loss = calc_loss(img, self.model)

        # Calculate the gradient of the loss with respect to the pixels of the input image.
        gradients = tape.gradient(loss, img)

        # Normalize the gradients.
        gradients /= tf.math.reduce_std(gradients) + 1e-8

        # In gradient ascent, the "loss" is maximized so that the input image increasingly "excites" the layers.
        # You can update the image by directly adding the gradients (because they're the same shape!)
        img = img + gradients*step_size
        img = tf.clip_by_value(img, -1, 1)

      return loss, img
deepdream = DeepDream(dream_model)
לולאה ראשית
def run_deep_dream_simple(img, steps=100, step_size=0.01):
  # Convert from uint8 to the range expected by the model.
  img = tf.keras.applications.inception_v3.preprocess_input(img)
  img = tf.convert_to_tensor(img)
  step_size = tf.convert_to_tensor(step_size)
  steps_remaining = steps
  step = 0
  while steps_remaining:
    if steps_remaining>100:
      run_steps = tf.constant(100)
    else:
      run_steps = tf.constant(steps_remaining)
    steps_remaining -= run_steps
    step += run_steps

    loss, img = deepdream(img, run_steps, tf.constant(step_size))

    display.clear_output(wait=True)
    show(deprocess(img))
    print ("Step {}, loss {}".format(step, loss))


  result = deprocess(img)
  display.clear_output(wait=True)
  show(result)

  return result
dream_img = run_deep_dream_simple(img=original_img,
                                  steps=100, step_size=0.01)
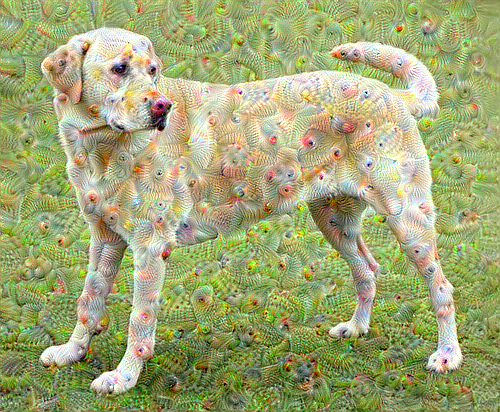
לוקח את זה באוקטבה
די טוב, אבל יש כמה בעיות עם הניסיון הראשון הזה:
- הפלט רועש (ניתן לטפל בזה עם אובדן
tf.image.total_variation). - התמונה ברזולוציה נמוכה.
- הדפוסים נראים כאילו כולם מתרחשים באותה פירוט.
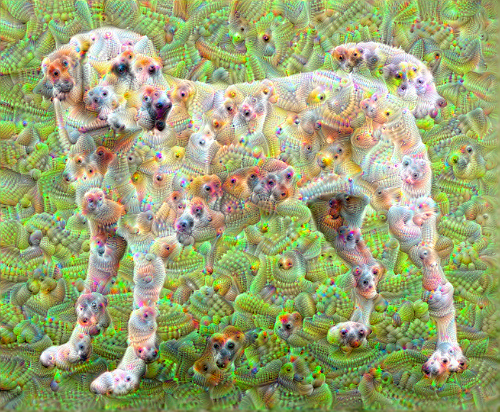
גישה אחת המטפלת בכל הבעיות הללו היא יישום עלייה בשיפוע בקנה מידה שונה. זה יאפשר לשלב דפוסים שנוצרו בקנה מידה קטן יותר בדפוסים בקנה מידה גבוה יותר ולמלא אותם בפרטים נוספים.
לשם כך ניתן לבצע את גישת העלייה הקודמת לשיפוע, ולאחר מכן להגדיל את גודל התמונה (המכונה אוקטבה), ולחזור על תהליך זה עבור מספר אוקטבות.
import time
start = time.time()

OCTAVE_SCALE = 1.30

img = tf.constant(np.array(original_img))
base_shape = tf.shape(img)[:-1]
float_base_shape = tf.cast(base_shape, tf.float32)

for n in range(-2, 3):
  new_shape = tf.cast(float_base_shape*(OCTAVE_SCALE**n), tf.int32)

  img = tf.image.resize(img, new_shape).numpy()

  img = run_deep_dream_simple(img=img, steps=50, step_size=0.01)

display.clear_output(wait=True)
img = tf.image.resize(img, base_shape)
img = tf.image.convert_image_dtype(img/255.0, dtype=tf.uint8)
show(img)

end = time.time()
end-start
6.38355278968811
אופציונלי: הגדלה עם אריחים
דבר אחד שיש לקחת בחשבון הוא שככל שהתמונה תגדל בגודלה, כך יגדל הזמן והזיכרון הדרושים לביצוע חישוב השיפוע. יישום האוקטבות לעיל לא יעבוד על תמונות גדולות מאוד, או אוקטבות רבות.
כדי להימנע מבעיה זו ניתן לפצל את התמונה לאריחים ולחשב את השיפוע עבור כל אריח.
החלת שינויים אקראיים על התמונה לפני כל חישוב אריחים מונעת את הופעת תפרי האריחים.
התחל ביישום השינוי האקראי:
def random_roll(img, maxroll):
  # Randomly shift the image to avoid tiled boundaries.
  shift = tf.random.uniform(shape=[2], minval=-maxroll, maxval=maxroll, dtype=tf.int32)
  img_rolled = tf.roll(img, shift=shift, axis=[0,1])
  return shift, img_rolled
shift, img_rolled = random_roll(np.array(original_img), 512)
show(img_rolled)

הנה מקבילה של אריחים לפונקציית deepdream שהוגדרה קודם לכן:
class TiledGradients(tf.Module):
  def __init__(self, model):
    self.model = model

  @tf.function(
      input_signature=(
        tf.TensorSpec(shape=[None,None,3], dtype=tf.float32),
        tf.TensorSpec(shape=[2], dtype=tf.int32),
        tf.TensorSpec(shape=[], dtype=tf.int32),)
  )
  def __call__(self, img, img_size, tile_size=512):
    shift, img_rolled = random_roll(img, tile_size)

    # Initialize the image gradients to zero.
    gradients = tf.zeros_like(img_rolled)

    # Skip the last tile, unless there's only one tile.
    xs = tf.range(0, img_size[1], tile_size)[:-1]
    if not tf.cast(len(xs), bool):
      xs = tf.constant([0])
    ys = tf.range(0, img_size[0], tile_size)[:-1]
    if not tf.cast(len(ys), bool):
      ys = tf.constant([0])

    for x in xs:
      for y in ys:
        # Calculate the gradients for this tile.
        with tf.GradientTape() as tape:
          # This needs gradients relative to `img_rolled`.
          # `GradientTape` only watches `tf.Variable`s by default.
          tape.watch(img_rolled)

          # Extract a tile out of the image.
          img_tile = img_rolled[y:y+tile_size, x:x+tile_size]
          loss = calc_loss(img_tile, self.model)

        # Update the image gradients for this tile.
        gradients = gradients + tape.gradient(loss, img_rolled)

    # Undo the random shift applied to the image and its gradients.
    gradients = tf.roll(gradients, shift=-shift, axis=[0,1])

    # Normalize the gradients.
    gradients /= tf.math.reduce_std(gradients) + 1e-8

    return gradients
get_tiled_gradients = TiledGradients(dream_model)
חיבור זה נותן יישום דיפ-דרים בעל מודע אוקטבות להרחבה:
def run_deep_dream_with_octaves(img, steps_per_octave=100, step_size=0.01,
                                octaves=range(-2,3), octave_scale=1.3):
  base_shape = tf.shape(img)
  img = tf.keras.utils.img_to_array(img)
  img = tf.keras.applications.inception_v3.preprocess_input(img)

  initial_shape = img.shape[:-1]
  img = tf.image.resize(img, initial_shape)
  for octave in octaves:
    # Scale the image based on the octave
    new_size = tf.cast(tf.convert_to_tensor(base_shape[:-1]), tf.float32)*(octave_scale**octave)
    new_size = tf.cast(new_size, tf.int32)
    img = tf.image.resize(img, new_size)

    for step in range(steps_per_octave):
      gradients = get_tiled_gradients(img, new_size)
      img = img + gradients*step_size
      img = tf.clip_by_value(img, -1, 1)

      if step % 10 == 0:
        display.clear_output(wait=True)
        show(deprocess(img))
        print ("Octave {}, Step {}".format(octave, step))

  result = deprocess(img)
  return result
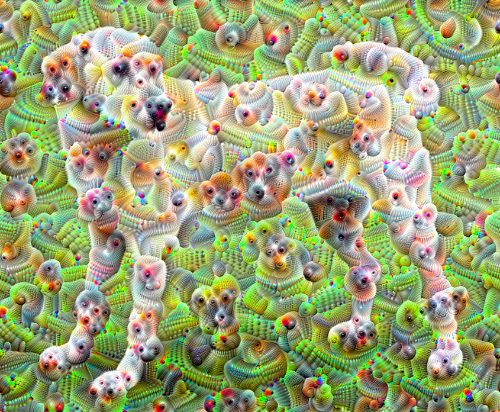
img = run_deep_dream_with_octaves(img=original_img, step_size=0.01)

display.clear_output(wait=True)
img = tf.image.resize(img, base_shape)
img = tf.image.convert_image_dtype(img/255.0, dtype=tf.uint8)
show(img)
הרבה יותר טוב! שחקו עם מספר האוקטבות, סולם האוקטבות והשכבות המופעלות כדי לשנות את מראה תמונת ה-DeepDream ed שלכם.
הקוראים עשויים להתעניין גם ב- TensorFlow Lucid שמרחיב את הרעיונות שהוצגו במדריך זה כדי להמחיש ולפרש רשתות עצביות.