
| | |  הצג ב-GitHub הצג ב-GitHub | | |
הדרכה זו משתמשת בלמידה עמוקה כדי לחבר תמונה אחת בסגנון תמונה אחרת (אי פעם הלוואי שהיית יכול לצייר כמו פיקאסו או ואן גוך?). זה ידוע כהעברת סגנון עצבי והטכניקה מתוארת באלגוריתם עצבי של סגנון אמנותי (Gatys et al.).
ליישום פשוט של העברת סגנון, עיין במדריך זה כדי ללמוד עוד על אופן השימוש במודל עיצוב שרירותי תמונה המיומן מראש מ- TensorFlow Hub או כיצד להשתמש במודל העברת סגנון עם TensorFlow Lite .
העברת סגנון עצבי היא טכניקת אופטימיזציה המשמשת לצילום שתי תמונות - תמונת תוכן ותמונת התייחסות לסגנון (כגון יצירת אמנות של צייר מפורסם) - ולמזג אותן יחד כך שתמונת הפלט תיראה כמו תמונת התוכן, אך "צבועה" בסגנון תמונת ההתייחסות לסגנון.
זה מיושם על ידי אופטימיזציה של תמונת הפלט כך שתתאים לסטטיסטיקות התוכן של תמונת התוכן ולסטטיסטיקות הסגנון של תמונת ההפניה לסגנון. נתונים סטטיסטיים אלו מופקים מהתמונות באמצעות רשת קונבולוציונית.
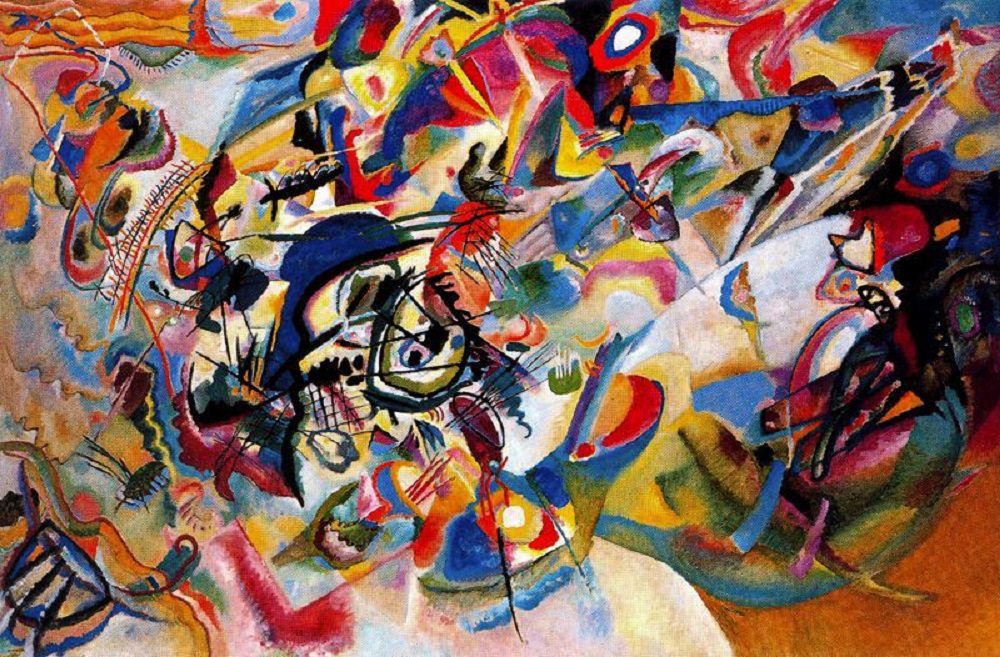
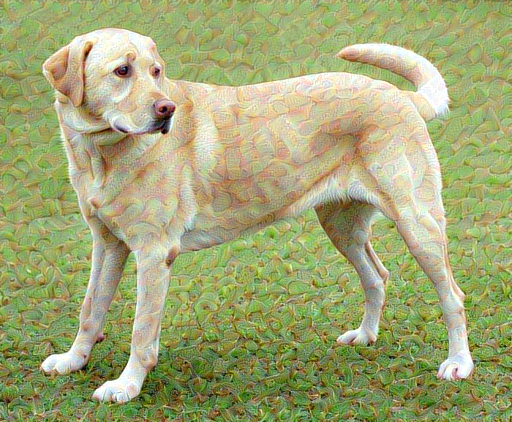
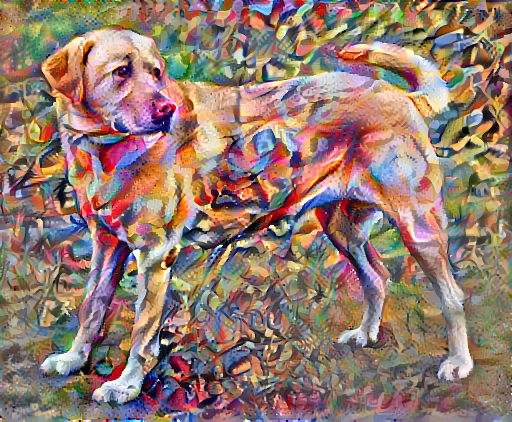
לדוגמה, בואו ניקח תמונה של הכלב הזה ושל קומפוזיציה 7 של ואסילי קנדינסקי:

לברדור צהוב מסתכל , מ-Wikimedia Commons מאת Elf . רישיון CC BY-SA 3.0
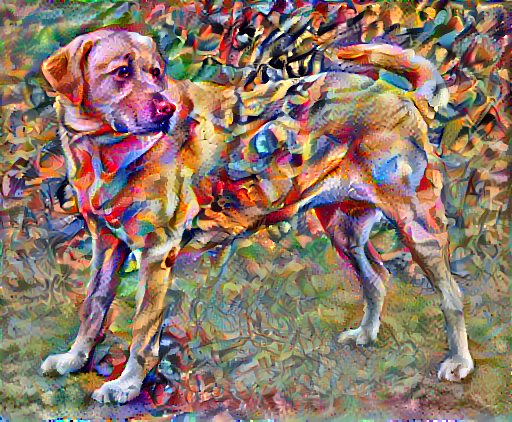
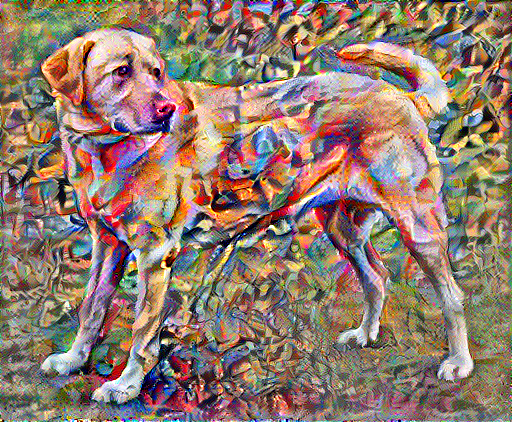
עכשיו איך זה היה נראה אם קנדינסקי החליט לצייר את התמונה של הכלב הזה אך ורק בסגנון הזה? משהו כזה?
להכין
ייבוא והגדר מודולים
import os
import tensorflow as tf
# Load compressed models from tensorflow_hub
os.environ['TFHUB_MODEL_LOAD_FORMAT'] = 'COMPRESSED'
import IPython.display as display

import matplotlib.pyplot as plt
import matplotlib as mpl
mpl.rcParams['figure.figsize'] = (12, 12)
mpl.rcParams['axes.grid'] = False

import numpy as np
import PIL.Image
import time
import functools
def tensor_to_image(tensor):
  tensor = tensor*255
  tensor = np.array(tensor, dtype=np.uint8)
  if np.ndim(tensor)>3:
    assert tensor.shape[0] == 1
    tensor = tensor[0]
  return PIL.Image.fromarray(tensor)
הורד תמונות ובחר תמונת סגנון ותמונת תוכן:
content_path = tf.keras.utils.get_file('YellowLabradorLooking_new.jpg', 'https://storage.googleapis.com/download.tensorflow.org/example_images/YellowLabradorLooking_new.jpg')
style_path = tf.keras.utils.get_file('kandinsky5.jpg','https://storage.googleapis.com/download.tensorflow.org/example_images/Vassily_Kandinsky%2C_1913_-_Composition_7.jpg')
Downloading data from https://storage.googleapis.com/download.tensorflow.org/example_images/Vassily_Kandinsky%2C_1913_-_Composition_7.jpg
196608/195196 [==============================] - 0s 0us/step
204800/195196 [===============================] - 0s 0us/step
דמיינו את הקלט
הגדר פונקציה לטעינת תמונה והגבלת הממד המקסימלי שלה ל-512 פיקסלים.
def load_img(path_to_img):
  max_dim = 512
  img = tf.io.read_file(path_to_img)
  img = tf.image.decode_image(img, channels=3)
  img = tf.image.convert_image_dtype(img, tf.float32)

  shape = tf.cast(tf.shape(img)[:-1], tf.float32)
  long_dim = max(shape)
  scale = max_dim / long_dim

  new_shape = tf.cast(shape * scale, tf.int32)

  img = tf.image.resize(img, new_shape)
  img = img[tf.newaxis, :]
  return img
צור פונקציה פשוטה להצגת תמונה:
def imshow(image, title=None):
  if len(image.shape) > 3:
    image = tf.squeeze(image, axis=0)

  plt.imshow(image)
  if title:
    plt.title(title)
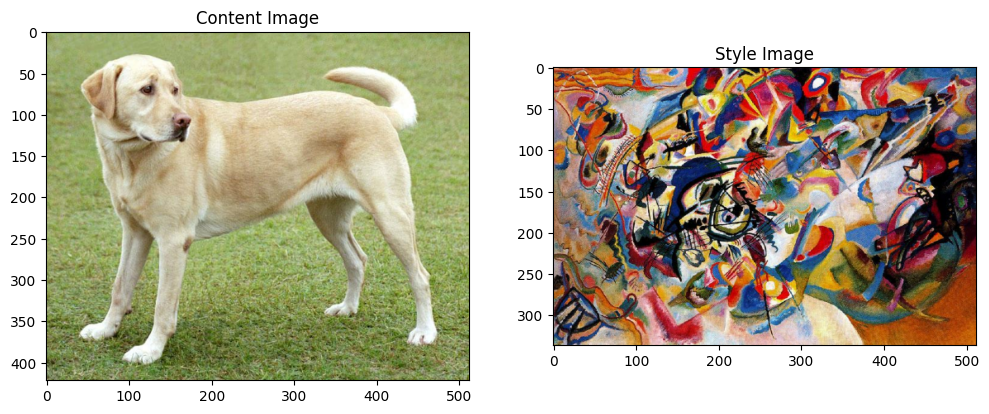
content_image = load_img(content_path)
style_image = load_img(style_path)

plt.subplot(1, 2, 1)
imshow(content_image, 'Content Image')

plt.subplot(1, 2, 2)
imshow(style_image, 'Style Image')
העברת סגנון מהירה באמצעות TF-Hub
מדריך זה מדגים את אלגוריתם העברת הסגנון המקורי, אשר מייעל את תוכן התמונה לסגנון מסוים. לפני שנכנס לפרטים, בואו נראה כיצד דגם TensorFlow Hub עושה זאת:
import tensorflow_hub as hub
hub_model = hub.load('https://tfhub.dev/google/magenta/arbitrary-image-stylization-v1-256/2')
stylized_image = hub_model(tf.constant(content_image), tf.constant(style_image))[0]
tensor_to_image(stylized_image)
הגדר ייצוגי תוכן וסגנון
השתמש בשכבות הביניים של המודל כדי לקבל את ייצוגי התוכן והסגנון של התמונה. החל משכבת הקלט של הרשת, הפעלת השכבות הראשונות מייצגות תכונות ברמה נמוכה כמו קצוות ומרקמים. כשאתה עובר ברשת, השכבות האחרונות מייצגות תכונות ברמה גבוהה יותר - חלקי אובייקט כמו גלגלים או עיניים . במקרה זה, אתה משתמש בארכיטקטורת הרשת VGG19, רשת סיווג תמונות מיומנת מראש. שכבות ביניים אלו נחוצות כדי להגדיר את ייצוג התוכן והסגנון מהתמונות. עבור תמונת קלט, נסה להתאים את ייצוגי יעד הסגנון והתוכן המתאימים בשכבות הביניים הללו.
טען VGG19 והפעל אותו בבדיקה על התמונה שלנו כדי לוודא שהוא בשימוש נכון:
x = tf.keras.applications.vgg19.preprocess_input(content_image*255)
x = tf.image.resize(x, (224, 224))
vgg = tf.keras.applications.VGG19(include_top=True, weights='imagenet')
prediction_probabilities = vgg(x)
prediction_probabilities.shape
Downloading data from https://storage.googleapis.com/tensorflow/keras-applications/vgg19/vgg19_weights_tf_dim_ordering_tf_kernels.h5
574717952/574710816 [==============================] - 17s 0us/step
574726144/574710816 [==============================] - 17s 0us/step
TensorShape([1, 1000])
predicted_top_5 = tf.keras.applications.vgg19.decode_predictions(prediction_probabilities.numpy())[0]
[(class_name, prob) for (number, class_name, prob) in predicted_top_5]
[('Labrador_retriever', 0.493171),
 ('golden_retriever', 0.2366529),
 ('kuvasz', 0.036357544),
 ('Chesapeake_Bay_retriever', 0.024182785),
 ('Greater_Swiss_Mountain_dog', 0.0186461)]
כעת VGG19 ללא ראש הסיווג, ורשום את שמות השכבות
vgg = tf.keras.applications.VGG19(include_top=False, weights='imagenet')

print()
for layer in vgg.layers:
  print(layer.name)
Downloading data from https://storage.googleapis.com/tensorflow/keras-applications/vgg19/vgg19_weights_tf_dim_ordering_tf_kernels_notop.h5
80142336/80134624 [==============================] - 2s 0us/step
80150528/80134624 [==============================] - 2s 0us/step

input_2
block1_conv1
block1_conv2
block1_pool
block2_conv1
block2_conv2
block2_pool
block3_conv1
block3_conv2
block3_conv3
block3_conv4
block3_pool
block4_conv1
block4_conv2
block4_conv3
block4_conv4
block4_pool
block5_conv1
block5_conv2
block5_conv3
block5_conv4
block5_pool
בחר שכבות ביניים מהרשת כדי לייצג את הסגנון והתוכן של התמונה:
content_layers = ['block5_conv2']

style_layers = ['block1_conv1',
                'block2_conv1',
                'block3_conv1',
                'block4_conv1',
                'block5_conv1']

num_content_layers = len(content_layers)
num_style_layers = len(style_layers)
שכבות ביניים לסגנון ותוכן
אז מדוע תפוקות הביניים הללו בתוך רשת סיווג התמונות המאומנת שלנו מאפשרות לנו להגדיר ייצוגי סגנון ותוכן?
ברמה גבוהה, על מנת שרשת תבצע סיווג תמונה (שרשת זו הוכשרה לעשות), עליה להבין את התמונה. זה מחייב לקחת את התמונה הגולמית בתור פיקסלים קלט ובניית ייצוג פנימי הממיר את פיקסלי התמונה הגולמית להבנה מורכבת של התכונות הקיימות בתמונה.
זו גם סיבה לכך שרשתות עצביות קונבולוציוניות מסוגלות להכליל היטב: הן מסוגלות ללכוד את השונות והמאפיינים המגדירים בתוך מחלקות (למשל חתולים לעומת כלבים) שהם אגנוסטיים לרעש רקע ומטרדים אחרים. לפיכך, איפשהו בין המקום שבו התמונה הגולמית מוזנת לתוך המודל לבין תווית סיווג הפלט, המודל משמש כמחלץ תכונות מורכבות. על ידי גישה לשכבות ביניים של המודל, אתה יכול לתאר את התוכן והסגנון של תמונות הקלט.
בנה את הדגם
הרשתות ב- tf.keras.applications תוכננו כך שתוכל לחלץ בקלות את ערכי שכבת הביניים באמצעות ה-API הפונקציונלי של Keras.
כדי להגדיר מודל באמצעות ה-API הפונקציונלי, ציין את הכניסות והפלטים:
model = Model(inputs, outputs)
הפונקציה הבאה בונה מודל VGG19 שמחזיר רשימה של פלטי שכבת ביניים:
def vgg_layers(layer_names):
  """ Creates a vgg model that returns a list of intermediate output values."""
  # Load our model. Load pretrained VGG, trained on imagenet data
  vgg = tf.keras.applications.VGG19(include_top=False, weights='imagenet')
  vgg.trainable = False

  outputs = [vgg.get_layer(name).output for name in layer_names]

  model = tf.keras.Model([vgg.input], outputs)
  return model
וכדי ליצור את הדגם:
style_extractor = vgg_layers(style_layers)
style_outputs = style_extractor(style_image*255)

#Look at the statistics of each layer's output
for name, output in zip(style_layers, style_outputs):
  print(name)
  print("  shape: ", output.numpy().shape)
  print("  min: ", output.numpy().min())
  print("  max: ", output.numpy().max())
  print("  mean: ", output.numpy().mean())
  print()
block1_conv1
  shape:  (1, 336, 512, 64)
  min:  0.0
  max:  835.5256
  mean:  33.97525

block2_conv1
  shape:  (1, 168, 256, 128)
  min:  0.0
  max:  4625.8857
  mean:  199.82687

block3_conv1
  shape:  (1, 84, 128, 256)
  min:  0.0
  max:  8789.239
  mean:  230.78099

block4_conv1
  shape:  (1, 42, 64, 512)
  min:  0.0
  max:  21566.135
  mean:  791.24005

block5_conv1
  shape:  (1, 21, 32, 512)
  min:  0.0
  max:  3189.2542
  mean:  59.179478
חשב סגנון
התוכן של תמונה מיוצג על ידי הערכים של מפות התכונות הביניים.
מסתבר שניתן לתאר את הסגנון של תמונה באמצעים ובקורלציות על פני מפות התכונות השונות. חשב מטריצת גראם הכוללת מידע זה על ידי לקיחת המכפלה החיצונית של וקטור התכונה עם עצמו בכל מיקום, וביצוע ממוצע של המכפלה החיצונית על כל המיקומים. ניתן לחשב מטריצת גראם זו עבור שכבה מסוימת כ:
\[G^l_{cd} = \frac{\sum_{ij} F^l_{ijc}(x)F^l_{ijd}(x)}{IJ}\]
ניתן ליישם זאת בצורה תמציתית באמצעות הפונקציה tf.linalg.einsum :
def gram_matrix(input_tensor):
  result = tf.linalg.einsum('bijc,bijd->bcd', input_tensor, input_tensor)
  input_shape = tf.shape(input_tensor)
  num_locations = tf.cast(input_shape[1]*input_shape[2], tf.float32)
  return result/(num_locations)
חלץ סגנון ותוכן
בנו מודל שמחזיר את טנסור הסגנון והתוכן.
class StyleContentModel(tf.keras.models.Model):
  def __init__(self, style_layers, content_layers):
    super(StyleContentModel, self).__init__()
    self.vgg = vgg_layers(style_layers + content_layers)
    self.style_layers = style_layers
    self.content_layers = content_layers
    self.num_style_layers = len(style_layers)
    self.vgg.trainable = False

  def call(self, inputs):
    "Expects float input in [0,1]"
    inputs = inputs*255.0
    preprocessed_input = tf.keras.applications.vgg19.preprocess_input(inputs)
    outputs = self.vgg(preprocessed_input)
    style_outputs, content_outputs = (outputs[:self.num_style_layers],
                                      outputs[self.num_style_layers:])

    style_outputs = [gram_matrix(style_output)
                     for style_output in style_outputs]

    content_dict = {content_name: value
                    for content_name, value
                    in zip(self.content_layers, content_outputs)}

    style_dict = {style_name: value
                  for style_name, value
                  in zip(self.style_layers, style_outputs)}

    return {'content': content_dict, 'style': style_dict}
כאשר קוראים לתמונה, מודל זה מחזיר את מטריצת הגרם (סגנון) של style_layers ותוכן של content_layers :
extractor = StyleContentModel(style_layers, content_layers)

results = extractor(tf.constant(content_image))

print('Styles:')
for name, output in sorted(results['style'].items()):
  print("  ", name)
  print("    shape: ", output.numpy().shape)
  print("    min: ", output.numpy().min())
  print("    max: ", output.numpy().max())
  print("    mean: ", output.numpy().mean())
  print()

print("Contents:")
for name, output in sorted(results['content'].items()):
  print("  ", name)
  print("    shape: ", output.numpy().shape)
  print("    min: ", output.numpy().min())
  print("    max: ", output.numpy().max())
  print("    mean: ", output.numpy().mean())
Styles:
   block1_conv1
    shape:  (1, 64, 64)
    min:  0.0055228462
    max:  28014.557
    mean:  263.79022

   block2_conv1
    shape:  (1, 128, 128)
    min:  0.0
    max:  61479.496
    mean:  9100.949

   block3_conv1
    shape:  (1, 256, 256)
    min:  0.0
    max:  545623.44
    mean:  7660.976

   block4_conv1
    shape:  (1, 512, 512)
    min:  0.0
    max:  4320502.0
    mean:  134288.84

   block5_conv1
    shape:  (1, 512, 512)
    min:  0.0
    max:  110005.37
    mean:  1487.0378

Contents:
   block5_conv2
    shape:  (1, 26, 32, 512)
    min:  0.0
    max:  2410.8796
    mean:  13.764149
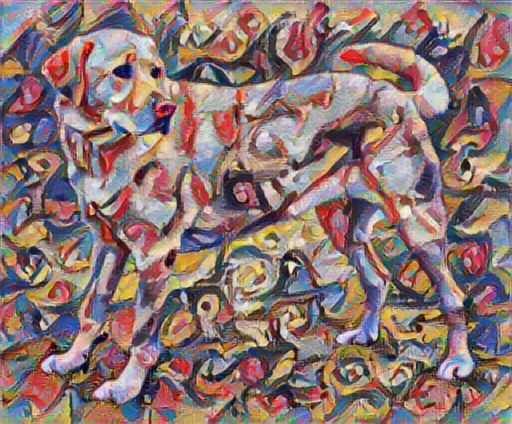
הפעל ירידה בשיפוע
עם מחלץ סגנון ותוכן זה, כעת תוכל ליישם את אלגוריתם העברת הסגנון. עשה זאת על ידי חישוב השגיאה הריבועית הממוצעת עבור הפלט של התמונה שלך ביחס לכל יעד, ולאחר מכן קח את הסכום המשוקלל של ההפסדים הללו.
הגדר את ערכי יעד הסגנון והתוכן שלך:
style_targets = extractor(style_image)['style']
content_targets = extractor(content_image)['content']
הגדר tf.Variable שיכיל את התמונה למיטוב. כדי לעשות זאת במהירות, אתחל אותו עם תמונת התוכן ( tf.Variable . חייב להיות זהה לתמונת התוכן):
image = tf.Variable(content_image)
מכיוון שזוהי תמונה צפה, הגדר פונקציה כדי לשמור את ערכי הפיקסלים בין 0 ל-1:
def clip_0_1(image):
  return tf.clip_by_value(image, clip_value_min=0.0, clip_value_max=1.0)
צור מייעל. העיתון ממליץ על LBFGS, אבל גם Adam עובד בסדר:
opt = tf.optimizers.Adam(learning_rate=0.02, beta_1=0.99, epsilon=1e-1)
כדי לייעל זאת, השתמש בשילוב משוקלל של שני ההפסדים כדי לקבל את ההפסד הכולל:
style_weight=1e-2
content_weight=1e4
def style_content_loss(outputs):
    style_outputs = outputs['style']
    content_outputs = outputs['content']
    style_loss = tf.add_n([tf.reduce_mean((style_outputs[name]-style_targets[name])**2)
                           for name in style_outputs.keys()])
    style_loss *= style_weight / num_style_layers

    content_loss = tf.add_n([tf.reduce_mean((content_outputs[name]-content_targets[name])**2)
                             for name in content_outputs.keys()])
    content_loss *= content_weight / num_content_layers
    loss = style_loss + content_loss
    return loss
השתמש tf.GradientTape כדי לעדכן את התמונה.
@tf.function()
def train_step(image):
  with tf.GradientTape() as tape:
    outputs = extractor(image)
    loss = style_content_loss(outputs)

  grad = tape.gradient(loss, image)
  opt.apply_gradients([(grad, image)])
  image.assign(clip_0_1(image))
כעת הפעל מספר שלבים לבדיקה:
train_step(image)
train_step(image)
train_step(image)
tensor_to_image(image)
מכיוון שהוא עובד, בצע אופטימיזציה ארוכה יותר:
import time
start = time.time()

epochs = 10
steps_per_epoch = 100

step = 0
for n in range(epochs):
  for m in range(steps_per_epoch):
    step += 1
    train_step(image)
    print(".", end='', flush=True)
  display.clear_output(wait=True)
  display.display(tensor_to_image(image))
  print("Train step: {}".format(step))

end = time.time()
print("Total time: {:.1f}".format(end-start))
Train step: 1000
Total time: 21.3
אובדן וריאציה מוחלט
חסרון אחד ביישום הבסיסי הזה הוא שהוא מייצר הרבה חפצים בתדר גבוה. הקטנת אלה באמצעות מונח רגוליזציה מפורש על רכיבי התדירות הגבוהה של התמונה. בהעברת סגנון, זה נקרא לרוב אובדן הווריאציה הכולל :
def high_pass_x_y(image):
  x_var = image[:, :, 1:, :] - image[:, :, :-1, :]
  y_var = image[:, 1:, :, :] - image[:, :-1, :, :]

  return x_var, y_var
x_deltas, y_deltas = high_pass_x_y(content_image)

plt.figure(figsize=(14, 10))
plt.subplot(2, 2, 1)
imshow(clip_0_1(2*y_deltas+0.5), "Horizontal Deltas: Original")

plt.subplot(2, 2, 2)
imshow(clip_0_1(2*x_deltas+0.5), "Vertical Deltas: Original")

x_deltas, y_deltas = high_pass_x_y(image)

plt.subplot(2, 2, 3)
imshow(clip_0_1(2*y_deltas+0.5), "Horizontal Deltas: Styled")

plt.subplot(2, 2, 4)
imshow(clip_0_1(2*x_deltas+0.5), "Vertical Deltas: Styled")
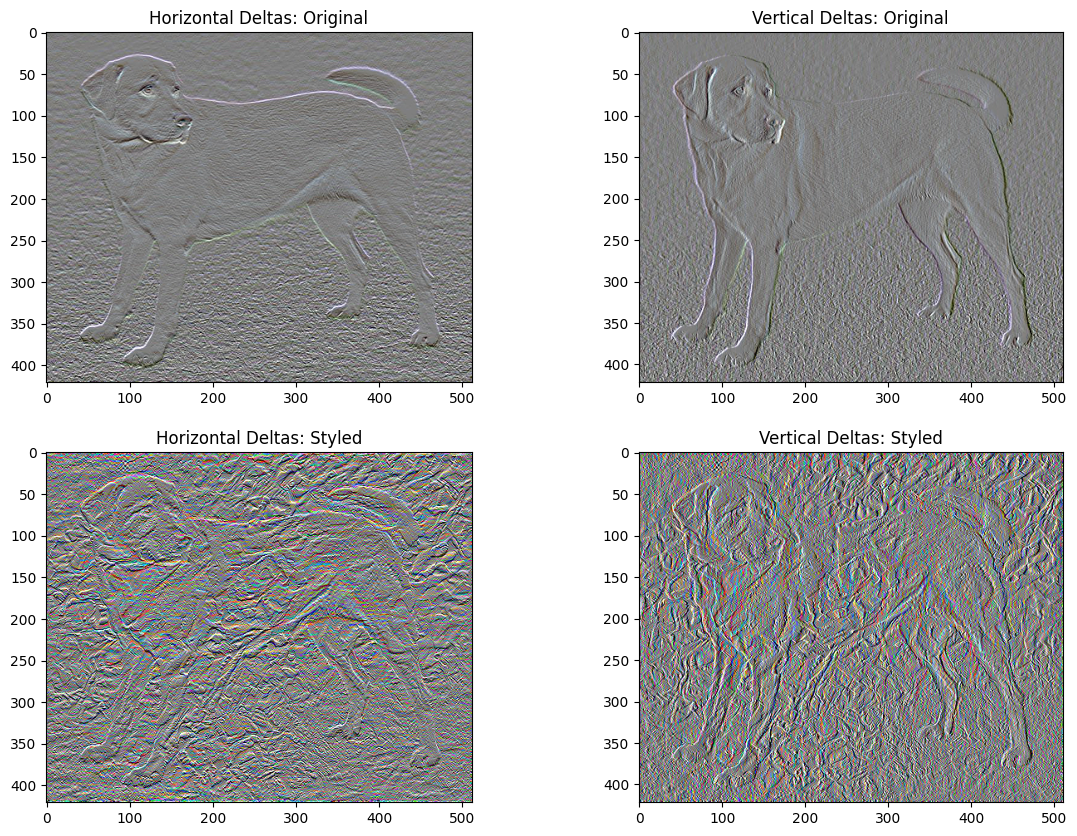
זה מראה כיצד רכיבי התדר הגבוה גדלו.
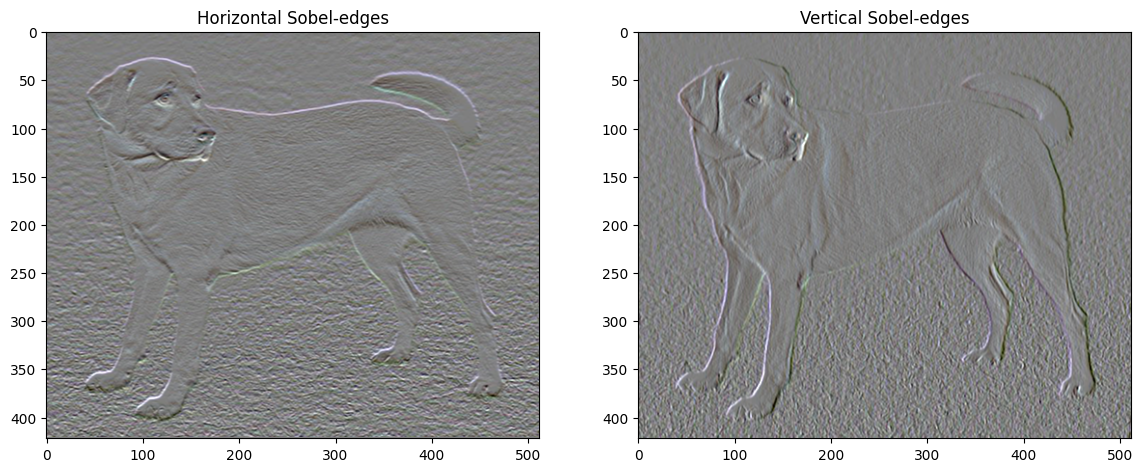
כמו כן, רכיב התדר הגבוה הזה הוא בעצם גלאי קצה. אתה יכול לקבל פלט דומה מגלאי הקצה של Sobel, למשל:
plt.figure(figsize=(14, 10))

sobel = tf.image.sobel_edges(content_image)
plt.subplot(1, 2, 1)
imshow(clip_0_1(sobel[..., 0]/4+0.5), "Horizontal Sobel-edges")
plt.subplot(1, 2, 2)
imshow(clip_0_1(sobel[..., 1]/4+0.5), "Vertical Sobel-edges")
הפסד ההסדרה הקשור לכך הוא סכום הריבועים של הערכים:
def total_variation_loss(image):
  x_deltas, y_deltas = high_pass_x_y(image)
  return tf.reduce_sum(tf.abs(x_deltas)) + tf.reduce_sum(tf.abs(y_deltas))
total_variation_loss(image).numpy()
149402.94
זה הוכיח מה זה עושה. אבל אין צורך ליישם את זה בעצמך, TensorFlow כולל יישום סטנדרטי:
tf.image.total_variation(image).numpy()
array([149402.94], dtype=float32)
הפעל מחדש את האופטימיזציה
בחר משקל עבור total_variation_loss :
total_variation_weight=30
כעת כלול אותו בפונקציית train_step :
@tf.function()
def train_step(image):
  with tf.GradientTape() as tape:
    outputs = extractor(image)
    loss = style_content_loss(outputs)
    loss += total_variation_weight*tf.image.total_variation(image)

  grad = tape.gradient(loss, image)
  opt.apply_gradients([(grad, image)])
  image.assign(clip_0_1(image))
אתחול מחדש את משתנה האופטימיזציה:
image = tf.Variable(content_image)
והפעל את האופטימיזציה:
import time
start = time.time()

epochs = 10
steps_per_epoch = 100

step = 0
for n in range(epochs):
  for m in range(steps_per_epoch):
    step += 1
    train_step(image)
    print(".", end='', flush=True)
  display.clear_output(wait=True)
  display.display(tensor_to_image(image))
  print("Train step: {}".format(step))

end = time.time()
print("Total time: {:.1f}".format(end-start))
Train step: 1000
Total time: 22.4
לבסוף, שמור את התוצאה:
file_name = 'stylized-image.png'
tensor_to_image(image).save(file_name)

try:
  from google.colab import files
except ImportError:
   pass
else:
  files.download(file_name)
למד עוד
מדריך זה מדגים את אלגוריתם העברת הסגנון המקורי. ליישום פשוט של העברת סגנון, עיין במדריך זה כדי ללמוד עוד על אופן השימוש במודל העברת סגנון תמונה שרירותי מ- TensorFlow Hub .