
| | |  ดูแหล่งที่มาบน GitHub ดูแหล่งที่มาบน GitHub |
tf.data API ช่วยให้คุณสร้างไพพ์ไลน์อินพุตที่ซับซ้อนจากชิ้นส่วนที่เรียบง่ายและนำกลับมาใช้ใหม่ได้ ตัวอย่างเช่น ไปป์ไลน์สำหรับโมเดลรูปภาพอาจรวมข้อมูลจากไฟล์ในระบบไฟล์แบบกระจาย ใช้การรบกวนแบบสุ่มกับแต่ละรูปภาพ และรวมรูปภาพที่เลือกแบบสุ่มเข้าเป็นกลุ่มสำหรับการฝึก ไปป์ไลน์สำหรับโมเดลข้อความอาจเกี่ยวข้องกับการดึงสัญลักษณ์จากข้อมูลข้อความดิบ แปลงเป็นตัวบ่งชี้ที่ฝังด้วยตารางค้นหา และการรวมลำดับที่มีความยาวต่างกัน tf.data API ทำให้สามารถจัดการข้อมูลจำนวนมาก อ่านจากรูปแบบข้อมูลต่างๆ และดำเนินการแปลงที่ซับซ้อนได้
tf.data API แนะนำสิ่งที่เป็นนามธรรมของ tf.data.Dataset ที่แสดงถึงลำดับขององค์ประกอบ ซึ่งแต่ละองค์ประกอบประกอบด้วยส่วนประกอบตั้งแต่หนึ่งองค์ประกอบขึ้นไป ตัวอย่างเช่น ในไปป์ไลน์รูปภาพ องค์ประกอบอาจเป็นตัวอย่างการฝึกเดี่ยว โดยมีองค์ประกอบเทนเซอร์คู่หนึ่งแทนรูปภาพและป้ายกำกับ
มีสองวิธีที่แตกต่างกันในการสร้างชุดข้อมูล:
แหล่ง ข้อมูลสร้าง
Datasetจากข้อมูลที่จัดเก็บไว้ในหน่วยความจำหรือในไฟล์ตั้งแต่หนึ่งไฟล์ขึ้นไปการ แปลง ข้อมูลจะสร้างชุดข้อมูลจากออบเจ็กต์
tf.data.Datasetตั้งแต่หนึ่งรายการขึ้นไป
import tensorflow as tf
import pathlib
import os
import matplotlib.pyplot as plt
import pandas as pd
import numpy as np

np.set_printoptions(precision=4)
กลศาสตร์พื้นฐาน
ในการสร้างไพพ์ไลน์อินพุต คุณต้องเริ่มต้นด้วย แหล่ง ข้อมูล ตัวอย่างเช่น ในการสร้าง Dataset จากข้อมูลในหน่วยความจำ คุณสามารถใช้ tf.data.Dataset.from_tensors() หรือ tf.data.Dataset.from_tensor_slices() หรือหากข้อมูลที่ป้อนของคุณถูกเก็บไว้ในไฟล์ในรูปแบบ TFRecord ที่แนะนำ คุณสามารถใช้ tf.data.TFRecordDataset()
เมื่อคุณมีอ็อบเจ็กต์ Dataset แล้ว คุณสามารถ แปลง เป็น Dataset ใหม่ได้โดยการผูกเมธอดบนอ็อบเจ็กต์ tf.data.Dataset ตัวอย่างเช่น คุณสามารถใช้การแปลงต่อองค์ประกอบ เช่น Dataset.map() และการแปลงหลายองค์ประกอบ เช่น Dataset.batch() ดูเอกสารประกอบสำหรับ tf.data.Dataset สำหรับรายการการแปลงทั้งหมด
วัตถุ Dataset เป็น Python iterable สิ่งนี้ทำให้สามารถใช้องค์ประกอบโดยใช้ for loop:
dataset = tf.data.Dataset.from_tensor_slices([8, 3, 0, 8, 2, 1])
dataset
<TensorSliceDataset element_spec=TensorSpec(shape=(), dtype=tf.int32, name=None)>
for elem in dataset:
  print(elem.numpy())
8
3
0
8
2
1
หรือโดยการสร้าง Python iterator อย่างชัดเจนโดยใช้ iter และใช้องค์ประกอบโดยใช้ next :
it = iter(dataset)

print(next(it).numpy())
8
อีกทางหนึ่ง สามารถใช้องค์ประกอบชุดข้อมูลได้โดยใช้การ reduce การแปลง ซึ่งลดองค์ประกอบทั้งหมดเพื่อสร้างผลลัพธ์เดียว ตัวอย่างต่อไปนี้แสดงให้เห็นวิธีการใช้การแปลงแบบ reduce เพื่อคำนวณผลรวมของชุดข้อมูลของจำนวนเต็ม
print(dataset.reduce(0, lambda state, value: state + value).numpy())
22
โครงสร้างชุดข้อมูล
ชุดข้อมูลสร้างลำดับของ องค์ประกอบ โดยที่แต่ละองค์ประกอบมีโครงสร้าง (ซ้อนกัน) ของ ส่วนประกอบ เดียวกัน ส่วนประกอบแต่ละรายการของโครงสร้างสามารถเป็นประเภทใดก็ได้ที่ tf.TypeSpec เป็นตัวแทนได้ รวมถึง tf.Tensor , tf.sparse.SparseTensor , tf.RaggedTensor , tf.TensorArray หรือ tf.data.Dataset
โครงสร้าง Python ที่ใช้เพื่อแสดงโครงสร้าง (ซ้อนกัน) ขององค์ประกอบ ได้แก่ tuple , dict , NamedTuple และ OrderedDict โดยเฉพาะอย่างยิ่ง list ไม่ใช่โครงสร้างที่ถูกต้องสำหรับการแสดงโครงสร้างขององค์ประกอบชุดข้อมูล นี่เป็นเพราะว่าผู้ใช้ tuple ในยุคแรกๆ รู้สึกหนักใจกับ list อินพุต (เช่น ส่งผ่านไปยัง tf.data.Dataset.from_tensors ) ที่บรรจุโดยอัตโนมัติเป็นเทนเซอร์และ list เอาท์พุต ดังนั้น หากคุณต้องการให้ list อินพุตถูกจัดเป็นโครงสร้าง คุณต้องแปลงเป็น tuple และหากคุณต้องการให้เอาต์พุต list เป็นส่วนประกอบเดียว คุณจะต้องแพ็คมันอย่างชัดเจนโดยใช้ tf.stack .
คุณสมบัติ Dataset.element_spec ช่วยให้คุณตรวจสอบประเภทขององค์ประกอบแต่ละองค์ประกอบได้ คุณสมบัติส่งคืน โครงสร้างที่ซ้อนกัน ของ tf.TypeSpec ซึ่งตรงกับโครงสร้างขององค์ประกอบ ซึ่งอาจเป็นส่วนประกอบเดียว ทูเพิลของส่วนประกอบ หรือทูเพิลที่ซ้อนกันของส่วนประกอบ ตัวอย่างเช่น:
dataset1 = tf.data.Dataset.from_tensor_slices(tf.random.uniform([4, 10]))

dataset1.element_spec
TensorSpec(shape=(10,), dtype=tf.float32, name=None)
dataset2 = tf.data.Dataset.from_tensor_slices(
   (tf.random.uniform([4]),
    tf.random.uniform([4, 100], maxval=100, dtype=tf.int32)))

dataset2.element_spec
(TensorSpec(shape=(), dtype=tf.float32, name=None),
 TensorSpec(shape=(100,), dtype=tf.int32, name=None))
dataset3 = tf.data.Dataset.zip((dataset1, dataset2))

dataset3.element_spec
(TensorSpec(shape=(10,), dtype=tf.float32, name=None),
 (TensorSpec(shape=(), dtype=tf.float32, name=None),
  TensorSpec(shape=(100,), dtype=tf.int32, name=None)))
# Dataset containing a sparse tensor.
dataset4 = tf.data.Dataset.from_tensors(tf.SparseTensor(indices=[[0, 0], [1, 2]], values=[1, 2], dense_shape=[3, 4]))

dataset4.element_spec
SparseTensorSpec(TensorShape([3, 4]), tf.int32)
# Use value_type to see the type of value represented by the element spec
dataset4.element_spec.value_type
tensorflow.python.framework.sparse_tensor.SparseTensor
การแปลง Dataset ข้อมูลรองรับชุดข้อมูลของโครงสร้างใดๆ เมื่อใช้การ Dataset.map() และ Dataset.filter() ซึ่งใช้ฟังก์ชันกับแต่ละองค์ประกอบ โครงสร้างองค์ประกอบจะกำหนดอาร์กิวเมนต์ของฟังก์ชัน:
dataset1 = tf.data.Dataset.from_tensor_slices(
    tf.random.uniform([4, 10], minval=1, maxval=10, dtype=tf.int32))

dataset1
<TensorSliceDataset element_spec=TensorSpec(shape=(10,), dtype=tf.int32, name=None)>
for z in dataset1:
  print(z.numpy())
[3 3 7 5 9 8 4 2 3 7]
[8 9 6 7 5 6 1 6 2 3]
[9 8 4 4 8 7 1 5 6 7]
[5 9 5 4 2 5 7 8 8 8]
dataset2 = tf.data.Dataset.from_tensor_slices(
   (tf.random.uniform([4]),
    tf.random.uniform([4, 100], maxval=100, dtype=tf.int32)))

dataset2
<TensorSliceDataset element_spec=(TensorSpec(shape=(), dtype=tf.float32, name=None), TensorSpec(shape=(100,), dtype=tf.int32, name=None))>
dataset3 = tf.data.Dataset.zip((dataset1, dataset2))

dataset3
<ZipDataset element_spec=(TensorSpec(shape=(10,), dtype=tf.int32, name=None), (TensorSpec(shape=(), dtype=tf.float32, name=None), TensorSpec(shape=(100,), dtype=tf.int32, name=None)))>
for a, (b,c) in dataset3:
  print('shapes: {a.shape}, {b.shape}, {c.shape}'.format(a=a, b=b, c=c))
shapes: (10,), (), (100,)
shapes: (10,), (), (100,)
shapes: (10,), (), (100,)
shapes: (10,), (), (100,)
การอ่านข้อมูลเข้า
การใช้อาร์เรย์ NumPy
ดูการ โหลดอาร์เรย์ NumPy สำหรับตัวอย่างเพิ่มเติม
หากข้อมูลที่ป้อนเข้าทั้งหมดของคุณพอดีกับหน่วยความจำ วิธีที่ง่ายที่สุดในการสร้าง Dataset จากข้อมูลเหล่านั้นคือการแปลงเป็นวัตถุ tf.Tensor และใช้ Dataset.from_tensor_slices()
train, test = tf.keras.datasets.fashion_mnist.load_data()
Downloading data from https://storage.googleapis.com/tensorflow/tf-keras-datasets/train-labels-idx1-ubyte.gz
32768/29515 [=================================] - 0s 0us/step
40960/29515 [=========================================] - 0s 0us/step
Downloading data from https://storage.googleapis.com/tensorflow/tf-keras-datasets/train-images-idx3-ubyte.gz
26427392/26421880 [==============================] - 0s 0us/step
26435584/26421880 [==============================] - 0s 0us/step
Downloading data from https://storage.googleapis.com/tensorflow/tf-keras-datasets/t10k-labels-idx1-ubyte.gz
16384/5148 [===============================================================================================] - 0s 0us/step
Downloading data from https://storage.googleapis.com/tensorflow/tf-keras-datasets/t10k-images-idx3-ubyte.gz
4423680/4422102 [==============================] - 0s 0us/step
4431872/4422102 [==============================] - 0s 0us/step
images, labels = train
images = images/255

dataset = tf.data.Dataset.from_tensor_slices((images, labels))
dataset
<TensorSliceDataset element_spec=(TensorSpec(shape=(28, 28), dtype=tf.float64, name=None), TensorSpec(shape=(), dtype=tf.uint8, name=None))>
การใช้เครื่องกำเนิด Python
แหล่งข้อมูลทั่วไปอีกแหล่งหนึ่งที่สามารถนำเข้ามาเป็น tf.data.Dataset ได้อย่างง่ายดายคือตัวสร้างหลาม
def count(stop):
  i = 0
  while i<stop:
    yield i
    i += 1
for n in count(5):
  print(n)
0
1
2
3
4
ตัวสร้าง Dataset.from_generator แปลงตัวสร้างหลามเป็น tf.data.Dataset ที่ทำงานได้อย่างสมบูรณ์
ตัวสร้างรับ callable เป็นอินพุต ไม่ใช่ตัววนซ้ำ ซึ่งช่วยให้สามารถรีสตาร์ทเครื่องกำเนิดไฟฟ้าเมื่อถึงจุดสิ้นสุด ใช้ args ที่เป็นตัวเลือก ซึ่งส่งผ่านเป็นอาร์กิวเมนต์ของ callable
จำเป็นต้องมีอาร์กิวเมนต์ output_types เนื่องจาก tf.data สร้าง tf.Graph ภายใน และขอบกราฟต้องการ tf.dtype
ds_counter = tf.data.Dataset.from_generator(count, args=[25], output_types=tf.int32, output_shapes = (), )
for count_batch in ds_counter.repeat().batch(10).take(10):
  print(count_batch.numpy())
[0 1 2 3 4 5 6 7 8 9]
[10 11 12 13 14 15 16 17 18 19]
[20 21 22 23 24  0  1  2  3  4]
[ 5  6  7  8  9 10 11 12 13 14]
[15 16 17 18 19 20 21 22 23 24]
[0 1 2 3 4 5 6 7 8 9]
[10 11 12 13 14 15 16 17 18 19]
[20 21 22 23 24  0  1  2  3  4]
[ 5  6  7  8  9 10 11 12 13 14]
[15 16 17 18 19 20 21 22 23 24]
ไม่ จำเป็นต้องใช้ อาร์กิวเมนต์ output_shapes แต่ขอแนะนำเป็นอย่างยิ่ง เนื่องจากการดำเนินการ TensorFlow จำนวนมากไม่สนับสนุนเทนเซอร์ที่มีอันดับที่ไม่รู้จัก หากไม่ทราบความยาวของแกนเฉพาะหรือตัวแปร ให้ตั้งค่าเป็น None ใน output_shapes
สิ่งสำคัญที่ควรทราบคือ output_shapes และ output_types เป็นไปตามกฎการซ้อนแบบเดียวกันกับวิธีชุดข้อมูลอื่นๆ
นี่คือตัวอย่างเครื่องกำเนิดที่แสดงให้เห็นทั้งสองลักษณะ โดยจะคืนค่าทูเพิลของอาร์เรย์ โดยที่อาร์เรย์ที่สองเป็นเวกเตอร์ที่ไม่ทราบความยาว
def gen_series():
  i = 0
  while True:
    size = np.random.randint(0, 10)
    yield i, np.random.normal(size=(size,))
    i += 1
for i, series in gen_series():
  print(i, ":", str(series))
  if i > 5:
    break
0 : [0.3939]
1 : [ 0.9282 -0.0158  1.0096  0.7155  0.0491  0.6697 -0.2565  0.487 ]
2 : [-0.4831  0.37   -1.3918 -0.4786  0.7425 -0.3299]
3 : [ 0.1427 -1.0438  0.821  -0.8766 -0.8369  0.4168]
4 : [-1.4984 -1.8424  0.0337  0.0941  1.3286 -1.4938]
5 : [-1.3158 -1.2102  2.6887 -1.2809]
6 : []
เอาต์พุตแรกคือ int32 เอาต์พุตที่สองคือ float32
รายการแรกเป็นสเกลาร์ รูปร่าง () และรายการที่สองคือเวกเตอร์ที่ไม่ทราบความยาว รูปร่าง (None,)
ds_series = tf.data.Dataset.from_generator(
    gen_series,
    output_types=(tf.int32, tf.float32),
    output_shapes=((), (None,)))

ds_series
<FlatMapDataset element_spec=(TensorSpec(shape=(), dtype=tf.int32, name=None), TensorSpec(shape=(None,), dtype=tf.float32, name=None))>
ตอนนี้สามารถใช้งานได้เหมือน tf.data.Dataset ปกติ โปรดทราบว่าเมื่อทำการแบทช์ชุดข้อมูลที่มีรูปร่างแปรผัน คุณต้องใช้ Dataset.padded_batch
ds_series_batch = ds_series.shuffle(20).padded_batch(10)

ids, sequence_batch = next(iter(ds_series_batch))
print(ids.numpy())
print()
print(sequence_batch.numpy())
[ 8 10 18  1  5 19 22 17 21 25]

[[-0.6098  0.1366 -2.15   -0.9329  0.      0.    ]
 [ 1.0295 -0.033  -0.0388  0.      0.      0.    ]
 [-0.1137  0.3552  0.4363 -0.2487 -1.1329  0.    ]
 [ 0.      0.      0.      0.      0.      0.    ]
 [-1.0466  0.624  -1.7705  1.4214  0.9143 -0.62  ]
 [-0.9502  1.7256  0.5895  0.7237  1.5397  0.    ]
 [ 0.3747  1.2967  0.      0.      0.      0.    ]
 [-0.4839  0.292  -0.7909 -0.7535  0.4591 -1.3952]
 [-0.0468  0.0039 -1.1185 -1.294   0.      0.    ]
 [-0.1679 -0.3375  0.      0.      0.      0.    ]]
สำหรับตัวอย่างที่สมจริงยิ่งขึ้น ให้ลองตัด preprocessing.image.ImageDataGenerator เป็น tf.data.Dataset
ขั้นแรกให้ดาวน์โหลดข้อมูล:
flowers = tf.keras.utils.get_file(
    'flower_photos',
    'https://storage.googleapis.com/download.tensorflow.org/example_images/flower_photos.tgz',
    untar=True)
Downloading data from https://storage.googleapis.com/download.tensorflow.org/example_images/flower_photos.tgz
228818944/228813984 [==============================] - 10s 0us/step
228827136/228813984 [==============================] - 10s 0us/step
สร้างภาพ image.ImageDataGenerator
img_gen = tf.keras.preprocessing.image.ImageDataGenerator(rescale=1./255, rotation_range=20)
images, labels = next(img_gen.flow_from_directory(flowers))
Found 3670 images belonging to 5 classes.
print(images.dtype, images.shape)
print(labels.dtype, labels.shape)
float32 (32, 256, 256, 3)
float32 (32, 5)
ds = tf.data.Dataset.from_generator(
    lambda: img_gen.flow_from_directory(flowers),
    output_types=(tf.float32, tf.float32),
    output_shapes=([32,256,256,3], [32,5])
)

ds.element_spec
(TensorSpec(shape=(32, 256, 256, 3), dtype=tf.float32, name=None),
 TensorSpec(shape=(32, 5), dtype=tf.float32, name=None))
for images, label in ds.take(1):
  print('images.shape: ', images.shape)
  print('labels.shape: ', labels.shape)
Found 3670 images belonging to 5 classes.
images.shape:  (32, 256, 256, 3)
labels.shape:  (32, 5)
กำลังใช้ข้อมูล TFRecord
ดูการ โหลด TFRecords สำหรับตัวอย่างแบบ end-to-end
tf.data API รองรับไฟล์รูปแบบต่างๆ เพื่อให้คุณสามารถประมวลผลชุดข้อมูลขนาดใหญ่ที่ไม่พอดีกับหน่วยความจำ ตัวอย่างเช่น รูปแบบไฟล์ TFRecord เป็นรูปแบบไบนารีเชิงบันทึกอย่างง่ายที่แอปพลิเคชั่น TensorFlow จำนวนมากใช้สำหรับข้อมูลการฝึกอบรม คลาส tf.data.TFRecordDataset ช่วยให้คุณสามารถสตรีมเนื้อหาของไฟล์ TFRecord ตั้งแต่หนึ่งไฟล์ขึ้นไปโดยเป็นส่วนหนึ่งของไปป์ไลน์อินพุต
นี่คือตัวอย่างการใช้ไฟล์ทดสอบจาก French Street Name Signs (FSNS)
# Creates a dataset that reads all of the examples from two files.
fsns_test_file = tf.keras.utils.get_file("fsns.tfrec", "https://storage.googleapis.com/download.tensorflow.org/data/fsns-20160927/testdata/fsns-00000-of-00001")
Downloading data from https://storage.googleapis.com/download.tensorflow.org/data/fsns-20160927/testdata/fsns-00000-of-00001
7905280/7904079 [==============================] - 1s 0us/step
7913472/7904079 [==============================] - 1s 0us/step
ตัวยึดตำแหน่ง60
อาร์กิวเมนต์ filenames สำหรับตัวเริ่มต้น TFRecordDataset สามารถเป็นสตริง รายการสตริง หรือ tf.Tensor ของสตริง ดังนั้น หากคุณมีไฟล์สองชุดสำหรับการฝึกอบรมและการตรวจสอบ คุณสามารถสร้างวิธีการจากโรงงานที่สร้างชุดข้อมูล โดยใช้ชื่อไฟล์เป็นอาร์กิวเมนต์อินพุต:
dataset = tf.data.TFRecordDataset(filenames = [fsns_test_file])
dataset
<TFRecordDatasetV2 element_spec=TensorSpec(shape=(), dtype=tf.string, name=None)>
โครงการ TensorFlow หลายโครงการใช้ระเบียน tf.train.Example อนุกรมในไฟล์ TFRecord ต้องถอดรหัสเหล่านี้ก่อนจึงจะสามารถตรวจสอบได้:
raw_example = next(iter(dataset))
parsed = tf.train.Example.FromString(raw_example.numpy())

parsed.features.feature['image/text']
bytes_list {
  value: "Rue Perreyon"
}
การใช้ข้อมูลข้อความ
ดูการ โหลดข้อความ สำหรับตัวอย่างตั้งแต่ต้นจนจบ
ชุดข้อมูลจำนวนมากถูกแจกจ่ายเป็นไฟล์ข้อความตั้งแต่หนึ่งไฟล์ขึ้นไป tf.data.TextLineDataset มีวิธีง่ายๆ ในการแยกบรรทัดจากไฟล์ข้อความตั้งแต่หนึ่งไฟล์ขึ้นไป กำหนดชื่อไฟล์ตั้งแต่หนึ่งชื่อขึ้นไป TextLineDataset จะสร้างองค์ประกอบค่าสตริงหนึ่งรายการต่อบรรทัดของไฟล์เหล่านั้น
directory_url = 'https://storage.googleapis.com/download.tensorflow.org/data/illiad/'
file_names = ['cowper.txt', 'derby.txt', 'butler.txt']

file_paths = [
    tf.keras.utils.get_file(file_name, directory_url + file_name)
    for file_name in file_names
]
Downloading data from https://storage.googleapis.com/download.tensorflow.org/data/illiad/cowper.txt
819200/815980 [==============================] - 0s 0us/step
827392/815980 [==============================] - 0s 0us/step
Downloading data from https://storage.googleapis.com/download.tensorflow.org/data/illiad/derby.txt
811008/809730 [==============================] - 0s 0us/step
819200/809730 [==============================] - 0s 0us/step
Downloading data from https://storage.googleapis.com/download.tensorflow.org/data/illiad/butler.txt
811008/807992 [==============================] - 0s 0us/step
819200/807992 [==============================] - 0s 0us/step
dataset = tf.data.TextLineDataset(file_paths)
ต่อไปนี้คือสองสามบรรทัดแรกของไฟล์แรก:
for line in dataset.take(5):
  print(line.numpy())
b"\xef\xbb\xbfAchilles sing, O Goddess! Peleus' son;"
b'His wrath pernicious, who ten thousand woes'
b"Caused to Achaia's host, sent many a soul"
b'Illustrious into Ades premature,'
b'And Heroes gave (so stood the will of Jove)'
หากต้องการสลับบรรทัดระหว่างไฟล์ ให้ใช้ Dataset.interleave ทำให้ง่ายต่อการสับไฟล์ร่วมกัน ต่อไปนี้คือบรรทัดแรก สอง และสามจากการแปลแต่ละรายการ:
files_ds = tf.data.Dataset.from_tensor_slices(file_paths)
lines_ds = files_ds.interleave(tf.data.TextLineDataset, cycle_length=3)

for i, line in enumerate(lines_ds.take(9)):
  if i % 3 == 0:
    print()
  print(line.numpy())
b"\xef\xbb\xbfAchilles sing, O Goddess! Peleus' son;"
b"\xef\xbb\xbfOf Peleus' son, Achilles, sing, O Muse,"
b'\xef\xbb\xbfSing, O goddess, the anger of Achilles son of Peleus, that brought'

b'His wrath pernicious, who ten thousand woes'
b'The vengeance, deep and deadly; whence to Greece'
b'countless ills upon the Achaeans. Many a brave soul did it send'

b"Caused to Achaia's host, sent many a soul"
b'Unnumbered ills arose; which many a soul'
b'hurrying down to Hades, and many a hero did it yield a prey to dogs and'
โดยค่าเริ่มต้น TextLineDataset จะให้ผลลัพธ์ ทุก บรรทัดของแต่ละไฟล์ ซึ่งอาจไม่เป็นที่ต้องการ ตัวอย่างเช่น หากไฟล์เริ่มต้นด้วยบรรทัดส่วนหัว หรือมีความคิดเห็น บรรทัดเหล่านี้สามารถลบออกได้โดยใช้การ Dataset.skip() หรือ Dataset.filter() ที่นี่ คุณข้ามบรรทัดแรก แล้วกรองเพื่อค้นหาเฉพาะผู้รอดชีวิต
titanic_file = tf.keras.utils.get_file("train.csv", "https://storage.googleapis.com/tf-datasets/titanic/train.csv")
titanic_lines = tf.data.TextLineDataset(titanic_file)
Downloading data from https://storage.googleapis.com/tf-datasets/titanic/train.csv
32768/30874 [===============================] - 0s 0us/step
40960/30874 [=======================================] - 0s 0us/step
for line in titanic_lines.take(10):
  print(line.numpy())
b'survived,sex,age,n_siblings_spouses,parch,fare,class,deck,embark_town,alone'
b'0,male,22.0,1,0,7.25,Third,unknown,Southampton,n'
b'1,female,38.0,1,0,71.2833,First,C,Cherbourg,n'
b'1,female,26.0,0,0,7.925,Third,unknown,Southampton,y'
b'1,female,35.0,1,0,53.1,First,C,Southampton,n'
b'0,male,28.0,0,0,8.4583,Third,unknown,Queenstown,y'
b'0,male,2.0,3,1,21.075,Third,unknown,Southampton,n'
b'1,female,27.0,0,2,11.1333,Third,unknown,Southampton,n'
b'1,female,14.0,1,0,30.0708,Second,unknown,Cherbourg,n'
b'1,female,4.0,1,1,16.7,Third,G,Southampton,n'
def survived(line):
  return tf.not_equal(tf.strings.substr(line, 0, 1), "0")

survivors = titanic_lines.skip(1).filter(survived)
for line in survivors.take(10):
  print(line.numpy())
b'1,female,38.0,1,0,71.2833,First,C,Cherbourg,n'
b'1,female,26.0,0,0,7.925,Third,unknown,Southampton,y'
b'1,female,35.0,1,0,53.1,First,C,Southampton,n'
b'1,female,27.0,0,2,11.1333,Third,unknown,Southampton,n'
b'1,female,14.0,1,0,30.0708,Second,unknown,Cherbourg,n'
b'1,female,4.0,1,1,16.7,Third,G,Southampton,n'
b'1,male,28.0,0,0,13.0,Second,unknown,Southampton,y'
b'1,female,28.0,0,0,7.225,Third,unknown,Cherbourg,y'
b'1,male,28.0,0,0,35.5,First,A,Southampton,y'
b'1,female,38.0,1,5,31.3875,Third,unknown,Southampton,n'
การใช้ข้อมูล CSV
ดู การ โหลดไฟล์ CSV และ การ โหลด Pandas DataFrames สำหรับตัวอย่างเพิ่มเติม
รูปแบบไฟล์ CSV เป็นรูปแบบที่นิยมสำหรับการจัดเก็บข้อมูลแบบตารางในข้อความธรรมดา
ตัวอย่างเช่น:
titanic_file = tf.keras.utils.get_file("train.csv", "https://storage.googleapis.com/tf-datasets/titanic/train.csv")
df = pd.read_csv(titanic_file)
df.head()
หากข้อมูลของคุณพอดีกับหน่วยความจำ เมธอด Dataset.from_tensor_slices เดียวกันนี้ใช้ได้กับพจนานุกรม ทำให้นำเข้าข้อมูลนี้ได้อย่างง่ายดาย:
titanic_slices = tf.data.Dataset.from_tensor_slices(dict(df))

for feature_batch in titanic_slices.take(1):
  for key, value in feature_batch.items():
    print("  {!r:20s}: {}".format(key, value))
'survived'          : 0
  'sex'               : b'male'
  'age'               : 22.0
  'n_siblings_spouses': 1
  'parch'             : 0
  'fare'              : 7.25
  'class'             : b'Third'
  'deck'              : b'unknown'
  'embark_town'       : b'Southampton'
  'alone'             : b'n'
แนวทางที่ปรับขนาดได้มากขึ้นคือการโหลดจากดิสก์เท่าที่จำเป็น
โมดูล tf.data มีวิธีการแยกบันทึกจากไฟล์ CSV ตั้งแต่หนึ่งไฟล์ขึ้นไปที่สอดคล้องกับ RFC 4180
ฟังก์ชัน experimental.make_csv_dataset เป็นอินเทอร์เฟซระดับสูงสำหรับการอ่านชุดไฟล์ csv รองรับการอนุมานประเภทคอลัมน์และคุณสมบัติอื่นๆ เช่น การแบ่งกลุ่มและการสับเปลี่ยน เพื่อให้การใช้งานง่ายขึ้น
titanic_batches = tf.data.experimental.make_csv_dataset(
    titanic_file, batch_size=4,
    label_name="survived")
for feature_batch, label_batch in titanic_batches.take(1):
  print("'survived': {}".format(label_batch))
  print("features:")
  for key, value in feature_batch.items():
    print("  {!r:20s}: {}".format(key, value))
'survived': [1 0 0 0]
features:
  'sex'               : [b'female' b'female' b'male' b'male']
  'age'               : [32. 28. 37. 50.]
  'n_siblings_spouses': [0 3 0 0]
  'parch'             : [0 1 1 0]
  'fare'              : [13.     25.4667 29.7    13.    ]
  'class'             : [b'Second' b'Third' b'First' b'Second']
  'deck'              : [b'unknown' b'unknown' b'C' b'unknown']
  'embark_town'       : [b'Southampton' b'Southampton' b'Cherbourg' b'Southampton']
  'alone'             : [b'y' b'n' b'n' b'y']
คุณสามารถใช้อาร์กิวเมนต์ select_columns หากต้องการเพียงชุดย่อยของคอลัมน์
titanic_batches = tf.data.experimental.make_csv_dataset(
    titanic_file, batch_size=4,
    label_name="survived", select_columns=['class', 'fare', 'survived'])
for feature_batch, label_batch in titanic_batches.take(1):
  print("'survived': {}".format(label_batch))
  for key, value in feature_batch.items():
    print("  {!r:20s}: {}".format(key, value))
'survived': [0 1 1 0]
  'fare'              : [ 7.05 15.5  26.25  8.05]
  'class'             : [b'Third' b'Third' b'Second' b'Third']
นอกจากนี้ยังมีคลาส experimental.CsvDataset ระดับล่าง ซึ่งให้การควบคุมที่ละเอียดยิ่งขึ้น ไม่สนับสนุนการอนุมานประเภทคอลัมน์ คุณต้องระบุประเภทของแต่ละคอลัมน์แทน
titanic_types  = [tf.int32, tf.string, tf.float32, tf.int32, tf.int32, tf.float32, tf.string, tf.string, tf.string, tf.string]
dataset = tf.data.experimental.CsvDataset(titanic_file, titanic_types , header=True)

for line in dataset.take(10):
  print([item.numpy() for item in line])
[0, b'male', 22.0, 1, 0, 7.25, b'Third', b'unknown', b'Southampton', b'n']
[1, b'female', 38.0, 1, 0, 71.2833, b'First', b'C', b'Cherbourg', b'n']
[1, b'female', 26.0, 0, 0, 7.925, b'Third', b'unknown', b'Southampton', b'y']
[1, b'female', 35.0, 1, 0, 53.1, b'First', b'C', b'Southampton', b'n']
[0, b'male', 28.0, 0, 0, 8.4583, b'Third', b'unknown', b'Queenstown', b'y']
[0, b'male', 2.0, 3, 1, 21.075, b'Third', b'unknown', b'Southampton', b'n']
[1, b'female', 27.0, 0, 2, 11.1333, b'Third', b'unknown', b'Southampton', b'n']
[1, b'female', 14.0, 1, 0, 30.0708, b'Second', b'unknown', b'Cherbourg', b'n']
[1, b'female', 4.0, 1, 1, 16.7, b'Third', b'G', b'Southampton', b'n']
[0, b'male', 20.0, 0, 0, 8.05, b'Third', b'unknown', b'Southampton', b'y']
หากบางคอลัมน์ว่างเปล่า อินเทอร์เฟซระดับต่ำนี้จะให้คุณระบุค่าเริ่มต้นแทนประเภทคอลัมน์ได้
%%writefile missing.csv
1,2,3,4
,2,3,4
1,,3,4
1,2,,4
1,2,3,
,,,
Writing missing.csv
# Creates a dataset that reads all of the records from two CSV files, each with
# four float columns which may have missing values.

record_defaults = [999,999,999,999]
dataset = tf.data.experimental.CsvDataset("missing.csv", record_defaults)
dataset = dataset.map(lambda *items: tf.stack(items))
dataset
<MapDataset element_spec=TensorSpec(shape=(4,), dtype=tf.int32, name=None)>
for line in dataset:
  print(line.numpy())
[1 2 3 4]
[999   2   3   4]
[  1 999   3   4]
[  1   2 999   4]
[  1   2   3 999]
[999 999 999 999]
ตามค่าเริ่มต้น CsvDataset จะให้ผล ทุก คอลัมน์ของ ทุก บรรทัดของไฟล์ ซึ่งอาจไม่เป็นที่ต้องการ เช่น หากไฟล์ขึ้นต้นด้วยบรรทัดส่วนหัวที่ควรละเว้น หรือถ้าบางคอลัมน์ไม่จำเป็นในอินพุต บรรทัดและฟิลด์เหล่านี้สามารถลบออกได้ด้วยอาร์กิวเมนต์ header และ select_cols ตามลำดับ
# Creates a dataset that reads all of the records from two CSV files with
# headers, extracting float data from columns 2 and 4.
record_defaults = [999, 999] # Only provide defaults for the selected columns
dataset = tf.data.experimental.CsvDataset("missing.csv", record_defaults, select_cols=[1, 3])
dataset = dataset.map(lambda *items: tf.stack(items))
dataset
<MapDataset element_spec=TensorSpec(shape=(2,), dtype=tf.int32, name=None)>
for line in dataset:
  print(line.numpy())
[2 4]
[2 4]
[999   4]
[2 4]
[  2 999]
[999 999]
การใช้ชุดไฟล์
มีชุดข้อมูลจำนวนมากที่แจกจ่ายเป็นชุดของไฟล์ โดยที่แต่ละไฟล์เป็นตัวอย่าง
flowers_root = tf.keras.utils.get_file(
    'flower_photos',
    'https://storage.googleapis.com/download.tensorflow.org/example_images/flower_photos.tgz',
    untar=True)
flowers_root = pathlib.Path(flowers_root)
ไดเร็กทอรี root มีไดเร็กทอรีสำหรับแต่ละคลาส:
for item in flowers_root.glob("*"):
  print(item.name)
sunflowers
daisy
LICENSE.txt
roses
tulips
dandelion
ตัวยึดตำแหน่ง103
ไฟล์ในแต่ละไดเร็กทอรีคลาสเป็นตัวอย่าง:
list_ds = tf.data.Dataset.list_files(str(flowers_root/'*/*'))

for f in list_ds.take(5):
  print(f.numpy())
b'/home/kbuilder/.keras/datasets/flower_photos/sunflowers/5018120483_cc0421b176_m.jpg'
b'/home/kbuilder/.keras/datasets/flower_photos/dandelion/8642679391_0805b147cb_m.jpg'
b'/home/kbuilder/.keras/datasets/flower_photos/sunflowers/8266310743_02095e782d_m.jpg'
b'/home/kbuilder/.keras/datasets/flower_photos/tulips/13176521023_4d7cc74856_m.jpg'
b'/home/kbuilder/.keras/datasets/flower_photos/dandelion/19437578578_6ab1b3c984.jpg'
ตัวยึดตำแหน่ง105
อ่านข้อมูลโดยใช้ฟังก์ชัน tf.io.read_file และแยกป้ายกำกับออกจากพาธ ส่งคืนคู่ (image, label) :
def process_path(file_path):
  label = tf.strings.split(file_path, os.sep)[-2]
  return tf.io.read_file(file_path), label

labeled_ds = list_ds.map(process_path)
for image_raw, label_text in labeled_ds.take(1):
  print(repr(image_raw.numpy()[:100]))
  print()
  print(label_text.numpy())
b'\xff\xd8\xff\xe0\x00\x10JFIF\x00\x01\x01\x00\x00\x01\x00\x01\x00\x00\xff\xe2\x0cXICC_PROFILE\x00\x01\x01\x00\x00\x0cHLino\x02\x10\x00\x00mntrRGB XYZ \x07\xce\x00\x02\x00\t\x00\x06\x001\x00\x00acspMSFT\x00\x00\x00\x00IEC sRGB\x00\x00\x00\x00\x00\x00'

b'daisy'
แบทช์องค์ประกอบชุดข้อมูล
แบทช์ง่าย
รูปแบบที่ง่ายที่สุดของแบทช์สแต็ก n อิลิเมนต์ที่ต่อเนื่องกันของชุดข้อมูลเป็นอิลิเมนต์เดียว การ Dataset.batch() ทำสิ่งนี้ทั้งหมด โดยมีข้อจำกัดเดียวกันกับตัวดำเนินการ tf.stack() ที่ใช้กับแต่ละองค์ประกอบขององค์ประกอบ: เช่น สำหรับแต่ละองค์ประกอบ i องค์ประกอบทั้งหมดต้องมีเทนเซอร์ที่มีรูปร่างเหมือนกันทุกประการ
inc_dataset = tf.data.Dataset.range(100)
dec_dataset = tf.data.Dataset.range(0, -100, -1)
dataset = tf.data.Dataset.zip((inc_dataset, dec_dataset))
batched_dataset = dataset.batch(4)

for batch in batched_dataset.take(4):
  print([arr.numpy() for arr in batch])
[array([0, 1, 2, 3]), array([ 0, -1, -2, -3])]
[array([4, 5, 6, 7]), array([-4, -5, -6, -7])]
[array([ 8,  9, 10, 11]), array([ -8,  -9, -10, -11])]
[array([12, 13, 14, 15]), array([-12, -13, -14, -15])]
ตัวยึดตำแหน่ง110
ขณะที่ tf.data พยายามเผยแพร่ข้อมูลรูปร่าง การตั้งค่าเริ่มต้นของ Dataset.batch ส่งผลให้มีขนาดแบทช์ที่ไม่รู้จักเนื่องจากแบทช์ล่าสุดอาจไม่เต็ม หมายเหตุ None ในรูปร่าง:
batched_dataset
<BatchDataset element_spec=(TensorSpec(shape=(None,), dtype=tf.int64, name=None), TensorSpec(shape=(None,), dtype=tf.int64, name=None))>ตัวยึดตำแหน่ง112
ใช้อาร์กิวเมนต์ drop_remainder เพื่อละเว้นแบทช์สุดท้ายและรับการขยายพันธุ์แบบเต็ม:
batched_dataset = dataset.batch(7, drop_remainder=True)
batched_dataset
<BatchDataset element_spec=(TensorSpec(shape=(7,), dtype=tf.int64, name=None), TensorSpec(shape=(7,), dtype=tf.int64, name=None))>
แบทช์เทนเซอร์พร้อมช่องว่างภายใน
สูตรข้างต้นใช้ได้กับเทนเซอร์ที่มีขนาดเท่ากันทั้งหมด อย่างไรก็ตาม โมเดลจำนวนมาก (เช่น โมเดลตามลำดับ) ทำงานกับข้อมูลอินพุตที่สามารถมีขนาดต่างกันได้ (เช่น ลำดับที่มีความยาวต่างกัน) ในการจัดการกรณีนี้ การแปลง Dataset.padded_batch ช่วยให้คุณสามารถแบทช์เทนเซอร์ที่มีรูปร่างต่างกันโดยระบุมิติข้อมูลอย่างน้อยหนึ่งรายการซึ่งอาจมีการเสริม
dataset = tf.data.Dataset.range(100)
dataset = dataset.map(lambda x: tf.fill([tf.cast(x, tf.int32)], x))
dataset = dataset.padded_batch(4, padded_shapes=(None,))

for batch in dataset.take(2):
  print(batch.numpy())
  print()
[[0 0 0]
 [1 0 0]
 [2 2 0]
 [3 3 3]]

[[4 4 4 4 0 0 0]
 [5 5 5 5 5 0 0]
 [6 6 6 6 6 6 0]
 [7 7 7 7 7 7 7]]
ตัวยึดตำแหน่ง116
การแปลง Dataset.padded_batch ช่วยให้คุณสามารถตั้งค่าช่องว่างภายในที่แตกต่างกันสำหรับแต่ละมิติของแต่ละองค์ประกอบ และอาจเป็นความยาวผันแปร (แสดงโดย None ในตัวอย่างด้านบน) หรือความยาวคงที่ นอกจากนี้ยังสามารถแทนที่ค่าช่องว่างภายในซึ่งมีค่าเริ่มต้นเป็น 0
เวิร์กโฟลว์การฝึกอบรม
กำลังประมวลผลหลายยุค
tf.data API นำเสนอสองวิธีหลักในการประมวลผลหลายยุคสมัยของข้อมูลเดียวกัน
วิธีที่ง่ายที่สุดในการวนซ้ำชุดข้อมูลในหลายยุคสมัยคือการใช้การ Dataset.repeat() ขั้นแรก สร้างชุดข้อมูลของข้อมูลไททานิค:
titanic_file = tf.keras.utils.get_file("train.csv", "https://storage.googleapis.com/tf-datasets/titanic/train.csv")
titanic_lines = tf.data.TextLineDataset(titanic_file)
def plot_batch_sizes(ds):
  batch_sizes = [batch.shape[0] for batch in ds]
  plt.bar(range(len(batch_sizes)), batch_sizes)
  plt.xlabel('Batch number')
  plt.ylabel('Batch size')
การใช้การ Dataset.repeat() โดยไม่มีอาร์กิวเมนต์จะทำให้อินพุตซ้ำอย่างไม่มีกำหนด
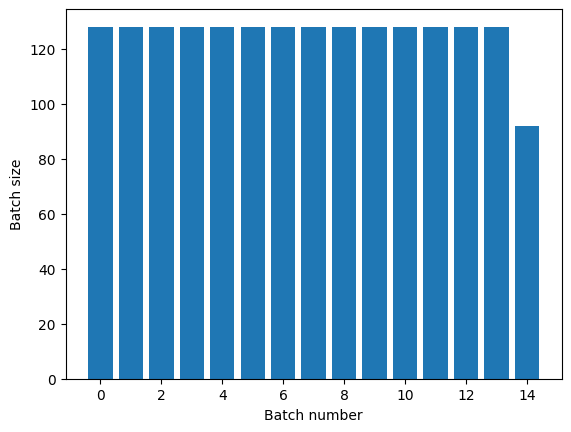
การแปลง Dataset.repeat เชื่อมอาร์กิวเมนต์เข้าด้วยกันโดยไม่ส่งสัญญาณการสิ้นสุดของยุคหนึ่งและจุดเริ่มต้นของยุคถัดไป ด้วยเหตุนี้ Dataset.batch ที่ใช้หลังจาก Dataset.repeat จะให้ผลเป็นแบตช์ที่คร่อมขอบเขตของยุค:
titanic_batches = titanic_lines.repeat(3).batch(128)
plot_batch_sizes(titanic_batches)
หากคุณต้องการการแยกยุคที่ชัดเจน ให้ใส่ Dataset.batch ก่อนการทำซ้ำ:
titanic_batches = titanic_lines.batch(128).repeat(3)

plot_batch_sizes(titanic_batches)

หากคุณต้องการดำเนินการคำนวณแบบกำหนดเอง (เช่น เพื่อรวบรวมสถิติ) เมื่อสิ้นสุดแต่ละยุค จะเป็นการง่ายที่สุดที่จะรีสตาร์ทชุดข้อมูลซ้ำในแต่ละยุค:
epochs = 3
dataset = titanic_lines.batch(128)

for epoch in range(epochs):
  for batch in dataset:
    print(batch.shape)
  print("End of epoch: ", epoch)
(128,)
(128,)
(128,)
(128,)
(116,)
End of epoch:  0
(128,)
(128,)
(128,)
(128,)
(116,)
End of epoch:  1
(128,)
(128,)
(128,)
(128,)
(116,)
End of epoch:  2
ตัวยึดตำแหน่ง122
สุ่มสับเปลี่ยนข้อมูลเข้า
การ Dataset.shuffle() จะรักษาบัฟเฟอร์ขนาดคงที่และเลือกองค์ประกอบถัดไปแบบสุ่มจากบัฟเฟอร์นั้น
เพิ่มดัชนีไปยังชุดข้อมูลเพื่อให้คุณเห็นผล:
lines = tf.data.TextLineDataset(titanic_file)
counter = tf.data.experimental.Counter()

dataset = tf.data.Dataset.zip((counter, lines))
dataset = dataset.shuffle(buffer_size=100)
dataset = dataset.batch(20)
dataset
<BatchDataset element_spec=(TensorSpec(shape=(None,), dtype=tf.int64, name=None), TensorSpec(shape=(None,), dtype=tf.string, name=None))>ตัวยึดตำแหน่ง124
เนื่องจาก buffer_size คือ 100 และขนาดชุดงานคือ 20 ชุดแรกจึงไม่มีองค์ประกอบที่มีดัชนีมากกว่า 120
n,line_batch = next(iter(dataset))
print(n.numpy())
[ 52  94  22  70  63  96  56 102  38  16  27 104  89  43  41  68  42  61
 112   8]
ตัวยึดตำแหน่ง126
เช่นเดียวกับ Dataset.batch ลำดับที่เกี่ยวข้องกับ Dataset.repeat
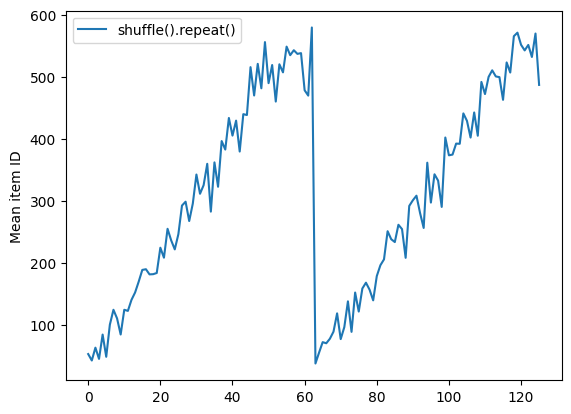
Dataset.shuffle ไม่ได้ส่งสัญญาณการสิ้นสุดของยุคจนกว่าบัฟเฟอร์การสับเปลี่ยนจะว่างเปล่า ดังนั้นการสุ่มที่วางไว้ก่อนการทำซ้ำจะแสดงทุกองค์ประกอบของยุคหนึ่งก่อนที่จะย้ายไปที่ถัดไป:
dataset = tf.data.Dataset.zip((counter, lines))
shuffled = dataset.shuffle(buffer_size=100).batch(10).repeat(2)

print("Here are the item ID's near the epoch boundary:\n")
for n, line_batch in shuffled.skip(60).take(5):
  print(n.numpy())
Here are the item ID's near the epoch boundary:

[509 595 537 550 555 591 480 627 482 519]
[522 619 538 581 569 608 531 558 461 496]
[548 489 379 607 611 622 234 525]
[ 59  38   4  90  73  84  27  51 107  12]
[77 72 91 60  7 62 92 47 70 67]
shuffle_repeat = [n.numpy().mean() for n, line_batch in shuffled]
plt.plot(shuffle_repeat, label="shuffle().repeat()")
plt.ylabel("Mean item ID")
plt.legend()
<matplotlib.legend.Legend at 0x7f7e7061c650>
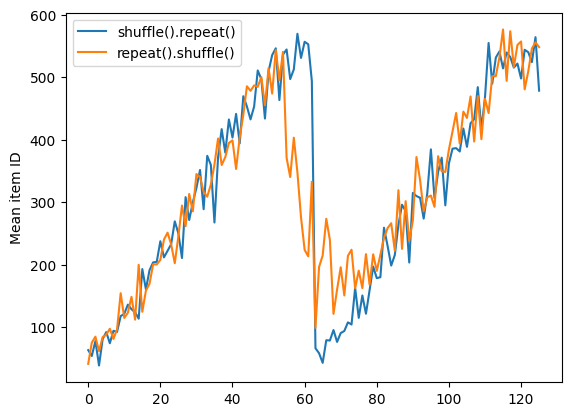
แต่ให้ทำซ้ำก่อนที่การสับเปลี่ยนจะผสมขอบเขตของยุคเข้าด้วยกัน:
dataset = tf.data.Dataset.zip((counter, lines))
shuffled = dataset.repeat(2).shuffle(buffer_size=100).batch(10)

print("Here are the item ID's near the epoch boundary:\n")
for n, line_batch in shuffled.skip(55).take(15):
  print(n.numpy())
Here are the item ID's near the epoch boundary:

[  6   8 528 604  13 492 308 441 569 475]
[  5 626 615 568  20 554 520 454  10 607]
[510 542   0 363  32 446 395 588  35   4]
[  7  15  28  23  39 559 585  49 252 556]
[581 617  25  43  26 548  29 460  48  41]
[ 19  64  24 300 612 611  36  63  69  57]
[287 605  21 512 442  33  50  68 608  47]
[625  90  91 613  67  53 606 344  16  44]
[453 448  89  45 465   2  31 618 368 105]
[565   3 586 114  37 464  12 627  30 621]
[ 82 117  72  75  84  17 571 610  18 600]
[107 597 575  88 623  86 101  81 456 102]
[122  79  51  58  80  61 367  38 537 113]
[ 71  78 598 152 143 620 100 158 133 130]
[155 151 144 135 146 121  83  27 103 134]
repeat_shuffle = [n.numpy().mean() for n, line_batch in shuffled]

plt.plot(shuffle_repeat, label="shuffle().repeat()")
plt.plot(repeat_shuffle, label="repeat().shuffle()")
plt.ylabel("Mean item ID")
plt.legend()
<matplotlib.legend.Legend at 0x7f7e706013d0>
กำลังประมวลผลข้อมูลล่วงหน้า
การ Dataset.map(f) จะสร้างชุดข้อมูลใหม่โดยใช้ฟังก์ชันที่กำหนด f กับแต่ละองค์ประกอบของชุดข้อมูลอินพุต มันขึ้นอยู่กับฟังก์ชัน map() ที่มักใช้กับรายการ (และโครงสร้างอื่นๆ) ในภาษาการเขียนโปรแกรมเชิงฟังก์ชัน ฟังก์ชัน f รับออบเจ็กต์ tf.Tensor ที่แสดงองค์ประกอบเดียวในอินพุต และส่งกลับออบเจ็กต์ tf.Tensor ที่จะเป็นตัวแทนขององค์ประกอบเดียวในชุดข้อมูลใหม่ การนำไปใช้นั้นใช้การดำเนินการมาตรฐานของ TensorFlow เพื่อแปลงองค์ประกอบหนึ่งเป็นอีกองค์ประกอบหนึ่ง
ส่วนนี้ครอบคลุมตัวอย่างทั่วไปของวิธีใช้ Dataset.map()
ถอดรหัสข้อมูลภาพและปรับขนาด
เมื่อฝึกโครงข่ายประสาทเทียมกับข้อมูลภาพจริง มักจะจำเป็นต้องแปลงรูปภาพที่มีขนาดต่างกันให้เป็นขนาดทั่วไป เพื่อที่ภาพเหล่านั้นจะถูกแบทช์เป็นขนาดคงที่
สร้างชุดข้อมูลชื่อไฟล์ดอกไม้ใหม่:
list_ds = tf.data.Dataset.list_files(str(flowers_root/'*/*'))
เขียนฟังก์ชันที่จัดการองค์ประกอบของชุดข้อมูล
# Reads an image from a file, decodes it into a dense tensor, and resizes it
# to a fixed shape.
def parse_image(filename):
  parts = tf.strings.split(filename, os.sep)
  label = parts[-2]

  image = tf.io.read_file(filename)
  image = tf.io.decode_jpeg(image)
  image = tf.image.convert_image_dtype(image, tf.float32)
  image = tf.image.resize(image, [128, 128])
  return image, label
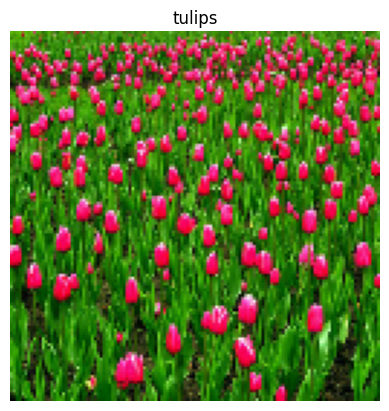
ทดสอบว่ามันใช้งานได้
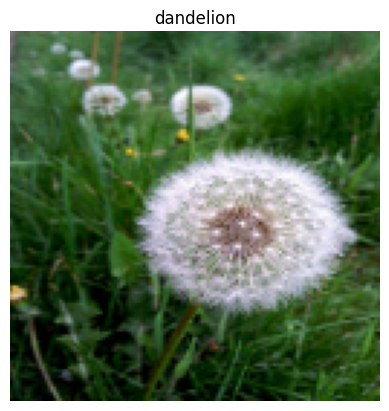
file_path = next(iter(list_ds))
image, label = parse_image(file_path)

def show(image, label):
  plt.figure()
  plt.imshow(image)
  plt.title(label.numpy().decode('utf-8'))
  plt.axis('off')

show(image, label)
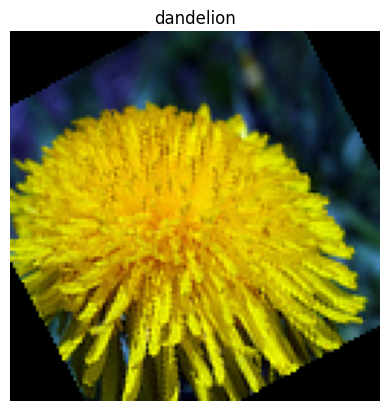
แมปไว้เหนือชุดข้อมูล
images_ds = list_ds.map(parse_image)

for image, label in images_ds.take(2):
  show(image, label)

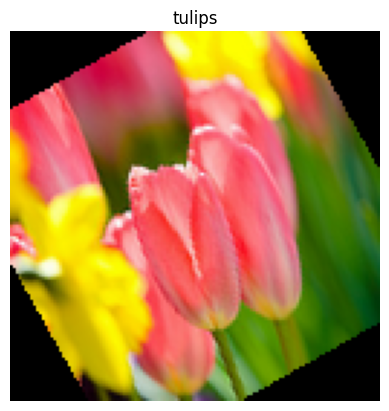
การใช้ตรรกะ Python โดยพลการ
ด้วยเหตุผลด้านประสิทธิภาพ ให้ใช้การดำเนินการ TensorFlow เพื่อประมวลผลข้อมูลล่วงหน้าทุกครั้งที่ทำได้ อย่างไรก็ตาม บางครั้งการเรียกไลบรารี Python ภายนอกเมื่อแยกวิเคราะห์ข้อมูลอินพุตของคุณก็มีประโยชน์ คุณสามารถใช้การดำเนินการ tf.py_function() ในการ Dataset.map()
ตัวอย่างเช่น หากคุณต้องการใช้การหมุนแบบสุ่ม โมดูล tf.image จะมีเพียง tf.image.rot90 ซึ่งไม่มีประโยชน์อย่างมากสำหรับการเพิ่มรูปภาพ
ในการสาธิต tf.py_function ให้ลองใช้ฟังก์ชัน scipy.ndimage.rotate แทน:
import scipy.ndimage as ndimage

def random_rotate_image(image):
  image = ndimage.rotate(image, np.random.uniform(-30, 30), reshape=False)
  return image
image, label = next(iter(images_ds))
image = random_rotate_image(image)
show(image, label)
Clipping input data to the valid range for imshow with RGB data ([0..1] for floats or [0..255] for integers).
ในการใช้ฟังก์ชันนี้กับ Dataset.map ให้ใช้คำเตือนเดียวกันกับ Dataset.from_generator คุณต้องอธิบายรูปร่างและประเภทการส่งคืนเมื่อคุณใช้ฟังก์ชัน:
def tf_random_rotate_image(image, label):
  im_shape = image.shape
  [image,] = tf.py_function(random_rotate_image, [image], [tf.float32])
  image.set_shape(im_shape)
  return image, label
rot_ds = images_ds.map(tf_random_rotate_image)

for image, label in rot_ds.take(2):
  show(image, label)
Clipping input data to the valid range for imshow with RGB data ([0..1] for floats or [0..255] for integers).
Clipping input data to the valid range for imshow with RGB data ([0..1] for floats or [0..255] for integers).

การแยกวิเคราะห์ข้อความบัฟเฟอร์โปรโตคอล tf.Example
ไปป์ไลน์อินพุตจำนวนมากแยกข้อความบัฟเฟอร์โปรโตคอล tf.train.Example จากรูปแบบ TFRecord แต่ละเร็กคอร์ด tf.train.Example มี "คุณสมบัติ" อย่างน้อยหนึ่งอย่าง และไปป์ไลน์อินพุตมักจะแปลงคุณสมบัติเหล่านี้เป็นเทนเซอร์
fsns_test_file = tf.keras.utils.get_file("fsns.tfrec", "https://storage.googleapis.com/download.tensorflow.org/data/fsns-20160927/testdata/fsns-00000-of-00001")
dataset = tf.data.TFRecordDataset(filenames = [fsns_test_file])
dataset
<TFRecordDatasetV2 element_spec=TensorSpec(shape=(), dtype=tf.string, name=None)>ตัวยึดตำแหน่ง146
คุณสามารถทำงานกับ tf.train.Example protos นอก tf.data.Dataset เพื่อทำความเข้าใจข้อมูล:
raw_example = next(iter(dataset))
parsed = tf.train.Example.FromString(raw_example.numpy())

feature = parsed.features.feature
raw_img = feature['image/encoded'].bytes_list.value[0]
img = tf.image.decode_png(raw_img)
plt.imshow(img)
plt.axis('off')
_ = plt.title(feature["image/text"].bytes_list.value[0])

raw_example = next(iter(dataset))
def tf_parse(eg):
  example = tf.io.parse_example(
      eg[tf.newaxis], {
          'image/encoded': tf.io.FixedLenFeature(shape=(), dtype=tf.string),
          'image/text': tf.io.FixedLenFeature(shape=(), dtype=tf.string)
      })
  return example['image/encoded'][0], example['image/text'][0]
img, txt = tf_parse(raw_example)
print(txt.numpy())
print(repr(img.numpy()[:20]), "...")
b'Rue Perreyon'
b'\x89PNG\r\n\x1a\n\x00\x00\x00\rIHDR\x00\x00\x02X' ...
decoded = dataset.map(tf_parse)
decoded
<MapDataset element_spec=(TensorSpec(shape=(), dtype=tf.string, name=None), TensorSpec(shape=(), dtype=tf.string, name=None))>
image_batch, text_batch = next(iter(decoded.batch(10)))
image_batch.shape
TensorShape([10])
หน้าต่างอนุกรมเวลา
สำหรับตัวอย่างอนุกรมเวลาแบบสิ้นสุดถึงสิ้นสุด โปรดดูที่: การพยากรณ์อนุกรมเวลา
ข้อมูลอนุกรมเวลามักจะถูกจัดระเบียบโดยให้แกนเวลาไม่เสียหาย
ใช้ Dataset.range อย่างง่ายเพื่อสาธิต:
range_ds = tf.data.Dataset.range(100000)
โดยปกติ โมเดลที่อิงตามข้อมูลประเภทนี้จะต้องการการแบ่งเวลาแบบต่อเนื่องกัน
วิธีที่ง่ายที่สุดคือแบทช์ข้อมูล:
ใช้ batch
batches = range_ds.batch(10, drop_remainder=True)

for batch in batches.take(5):
  print(batch.numpy())
[0 1 2 3 4 5 6 7 8 9]
[10 11 12 13 14 15 16 17 18 19]
[20 21 22 23 24 25 26 27 28 29]
[30 31 32 33 34 35 36 37 38 39]
[40 41 42 43 44 45 46 47 48 49]
ตัวยึดตำแหน่ง158
หรือหากต้องการคาดการณ์อย่างหนาแน่นหนึ่งก้าวสู่อนาคต คุณอาจเปลี่ยนคุณลักษณะและป้ายกำกับทีละขั้นโดยสัมพันธ์กัน:
def dense_1_step(batch):
  # Shift features and labels one step relative to each other.
  return batch[:-1], batch[1:]

predict_dense_1_step = batches.map(dense_1_step)

for features, label in predict_dense_1_step.take(3):
  print(features.numpy(), " => ", label.numpy())
[0 1 2 3 4 5 6 7 8]  =>  [1 2 3 4 5 6 7 8 9]
[10 11 12 13 14 15 16 17 18]  =>  [11 12 13 14 15 16 17 18 19]
[20 21 22 23 24 25 26 27 28]  =>  [21 22 23 24 25 26 27 28 29]
ในการทำนายทั้งหน้าต่างแทนออฟเซ็ตคงที่ คุณสามารถแบ่งแบตช์ออกเป็นสองส่วน:
batches = range_ds.batch(15, drop_remainder=True)

def label_next_5_steps(batch):
  return (batch[:-5],   # Inputs: All except the last 5 steps
          batch[-5:])   # Labels: The last 5 steps

predict_5_steps = batches.map(label_next_5_steps)

for features, label in predict_5_steps.take(3):
  print(features.numpy(), " => ", label.numpy())
[0 1 2 3 4 5 6 7 8 9]  =>  [10 11 12 13 14]
[15 16 17 18 19 20 21 22 23 24]  =>  [25 26 27 28 29]
[30 31 32 33 34 35 36 37 38 39]  =>  [40 41 42 43 44]
หากต้องการให้คุณลักษณะของชุดหนึ่งและชุดอื่นทับซ้อนกัน ให้ใช้ Dataset.zip :
feature_length = 10
label_length = 3

features = range_ds.batch(feature_length, drop_remainder=True)
labels = range_ds.batch(feature_length).skip(1).map(lambda labels: labels[:label_length])

predicted_steps = tf.data.Dataset.zip((features, labels))

for features, label in predicted_steps.take(5):
  print(features.numpy(), " => ", label.numpy())
[0 1 2 3 4 5 6 7 8 9]  =>  [10 11 12]
[10 11 12 13 14 15 16 17 18 19]  =>  [20 21 22]
[20 21 22 23 24 25 26 27 28 29]  =>  [30 31 32]
[30 31 32 33 34 35 36 37 38 39]  =>  [40 41 42]
[40 41 42 43 44 45 46 47 48 49]  =>  [50 51 52]
การใช้ window
ขณะใช้งาน Dataset.batch มีบางสถานการณ์ที่คุณอาจต้องการการควบคุมที่ละเอียดยิ่งขึ้น เมธอด Dataset.window ให้คุณควบคุมได้อย่างสมบูรณ์ แต่ต้องการการดูแลเป็นพิเศษ โดยจะส่งคืน Dataset of Datasets ดู โครงสร้างชุดข้อมูล สำหรับรายละเอียด
window_size = 5

windows = range_ds.window(window_size, shift=1)
for sub_ds in windows.take(5):
  print(sub_ds)
<_VariantDataset element_spec=TensorSpec(shape=(), dtype=tf.int64, name=None)>
<_VariantDataset element_spec=TensorSpec(shape=(), dtype=tf.int64, name=None)>
<_VariantDataset element_spec=TensorSpec(shape=(), dtype=tf.int64, name=None)>
<_VariantDataset element_spec=TensorSpec(shape=(), dtype=tf.int64, name=None)>
<_VariantDataset element_spec=TensorSpec(shape=(), dtype=tf.int64, name=None)>
ตัวยึดตำแหน่ง166
เมธอด Dataset.flat_map สามารถนำชุดข้อมูลของชุดข้อมูลมารวมกันเป็นชุดข้อมูลเดียว:
for x in windows.flat_map(lambda x: x).take(30):
   print(x.numpy(), end=' ')
0 1 2 3 4 1 2 3 4 5 2 3 4 5 6 3 4 5 6 7 4 5 6 7 8 5 6 7 8 9
ในเกือบทุกกรณี คุณจะต้องการ .batch ชุดข้อมูลก่อน:
def sub_to_batch(sub):
  return sub.batch(window_size, drop_remainder=True)

for example in windows.flat_map(sub_to_batch).take(5):
  print(example.numpy())
[0 1 2 3 4]
[1 2 3 4 5]
[2 3 4 5 6]
[3 4 5 6 7]
[4 5 6 7 8]
ตัวยึดตำแหน่ง170
ในตอนนี้ คุณจะเห็นว่าอาร์กิวเมนต์ shift ควบคุมจำนวนหน้าต่างที่เคลื่อนผ่าน
เมื่อรวมสิ่งนี้เข้าด้วยกัน คุณอาจเขียนฟังก์ชันนี้:
def make_window_dataset(ds, window_size=5, shift=1, stride=1):
  windows = ds.window(window_size, shift=shift, stride=stride)

  def sub_to_batch(sub):
    return sub.batch(window_size, drop_remainder=True)

  windows = windows.flat_map(sub_to_batch)
  return windows
ds = make_window_dataset(range_ds, window_size=10, shift = 5, stride=3)

for example in ds.take(10):
  print(example.numpy())
[ 0  3  6  9 12 15 18 21 24 27]
[ 5  8 11 14 17 20 23 26 29 32]
[10 13 16 19 22 25 28 31 34 37]
[15 18 21 24 27 30 33 36 39 42]
[20 23 26 29 32 35 38 41 44 47]
[25 28 31 34 37 40 43 46 49 52]
[30 33 36 39 42 45 48 51 54 57]
[35 38 41 44 47 50 53 56 59 62]
[40 43 46 49 52 55 58 61 64 67]
[45 48 51 54 57 60 63 66 69 72]
จากนั้น แยกป้ายกำกับได้ง่ายเหมือนเมื่อก่อน:
dense_labels_ds = ds.map(dense_1_step)

for inputs,labels in dense_labels_ds.take(3):
  print(inputs.numpy(), "=>", labels.numpy())
[ 0  3  6  9 12 15 18 21 24] => [ 3  6  9 12 15 18 21 24 27]
[ 5  8 11 14 17 20 23 26 29] => [ 8 11 14 17 20 23 26 29 32]
[10 13 16 19 22 25 28 31 34] => [13 16 19 22 25 28 31 34 37]
ตัวยึดตำแหน่ง175
สุ่มตัวอย่างใหม่
เมื่อทำงานกับชุดข้อมูลที่มีคลาสไม่สมดุลมาก คุณอาจต้องการสุ่มตัวอย่างชุดข้อมูล tf.data มีสองวิธีในการทำเช่นนี้ ชุดข้อมูลการฉ้อโกงบัตรเครดิตเป็นตัวอย่างที่ดีของปัญหาประเภทนี้
zip_path = tf.keras.utils.get_file(
    origin='https://storage.googleapis.com/download.tensorflow.org/data/creditcard.zip',
    fname='creditcard.zip',
    extract=True)

csv_path = zip_path.replace('.zip', '.csv')
Downloading data from https://storage.googleapis.com/download.tensorflow.org/data/creditcard.zip
69156864/69155632 [==============================] - 2s 0us/step
69165056/69155632 [==============================] - 2s 0us/step
creditcard_ds = tf.data.experimental.make_csv_dataset(
    csv_path, batch_size=1024, label_name="Class",
    # Set the column types: 30 floats and an int.
    column_defaults=[float()]*30+[int()])
ตอนนี้ ตรวจสอบการกระจายของคลาส มันเบ้มาก:
def count(counts, batch):
  features, labels = batch
  class_1 = labels == 1
  class_1 = tf.cast(class_1, tf.int32)

  class_0 = labels == 0
  class_0 = tf.cast(class_0, tf.int32)

  counts['class_0'] += tf.reduce_sum(class_0)
  counts['class_1'] += tf.reduce_sum(class_1)

  return counts
counts = creditcard_ds.take(10).reduce(
    initial_state={'class_0': 0, 'class_1': 0},
    reduce_func = count)

counts = np.array([counts['class_0'].numpy(),
                   counts['class_1'].numpy()]).astype(np.float32)

fractions = counts/counts.sum()
print(fractions)
[0.9956 0.0044]
วิธีทั่วไปในการฝึกอบรมด้วยชุดข้อมูลที่ไม่สมดุลคือการทำให้สมดุล tf.data มีวิธีการสองสามวิธีที่เปิดใช้งานเวิร์กโฟลว์นี้:
การสุ่มตัวอย่างชุดข้อมูล
วิธีหนึ่งในการสุ่มตัวอย่างชุดข้อมูลใหม่คือใช้ sample_from_datasets สิ่งนี้จะเหมาะสมกว่าเมื่อคุณมี data.Dataset แยกกันสำหรับแต่ละคลาส
ที่นี่ เพียงใช้ตัวกรองเพื่อสร้างจากข้อมูลการฉ้อโกงบัตรเครดิต:
negative_ds = (
  creditcard_ds
    .unbatch()
    .filter(lambda features, label: label==0)
    .repeat())
positive_ds = (
  creditcard_ds
    .unbatch()
    .filter(lambda features, label: label==1)
    .repeat())
for features, label in positive_ds.batch(10).take(1):
  print(label.numpy())
[1 1 1 1 1 1 1 1 1 1]
ในการใช้ tf.data.Dataset.sample_from_datasets ให้ส่งชุดข้อมูลและน้ำหนักสำหรับแต่ละชุด:
balanced_ds = tf.data.Dataset.sample_from_datasets(
    [negative_ds, positive_ds], [0.5, 0.5]).batch(10)
ตอนนี้ชุดข้อมูลสร้างตัวอย่างของแต่ละคลาสด้วยความน่าจะเป็น 50/50:
for features, labels in balanced_ds.take(10):
  print(labels.numpy())
[1 0 1 0 1 0 1 1 1 1]
[0 0 1 1 0 1 1 1 1 1]
[1 1 1 1 0 0 1 0 1 0]
[1 1 1 0 1 0 0 1 1 1]
[0 1 0 1 1 1 0 1 1 0]
[0 1 0 0 0 1 0 0 0 0]
[1 1 1 1 1 0 0 1 1 0]
[0 0 0 1 0 1 1 1 0 0]
[0 0 1 1 1 1 0 1 1 1]
[1 0 0 1 1 1 1 0 1 1]
ตัวยึดตำแหน่ง187
การสุ่มตัวอย่างการปฏิเสธ
ปัญหาอย่างหนึ่งของแนวทาง Dataset.sample_from_datasets ด้านบนคือต้องใช้ tf.data.Dataset แยกกันต่อคลาส คุณสามารถใช้ Dataset.filter เพื่อสร้างชุดข้อมูลทั้งสองชุด แต่นั่นส่งผลให้ข้อมูลทั้งหมดถูกโหลดสองครั้ง
สามารถใช้เมธอด data.Dataset.rejection_resample กับชุดข้อมูลเพื่อปรับสมดุล ในขณะที่โหลดเพียงครั้งเดียว องค์ประกอบจะถูกลบออกจากชุดข้อมูลเพื่อให้เกิดความสมดุล
data.Dataset.rejection_resample รับอาร์กิวเมนต์ class_func class_func นี้ใช้กับองค์ประกอบชุดข้อมูลแต่ละองค์ประกอบ และใช้เพื่อพิจารณาว่าตัวอย่างเป็นของคลาสใดเพื่อวัตถุประสงค์ในการปรับสมดุล
เป้าหมายที่นี่คือการสร้างสมดุลให้กับการกระจายฉลาก และองค์ประกอบของ creditcard_ds เป็นคู่ (features, label) แล้ว ดังนั้น class_func ต้องส่งคืนป้ายกำกับเหล่านั้น:
def class_func(features, label):
  return label
วิธีการสุ่มตัวอย่างจะเกี่ยวข้องกับแต่ละตัวอย่าง ดังนั้นในกรณีนี้ คุณต้อง unbatch ชุดข้อมูลออกก่อนที่จะใช้วิธีนั้น
วิธีการนี้ต้องการการกระจายเป้าหมาย และเลือกประมาณการการกระจายเริ่มต้นเป็นอินพุต
resample_ds = (
    creditcard_ds
    .unbatch()
    .rejection_resample(class_func, target_dist=[0.5,0.5],
                        initial_dist=fractions)
    .batch(10))
WARNING:tensorflow:From /tmpfs/src/tf_docs_env/lib/python3.7/site-packages/tensorflow/python/data/ops/dataset_ops.py:5797: Print (from tensorflow.python.ops.logging_ops) is deprecated and will be removed after 2018-08-20.
Instructions for updating:
Use tf.print instead of tf.Print. Note that tf.print returns a no-output operator that directly prints the output. Outside of defuns or eager mode, this operator will not be executed unless it is directly specified in session.run or used as a control dependency for other operators. This is only a concern in graph mode. Below is an example of how to ensure tf.print executes in graph mode:
ตัวยึดตำแหน่ง190
วิธี rejection_resample ตัวอย่างจะคืนค่าคู่ (class, example) โดยที่ class เป็นเอาต์พุตของ class_func ในกรณีนี้ example เป็นคู่ (feature, label) อยู่แล้ว ดังนั้นให้ใช้ map เพื่อวางสำเนาพิเศษของป้ายกำกับ:
balanced_ds = resample_ds.map(lambda extra_label, features_and_label: features_and_label)
ตอนนี้ชุดข้อมูลสร้างตัวอย่างของแต่ละคลาสด้วยความน่าจะเป็น 50/50:
for features, labels in balanced_ds.take(10):
  print(labels.numpy())
Proportion of examples rejected by sampler is high: [0.995605469][0.995605469 0.00439453125][0 1]
Proportion of examples rejected by sampler is high: [0.995605469][0.995605469 0.00439453125][0 1]
Proportion of examples rejected by sampler is high: [0.995605469][0.995605469 0.00439453125][0 1]
Proportion of examples rejected by sampler is high: [0.995605469][0.995605469 0.00439453125][0 1]
Proportion of examples rejected by sampler is high: [0.995605469][0.995605469 0.00439453125][0 1]
Proportion of examples rejected by sampler is high: [0.995605469][0.995605469 0.00439453125][0 1]
Proportion of examples rejected by sampler is high: [0.995605469][0.995605469 0.00439453125][0 1]
Proportion of examples rejected by sampler is high: [0.995605469][0.995605469 0.00439453125][0 1]
Proportion of examples rejected by sampler is high: [0.995605469][0.995605469 0.00439453125][0 1]
Proportion of examples rejected by sampler is high: [0.995605469][0.995605469 0.00439453125][0 1]
[0 1 1 1 0 1 1 0 1 1]
[1 1 0 1 0 0 0 0 1 1]
[1 1 1 1 0 0 0 0 1 1]
[1 0 0 1 0 0 1 0 1 1]
[1 0 0 0 0 1 0 0 0 0]
[1 0 0 1 1 0 1 1 1 0]
[1 1 0 0 0 0 0 0 0 1]
[0 0 1 0 0 0 1 0 1 1]
[0 1 0 1 0 1 0 0 0 1]
[0 0 0 0 0 0 0 0 1 1]
จุดตรวจ Iterator
Tensorflow รองรับ การตรวจสอบจุดตรวจ ดังนั้นเมื่อกระบวนการฝึกอบรมของคุณเริ่มต้นใหม่ จะสามารถกู้คืนจุดตรวจสอบล่าสุดเพื่อกู้คืนความคืบหน้าส่วนใหญ่ได้ นอกจากจุดตรวจสอบตัวแปรโมเดลแล้ว คุณยังสามารถตรวจสอบความคืบหน้าของตัววนซ้ำชุดข้อมูลได้อีกด้วย ซึ่งอาจเป็นประโยชน์หากคุณมีชุดข้อมูลขนาดใหญ่และไม่ต้องการเริ่มชุดข้อมูลตั้งแต่ต้นในการรีสตาร์ทแต่ละครั้ง อย่างไรก็ตาม โปรดทราบว่าจุดตรวจสอบของ iterator อาจมีขนาดใหญ่ เนื่องจากการแปลง เช่น shuffle และ prefetch จำเป็นต้องมีองค์ประกอบบัฟเฟอร์ภายใน iterator
หากต้องการรวม iterator ของคุณในจุดตรวจสอบ ให้ส่ง iterator ไปยังตัวสร้าง tf.train.Checkpoint
range_ds = tf.data.Dataset.range(20)

iterator = iter(range_ds)
ckpt = tf.train.Checkpoint(step=tf.Variable(0), iterator=iterator)
manager = tf.train.CheckpointManager(ckpt, '/tmp/my_ckpt', max_to_keep=3)

print([next(iterator).numpy() for _ in range(5)])

save_path = manager.save()

print([next(iterator).numpy() for _ in range(5)])

ckpt.restore(manager.latest_checkpoint)

print([next(iterator).numpy() for _ in range(5)])
[0, 1, 2, 3, 4]
[5, 6, 7, 8, 9]
[5, 6, 7, 8, 9]
ตัวยึดตำแหน่ง195
การใช้ tf.data กับ tf.keras
tf.keras API ช่วยลดความยุ่งยากในหลายแง่มุมของการสร้างและดำเนินการโมเดลการเรียนรู้ของเครื่อง .fit() และ .evaluate() และ .predict() APIs รองรับชุดข้อมูลเป็นอินพุต นี่คือชุดข้อมูลและการตั้งค่าแบบจำลองอย่างรวดเร็ว:
train, test = tf.keras.datasets.fashion_mnist.load_data()

images, labels = train
images = images/255.0
labels = labels.astype(np.int32)
fmnist_train_ds = tf.data.Dataset.from_tensor_slices((images, labels))
fmnist_train_ds = fmnist_train_ds.shuffle(5000).batch(32)

model = tf.keras.Sequential([
  tf.keras.layers.Flatten(),
  tf.keras.layers.Dense(10)
])

model.compile(optimizer='adam',
              loss=tf.keras.losses.SparseCategoricalCrossentropy(from_logits=True),
              metrics=['accuracy'])
การส่งชุดข้อมูลของคู่ (feature, label) เป็นสิ่งที่จำเป็นสำหรับ Model.fit และ Model.evaluate :
model.fit(fmnist_train_ds, epochs=2)
Epoch 1/2
1875/1875 [==============================] - 4s 2ms/step - loss: 0.5984 - accuracy: 0.7973
Epoch 2/2
1875/1875 [==============================] - 4s 2ms/step - loss: 0.4607 - accuracy: 0.8430
<keras.callbacks.History at 0x7f7e70283110>
ตัวยึดตำแหน่ง199
หากคุณส่งชุดข้อมูลที่ไม่จำกัด เช่น เรียก Dataset.repeat() คุณเพียงแค่ต้องส่งอาร์กิวเมนต์ steps_per_epoch :
model.fit(fmnist_train_ds.repeat(), epochs=2, steps_per_epoch=20)
Epoch 1/2
20/20 [==============================] - 0s 2ms/step - loss: 0.4574 - accuracy: 0.8672
Epoch 2/2
20/20 [==============================] - 0s 2ms/step - loss: 0.4216 - accuracy: 0.8562
<keras.callbacks.History at 0x7f7e144948d0>
ตัวยึดตำแหน่ง201
สำหรับการประเมิน คุณสามารถผ่านจำนวนขั้นตอนการประเมิน:
loss, accuracy = model.evaluate(fmnist_train_ds)
print("Loss :", loss)
print("Accuracy :", accuracy)
1875/1875 [==============================] - 4s 2ms/step - loss: 0.4350 - accuracy: 0.8524
Loss : 0.4350026249885559
Accuracy : 0.8524333238601685
ตัวยึดตำแหน่ง203
สำหรับชุดข้อมูลแบบยาว ให้กำหนดจำนวนขั้นตอนในการประเมิน:
loss, accuracy = model.evaluate(fmnist_train_ds.repeat(), steps=10)
print("Loss :", loss)
print("Accuracy :", accuracy)
10/10 [==============================] - 0s 2ms/step - loss: 0.4345 - accuracy: 0.8687
Loss : 0.43447819352149963
Accuracy : 0.8687499761581421
ตัวยึดตำแหน่ง205
ไม่จำเป็นต้องใช้ป้ายกำกับเมื่อเรียก Model.predict
predict_ds = tf.data.Dataset.from_tensor_slices(images).batch(32)
result = model.predict(predict_ds, steps = 10)
print(result.shape)
(320, 10)ตัวยึดตำแหน่ง207
แต่ป้ายกำกับจะถูกละเว้นหากคุณส่งชุดข้อมูลที่มี:
result = model.predict(fmnist_train_ds, steps = 10)
print(result.shape)
(320, 10)ตัวยึดตำแหน่ง209