
| | |  ดูแหล่งที่มาบน GitHub ดูแหล่งที่มาบน GitHub | |
บทช่วยสอนนี้แสดงตัวอย่างวิธีการโหลด DataFrames แพนด้า ใน TensorFlow
คุณจะใช้ ชุดข้อมูลโรคหัวใจ ขนาดเล็กที่จัดทำโดย UCI Machine Learning Repository CSV มีหลายร้อยแถว แต่ละแถวอธิบายผู้ป่วย และแต่ละคอลัมน์อธิบายแอตทริบิวต์ คุณจะใช้ข้อมูลนี้เพื่อทำนายว่าผู้ป่วยเป็นโรคหัวใจหรือไม่ ซึ่งเป็นงานการจำแนกเลขฐานสอง
อ่านข้อมูลโดยใช้แพนด้า
import pandas as pd
import tensorflow as tf

SHUFFLE_BUFFER = 500
BATCH_SIZE = 2
ดาวน์โหลดไฟล์ CSV ที่มีชุดข้อมูลโรคหัวใจ:
csv_file = tf.keras.utils.get_file('heart.csv', 'https://storage.googleapis.com/download.tensorflow.org/data/heart.csv')
Downloading data from https://storage.googleapis.com/download.tensorflow.org/data/heart.csv
16384/13273 [=====================================] - 0s 0us/step
24576/13273 [=======================================================] - 0s 0us/step
อ่านไฟล์ CSV โดยใช้แพนด้า:
df = pd.read_csv(csv_file)
นี่คือลักษณะของข้อมูล:
df.head()
df.dtypes
age           int64
sex           int64
cp            int64
trestbps      int64
chol          int64
fbs           int64
restecg       int64
thalach       int64
exang         int64
oldpeak     float64
slope         int64
ca            int64
thal         object
target        int64
dtype: object
คุณจะสร้างแบบจำลองเพื่อคาดการณ์ป้ายกำกับที่อยู่ในคอลัมน์ target
target = df.pop('target')
DataFrame เป็นอาร์เรย์
หากข้อมูลของคุณมี datatype สม่ำเสมอ หรือ dtype ก็สามารถใช้ pandas DataFrame ได้ทุกที่ที่คุณสามารถใช้อาร์เรย์ NumPy สิ่งนี้ใช้ได้เพราะคลาส pandas.DataFrame รองรับโปรโตคอล __array__ และฟังก์ชัน tf.convert_to_tensor ของ tf.convert_to_tensor ยอมรับอ็อบเจ็กต์ที่รองรับโปรโตคอล
นำคุณสมบัติตัวเลขจากชุดข้อมูล (ข้ามคุณสมบัติหมวดหมู่ไปก่อน):
numeric_feature_names = ['age', 'thalach', 'trestbps',  'chol', 'oldpeak']
numeric_features = df[numeric_feature_names]
numeric_features.head()
DataFrame สามารถแปลงเป็นอาร์เรย์ NumPy ได้โดยใช้คุณสมบัติ DataFrame.values หรือ numpy.array(df) หากต้องการแปลงเป็นเมตริกซ์ ให้ใช้ tf.convert_to_tensor :
tf.convert_to_tensor(numeric_features)
<tf.Tensor: shape=(303, 5), dtype=float64, numpy=
array([[ 63. , 150. , 145. , 233. ,   2.3],
       [ 67. , 108. , 160. , 286. ,   1.5],
       [ 67. , 129. , 120. , 229. ,   2.6],
       ...,
       [ 65. , 127. , 135. , 254. ,   2.8],
       [ 48. , 150. , 130. , 256. ,   0. ],
       [ 63. , 154. , 150. , 407. ,   4. ]])>
โดยทั่วไป หากวัตถุสามารถแปลงเป็นเมตริกซ์ด้วย tf.convert_to_tensor นั้นสามารถส่งผ่านได้ทุกที่ที่คุณสามารถส่งผ่าน tf.Tensor ได้
ด้วย Model.fit
DataFrame ซึ่งถูกตีความว่าเป็นเมตริกซ์เดียว สามารถใช้เป็นอาร์กิวเมนต์ของเมธอด Model.fit ได้โดยตรง
ด้านล่างนี้คือตัวอย่างการฝึกโมเดลเกี่ยวกับคุณสมบัติตัวเลขของชุดข้อมูล
ขั้นตอนแรกคือการปรับช่วงอินพุตให้เป็นมาตรฐาน ใช้เลเยอร์ tf.keras.layers.Normalization สำหรับสิ่งนั้น
ในการตั้งค่าค่าเฉลี่ยและความเบี่ยงเบนมาตรฐานของเลเยอร์ก่อนเรียกใช้ ต้องแน่ใจว่าได้เรียกใช้เมธอด Normalization.adapt :
normalizer = tf.keras.layers.Normalization(axis=-1)
normalizer.adapt(numeric_features)
เรียกเลเยอร์ในสามแถวแรกของ DataFrame เพื่อแสดงตัวอย่างผลลัพธ์จากเลเยอร์นี้:
normalizer(numeric_features.iloc[:3])
<tf.Tensor: shape=(3, 5), dtype=float32, numpy=
array([[ 0.93383914,  0.03480718,  0.74578077, -0.26008663,  1.0680453 ],
       [ 1.3782105 , -1.7806165 ,  1.5923285 ,  0.7573877 ,  0.38022864],
       [ 1.3782105 , -0.87290466, -0.6651321 , -0.33687714,  1.3259765 ]],
      dtype=float32)>
ใช้เลเยอร์การทำให้เป็นมาตรฐานเป็นเลเยอร์แรกของโมเดลอย่างง่าย:
def get_basic_model():
  model = tf.keras.Sequential([
    normalizer,
    tf.keras.layers.Dense(10, activation='relu'),
    tf.keras.layers.Dense(10, activation='relu'),
    tf.keras.layers.Dense(1)
  ])

  model.compile(optimizer='adam',
                loss=tf.keras.losses.BinaryCrossentropy(from_logits=True),
                metrics=['accuracy'])
  return model
เมื่อคุณส่ง DataFrame เป็นอาร์กิวเมนต์ x ไปยัง Model.fit Keras จะถือว่า DataFrame เหมือนกับอาร์เรย์ NumPy:
model = get_basic_model()
model.fit(numeric_features, target, epochs=15, batch_size=BATCH_SIZE)
Epoch 1/15
152/152 [==============================] - 1s 2ms/step - loss: 0.6839 - accuracy: 0.7690
Epoch 2/15
152/152 [==============================] - 0s 2ms/step - loss: 0.5789 - accuracy: 0.7789
Epoch 3/15
152/152 [==============================] - 0s 2ms/step - loss: 0.5195 - accuracy: 0.7723
Epoch 4/15
152/152 [==============================] - 0s 2ms/step - loss: 0.4814 - accuracy: 0.7855
Epoch 5/15
152/152 [==============================] - 0s 2ms/step - loss: 0.4566 - accuracy: 0.7789
Epoch 6/15
152/152 [==============================] - 0s 2ms/step - loss: 0.4427 - accuracy: 0.7888
Epoch 7/15
152/152 [==============================] - 0s 2ms/step - loss: 0.4342 - accuracy: 0.7921
Epoch 8/15
152/152 [==============================] - 0s 2ms/step - loss: 0.4290 - accuracy: 0.7855
Epoch 9/15
152/152 [==============================] - 0s 2ms/step - loss: 0.4240 - accuracy: 0.7987
Epoch 10/15
152/152 [==============================] - 0s 2ms/step - loss: 0.4232 - accuracy: 0.7987
Epoch 11/15
152/152 [==============================] - 0s 2ms/step - loss: 0.4208 - accuracy: 0.7987
Epoch 12/15
152/152 [==============================] - 0s 2ms/step - loss: 0.4186 - accuracy: 0.7954
Epoch 13/15
152/152 [==============================] - 0s 2ms/step - loss: 0.4172 - accuracy: 0.8020
Epoch 14/15
152/152 [==============================] - 0s 2ms/step - loss: 0.4156 - accuracy: 0.8020
Epoch 15/15
152/152 [==============================] - 0s 2ms/step - loss: 0.4138 - accuracy: 0.8020
<keras.callbacks.History at 0x7f1ddc27b110>
ด้วย tf.data
หากคุณต้องการใช้การแปลง tf.data กับ DataFrame ของ dtype แบบเดียวกัน เมธอด Dataset.from_tensor_slices จะสร้างชุดข้อมูลที่วนซ้ำในแถวของ DataFrame แต่ละแถวเริ่มต้นเป็นเวกเตอร์ของค่า ในการฝึกโมเดล คุณต้องมีคู่ (inputs, labels) ดังนั้น pass (features, labels) และ Dataset.from_tensor_slices จะส่งคืนคู่ของสไลซ์ที่ต้องการ:
numeric_dataset = tf.data.Dataset.from_tensor_slices((numeric_features, target))

for row in numeric_dataset.take(3):
  print(row)
(<tf.Tensor: shape=(5,), dtype=float64, numpy=array([ 63. , 150. , 145. , 233. ,   2.3])>, <tf.Tensor: shape=(), dtype=int64, numpy=0>)
(<tf.Tensor: shape=(5,), dtype=float64, numpy=array([ 67. , 108. , 160. , 286. ,   1.5])>, <tf.Tensor: shape=(), dtype=int64, numpy=1>)
(<tf.Tensor: shape=(5,), dtype=float64, numpy=array([ 67. , 129. , 120. , 229. ,   2.6])>, <tf.Tensor: shape=(), dtype=int64, numpy=0>)
numeric_batches = numeric_dataset.shuffle(1000).batch(BATCH_SIZE)

model = get_basic_model()
model.fit(numeric_batches, epochs=15)
Epoch 1/15
152/152 [==============================] - 1s 2ms/step - loss: 0.7677 - accuracy: 0.6865
Epoch 2/15
152/152 [==============================] - 0s 2ms/step - loss: 0.6319 - accuracy: 0.7591
Epoch 3/15
152/152 [==============================] - 0s 2ms/step - loss: 0.5717 - accuracy: 0.7459
Epoch 4/15
152/152 [==============================] - 0s 2ms/step - loss: 0.5228 - accuracy: 0.7558
Epoch 5/15
152/152 [==============================] - 0s 2ms/step - loss: 0.4820 - accuracy: 0.7624
Epoch 6/15
152/152 [==============================] - 0s 2ms/step - loss: 0.4584 - accuracy: 0.7657
Epoch 7/15
152/152 [==============================] - 0s 2ms/step - loss: 0.4454 - accuracy: 0.7657
Epoch 8/15
152/152 [==============================] - 0s 2ms/step - loss: 0.4379 - accuracy: 0.7789
Epoch 9/15
152/152 [==============================] - 0s 2ms/step - loss: 0.4324 - accuracy: 0.7789
Epoch 10/15
152/152 [==============================] - 0s 2ms/step - loss: 0.4282 - accuracy: 0.7756
Epoch 11/15
152/152 [==============================] - 0s 2ms/step - loss: 0.4273 - accuracy: 0.7789
Epoch 12/15
152/152 [==============================] - 0s 2ms/step - loss: 0.4268 - accuracy: 0.7756
Epoch 13/15
152/152 [==============================] - 0s 2ms/step - loss: 0.4248 - accuracy: 0.7789
Epoch 14/15
152/152 [==============================] - 0s 2ms/step - loss: 0.4235 - accuracy: 0.7855
Epoch 15/15
152/152 [==============================] - 0s 2ms/step - loss: 0.4223 - accuracy: 0.7888
<keras.callbacks.History at 0x7f1ddc406510>
DataFrame เป็นพจนานุกรม
เมื่อคุณเริ่มจัดการกับข้อมูลที่ต่างกัน จะไม่สามารถจัดการกับ DataFrame ราวกับว่ามันเป็นอาร์เรย์เดียวได้อีกต่อไป เทนเซอร์ TensorFlow ต้องการให้องค์ประกอบทั้งหมดมี dtype เหมือนกัน
ดังนั้น ในกรณีนี้ คุณต้องเริ่มถือว่าเป็นพจนานุกรมของคอลัมน์ โดยที่แต่ละคอลัมน์มี dtype เหมือนกัน DataFrame นั้นเหมือนกับพจนานุกรมของอาร์เรย์ ดังนั้นโดยปกติสิ่งที่คุณต้องทำคือส่ง DataFrame ไปยัง Python dict TensorFlow APIs ที่สำคัญหลายตัวรองรับ (nested-) พจนานุกรมของอาร์เรย์เป็นอินพุต
ไปป์ไลน์อินพุต tf.data จัดการกับสิ่งนี้ได้ค่อนข้างดี การดำเนินการ tf.data ทั้งหมดจะจัดการพจนานุกรมและทูเพิลโดยอัตโนมัติ ดังนั้น ในการสร้างชุดข้อมูลของตัวอย่างพจนานุกรมจาก DataFrame เพียงแค่แคสต์ไปยัง dict ก่อนทำการสไลซ์ด้วย Dataset.from_tensor_slices :
numeric_dict_ds = tf.data.Dataset.from_tensor_slices((dict(numeric_features), target))
นี่คือตัวอย่างสามตัวอย่างแรกจากชุดข้อมูลนั้น:
for row in numeric_dict_ds.take(3):
  print(row)
({'age': <tf.Tensor: shape=(), dtype=int64, numpy=63>, 'thalach': <tf.Tensor: shape=(), dtype=int64, numpy=150>, 'trestbps': <tf.Tensor: shape=(), dtype=int64, numpy=145>, 'chol': <tf.Tensor: shape=(), dtype=int64, numpy=233>, 'oldpeak': <tf.Tensor: shape=(), dtype=float64, numpy=2.3>}, <tf.Tensor: shape=(), dtype=int64, numpy=0>)
({'age': <tf.Tensor: shape=(), dtype=int64, numpy=67>, 'thalach': <tf.Tensor: shape=(), dtype=int64, numpy=108>, 'trestbps': <tf.Tensor: shape=(), dtype=int64, numpy=160>, 'chol': <tf.Tensor: shape=(), dtype=int64, numpy=286>, 'oldpeak': <tf.Tensor: shape=(), dtype=float64, numpy=1.5>}, <tf.Tensor: shape=(), dtype=int64, numpy=1>)
({'age': <tf.Tensor: shape=(), dtype=int64, numpy=67>, 'thalach': <tf.Tensor: shape=(), dtype=int64, numpy=129>, 'trestbps': <tf.Tensor: shape=(), dtype=int64, numpy=120>, 'chol': <tf.Tensor: shape=(), dtype=int64, numpy=229>, 'oldpeak': <tf.Tensor: shape=(), dtype=float64, numpy=2.6>}, <tf.Tensor: shape=(), dtype=int64, numpy=0>)
พจนานุกรมที่มี Keras
โดยปกติ โมเดลและเลเยอร์ของ Keras คาดหวังเทนเซอร์อินพุตเดียว แต่คลาสเหล่านี้สามารถรับและส่งคืนโครงสร้างที่ซ้อนกันของพจนานุกรม ทูเพิล และเทนเซอร์ โครงสร้างเหล่านี้เรียกว่า "รัง" (ดูรายละเอียดในโมดูล tf.nest )
มีสองวิธีที่เทียบเท่ากันที่คุณสามารถเขียนโมเดล keras ที่ยอมรับพจนานุกรมเป็นอินพุต
1. Model-subclass style
คุณเขียนคลาสย่อยของ tf.keras.Model (หรือ tf.keras.Layer ) คุณจัดการอินพุตโดยตรงและสร้างเอาต์พุต:
def stack_dict(inputs, fun=tf.stack):
    values = []
    for key in sorted(inputs.keys()):
      values.append(tf.cast(inputs[key], tf.float32))

    return fun(values, axis=-1)
class MyModel(tf.keras.Model):
  def __init__(self):
    # Create all the internal layers in init.
    super().__init__(self)

    self.normalizer = tf.keras.layers.Normalization(axis=-1)

    self.seq = tf.keras.Sequential([
      self.normalizer,
      tf.keras.layers.Dense(10, activation='relu'),
      tf.keras.layers.Dense(10, activation='relu'),
      tf.keras.layers.Dense(1)
    ])

  def adapt(self, inputs):
    # Stach the inputs and `adapt` the normalization layer.
    inputs = stack_dict(inputs)
    self.normalizer.adapt(inputs)

  def call(self, inputs):
    # Stack the inputs
    inputs = stack_dict(inputs)
    # Run them through all the layers.
    result = self.seq(inputs)

    return result

model = MyModel()

model.adapt(dict(numeric_features))

model.compile(optimizer='adam',
              loss=tf.keras.losses.BinaryCrossentropy(from_logits=True),
              metrics=['accuracy'],
              run_eagerly=True)
โมเดลนี้สามารถรับพจนานุกรมของคอลัมน์หรือชุดข้อมูลขององค์ประกอบพจนานุกรมสำหรับการฝึกอบรมได้:
model.fit(dict(numeric_features), target, epochs=5, batch_size=BATCH_SIZE)
Epoch 1/5
152/152 [==============================] - 3s 17ms/step - loss: 0.6736 - accuracy: 0.7063
Epoch 2/5
152/152 [==============================] - 3s 17ms/step - loss: 0.5577 - accuracy: 0.7294
Epoch 3/5
152/152 [==============================] - 2s 16ms/step - loss: 0.4869 - accuracy: 0.7591
Epoch 4/5
152/152 [==============================] - 2s 16ms/step - loss: 0.4525 - accuracy: 0.7690
Epoch 5/5
152/152 [==============================] - 2s 16ms/step - loss: 0.4403 - accuracy: 0.7624
<keras.callbacks.History at 0x7f1de4fa9390>
numeric_dict_batches = numeric_dict_ds.shuffle(SHUFFLE_BUFFER).batch(BATCH_SIZE)
model.fit(numeric_dict_batches, epochs=5)
Epoch 1/5
152/152 [==============================] - 2s 15ms/step - loss: 0.4328 - accuracy: 0.7756
Epoch 2/5
152/152 [==============================] - 2s 14ms/step - loss: 0.4297 - accuracy: 0.7888
Epoch 3/5
152/152 [==============================] - 2s 15ms/step - loss: 0.4270 - accuracy: 0.7888
Epoch 4/5
152/152 [==============================] - 2s 15ms/step - loss: 0.4245 - accuracy: 0.8020
Epoch 5/5
152/152 [==============================] - 2s 15ms/step - loss: 0.4240 - accuracy: 0.7921
<keras.callbacks.History at 0x7f1ddc0dba90>
ต่อไปนี้เป็นคำทำนายสำหรับสามตัวอย่างแรก:
model.predict(dict(numeric_features.iloc[:3]))
array([[[0.00565109]],

       [[0.60601974]],

       [[0.03647463]]], dtype=float32)
ตัวยึดตำแหน่ง322. สไตล์การทำงานของ Keras
inputs = {}
for name, column in numeric_features.items():
  inputs[name] = tf.keras.Input(
      shape=(1,), name=name, dtype=tf.float32)

inputs
{'age': <KerasTensor: shape=(None, 1) dtype=float32 (created by layer 'age')>,
 'thalach': <KerasTensor: shape=(None, 1) dtype=float32 (created by layer 'thalach')>,
 'trestbps': <KerasTensor: shape=(None, 1) dtype=float32 (created by layer 'trestbps')>,
 'chol': <KerasTensor: shape=(None, 1) dtype=float32 (created by layer 'chol')>,
 'oldpeak': <KerasTensor: shape=(None, 1) dtype=float32 (created by layer 'oldpeak')>}
x = stack_dict(inputs, fun=tf.concat)

normalizer = tf.keras.layers.Normalization(axis=-1)
normalizer.adapt(stack_dict(dict(numeric_features)))

x = normalizer(x)
x = tf.keras.layers.Dense(10, activation='relu')(x)
x = tf.keras.layers.Dense(10, activation='relu')(x)
x = tf.keras.layers.Dense(1)(x)

model = tf.keras.Model(inputs, x)

model.compile(optimizer='adam',
              loss=tf.keras.losses.BinaryCrossentropy(from_logits=True),
              metrics=['accuracy'],
              run_eagerly=True)
tf.keras.utils.plot_model(model, rankdir="LR", show_shapes=True)

คุณสามารถฝึกโมเดลฟังก์ชันได้ในลักษณะเดียวกับคลาสย่อยของโมเดล:
model.fit(dict(numeric_features), target, epochs=5, batch_size=BATCH_SIZE)
Epoch 1/5
152/152 [==============================] - 2s 15ms/step - loss: 0.6529 - accuracy: 0.7492
Epoch 2/5
152/152 [==============================] - 2s 15ms/step - loss: 0.5448 - accuracy: 0.7624
Epoch 3/5
152/152 [==============================] - 2s 15ms/step - loss: 0.4935 - accuracy: 0.7756
Epoch 4/5
152/152 [==============================] - 2s 15ms/step - loss: 0.4650 - accuracy: 0.7789
Epoch 5/5
152/152 [==============================] - 2s 15ms/step - loss: 0.4486 - accuracy: 0.7855
<keras.callbacks.History at 0x7f1ddc0d0f90>
numeric_dict_batches = numeric_dict_ds.shuffle(SHUFFLE_BUFFER).batch(BATCH_SIZE)
model.fit(numeric_dict_batches, epochs=5)
Epoch 1/5
152/152 [==============================] - 2s 15ms/step - loss: 0.4398 - accuracy: 0.7855
Epoch 2/5
152/152 [==============================] - 2s 15ms/step - loss: 0.4330 - accuracy: 0.7855
Epoch 3/5
152/152 [==============================] - 2s 16ms/step - loss: 0.4294 - accuracy: 0.7921
Epoch 4/5
152/152 [==============================] - 2s 16ms/step - loss: 0.4271 - accuracy: 0.7888
Epoch 5/5
152/152 [==============================] - 2s 16ms/step - loss: 0.4231 - accuracy: 0.7855
<keras.callbacks.History at 0x7f1d7c5d5d10>
ตัวอย่างเต็ม
คุณกำลังส่ง DataFrame ที่แตกต่างกันไปยัง Keras แต่ละคอลัมน์อาจต้องมีการประมวลผลล่วงหน้าที่ไม่ซ้ำกัน คุณสามารถประมวลผลล่วงหน้านี้ได้โดยตรงใน DataFrame แต่เพื่อให้โมเดลทำงานได้อย่างถูกต้อง อินพุตจะต้องได้รับการประมวลผลล่วงหน้าในลักษณะเดียวกันเสมอ ดังนั้น วิธีที่ดีที่สุดคือการสร้างการประมวลผลล่วงหน้าในแบบจำลอง เลเยอร์การประมวลผลล่วงหน้าของ Keras ครอบคลุมงานทั่วไปหลายอย่าง
สร้างหัวประมวลผลล่วงหน้า
ในชุดข้อมูลนี้ คุณลักษณะ "จำนวนเต็ม" บางอย่างในข้อมูลดิบเป็นดัชนีตามหมวดหมู่จริงๆ ดัชนีเหล่านี้ไม่ใช่ค่าตัวเลขที่เรียงลำดับจริงๆ (ดูรายละเอียดใน คำอธิบายชุดข้อมูล ) เนื่องจากสิ่งเหล่านี้ไม่เป็นระเบียบจึงไม่เหมาะสมที่จะป้อนโดยตรงไปยังแบบจำลอง โมเดลจะตีความว่าพวกเขาได้รับคำสั่ง หากต้องการใช้อินพุตเหล่านี้ คุณจะต้องเข้ารหัสเป็นเวกเตอร์แบบร้อนครั้งเดียวหรือเวกเตอร์แบบฝัง เช่นเดียวกับคุณลักษณะการจัดหมวดหมู่สตริง
ในทางกลับกัน คุณสมบัติไบนารีไม่จำเป็นต้องเข้ารหัสหรือทำให้เป็นมาตรฐาน
เริ่มต้นด้วยการสร้างรายการคุณลักษณะที่จัดอยู่ในแต่ละกลุ่ม:
binary_feature_names = ['sex', 'fbs', 'exang']
categorical_feature_names = ['cp', 'restecg', 'slope', 'thal', 'ca']
ขั้นตอนต่อไปคือการสร้างแบบจำลองก่อนการประมวลผลที่จะใช้การประมวลผลล่วงหน้าที่เหมาะสมกับแต่ละรายการกับอินพุตแต่ละรายการและเชื่อมโยงผลลัพธ์เข้าด้วยกัน
ส่วนนี้ใช้ Keras Functional API เพื่อใช้การประมวลผลล่วงหน้า คุณเริ่มต้นด้วยการสร้างหนึ่ง tf.keras.Input สำหรับแต่ละคอลัมน์ของ dataframe:
inputs = {}
for name, column in df.items():
  if type(column[0]) == str:
    dtype = tf.string
  elif (name in categorical_feature_names or
        name in binary_feature_names):
    dtype = tf.int64
  else:
    dtype = tf.float32

  inputs[name] = tf.keras.Input(shape=(), name=name, dtype=dtype)
inputs
{'age': <KerasTensor: shape=(None,) dtype=float32 (created by layer 'age')>,
 'sex': <KerasTensor: shape=(None,) dtype=int64 (created by layer 'sex')>,
 'cp': <KerasTensor: shape=(None,) dtype=int64 (created by layer 'cp')>,
 'trestbps': <KerasTensor: shape=(None,) dtype=float32 (created by layer 'trestbps')>,
 'chol': <KerasTensor: shape=(None,) dtype=float32 (created by layer 'chol')>,
 'fbs': <KerasTensor: shape=(None,) dtype=int64 (created by layer 'fbs')>,
 'restecg': <KerasTensor: shape=(None,) dtype=int64 (created by layer 'restecg')>,
 'thalach': <KerasTensor: shape=(None,) dtype=float32 (created by layer 'thalach')>,
 'exang': <KerasTensor: shape=(None,) dtype=int64 (created by layer 'exang')>,
 'oldpeak': <KerasTensor: shape=(None,) dtype=float32 (created by layer 'oldpeak')>,
 'slope': <KerasTensor: shape=(None,) dtype=int64 (created by layer 'slope')>,
 'ca': <KerasTensor: shape=(None,) dtype=int64 (created by layer 'ca')>,
 'thal': <KerasTensor: shape=(None,) dtype=string (created by layer 'thal')>}
สำหรับแต่ละอินพุต คุณจะต้องใช้การแปลงบางส่วนโดยใช้เลเยอร์ Keras และ TensorFlow ops แต่ละคุณลักษณะเริ่มต้นเป็นชุดของสเกลาร์ ( shape=(batch,) ) ผลลัพธ์สำหรับแต่ละรายการควรเป็นชุดของเวกเตอร์ tf.float32 ( shape=(batch, n) ) ขั้นตอนสุดท้ายจะเชื่อมเวกเตอร์เหล่านั้นเข้าด้วยกัน
อินพุตไบนารี่
เนื่องจากอินพุตไบนารีไม่ต้องการการประมวลผลล่วงหน้าใดๆ เพียงเพิ่มแกนเวกเตอร์ แคสต์ไปที่ float32 แล้วเพิ่มลงในรายการอินพุตที่ประมวลผลล่วงหน้า:
preprocessed = []

for name in binary_feature_names:
  inp = inputs[name]
  inp = inp[:, tf.newaxis]
  float_value = tf.cast(inp, tf.float32)
  preprocessed.append(float_value)

preprocessed
[<KerasTensor: shape=(None, 1) dtype=float32 (created by layer 'tf.cast_5')>,
 <KerasTensor: shape=(None, 1) dtype=float32 (created by layer 'tf.cast_6')>,
 <KerasTensor: shape=(None, 1) dtype=float32 (created by layer 'tf.cast_7')>]
อินพุตตัวเลข
เช่นเดียวกับในส่วนก่อนหน้านี้ คุณจะต้องเรียกใช้อินพุตตัวเลขเหล่านี้ผ่านเลเยอร์ tf.keras.layers.Normalization ก่อนใช้งาน ความแตกต่างคือคราวนี้พวกเขากำลังป้อนข้อมูลเป็น dict รหัสด้านล่างรวบรวมคุณสมบัติตัวเลขจาก DataFrame ซ้อนกันและส่งผ่านไปยังวิธี Normalization.adapt
normalizer = tf.keras.layers.Normalization(axis=-1)
normalizer.adapt(stack_dict(dict(numeric_features)))
โค้ดด้านล่างจะซ้อนคุณสมบัติตัวเลขและเรียกใช้ผ่านเลเยอร์การทำให้เป็นมาตรฐาน
numeric_inputs = {}
for name in numeric_feature_names:
  numeric_inputs[name]=inputs[name]

numeric_inputs = stack_dict(numeric_inputs)
numeric_normalized = normalizer(numeric_inputs)

preprocessed.append(numeric_normalized)

preprocessed
[<KerasTensor: shape=(None, 1) dtype=float32 (created by layer 'tf.cast_5')>,
 <KerasTensor: shape=(None, 1) dtype=float32 (created by layer 'tf.cast_6')>,
 <KerasTensor: shape=(None, 1) dtype=float32 (created by layer 'tf.cast_7')>,
 <KerasTensor: shape=(None, 5) dtype=float32 (created by layer 'normalization_3')>]
คุณสมบัติหมวดหมู่
ในการใช้คุณสมบัติตามหมวดหมู่ ก่อนอื่นคุณต้องเข้ารหัสให้เป็นเวกเตอร์ไบนารีหรือการฝัง เนื่องจากคุณลักษณะเหล่านี้มีหมวดหมู่เพียงเล็กน้อย ให้แปลงอินพุตโดยตรงเป็นเวกเตอร์แบบร้อนโดยใช้ตัวเลือก output_mode='one_hot' ซึ่งได้รับการสนับสนุนโดยทั้ง tf.keras.layers.StringLookup และ tf.keras.layers.IntegerLookup
นี่คือตัวอย่างการทำงานของเลเยอร์เหล่านี้:
vocab = ['a','b','c']
lookup = tf.keras.layers.StringLookup(vocabulary=vocab, output_mode='one_hot')
lookup(['c','a','a','b','zzz'])
<tf.Tensor: shape=(5, 4), dtype=float32, numpy=
array([[0., 0., 0., 1.],
       [0., 1., 0., 0.],
       [0., 1., 0., 0.],
       [0., 0., 1., 0.],
       [1., 0., 0., 0.]], dtype=float32)>
vocab = [1,4,7,99]
lookup = tf.keras.layers.IntegerLookup(vocabulary=vocab, output_mode='one_hot')

lookup([-1,4,1])
<tf.Tensor: shape=(3, 5), dtype=float32, numpy=
array([[1., 0., 0., 0., 0.],
       [0., 0., 1., 0., 0.],
       [0., 1., 0., 0., 0.]], dtype=float32)>
ในการกำหนดคำศัพท์สำหรับอินพุตแต่ละรายการ ให้สร้างเลเยอร์เพื่อแปลงคำศัพท์นั้นเป็นเวกเตอร์ยอดนิยม:
for name in categorical_feature_names:
  vocab = sorted(set(df[name]))
  print(f'name: {name}')
  print(f'vocab: {vocab}\n')

  if type(vocab[0]) is str:
    lookup = tf.keras.layers.StringLookup(vocabulary=vocab, output_mode='one_hot')
  else:
    lookup = tf.keras.layers.IntegerLookup(vocabulary=vocab, output_mode='one_hot')

  x = inputs[name][:, tf.newaxis]
  x = lookup(x)
  preprocessed.append(x)
name: cp
vocab: [0, 1, 2, 3, 4]

name: restecg
vocab: [0, 1, 2]

name: slope
vocab: [1, 2, 3]

name: thal
vocab: ['1', '2', 'fixed', 'normal', 'reversible']

name: ca
vocab: [0, 1, 2, 3]
ประกอบหัวประมวลผลล่วงหน้า
ณ จุดนี้การ preprocessed เป็นเพียงรายการ Python ของผลลัพธ์การประมวลผลล่วงหน้าทั้งหมด แต่ละผลลัพธ์มีรูปร่างเป็น (batch_size, depth) :
preprocessed
[<KerasTensor: shape=(None, 1) dtype=float32 (created by layer 'tf.cast_5')>,
 <KerasTensor: shape=(None, 1) dtype=float32 (created by layer 'tf.cast_6')>,
 <KerasTensor: shape=(None, 1) dtype=float32 (created by layer 'tf.cast_7')>,
 <KerasTensor: shape=(None, 5) dtype=float32 (created by layer 'normalization_3')>,
 <KerasTensor: shape=(None, 6) dtype=float32 (created by layer 'integer_lookup_1')>,
 <KerasTensor: shape=(None, 4) dtype=float32 (created by layer 'integer_lookup_2')>,
 <KerasTensor: shape=(None, 4) dtype=float32 (created by layer 'integer_lookup_3')>,
 <KerasTensor: shape=(None, 6) dtype=float32 (created by layer 'string_lookup_1')>,
 <KerasTensor: shape=(None, 5) dtype=float32 (created by layer 'integer_lookup_4')>]
เชื่อมโยงคุณสมบัติที่ประมวลผลล่วงหน้าทั้งหมดเข้าด้วยกันตามแกน depth ดังนั้นตัวอย่างพจนานุกรมแต่ละรายการจึงถูกแปลงเป็นเวกเตอร์เดียว เวกเตอร์ประกอบด้วยคุณสมบัติการจัดหมวดหมู่ คุณสมบัติตัวเลข และคุณสมบัติด่วนหมวดหมู่:
preprocesssed_result = tf.concat(preprocessed, axis=-1)
preprocesssed_result
<KerasTensor: shape=(None, 33) dtype=float32 (created by layer 'tf.concat_1')>ตัวยึดตำแหน่ง60
ตอนนี้สร้างแบบจำลองจากการคำนวณนั้นเพื่อนำกลับมาใช้ใหม่ได้:
preprocessor = tf.keras.Model(inputs, preprocesssed_result)
tf.keras.utils.plot_model(preprocessor, rankdir="LR", show_shapes=True)
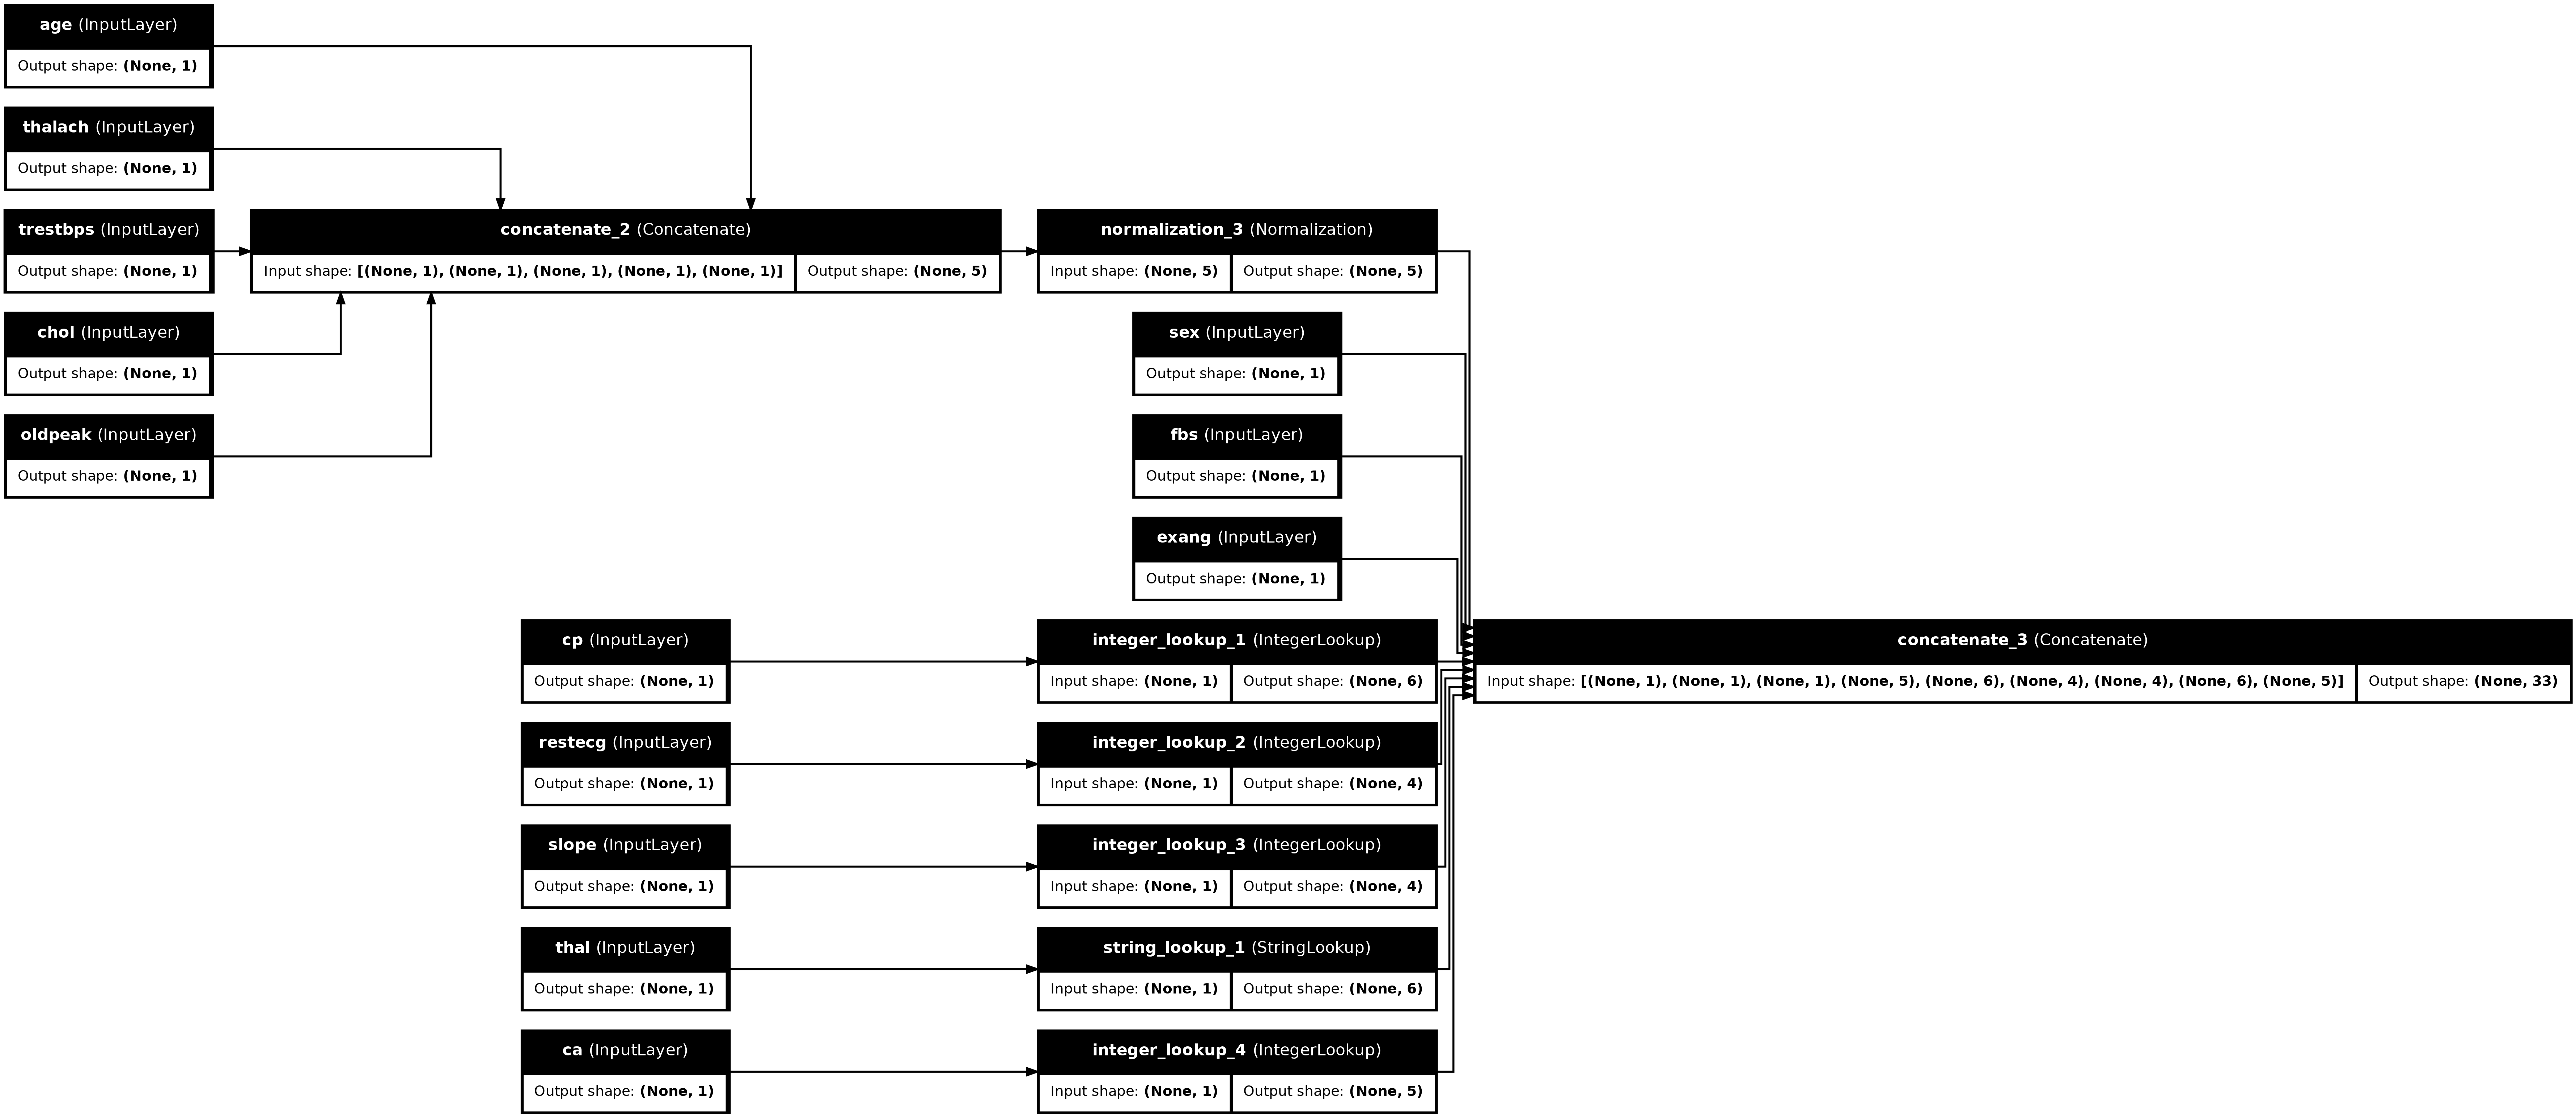
ในการทดสอบตัวประมวลผลล่วงหน้า ให้ใช้ตัว เข้าถึง DataFrame.iloc เพื่อแบ่งตัวอย่างแรกจาก DataFrame จากนั้นแปลงเป็นพจนานุกรมและส่งพจนานุกรมไปยังตัวประมวลผลล่วงหน้า ผลลัพธ์ที่ได้คือเวกเตอร์ตัวเดียวที่มีคุณลักษณะเลขฐานสอง คุณลักษณะที่เป็นตัวเลขปกติ และคุณลักษณะการจัดหมวดหมู่ที่ร้อนแรง ตามลำดับ:
preprocessor(dict(df.iloc[:1]))
<tf.Tensor: shape=(1, 33), dtype=float32, numpy=
array([[ 1.        ,  1.        ,  0.        ,  0.93383914, -0.26008663,
         1.0680453 ,  0.03480718,  0.74578077,  0.        ,  0.        ,

         1.        ,  0.        ,  0.        ,  0.        ,  0.        ,
         0.        ,  0.        ,  1.        ,  0.        ,  0.        ,
         0.        ,  1.        ,  0.        ,  0.        ,  0.        ,
         1.        ,  0.        ,  0.        ,  0.        ,  1.        ,
         0.        ,  0.        ,  0.        ]], dtype=float32)>
สร้างและฝึกโมเดล
ตอนนี้สร้างตัวหลักของโมเดล ใช้การกำหนดค่าเดียวกันกับในตัวอย่างก่อนหน้านี้: เลเยอร์สองเลเยอร์ที่แก้ไขเชิงเส้นตรงหนาแน่นและเลเยอร์เอาต์พุต Dense Dense(1) สำหรับการจำแนกประเภท
body = tf.keras.Sequential([
  tf.keras.layers.Dense(10, activation='relu'),
  tf.keras.layers.Dense(10, activation='relu'),
  tf.keras.layers.Dense(1)
])
ตอนนี้นำทั้งสองส่วนมารวมกันโดยใช้ Keras functional API
inputs
{'age': <KerasTensor: shape=(None,) dtype=float32 (created by layer 'age')>,
 'sex': <KerasTensor: shape=(None,) dtype=int64 (created by layer 'sex')>,
 'cp': <KerasTensor: shape=(None,) dtype=int64 (created by layer 'cp')>,
 'trestbps': <KerasTensor: shape=(None,) dtype=float32 (created by layer 'trestbps')>,
 'chol': <KerasTensor: shape=(None,) dtype=float32 (created by layer 'chol')>,
 'fbs': <KerasTensor: shape=(None,) dtype=int64 (created by layer 'fbs')>,
 'restecg': <KerasTensor: shape=(None,) dtype=int64 (created by layer 'restecg')>,
 'thalach': <KerasTensor: shape=(None,) dtype=float32 (created by layer 'thalach')>,
 'exang': <KerasTensor: shape=(None,) dtype=int64 (created by layer 'exang')>,
 'oldpeak': <KerasTensor: shape=(None,) dtype=float32 (created by layer 'oldpeak')>,
 'slope': <KerasTensor: shape=(None,) dtype=int64 (created by layer 'slope')>,
 'ca': <KerasTensor: shape=(None,) dtype=int64 (created by layer 'ca')>,
 'thal': <KerasTensor: shape=(None,) dtype=string (created by layer 'thal')>}
x = preprocessor(inputs)
x
<KerasTensor: shape=(None, 33) dtype=float32 (created by layer 'model_1')>
result = body(x)
result
<KerasTensor: shape=(None, 1) dtype=float32 (created by layer 'sequential_3')>
model = tf.keras.Model(inputs, result)

model.compile(optimizer='adam',
                loss=tf.keras.losses.BinaryCrossentropy(from_logits=True),
                metrics=['accuracy'])
โมเดลนี้คาดว่าจะมีพจนานุกรมของอินพุต วิธีที่ง่ายที่สุดในการส่งผ่านข้อมูลคือการแปลง DataFrame เป็น dict และส่ง dict นั้นเป็นอาร์กิวเมนต์ x ไปยัง Model.fit :
history = model.fit(dict(df), target, epochs=5, batch_size=BATCH_SIZE)
Epoch 1/5
152/152 [==============================] - 1s 4ms/step - loss: 0.6911 - accuracy: 0.6997
Epoch 2/5
152/152 [==============================] - 1s 4ms/step - loss: 0.5073 - accuracy: 0.7393
Epoch 3/5
152/152 [==============================] - 1s 4ms/step - loss: 0.4129 - accuracy: 0.7888
Epoch 4/5
152/152 [==============================] - 1s 4ms/step - loss: 0.3663 - accuracy: 0.7921
Epoch 5/5
152/152 [==============================] - 1s 4ms/step - loss: 0.3363 - accuracy: 0.8152
การใช้ tf.data ใช้งานได้เช่นกัน:
ds = tf.data.Dataset.from_tensor_slices((
    dict(df),
    target
))

ds = ds.batch(BATCH_SIZE)
import pprint

for x, y in ds.take(1):
  pprint.pprint(x)
  print()
  print(y)
{'age': <tf.Tensor: shape=(2,), dtype=int64, numpy=array([63, 67])>,
 'ca': <tf.Tensor: shape=(2,), dtype=int64, numpy=array([0, 3])>,
 'chol': <tf.Tensor: shape=(2,), dtype=int64, numpy=array([233, 286])>,
 'cp': <tf.Tensor: shape=(2,), dtype=int64, numpy=array([1, 4])>,
 'exang': <tf.Tensor: shape=(2,), dtype=int64, numpy=array([0, 1])>,
 'fbs': <tf.Tensor: shape=(2,), dtype=int64, numpy=array([1, 0])>,
 'oldpeak': <tf.Tensor: shape=(2,), dtype=float64, numpy=array([2.3, 1.5])>,
 'restecg': <tf.Tensor: shape=(2,), dtype=int64, numpy=array([2, 2])>,
 'sex': <tf.Tensor: shape=(2,), dtype=int64, numpy=array([1, 1])>,
 'slope': <tf.Tensor: shape=(2,), dtype=int64, numpy=array([3, 2])>,
 'thal': <tf.Tensor: shape=(2,), dtype=string, numpy=array([b'fixed', b'normal'], dtype=object)>,
 'thalach': <tf.Tensor: shape=(2,), dtype=int64, numpy=array([150, 108])>,
 'trestbps': <tf.Tensor: shape=(2,), dtype=int64, numpy=array([145, 160])>}

tf.Tensor([0 1], shape=(2,), dtype=int64)
history = model.fit(ds, epochs=5)
Epoch 1/5
152/152 [==============================] - 1s 5ms/step - loss: 0.3150 - accuracy: 0.8284
Epoch 2/5
152/152 [==============================] - 1s 5ms/step - loss: 0.2989 - accuracy: 0.8449
Epoch 3/5
152/152 [==============================] - 1s 5ms/step - loss: 0.2870 - accuracy: 0.8449
Epoch 4/5
152/152 [==============================] - 1s 5ms/step - loss: 0.2782 - accuracy: 0.8482
Epoch 5/5
152/152 [==============================] - 1s 5ms/step - loss: 0.2712 - accuracy: 0.8482