
| | |  ดูบน GitHub ดูบน GitHub | |
Colab นี้คือการสาธิตการใช้ Tensorflow Hub สำหรับการจำแนกข้อความในที่ไม่ใช่ภาษาอังกฤษ / ภาษาท้องถิ่น ที่นี่เราเลือก บางลา เป็นภาษาและการใช้คำ pretrained ท้องถิ่น embeddings จะแก้เป็นงานที่จัดหมวดหมู่ multiclass ที่เราจัดบทความข่าวบางลาใน 5 ประเภท embeddings pretrained สำหรับบางลามาจาก fastText ซึ่งเป็นห้องสมุดโดย Facebook ด้วยการปล่อยตัว pretrained เวกเตอร์คำ 157 ภาษา
เราจะใช้ pretrained ส่งออกฝัง TF-Hub ของสำหรับการแปลง embeddings คำเพื่อโมดูลฝังข้อความแรกและจากนั้นใช้โมดูลการฝึกอบรมลักษณนามกับ tf.keras ผู้ใช้ API ระดับสูงที่เป็นมิตร Tensorflow เพื่อสร้างโมเดลการเรียนรู้ลึก แม้ว่าเราจะใช้การฝัง fastText ที่นี่ ก็สามารถส่งออกการฝังอื่นๆ ที่ได้รับการฝึกจากงานอื่นๆ และรับผลลัพธ์อย่างรวดเร็วด้วยฮับ Tensorflow
ติดตั้ง
# https://github.com/pypa/setuptools/issues/1694#issuecomment-466010982pip install gdown --no-use-pep517
sudo apt-get install -y unzip
Reading package lists...
Building dependency tree...
Reading state information...
unzip is already the newest version (6.0-21ubuntu1.1).
The following packages were automatically installed and are no longer required:
  linux-gcp-5.4-headers-5.4.0-1040 linux-gcp-5.4-headers-5.4.0-1043
  linux-gcp-5.4-headers-5.4.0-1044 linux-gcp-5.4-headers-5.4.0-1049
  linux-headers-5.4.0-1049-gcp linux-image-5.4.0-1049-gcp
  linux-modules-5.4.0-1049-gcp linux-modules-extra-5.4.0-1049-gcp
Use 'sudo apt autoremove' to remove them.
0 upgraded, 0 newly installed, 0 to remove and 143 not upgraded.
import os

import tensorflow as tf
import tensorflow_hub as hub

import gdown
import numpy as np
from sklearn.metrics import classification_report
import matplotlib.pyplot as plt
import seaborn as sns
/tmpfs/src/tf_docs_env/lib/python3.7/site-packages/pkg_resources/__init__.py:119: PkgResourcesDeprecationWarning: 0.18ubuntu0.18.04.1 is an invalid version and will not be supported in a future release
  PkgResourcesDeprecationWarning,
ชุดข้อมูล
เราจะใช้ นักประพันธ์เพลง (บางลาบทความชุดข้อมูล) ซึ่งมีประมาณ 376,226 บทความที่เก็บได้จากที่แตกต่างกันบางลาพอร์ทัลข่าวและติดป้ายที่มี 5 หมวดหมู่: เศรษฐกิจรัฐระหว่างประเทศกีฬาและความบันเทิง เราดาวน์โหลดไฟล์จาก Google ไดรฟ์นี้ ( bit.ly/BARD_DATASET link) จะหมายถึงจาก นี้ พื้นที่เก็บข้อมูล GitHub
gdown.download(
    url='https://drive.google.com/uc?id=1Ag0jd21oRwJhVFIBohmX_ogeojVtapLy',
    output='bard.zip',
    quiet=True
)
'bard.zip'
unzip -qo bard.zip
ส่งออกเวกเตอร์คำที่ฝึกไว้ล่วงหน้าไปยังโมดูล TF-Hub
TF-Hub ให้สคริปต์ประโยชน์บางอย่างสำหรับการแปลง embeddings คำ TF-ศูนย์กลางโมดูลฝังข้อความ ที่นี่ เพื่อให้โมดูลสำหรับบางลาหรือภาษาอื่น ๆ เราก็ต้องดาวน์โหลดคำฝัง .txt หรือ .vec ไฟล์ไปยังไดเรกทอรีเดียวกันกับ export_v2.py และเรียกใช้สคริปต์
ผู้ส่งออกอ่านเวกเตอร์ฝังและส่งออกไปยัง Tensorflow SavedModel SavedModel ประกอบด้วยโปรแกรม TensorFlow ที่สมบูรณ์ ซึ่งรวมถึงน้ำหนักและกราฟ TF-Hub สามารถโหลด SavedModel เป็น โมดูล ซึ่งเราจะใช้ในการสร้างแบบจำลองสำหรับการจัดหมวดหมู่ข้อความ เนื่องจากเรามีการใช้ tf.keras ในการสร้างรูปแบบที่เราจะใช้ hub.KerasLayer ซึ่งมีเสื้อคลุมสำหรับโมดูล TF-Hub เพื่อใช้เป็นชั้น Keras
ครั้งแรกที่เราจะได้รับ embeddings คำพูดของเราจาก fastText และส่งออกจากการฝัง TF-Hub repo
curl -O https://dl.fbaipublicfiles.com/fasttext/vectors-crawl/cc.bn.300.vec.gzcurl -O https://raw.githubusercontent.com/tensorflow/hub/master/examples/text_embeddings_v2/export_v2.pygunzip -qf cc.bn.300.vec.gz --k
% Total    % Received % Xferd  Average Speed   Time    Time     Time  Current
                                 Dload  Upload   Total   Spent    Left  Speed
100  840M  100  840M    0     0  11.6M      0  0:01:12  0:01:12 --:--:-- 12.0M
  % Total    % Received % Xferd  Average Speed   Time    Time     Time  Current
                                 Dload  Upload   Total   Spent    Left  Speed
100  7469  100  7469    0     0  19053      0 --:--:-- --:--:-- --:--:-- 19005
จากนั้น เราจะเรียกใช้สคริปต์ผู้ส่งออกในไฟล์ฝังของเรา เนื่องจาก fastText embeddings มีส่วนหัวและค่อนข้างใหญ่ (ประมาณ 3.3 GB สำหรับ Bangla หลังจากแปลงเป็นโมดูล) เราไม่สนใจบรรทัดแรกและส่งออกเฉพาะ 100, 000 โทเค็นแรกไปยังโมดูลการฝังข้อความ
python export_v2.py --embedding_file=cc.bn.300.vec --export_path=text_module --num_lines_to_ignore=1 --num_lines_to_use=100000
INFO:tensorflow:Assets written to: text_module/assets
I1105 11:55:29.817717 140238757988160 builder_impl.py:784] Assets written to: text_module/assets
module_path = "text_module"
embedding_layer = hub.KerasLayer(module_path, trainable=False)
โมดูลการฝังข้อความใช้ชุดประโยคในเทนเซอร์ 1 มิติของสตริงเป็นอินพุตและเอาต์พุตเวกเตอร์การฝังของรูปร่าง (batch_size, embedding_dim) ที่สอดคล้องกับประโยค มันประมวลผลอินพุตล่วงหน้าโดยแยกช่องว่าง embeddings Word ที่จะรวมกันเพื่อ embeddings ประโยคกับ sqrtn combiner (ดู ที่นี่ ) สำหรับการสาธิต เราส่งรายการคำบางลาเป็นอินพุตและรับเวกเตอร์การฝังที่เกี่ยวข้อง
embedding_layer(['বাস', 'বসবাস', 'ট্রেন', 'যাত্রী', 'ট্রাক'])
<tf.Tensor: shape=(5, 300), dtype=float64, numpy=
array([[ 0.0462, -0.0355,  0.0129, ...,  0.0025, -0.0966,  0.0216],
       [-0.0631, -0.0051,  0.085 , ...,  0.0249, -0.0149,  0.0203],
       [ 0.1371, -0.069 , -0.1176, ...,  0.029 ,  0.0508, -0.026 ],
       [ 0.0532, -0.0465, -0.0504, ...,  0.02  , -0.0023,  0.0011],
       [ 0.0908, -0.0404, -0.0536, ..., -0.0275,  0.0528,  0.0253]])>
แปลงเป็นชุดข้อมูลเทนเซอร์โฟลว์
ตั้งแต่ชุดข้อมูลที่เป็นจริงที่มีขนาดใหญ่แทนการโหลดชุดข้อมูลทั้งหมดในหน่วยความจำเราจะใช้เครื่องกำเนิดไฟฟ้าให้ผลผลิตตัวอย่างในเวลาทำงานใน batches ใช้ Tensorflow ชุดข้อมูล ฟังก์ชั่น ชุดข้อมูลนั้นไม่สมดุลเช่นกัน ดังนั้นก่อนใช้ตัวสร้าง เราจะสับเปลี่ยนชุดข้อมูล
dir_names = ['economy', 'sports', 'entertainment', 'state', 'international']

file_paths = []
labels = []
for i, dir in enumerate(dir_names):
  file_names = ["/".join([dir, name]) for name in os.listdir(dir)]
  file_paths += file_names
  labels += [i] * len(os.listdir(dir))

np.random.seed(42)
permutation = np.random.permutation(len(file_paths))

file_paths = np.array(file_paths)[permutation]
labels = np.array(labels)[permutation]
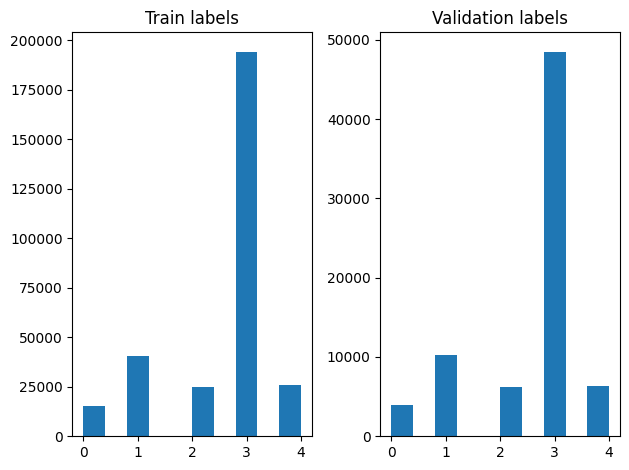
เราสามารถตรวจสอบการแจกแจงฉลากได้ในตัวอย่างการฝึกและการตรวจสอบหลังจากการสับเปลี่ยน
train_frac = 0.8
train_size = int(len(file_paths) * train_frac)
# plot training vs validation distribution
plt.subplot(1, 2, 1)
plt.hist(labels[0:train_size])
plt.title("Train labels")
plt.subplot(1, 2, 2)
plt.hist(labels[train_size:])
plt.title("Validation labels")
plt.tight_layout()
เพื่อสร้าง ชุดข้อมูล ใช้เครื่องกำเนิดไฟฟ้าครั้งแรกที่เราเขียนฟังก์ชั่นเครื่องกำเนิดไฟฟ้าที่อ่านแต่ละบทความจาก file_paths และป้ายชื่อจาก array ฉลากและอัตราผลตอบแทนเช่นการฝึกอบรมในแต่ละขั้นตอน เราผ่านฟังก์ชั่นเครื่องกำเนิดไฟฟ้านี้ไป tf.data.Dataset.from_generator วิธีการและระบุชนิดของการส่งออก ตัวอย่างเช่นการฝึกอบรมแต่ละคนเป็นอันดับที่มีบทความของ tf.string ชนิดข้อมูลและฉลากเข้ารหัสหนึ่งร้อน เราแบ่งชุดข้อมูลที่มีการแยกรถไฟตรวจสอบของ 80-20 ใช้ tf.data.Dataset.skip และ tf.data.Dataset.take วิธี
def load_file(path, label):
    return tf.io.read_file(path), label
def make_datasets(train_size):
  batch_size = 256

  train_files = file_paths[:train_size]
  train_labels = labels[:train_size]
  train_ds = tf.data.Dataset.from_tensor_slices((train_files, train_labels))
  train_ds = train_ds.map(load_file).shuffle(5000)
  train_ds = train_ds.batch(batch_size).prefetch(tf.data.AUTOTUNE)

  test_files = file_paths[train_size:]
  test_labels = labels[train_size:]
  test_ds = tf.data.Dataset.from_tensor_slices((test_files, test_labels))
  test_ds = test_ds.map(load_file)
  test_ds = test_ds.batch(batch_size).prefetch(tf.data.AUTOTUNE)


  return train_ds, test_ds
train_data, validation_data = make_datasets(train_size)
การฝึกโมเดลและการประเมิน
เนื่องจากเราได้เพิ่มเสื้อคลุมรอบโมดูลของเราที่จะใช้เป็นชั้นอื่น ๆ ใน Keras เราสามารถสร้างขนาดเล็ก ตามลำดับ รุ่นซึ่งเป็นกองเชิงเส้นของชั้น เราสามารถเพิ่มโมดูลฝังข้อความของเรากับ model.add เช่นเดียวกับชั้นอื่น ๆ เรารวบรวมโมเดลโดยระบุการสูญเสียและตัวเพิ่มประสิทธิภาพและฝึกฝนเป็นเวลา 10 ยุค tf.keras API สามารถจัดการ Tensorflow ชุดข้อมูลเป็นข้อมูลเพื่อให้เราสามารถผ่านอินสแตนซ์ชุดข้อมูลกับวิธีการที่เหมาะสมในการฝึกอบรมรุ่น เนื่องจากเรามีการใช้ฟังก์ชั่นเครื่องกำเนิดไฟฟ้า, tf.data จะจัดการสร้างตัวอย่างที่ batching พวกเขาและให้อาหารพวกเขาไปยังรูปแบบ
แบบอย่าง
def create_model():
  model = tf.keras.Sequential([
    tf.keras.layers.Input(shape=[], dtype=tf.string),
    embedding_layer,
    tf.keras.layers.Dense(64, activation="relu"),
    tf.keras.layers.Dense(16, activation="relu"),
    tf.keras.layers.Dense(5),
  ])
  model.compile(loss=tf.losses.SparseCategoricalCrossentropy(from_logits=True),
      optimizer="adam", metrics=['accuracy'])
  return model
model = create_model()
# Create earlystopping callback
early_stopping_callback = tf.keras.callbacks.EarlyStopping(monitor='val_loss', min_delta=0, patience=3)
การฝึกอบรม
history = model.fit(train_data,
                    validation_data=validation_data,
                    epochs=5,
                    callbacks=[early_stopping_callback])
Epoch 1/5
1176/1176 [==============================] - 34s 28ms/step - loss: 0.2181 - accuracy: 0.9279 - val_loss: 0.1580 - val_accuracy: 0.9449
Epoch 2/5
1176/1176 [==============================] - 32s 27ms/step - loss: 0.1411 - accuracy: 0.9505 - val_loss: 0.1411 - val_accuracy: 0.9503
Epoch 3/5
1176/1176 [==============================] - 32s 27ms/step - loss: 0.1307 - accuracy: 0.9534 - val_loss: 0.1359 - val_accuracy: 0.9524
Epoch 4/5
1176/1176 [==============================] - 32s 27ms/step - loss: 0.1248 - accuracy: 0.9555 - val_loss: 0.1318 - val_accuracy: 0.9527
Epoch 5/5
1176/1176 [==============================] - 32s 27ms/step - loss: 0.1196 - accuracy: 0.9567 - val_loss: 0.1247 - val_accuracy: 0.9555
การประเมิน
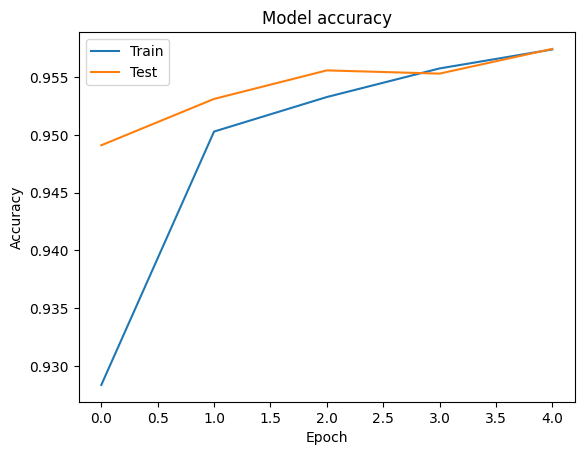
เราสามารถมองเห็นภาพความถูกต้องและการสูญเสียเส้นโค้งสำหรับการฝึกอบรมและการตรวจสอบข้อมูลโดยใช้ tf.keras.callbacks.History วัตถุส่งกลับโดย tf.keras.Model.fit วิธีการที่มีการสูญเสียและความถูกต้องคุ้มค่าสำหรับแต่ละยุค
# Plot training & validation accuracy values
plt.plot(history.history['accuracy'])
plt.plot(history.history['val_accuracy'])
plt.title('Model accuracy')
plt.ylabel('Accuracy')
plt.xlabel('Epoch')
plt.legend(['Train', 'Test'], loc='upper left')
plt.show()
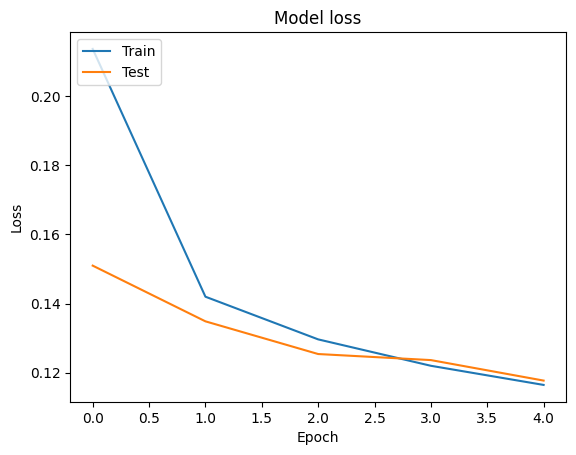
# Plot training & validation loss values
plt.plot(history.history['loss'])
plt.plot(history.history['val_loss'])
plt.title('Model loss')
plt.ylabel('Loss')
plt.xlabel('Epoch')
plt.legend(['Train', 'Test'], loc='upper left')
plt.show()
การทำนาย
เราสามารถรับการคาดคะเนสำหรับข้อมูลการตรวจสอบความถูกต้อง และตรวจสอบเมทริกซ์ความสับสนเพื่อดูประสิทธิภาพของโมเดลสำหรับ 5 คลาสแต่ละคลาส เพราะ tf.keras.Model.predict วิธีการส่งกลับอาร์เรย์ครั้งสำหรับความน่าจะเป็นสำหรับแต่ละชั้นเรียนที่พวกเขาสามารถแปลงเป็นป้ายระดับการใช้ np.argmax
y_pred = model.predict(validation_data)
y_pred = np.argmax(y_pred, axis=1)
samples = file_paths[0:3]
for i, sample in enumerate(samples):
  f = open(sample)
  text = f.read()
  print(text[0:100])
  print("True Class: ", sample.split("/")[0])
  print("Predicted Class: ", dir_names[y_pred[i]])
  f.close()
রবিন উইলিয়ামস তাঁর হ্যাপি ফিট ছবিতে মজা করে বলেছিলেন, ‘আমি শুনতে পাচ্ছি, মানুষ কিছু একটা চাইছে...সে
True Class:  entertainment
Predicted Class:  state

নির্মাণ শেষে ফিতা কেটে মন্ত্রী ভবন উদ্বোধন করেছেন বহু আগেই। তবে এখনো চালু করা যায়নি খাগড়াছড়ি জেল
True Class:  state
Predicted Class:  state

কমলাপুর বীরশ্রেষ্ঠ মোস্তফা কামাল স্টেডিয়ামে কাল ফকিরেরপুল ইয়ংমেন্স ক্লাব ৩-০ গোলে হারিয়েছে স্বাধ
True Class:  sports
Predicted Class:  state
เปรียบเทียบประสิทธิภาพ
ตอนนี้เราสามารถใช้ฉลากที่ถูกต้องสำหรับการตรวจสอบข้อมูลจาก labels และเปรียบเทียบกับการคาดการณ์ของเราที่จะได้รับ classification_report
y_true = np.array(labels[train_size:])
print(classification_report(y_true, y_pred, target_names=dir_names))
precision    recall  f1-score   support

      economy       0.83      0.76      0.79      3897
       sports       0.99      0.98      0.98     10204
entertainment       0.90      0.94      0.92      6256
        state       0.97      0.97      0.97     48512
international       0.92      0.93      0.93      6377

     accuracy                           0.96     75246
    macro avg       0.92      0.92      0.92     75246
 weighted avg       0.96      0.96      0.96     75246
นอกจากนี้เรายังสามารถเปรียบเทียบประสิทธิภาพของรูปแบบของเราที่มีการตีพิมพ์ผลที่ได้รับในต้นฉบับ กระดาษ ซึ่งมีความแม่นยำ 0.96 ได้โดยเริ่มต้นเขียนต้นฉบับอธิบายขั้นตอนก่อนการประมวลผลการดำเนินการในหลายชุดเช่นวางเครื่องหมายวรรคตอนและตัวเลขการลบชั้น 25 frequest ที่สุดคำหยุด ในฐานะที่เราสามารถมองเห็นในที่ classification_report เรายังจัดการเพื่อให้ได้ความแม่นยำและความถูกต้อง 0.96 หลังการฝึกอบรมเพียง 5 epochs โดยไม่ต้องประมวลผลเบื้องต้นใด ๆ !
ในตัวอย่างนี้เมื่อเราได้สร้างชั้น Keras จากโมดูลฝังของเราเราตั้งค่าพารามิเตอร์ trainable=False ซึ่งหมายความว่าน้ำหนักการฝังจะไม่ได้รับการปรับปรุงในระหว่างการฝึกอบรม ลองตั้งค่าให้ True ที่จะไปถึงความถูกต้องรอบ ๆ 97% โดยใช้ชุดนี้หลังจากนั้นเพียง 2 ยุคสมัย