
ภาพรวม
TensorFlow Model Analysis (TFMA) เป็นไลบรารีสำหรับดำเนินการประเมินโมเดล
- สำหรับ : Machine Learning Engineers หรือ Data Scientists
- who : ต้องการวิเคราะห์และทำความเข้าใจโมเดล TensorFlow ของพวกเขา
- มันคือ : ไลบรารีแบบสแตนด์อโลนหรือส่วนประกอบของไปป์ไลน์ TFX
- ที่ : ประเมินแบบจำลองบนข้อมูลจำนวนมากในลักษณะกระจายบนตัวชี้วัดเดียวกันที่กำหนดไว้ในการฝึกอบรม เมตริกเหล่านี้จะถูกเปรียบเทียบกับข้อมูลบางส่วน และแสดงเป็นภาพในสมุดบันทึก Jupyter หรือ Colab
- ไม่เหมือน : เครื่องมือวิปัสสนาโมเดลบางรุ่น เช่น เทนเซอร์บอร์ดที่นำเสนอวิปัสสนาแบบจำลอง
TFMA ดำเนินการคำนวณในลักษณะกระจายบนข้อมูลจำนวนมากโดยใช้ Apache Beam ส่วนต่อไปนี้จะอธิบายวิธีการตั้งค่าไปป์ไลน์การประเมิน TFMA พื้นฐาน ดูรายละเอียดเพิ่มเติมเกี่ยว กับสถาปัตยกรรม ในการใช้งานพื้นฐาน
หากคุณเพียงต้องการเริ่มต้นใช้งาน ลองดูสมุดบันทึก Colab ของเรา
หน้านี้สามารถดูได้จาก tensorflow.org
ประเภทรุ่นที่รองรับ
TFMA ได้รับการออกแบบมาเพื่อรองรับโมเดลที่ใช้เทนเซอร์โฟลว์ แต่สามารถขยายเพื่อรองรับเฟรมเวิร์กอื่น ๆ ได้อย่างง่ายดาย ในอดีต TFMA กำหนดให้สร้าง EvalSavedModel เพื่อใช้ TFMA แต่ TFMA เวอร์ชันล่าสุดรองรับโมเดลหลายประเภท ขึ้นอยู่กับความต้องการของผู้ใช้ ควร ตั้งค่า EvalSavedModel เฉพาะในกรณีที่ใช้โมเดลที่ใช้ tf.estimator และจำเป็นต้องมีตัววัดเวลาการฝึกแบบกำหนดเอง
โปรดทราบว่าเนื่องจากขณะนี้ TFMA ทำงานตามรูปแบบการให้บริการ TFMA จะไม่ประเมินเมตริกที่เพิ่มในเวลาการฝึกอบรมโดยอัตโนมัติอีกต่อไป ข้อยกเว้นสำหรับกรณีนี้คือ หากใช้โมเดล keras เนื่องจาก keras บันทึกหน่วยเมตริกที่ใช้ควบคู่ไปกับโมเดลที่บันทึกไว้ อย่างไรก็ตาม หากนี่เป็นข้อกำหนดที่ยาก TFMA ล่าสุดจะเข้ากันได้แบบย้อนหลัง โดยที่ EvalSavedModel ยังคงสามารถเรียกใช้ในไปป์ไลน์ TFMA ได้
ตารางต่อไปนี้สรุปรุ่นที่รองรับโดยค่าเริ่มต้น:
| ประเภทรุ่น | การวัดเวลาการฝึกอบรม | ตัวชี้วัดหลังการฝึกอบรม |
|---|---|---|
| TF2 (เครา) | ใช่* | ย |
| TF2 (ทั่วไป) | ไม่มี | ย |
| EvalSavedModel (ตัวประมาณค่า) | ย | ย |
| ไม่มี (pd.DataFrame ฯลฯ) | ไม่มี | ย |
- ตัววัดเวลาการฝึกหมายถึงตัววัดที่กำหนด ณ เวลาการฝึกและบันทึกด้วยโมเดล (TFMA EvalSavedModel หรือโมเดลที่บันทึกไว้ keras) เมทริกหลังการฝึกอบรมหมายถึงเมทริกที่เพิ่มผ่าน
tfma.MetricConfig - โมเดล TF2 ทั่วไปเป็นโมเดลแบบกำหนดเองที่ส่งออกลายเซ็นที่สามารถใช้ในการอนุมานได้ และไม่ได้ขึ้นอยู่กับ keras หรือตัวประมาณค่า
ดู คำถามที่พบบ่อย สำหรับข้อมูลเพิ่มเติมเกี่ยวกับวิธีการตั้งค่าและกำหนดค่าประเภทโมเดลต่างๆ เหล่านี้
ตั้งค่า
ก่อนที่จะดำเนินการประเมิน จำเป็นต้องมีการตั้งค่าเล็กน้อย ขั้นแรก ต้องกำหนดอ็อบเจ็กต์ tfma.EvalConfig ซึ่งมีข้อกำหนดเฉพาะสำหรับโมเดล เมทริก และสไลซ์ที่จะได้รับการประเมิน ประการที่สอง จะต้องสร้าง tfma.EvalSharedModel ซึ่งชี้ไปที่โมเดลจริง (หรือโมเดล) ที่จะใช้ในระหว่างการประเมิน เมื่อกำหนดสิ่งเหล่านี้แล้ว การประเมินจะดำเนินการโดยการเรียก tfma.run_model_analysis ด้วยชุดข้อมูลที่เหมาะสม สำหรับรายละเอียดเพิ่มเติม โปรดดูคู่มือ การตั้งค่า
หากทำงานภายในไปป์ไลน์ TFX โปรดดู คำแนะนำ TFX สำหรับวิธีกำหนดค่า TFMA ให้ทำงานเป็นส่วนประกอบ TFX Evaluator
ตัวอย่าง
การประเมินแบบจำลองเดี่ยว
ข้อมูลต่อไปนี้ใช้ tfma.run_model_analysis เพื่อทำการประเมินโมเดลการให้บริการ สำหรับคำอธิบายเกี่ยวกับการตั้งค่าต่างๆ ที่จำเป็น โปรดดูคู่มือ การตั้งค่า
# Run in a Jupyter Notebook.
from google.protobuf import text_format

eval_config = text_format.Parse("""
  ## Model information
  model_specs {
    # This assumes a serving model with a "serving_default" signature.
    label_key: "label"
    example_weight_key: "weight"
  }
  ## Post export metric information
  metrics_specs {
    # This adds AUC as a post training metric. If the model has built in
    # training metrics which also contains AUC, this metric will replace it.
    metrics { class_name: "AUC" }
    # ... other post training metrics ...

    # Plots are also configured here...
    metrics { class_name: "ConfusionMatrixPlot" }
  }
  ## Slicing information
  slicing_specs {}  # overall slice
  slicing_specs {
    feature_keys: ["age"]
  }
""", tfma.EvalConfig())

eval_shared_model = tfma.default_eval_shared_model(
    eval_saved_model_path='/path/to/saved/model', eval_config=eval_config)

eval_result = tfma.run_model_analysis(
    eval_shared_model=eval_shared_model,
    eval_config=eval_config,
    # This assumes your data is a TFRecords file containing records in the
    # tf.train.Example format.
    data_location='/path/to/file/containing/tfrecords',
    output_path='/path/for/output')

tfma.view.render_slicing_metrics(eval_result)
สำหรับการประเมินแบบกระจาย ให้สร้างไปป์ไลน์ Apache Beam โดยใช้ตัวรันแบบกระจาย ในไปป์ไลน์ ให้ใช้ tfma.ExtractEvaluateAndWriteResults สำหรับการประเมินและเขียนผลลัพธ์ สามารถโหลดผลลัพธ์เพื่อสร้างภาพได้โดยใช้ tfma.load_eval_result
ตัวอย่างเช่น:
# To run the pipeline.
from google.protobuf import text_format
from tfx_bsl.tfxio import tf_example_record

eval_config = text_format.Parse("""
  ## Model information
  model_specs {
    # This assumes a serving model with a "serving_default" signature.
    label_key: "label"
    example_weight_key: "weight"
  }
  ## Post export metric information
  metrics_specs {
    # This adds AUC and as a post training metric. If the model has built in
    # training metrics which also contains AUC, this metric will replace it.
    metrics { class_name: "AUC" }
    # ... other post training metrics ...

    # Plots are also configured here...
    metrics { class_name: "ConfusionMatrixPlot" }
  }
  ## Slicing information
  slicing_specs {}  # overall slice
  slicing_specs {
    feature_keys: ["age"]
  }
""", tfma.EvalConfig())

eval_shared_model = tfma.default_eval_shared_model(
    eval_saved_model_path='/path/to/saved/model', eval_config=eval_config)

output_path = '/path/for/output'

tfx_io = tf_example_record.TFExampleRecord(
    file_pattern=data_location, raw_record_column_name=tfma.ARROW_INPUT_COLUMN)

with beam.Pipeline(runner=...) as p:
  _ = (p
       # You can change the source as appropriate, e.g. read from BigQuery.
       # This assumes your data is a TFRecords file containing records in the
       # tf.train.Example format. If using EvalSavedModel then use the following
       # instead: 'ReadData' >> beam.io.ReadFromTFRecord(file_pattern=...)
       | 'ReadData' >> tfx_io.BeamSource()
       | 'ExtractEvaluateAndWriteResults' >>
       tfma.ExtractEvaluateAndWriteResults(
            eval_shared_model=eval_shared_model,
            eval_config=eval_config,
            output_path=output_path))

# To load and visualize results.
# Note that this code should be run in a Jupyter Notebook.
result = tfma.load_eval_result(output_path)
tfma.view.render_slicing_metrics(result)
การตรวจสอบแบบจำลอง
หากต้องการดำเนินการตรวจสอบโมเดลกับผู้สมัครและพื้นฐาน ให้อัปเดตการกำหนดค่าเพื่อรวมการตั้งค่าขีดจำกัด และส่งสองโมเดลไปที่ tfma.run_model_analysis
ตัวอย่างเช่น:
# Run in a Jupyter Notebook.
from google.protobuf import text_format

eval_config = text_format.Parse("""
  ## Model information
  model_specs {
    # This assumes a serving model with a "serving_default" signature.
    label_key: "label"
    example_weight_key: "weight"
  }
  ## Post export metric information
  metrics_specs {
    # This adds AUC and as a post training metric. If the model has built in
    # training metrics which also contains AUC, this metric will replace it.
    metrics {
      class_name: "AUC"
      threshold {
        value_threshold {
          lower_bound { value: 0.9 }
        }
        change_threshold {
          direction: HIGHER_IS_BETTER
          absolute { value: -1e-10 }
        }
      }
    }
    # ... other post training metrics ...

    # Plots are also configured here...
    metrics { class_name: "ConfusionMatrixPlot" }
  }
  ## Slicing information
  slicing_specs {}  # overall slice
  slicing_specs {
    feature_keys: ["age"]
  }
""", tfma.EvalConfig())

eval_shared_models = [
  tfma.default_eval_shared_model(
      model_name=tfma.CANDIDATE_KEY,
      eval_saved_model_path='/path/to/saved/candiate/model',
      eval_config=eval_config),
  tfma.default_eval_shared_model(
      model_name=tfma.BASELINE_KEY,
      eval_saved_model_path='/path/to/saved/baseline/model',
      eval_config=eval_config),
]

output_path = '/path/for/output'

eval_result = tfma.run_model_analysis(
    eval_shared_models,
    eval_config=eval_config,
    # This assumes your data is a TFRecords file containing records in the
    # tf.train.Example format.
    data_location='/path/to/file/containing/tfrecords',
    output_path=output_path)

tfma.view.render_slicing_metrics(eval_result)
tfma.load_validation_result(output_path)
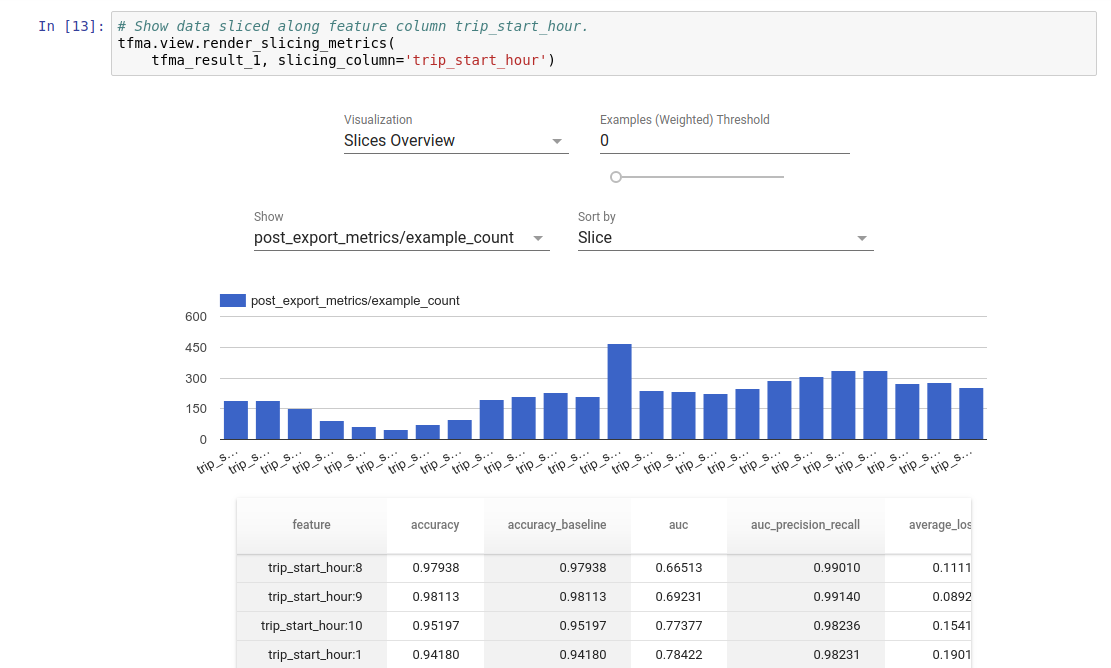
การแสดงภาพ
ผลการประเมิน TFMA สามารถมองเห็นได้ในสมุดบันทึก Jupyter โดยใช้ส่วนประกอบส่วนหน้าที่รวมอยู่ใน TFMA ตัวอย่างเช่น:
 -
-