
| | |  ดูแหล่งที่มาบน GitHub ดูแหล่งที่มาบน GitHub | |
บทช่วยสอนนี้สาธิตการจัดประเภทข้อความโดยเริ่มจากไฟล์ข้อความธรรมดาที่จัดเก็บไว้ในดิสก์ คุณจะฝึกตัวแยกประเภทไบนารีเพื่อทำการวิเคราะห์ความเชื่อมั่นในชุดข้อมูล IMDB ที่ส่วนท้ายของสมุดบันทึก มีแบบฝึกหัดให้คุณลอง ซึ่งคุณจะได้ฝึกตัวแยกประเภทแบบหลายคลาสเพื่อทำนายแท็กสำหรับคำถามการเขียนโปรแกรมบน Stack Overflow
import matplotlib.pyplot as plt
import os
import re
import shutil
import string
import tensorflow as tf

from tensorflow.keras import layers
from tensorflow.keras import losses
print(tf.__version__)
2.8.0-rc1
การวิเคราะห์ความรู้สึก
สมุดบันทึกนี้ฝึกรูปแบบการวิเคราะห์ความรู้สึกเพื่อจัดประเภทบทวิจารณ์ภาพยนตร์เป็น บวก หรือ ลบ ตามเนื้อหาของบทวิจารณ์ นี่คือตัวอย่างของการจำแนก เลขฐาน สองหรือสองคลาส ซึ่งเป็นปัญหาการเรียนรู้ของเครื่องที่สำคัญและนำไปใช้ได้อย่างกว้างขวาง
คุณจะใช้ ชุดข้อมูลการวิจารณ์ภาพยนตร์ขนาดใหญ่ ที่มีข้อความบทวิจารณ์ภาพยนตร์ 50,000 เรื่องจาก ฐานข้อมูลภาพยนตร์อินเทอร์เน็ต สิ่งเหล่านี้แบ่งออกเป็น 25,000 รีวิวสำหรับการฝึกอบรมและ 25,000 รีวิวสำหรับการทดสอบ ชุดการฝึกอบรมและการทดสอบมี ความสมดุล ซึ่งหมายความว่าประกอบด้วยบทวิจารณ์เชิงบวกและเชิงลบจำนวนเท่ากัน
ดาวน์โหลดและสำรวจชุดข้อมูล IMDB
มาดาวน์โหลดและแตกชุดข้อมูล จากนั้นสำรวจโครงสร้างไดเรกทอรี
url = "https://ai.stanford.edu/~amaas/data/sentiment/aclImdb_v1.tar.gz"

dataset = tf.keras.utils.get_file("aclImdb_v1", url,
                                    untar=True, cache_dir='.',
                                    cache_subdir='')

dataset_dir = os.path.join(os.path.dirname(dataset), 'aclImdb')
Downloading data from https://ai.stanford.edu/~amaas/data/sentiment/aclImdb_v1.tar.gz
84131840/84125825 [==============================] - 6s 0us/step
84140032/84125825 [==============================] - 6s 0us/step
os.listdir(dataset_dir)
['test', 'README', 'imdbEr.txt', 'imdb.vocab', 'train']
train_dir = os.path.join(dataset_dir, 'train')
os.listdir(train_dir)
['neg',
 'urls_neg.txt',
 'unsup',
 'unsupBow.feat',
 'urls_unsup.txt',
 'urls_pos.txt',
 'labeledBow.feat',
 'pos']
aclImdb/train/pos และ aclImdb/train/neg มีไฟล์ข้อความจำนวนมาก ซึ่งแต่ละไฟล์เป็นการวิจารณ์ภาพยนตร์เพียงเรื่องเดียว ลองดูที่หนึ่งในนั้น
sample_file = os.path.join(train_dir, 'pos/1181_9.txt')
with open(sample_file) as f:
  print(f.read())
Rachel Griffiths writes and directs this award winning short film. A heartwarming story about coping with grief and cherishing the memory of those we've loved and lost. Although, only 15 minutes long, Griffiths manages to capture so much emotion and truth onto film in the short space of time. Bud Tingwell gives a touching performance as Will, a widower struggling to cope with his wife's death. Will is confronted by the harsh reality of loneliness and helplessness as he proceeds to take care of Ruth's pet cow, Tulip. The film displays the grief and responsibility one feels for those they have loved and lost. Good cinematography, great direction, and superbly acted. It will bring tears to all those who have lost a loved one, and survived.
โหลดชุดข้อมูล
ถัดไป คุณจะโหลดข้อมูลออกจากดิสก์และเตรียมข้อมูลให้อยู่ในรูปแบบที่เหมาะสมกับการฝึกอบรม ในการดำเนินการดังกล่าว คุณจะต้องใช้ยูทิลิตี้ text_dataset_from_directory ที่เป็นประโยชน์ ซึ่งคาดว่าจะมีโครงสร้างไดเร็กทอรีดังนี้
main_directory/
...class_a/
......a_text_1.txt
......a_text_2.txt
...class_b/
......b_text_1.txt
......b_text_2.txt
ในการเตรียมชุดข้อมูลสำหรับการจัดประเภทไบนารี คุณจะต้องมีสองโฟลเดอร์บนดิสก์ ซึ่งสอดคล้องกับ class_a และ class_b สิ่งเหล่านี้จะเป็นบทวิจารณ์ภาพยนตร์เชิงบวกและเชิงลบ ซึ่งสามารถพบได้ใน aclImdb/train/pos และ aclImdb/train/neg เนื่องจากชุดข้อมูล IMDB มีโฟลเดอร์เพิ่มเติม คุณจะต้องลบออกก่อนที่จะใช้ยูทิลิตี้นี้
remove_dir = os.path.join(train_dir, 'unsup')
shutil.rmtree(remove_dir)
ถัดไป คุณจะใช้ยูทิลิตี้ text_dataset_from_directory เพื่อสร้าง tf.data.Dataset ที่มีป้ายกำกับ tf.data คือชุดเครื่องมือที่มีประสิทธิภาพสำหรับการทำงานกับข้อมูล
เมื่อทำการทดสอบแมชชีนเลิร์นนิง แนวทางปฏิบัติที่ดีที่สุดในการแบ่งชุดข้อมูลของคุณออกเป็นสามส่วน: ฝึกอบรม การตรวจสอบความถูกต้อง และ การทดสอบ
ชุดข้อมูล IMDB ถูกแบ่งออกเป็นการฝึกและการทดสอบแล้ว แต่ไม่มีชุดการตรวจสอบความถูกต้อง มาสร้างชุดการตรวจสอบโดยใช้การแบ่งข้อมูลการฝึก 80:20 โดยใช้อาร์กิวเมนต์ validation_split ด้านล่าง
batch_size = 32
seed = 42

raw_train_ds = tf.keras.utils.text_dataset_from_directory(
    'aclImdb/train',
    batch_size=batch_size,
    validation_split=0.2,
    subset='training',
    seed=seed)
Found 25000 files belonging to 2 classes.
Using 20000 files for training.
ดังที่คุณเห็นด้านบน มีตัวอย่าง 25,000 ตัวอย่างในโฟลเดอร์การฝึกอบรม ซึ่งคุณจะใช้ 80% (หรือ 20,000) สำหรับการฝึกอบรม ดังที่คุณเห็นในอีกสักครู่ คุณสามารถฝึกโมเดลโดยส่งชุดข้อมูลไปยัง model.fit โดยตรง หากคุณเพิ่งเริ่มใช้ tf.data คุณยังสามารถทำซ้ำชุดข้อมูลและพิมพ์ตัวอย่างบางส่วนได้ดังนี้
for text_batch, label_batch in raw_train_ds.take(1):
  for i in range(3):
    print("Review", text_batch.numpy()[i])
    print("Label", label_batch.numpy()[i])
Review b'"Pandemonium" is a horror movie spoof that comes off more stupid than funny. Believe me when I tell you, I love comedies. Especially comedy spoofs. "Airplane", "The Naked Gun" trilogy, "Blazing Saddles", "High Anxiety", and "Spaceballs" are some of my favorite comedies that spoof a particular genre. "Pandemonium" is not up there with those films. Most of the scenes in this movie had me sitting there in stunned silence because the movie wasn\'t all that funny. There are a few laughs in the film, but when you watch a comedy, you expect to laugh a lot more than a few times and that\'s all this film has going for it. Geez, "Scream" had more laughs than this film and that was more of a horror film. How bizarre is that?<br /><br />*1/2 (out of four)'
Label 0
Review b"David Mamet is a very interesting and a very un-equal director. His first movie 'House of Games' was the one I liked best, and it set a series of films with characters whose perspective of life changes as they get into complicated situations, and so does the perspective of the viewer.<br /><br />So is 'Homicide' which from the title tries to set the mind of the viewer to the usual crime drama. The principal characters are two cops, one Jewish and one Irish who deal with a racially charged area. The murder of an old Jewish shop owner who proves to be an ancient veteran of the Israeli Independence war triggers the Jewish identity in the mind and heart of the Jewish detective.<br /><br />This is were the flaws of the film are the more obvious. The process of awakening is theatrical and hard to believe, the group of Jewish militants is operatic, and the way the detective eventually walks to the final violent confrontation is pathetic. The end of the film itself is Mamet-like smart, but disappoints from a human emotional perspective.<br /><br />Joe Mantegna and William Macy give strong performances, but the flaws of the story are too evident to be easily compensated."
Label 0
Review b'Great documentary about the lives of NY firefighters during the worst terrorist attack of all time.. That reason alone is why this should be a must see collectors item.. What shocked me was not only the attacks, but the"High Fat Diet" and physical appearance of some of these firefighters. I think a lot of Doctors would agree with me that,in the physical shape they were in, some of these firefighters would NOT of made it to the 79th floor carrying over 60 lbs of gear. Having said that i now have a greater respect for firefighters and i realize becoming a firefighter is a life altering job. The French have a history of making great documentary\'s and that is what this is, a Great Documentary.....'
Label 1
สังเกตว่าบทวิจารณ์มีข้อความดิบ (พร้อมเครื่องหมายวรรคตอนและแท็ก HTML เป็นครั้งคราว เช่น <br/> ) คุณจะแสดงวิธีจัดการกับสิ่งเหล่านี้ในส่วนต่อไปนี้
ป้ายกำกับคือ 0 หรือ 1 หากต้องการดูว่าข้อใดสอดคล้องกับบทวิจารณ์ภาพยนตร์เชิงบวกและเชิงลบ คุณสามารถตรวจสอบคุณสมบัติ class_names ในชุดข้อมูล
print("Label 0 corresponds to", raw_train_ds.class_names[0])
print("Label 1 corresponds to", raw_train_ds.class_names[1])
Label 0 corresponds to neg
Label 1 corresponds to pos
ถัดไป คุณจะต้องสร้างชุดข้อมูลการตรวจสอบและทดสอบ คุณจะใช้บทวิจารณ์ที่เหลืออีก 5,000 รายการจากชุดการฝึกอบรมเพื่อตรวจสอบความถูกต้อง
raw_val_ds = tf.keras.utils.text_dataset_from_directory(
    'aclImdb/train',
    batch_size=batch_size,
    validation_split=0.2,
    subset='validation',
    seed=seed)
Found 25000 files belonging to 2 classes.
Using 5000 files for validation.
raw_test_ds = tf.keras.utils.text_dataset_from_directory(
    'aclImdb/test',
    batch_size=batch_size)
Found 25000 files belonging to 2 classes.
เตรียมชุดข้อมูลสำหรับการฝึกอบรม
ถัดไป คุณจะต้องสร้างมาตรฐาน สร้างโทเค็น และทำให้ข้อมูลเป็นเวกเตอร์โดยใช้เลเยอร์ tf.keras.layers.TextVectorization ที่เป็นประโยชน์
การกำหนดมาตรฐานหมายถึงการประมวลผลข้อความล่วงหน้า โดยทั่วไปแล้วจะลบเครื่องหมายวรรคตอนหรือองค์ประกอบ HTML เพื่อทำให้ชุดข้อมูลง่ายขึ้น Tokenization หมายถึงการแยกสตริงออกเป็นโทเค็น (เช่น การแยกประโยคเป็นคำแต่ละคำโดยแยกบนช่องว่าง) Vectorization หมายถึงการแปลงโทเค็นเป็นตัวเลขเพื่อให้สามารถป้อนเข้าสู่เครือข่ายประสาทได้ งานทั้งหมดนี้สามารถทำได้ด้วยเลเยอร์นี้
ดังที่คุณเห็นด้านบน บทวิจารณ์มีแท็ก HTML ต่างๆ เช่น <br /> ตัวสร้างมาตรฐานเริ่มต้นจะไม่ลบแท็กเหล่านี้ในเลเยอร์ TextVectorization (ซึ่งแปลงข้อความเป็นตัวพิมพ์เล็กและตัดเครื่องหมายวรรคตอนตามค่าเริ่มต้น แต่จะไม่ตัด HTML) คุณจะเขียนฟังก์ชันมาตรฐานที่กำหนดเองเพื่อลบ HTML
def custom_standardization(input_data):
  lowercase = tf.strings.lower(input_data)
  stripped_html = tf.strings.regex_replace(lowercase, '<br />', ' ')
  return tf.strings.regex_replace(stripped_html,
                                  '[%s]' % re.escape(string.punctuation),
                                  '')
ถัดไป คุณจะสร้างเลเยอร์ TextVectorization คุณจะใช้เลเยอร์นี้เพื่อสร้างมาตรฐาน สร้างโทเค็น และทำให้ข้อมูลของเราเป็นเวกเตอร์ คุณตั้งค่า output_mode เป็น int เพื่อสร้างดัชนีจำนวนเต็มที่ไม่ซ้ำกันสำหรับแต่ละโทเค็น
โปรดทราบว่าคุณกำลังใช้ฟังก์ชันการแบ่งเริ่มต้น และฟังก์ชันการกำหนดมาตรฐานแบบกำหนดเองที่คุณกำหนดไว้ด้านบน นอกจากนี้ คุณยังกำหนดค่าคงที่บางอย่างสำหรับโมเดล เช่น ค่าสูงสุด sequence_length ซึ่งจะทำให้เลเยอร์ลดขนาดหรือตัดทอนลำดับให้เหลือเพียงค่า sequence_length
max_features = 10000
sequence_length = 250

vectorize_layer = layers.TextVectorization(
    standardize=custom_standardization,
    max_tokens=max_features,
    output_mode='int',
    output_sequence_length=sequence_length)
ถัดไป คุณจะเรียก adapt เพื่อให้พอดีกับสถานะของเลเยอร์การประมวลผลล่วงหน้ากับชุดข้อมูล ซึ่งจะทำให้โมเดลสร้างดัชนีของสตริงเป็นจำนวนเต็ม
# Make a text-only dataset (without labels), then call adapt
train_text = raw_train_ds.map(lambda x, y: x)
vectorize_layer.adapt(train_text)
มาสร้างฟังก์ชันเพื่อดูผลลัพธ์ของการใช้เลเยอร์นี้เพื่อประมวลผลข้อมูลบางส่วนล่วงหน้า
def vectorize_text(text, label):
  text = tf.expand_dims(text, -1)
  return vectorize_layer(text), label
# retrieve a batch (of 32 reviews and labels) from the dataset
text_batch, label_batch = next(iter(raw_train_ds))
first_review, first_label = text_batch[0], label_batch[0]
print("Review", first_review)
print("Label", raw_train_ds.class_names[first_label])
print("Vectorized review", vectorize_text(first_review, first_label))
Review tf.Tensor(b'Great movie - especially the music - Etta James - "At Last". This speaks volumes when you have finally found that special someone.', shape=(), dtype=string)
Label neg
Vectorized review (<tf.Tensor: shape=(1, 250), dtype=int64, numpy=
array([[  86,   17,  260,    2,  222,    1,  571,   31,  229,   11, 2418,
           1,   51,   22,   25,  404,  251,   12,  306,  282,    0,    0,
           0,    0,    0,    0,    0,    0,    0,    0,    0,    0,    0,
           0,    0,    0,    0,    0,    0,    0,    0,    0,    0,    0,
           0,    0,    0,    0,    0,    0,    0,    0,    0,    0,    0,
           0,    0,    0,    0,    0,    0,    0,    0,    0,    0,    0,
           0,    0,    0,    0,    0,    0,    0,    0,    0,    0,    0,
           0,    0,    0,    0,    0,    0,    0,    0,    0,    0,    0,
           0,    0,    0,    0,    0,    0,    0,    0,    0,    0,    0,
           0,    0,    0,    0,    0,    0,    0,    0,    0,    0,    0,
           0,    0,    0,    0,    0,    0,    0,    0,    0,    0,    0,
           0,    0,    0,    0,    0,    0,    0,    0,    0,    0,    0,
           0,    0,    0,    0,    0,    0,    0,    0,    0,    0,    0,
           0,    0,    0,    0,    0,    0,    0,    0,    0,    0,    0,
           0,    0,    0,    0,    0,    0,    0,    0,    0,    0,    0,
           0,    0,    0,    0,    0,    0,    0,    0,    0,    0,    0,
           0,    0,    0,    0,    0,    0,    0,    0,    0,    0,    0,
           0,    0,    0,    0,    0,    0,    0,    0,    0,    0,    0,
           0,    0,    0,    0,    0,    0,    0,    0,    0,    0,    0,
           0,    0,    0,    0,    0,    0,    0,    0,    0,    0,    0,
           0,    0,    0,    0,    0,    0,    0,    0,    0,    0,    0,
           0,    0,    0,    0,    0,    0,    0,    0,    0,    0,    0,
           0,    0,    0,    0,    0,    0,    0,    0]])>, <tf.Tensor: shape=(), dtype=int32, numpy=0>)
ดังที่คุณเห็นด้านบน แต่ละโทเค็นจะถูกแทนที่ด้วยจำนวนเต็ม คุณสามารถค้นหาโทเค็น (สตริง) ที่จำนวนเต็มแต่ละจำนวนตรงกันได้โดยการเรียก .get_vocabulary() บนเลเยอร์
print("1287 ---> ",vectorize_layer.get_vocabulary()[1287])
print(" 313 ---> ",vectorize_layer.get_vocabulary()[313])
print('Vocabulary size: {}'.format(len(vectorize_layer.get_vocabulary())))
1287 --->  silent
 313 --->  night
Vocabulary size: 10000
คุณเกือบจะพร้อมที่จะฝึกโมเดลของคุณแล้ว สำหรับขั้นตอนก่อนการประมวลผลขั้นสุดท้าย คุณจะใช้เลเยอร์ TextVectorization ที่คุณสร้างไว้ก่อนหน้านี้กับชุดข้อมูลการฝึก การตรวจสอบ และการทดสอบ
train_ds = raw_train_ds.map(vectorize_text)
val_ds = raw_val_ds.map(vectorize_text)
test_ds = raw_test_ds.map(vectorize_text)
กำหนดค่าชุดข้อมูลสำหรับประสิทธิภาพ
นี่เป็นวิธีการสำคัญสองวิธีที่คุณควรใช้เมื่อโหลดข้อมูลเพื่อให้แน่ใจว่า I/O จะไม่ถูกบล็อก
.cache() เก็บข้อมูลในหน่วยความจำหลังจากที่โหลดจากดิสก์แล้ว เพื่อให้แน่ใจว่าชุดข้อมูลจะไม่กลายเป็นคอขวดขณะฝึกโมเดลของคุณ หากชุดข้อมูลของคุณใหญ่เกินไปที่จะใส่ลงในหน่วยความจำ คุณสามารถใช้วิธีนี้เพื่อสร้างแคชบนดิสก์ที่มีประสิทธิภาพ ซึ่งอ่านได้มีประสิทธิภาพมากกว่าไฟล์ขนาดเล็กจำนวนมาก
.prefetch() ทับซ้อนการประมวลผลข้อมูลล่วงหน้าและการดำเนินการโมเดลขณะฝึก
คุณสามารถเรียนรู้เพิ่มเติมเกี่ยวกับทั้งสองวิธี รวมถึงวิธีแคชข้อมูลลงดิสก์ใน คู่มือประสิทธิภาพข้อมูล
AUTOTUNE = tf.data.AUTOTUNE

train_ds = train_ds.cache().prefetch(buffer_size=AUTOTUNE)
val_ds = val_ds.cache().prefetch(buffer_size=AUTOTUNE)
test_ds = test_ds.cache().prefetch(buffer_size=AUTOTUNE)
สร้างแบบจำลอง
ได้เวลาสร้างโครงข่ายประสาทเทียมของคุณแล้ว:
embedding_dim = 16
model = tf.keras.Sequential([
  layers.Embedding(max_features + 1, embedding_dim),
  layers.Dropout(0.2),
  layers.GlobalAveragePooling1D(),
  layers.Dropout(0.2),
  layers.Dense(1)])

model.summary()
Model: "sequential"
_________________________________________________________________
 Layer (type)                Output Shape              Param #
=================================================================
 embedding (Embedding)       (None, None, 16)          160016

 dropout (Dropout)           (None, None, 16)          0

 global_average_pooling1d (G  (None, 16)               0
 lobalAveragePooling1D)

 dropout_1 (Dropout)         (None, 16)                0

 dense (Dense)               (None, 1)                 17

=================================================================
Total params: 160,033
Trainable params: 160,033
Non-trainable params: 0
_________________________________________________________________
เลเยอร์จะซ้อนกันตามลำดับเพื่อสร้างลักษณนาม:
- ชั้นแรกเป็นชั้นการ
Embeddingเลเยอร์นี้ใช้รีวิวที่เข้ารหัสเป็นจำนวนเต็มและค้นหาเวกเตอร์ที่ฝังสำหรับดัชนีคำแต่ละคำ เวกเตอร์เหล่านี้เรียนรู้เหมือนรถไฟจำลอง เวกเตอร์เพิ่มมิติให้กับอาร์เรย์เอาต์พุต มิติผลลัพธ์คือ:(batch, sequence, embedding)หากต้องการเรียนรู้เพิ่มเติมเกี่ยวกับการฝัง โปรดดู คำว่า บทช่วยสอนการฝัง - ถัดไป เลเยอร์
GlobalAveragePooling1Dส่งคืนเวกเตอร์เอาต์พุตที่มีความยาวคงที่สำหรับแต่ละตัวอย่างโดยการหาค่าเฉลี่ยบนมิติลำดับ ซึ่งช่วยให้โมเดลสามารถจัดการกับอินพุตของความยาวผันแปรได้ด้วยวิธีที่ง่ายที่สุด - เวกเตอร์เอาท์พุตความยาวคงที่นี้ถูกวางท่อผ่านเลเยอร์ที่เชื่อมต่ออย่างสมบูรณ์ (
Dense) โดยมีหน่วยที่ซ่อนอยู่ 16 หน่วย - เลเยอร์สุดท้ายเชื่อมต่ออย่างหนาแน่นด้วยโหนดเอาต์พุตเดียว
ฟังก์ชั่นการสูญเสียและเครื่องมือเพิ่มประสิทธิภาพ
โมเดลต้องมีฟังก์ชันการสูญเสียและเครื่องมือเพิ่มประสิทธิภาพสำหรับการฝึกอบรม เนื่องจากนี่เป็นปัญหาการจำแนกประเภทไบนารีและแบบจำลองแสดงความน่าจะเป็น (เลเยอร์หน่วยเดียวที่มีการเปิดใช้งาน sigmoid) คุณจะใช้การสูญเสียฟังก์ชันการสูญเสีย losses.BinaryCrossentropy
ตอนนี้ กำหนดค่าโมเดลเพื่อใช้ตัวเพิ่มประสิทธิภาพและฟังก์ชันการสูญเสีย:
model.compile(loss=losses.BinaryCrossentropy(from_logits=True),
              optimizer='adam',
              metrics=tf.metrics.BinaryAccuracy(threshold=0.0))
ฝึกโมเดล
คุณจะฝึกโมเดลโดยส่งอ็อบเจ็กต์ dataset ไปยังเมธอด fit
epochs = 10
history = model.fit(
    train_ds,
    validation_data=val_ds,
    epochs=epochs)
Epoch 1/10
625/625 [==============================] - 4s 4ms/step - loss: 0.6644 - binary_accuracy: 0.6894 - val_loss: 0.6159 - val_binary_accuracy: 0.7696
Epoch 2/10
625/625 [==============================] - 2s 4ms/step - loss: 0.5494 - binary_accuracy: 0.8020 - val_loss: 0.4993 - val_binary_accuracy: 0.8226
Epoch 3/10
625/625 [==============================] - 2s 3ms/step - loss: 0.4450 - binary_accuracy: 0.8447 - val_loss: 0.4205 - val_binary_accuracy: 0.8466
Epoch 4/10
625/625 [==============================] - 2s 3ms/step - loss: 0.3778 - binary_accuracy: 0.8659 - val_loss: 0.3740 - val_binary_accuracy: 0.8618
Epoch 5/10
625/625 [==============================] - 2s 3ms/step - loss: 0.3357 - binary_accuracy: 0.8785 - val_loss: 0.3451 - val_binary_accuracy: 0.8678
Epoch 6/10
625/625 [==============================] - 2s 3ms/step - loss: 0.3055 - binary_accuracy: 0.8885 - val_loss: 0.3260 - val_binary_accuracy: 0.8700
Epoch 7/10
625/625 [==============================] - 2s 3ms/step - loss: 0.2817 - binary_accuracy: 0.8971 - val_loss: 0.3126 - val_binary_accuracy: 0.8730
Epoch 8/10
625/625 [==============================] - 2s 4ms/step - loss: 0.2616 - binary_accuracy: 0.9034 - val_loss: 0.3037 - val_binary_accuracy: 0.8754
Epoch 9/10
625/625 [==============================] - 2s 4ms/step - loss: 0.2458 - binary_accuracy: 0.9110 - val_loss: 0.2965 - val_binary_accuracy: 0.8788
Epoch 10/10
625/625 [==============================] - 2s 4ms/step - loss: 0.2319 - binary_accuracy: 0.9158 - val_loss: 0.2920 - val_binary_accuracy: 0.8792
ตัวยึดตำแหน่ง39
ประเมินแบบจำลอง
เรามาดูกันว่าโมเดลทำงานอย่างไร สองค่าจะถูกส่งกลับ การสูญเสีย (ตัวเลขที่แสดงถึงข้อผิดพลาดของเรา ค่าที่ต่ำกว่าจะดีกว่า) และความแม่นยำ
loss, accuracy = model.evaluate(test_ds)

print("Loss: ", loss)
print("Accuracy: ", accuracy)
782/782 [==============================] - 2s 2ms/step - loss: 0.3104 - binary_accuracy: 0.8735
Loss:  0.3104138672351837
Accuracy:  0.873520016670227
ตัวยึดตำแหน่ง41
แนวทางที่ค่อนข้างไร้เดียงสานี้มีความแม่นยำประมาณ 86%
สร้างพล็อตของความถูกต้องและการสูญเสียเมื่อเวลาผ่านไป
model.fit() คืนค่าออบเจ็กต์ History ที่มีพจนานุกรมพร้อมทุกสิ่งที่เกิดขึ้นระหว่างการฝึก:
history_dict = history.history
history_dict.keys()
dict_keys(['loss', 'binary_accuracy', 'val_loss', 'val_binary_accuracy'])ตัวยึดตำแหน่ง43
มีสี่รายการ: หนึ่งรายการสำหรับแต่ละเมตริกที่ถูกตรวจสอบระหว่างการฝึกอบรมและการตรวจสอบ คุณสามารถใช้สิ่งเหล่านี้เพื่อวางแผนการสูญเสียการฝึกอบรมและการตรวจสอบเพื่อการเปรียบเทียบ รวมถึงความแม่นยำของการฝึกอบรมและการตรวจสอบ:
acc = history_dict['binary_accuracy']
val_acc = history_dict['val_binary_accuracy']
loss = history_dict['loss']
val_loss = history_dict['val_loss']

epochs = range(1, len(acc) + 1)

# "bo" is for "blue dot"
plt.plot(epochs, loss, 'bo', label='Training loss')
# b is for "solid blue line"
plt.plot(epochs, val_loss, 'b', label='Validation loss')
plt.title('Training and validation loss')
plt.xlabel('Epochs')
plt.ylabel('Loss')
plt.legend()

plt.show()
plt.plot(epochs, acc, 'bo', label='Training acc')
plt.plot(epochs, val_acc, 'b', label='Validation acc')
plt.title('Training and validation accuracy')
plt.xlabel('Epochs')
plt.ylabel('Accuracy')
plt.legend(loc='lower right')

plt.show()

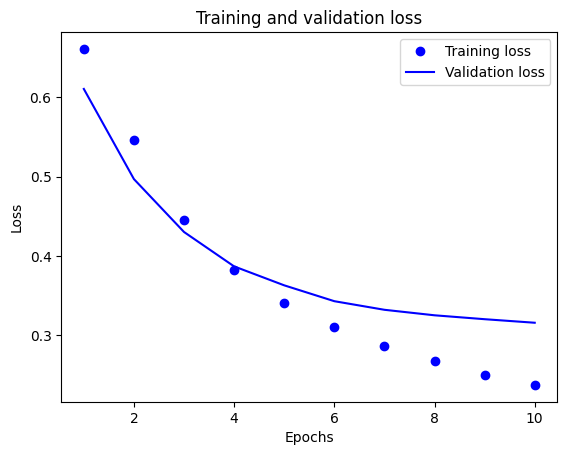
ในพล็อตนี้ จุดแสดงถึงการสูญเสียการฝึกอบรมและความแม่นยำ และเส้นทึบคือการสูญเสียและความแม่นยำในการตรวจสอบ
สังเกตว่าการสูญเสียการฝึก ลดลง ในแต่ละยุคและความแม่นยำในการฝึก จะเพิ่มขึ้น ในแต่ละยุค สิ่งนี้คาดหวังเมื่อใช้การเพิ่มประสิทธิภาพการไล่ระดับการไล่ระดับสี—ควรลดปริมาณที่ต้องการให้น้อยที่สุดในการวนซ้ำทุกครั้ง
นี่ไม่ใช่กรณีของการสูญเสียการตรวจสอบและความถูกต้อง—ดูเหมือนว่าจะถึงจุดสูงสุดก่อนความแม่นยำในการฝึก นี่คือตัวอย่างของการใส่มากเกินไป: โมเดลทำงานได้ดีกับข้อมูลการฝึกมากกว่าที่ทำกับข้อมูลที่ไม่เคยเห็นมาก่อน หลังจากจุดนี้ แบบจำลองจะปรับให้เหมาะสมมากเกินไปและเรียนรู้การแทนค่า เฉพาะ สำหรับข้อมูลการฝึกอบรมที่ไม่ได้ทำให้เป็นข้อมูล ทั่วไป ในการทดสอบข้อมูล
สำหรับกรณีนี้โดยเฉพาะ คุณสามารถป้องกันไม่ให้เกินกำลังโดยเพียงแค่หยุดการฝึกเมื่อความแม่นยำในการตรวจสอบความถูกต้องไม่เพิ่มขึ้นอีกต่อไป วิธีหนึ่งในการทำเช่นนี้คือใช้การเรียกกลับ tf.keras.callbacks.EarlyStopping
ส่งออกโมเดล
ในโค้ดด้านบน คุณใช้เลเยอร์ TextVectorization กับชุดข้อมูลก่อนป้อนข้อความไปยังโมเดล หากคุณต้องการทำให้โมเดลของคุณสามารถประมวลผลสตริงดิบได้ (เช่น เพื่อให้ปรับใช้ได้ง่ายขึ้น) คุณสามารถรวมเลเยอร์ TextVectorization ไว้ในโมเดลของคุณได้ ในการทำเช่นนั้น คุณสามารถสร้างโมเดลใหม่โดยใช้ตุ้มน้ำหนักที่คุณเพิ่งฝึก
export_model = tf.keras.Sequential([
  vectorize_layer,
  model,
  layers.Activation('sigmoid')
])

export_model.compile(
    loss=losses.BinaryCrossentropy(from_logits=False), optimizer="adam", metrics=['accuracy']
)

# Test it with `raw_test_ds`, which yields raw strings
loss, accuracy = export_model.evaluate(raw_test_ds)
print(accuracy)
782/782 [==============================] - 3s 4ms/step - loss: 0.3104 - accuracy: 0.8735
0.873520016670227
การอนุมานข้อมูลใหม่
หากต้องการรับการคาดคะเนตัวอย่างใหม่ คุณสามารถเรียก model.predict() ได้
examples = [
  "The movie was great!",
  "The movie was okay.",
  "The movie was terrible..."
]

export_model.predict(examples)
array([[0.60320234],
       [0.4262717 ],
       [0.34439093]], dtype=float32)
การรวมตรรกะการประมวลผลข้อความล่วงหน้าไว้ในโมเดลของคุณทำให้คุณสามารถส่งออกแบบจำลองสำหรับการผลิตที่ลดความยุ่งยากในการปรับใช้ และลดโอกาสสำหรับการ ฝึก/การทดสอบความเอียง
มีข้อควรพิจารณาด้านประสิทธิภาพที่แตกต่างกันเมื่อเลือกตำแหน่งที่จะใช้เลเยอร์ TextVectorization การใช้ภายนอกโมเดลของคุณทำให้คุณสามารถประมวลผล CPU แบบอะซิงโครนัสและการบัฟเฟอร์ข้อมูลของคุณเมื่อฝึก GPU ดังนั้น หากคุณกำลังฝึกโมเดลของคุณบน GPU คุณอาจต้องการใช้ตัวเลือกนี้เพื่อให้ได้ประสิทธิภาพที่ดีที่สุดในขณะที่พัฒนาโมเดลของคุณ จากนั้นสลับไปที่การรวมเลเยอร์ TextVectorization ภายในโมเดลของคุณเมื่อคุณพร้อมที่จะเตรียมใช้งาน .
ไปที่บทช่วย สอน นี้เพื่อเรียนรู้เพิ่มเติมเกี่ยวกับการบันทึกโมเดล
แบบฝึกหัด: การจำแนกประเภทหลายคลาสในคำถาม Stack Overflow
บทช่วยสอนนี้แสดงวิธีฝึกตัวแยกประเภทไบนารีตั้งแต่เริ่มต้นบนชุดข้อมูล IMDB ในแบบฝึกหัด คุณสามารถแก้ไขสมุดบันทึกนี้เพื่อฝึกตัวแยกประเภทแบบหลายคลาสเพื่อทำนายแท็กของคำถามการเขียนโปรแกรมบน Stack Overflow
มีการเตรียม ชุดข้อมูล ให้คุณใช้งานโดยมีคำถามการเขียนโปรแกรมหลายพันคำถาม (เช่น "ฉันจะจัดเรียงพจนานุกรมตามค่าใน Python ได้อย่างไร") ที่โพสต์ใน Stack Overflow แต่ละรายการมีป้ายกำกับด้วยแท็กเดียว (ทั้ง Python, CSharp, JavaScript หรือ Java) งานของคุณคือรับคำถามเป็นอินพุต และคาดเดาแท็กที่เหมาะสม ในกรณีนี้คือ Python
ชุดข้อมูลที่คุณจะใช้งานประกอบด้วยคำถามหลายพันข้อที่ดึงมาจากชุดข้อมูล Stack Overflow สาธารณะที่มีขนาดใหญ่กว่ามากบน BigQuery ซึ่งมีโพสต์มากกว่า 17 ล้านรายการ
หลังจากดาวน์โหลดชุดข้อมูล คุณจะพบว่ามีโครงสร้างไดเรกทอรีคล้ายกับชุดข้อมูล IMDB ที่คุณเคยใช้งานก่อนหน้านี้:
train/
...python/
......0.txt
......1.txt
...javascript/
......0.txt
......1.txt
...csharp/
......0.txt
......1.txt
...java/
......0.txt
......1.txt
ในการทำแบบฝึกหัดนี้ คุณควรแก้ไขสมุดบันทึกนี้ให้ทำงานกับชุดข้อมูล Stack Overflow โดยทำการแก้ไขต่อไปนี้:
ที่ด้านบนสุดของสมุดบันทึกของคุณ ให้อัปเดตรหัสที่ดาวน์โหลดชุดข้อมูล IMDB พร้อมรหัสเพื่อดาวน์โหลด ชุดข้อมูล Stack Overflow ที่เตรียมไว้แล้ว เนื่องจากชุดข้อมูล Stack Overflow มีโครงสร้างไดเร็กทอรีที่คล้ายกัน คุณจึงไม่จำเป็นต้องทำการแก้ไขหลายอย่าง
แก้ไขเลเยอร์สุดท้ายของโมเดลของคุณเป็น
Dense(4)เนื่องจากขณะนี้มีคลาสเอาต์พุตสี่คลาสเมื่อรวบรวมโมเดล ให้เปลี่ยนการสูญเสียเป็น
tf.keras.losses.SparseCategoricalCrossentropyนี่คือฟังก์ชันการสูญเสียที่ถูกต้องเพื่อใช้สำหรับปัญหาการจำแนกประเภทหลายคลาส เมื่อป้ายกำกับสำหรับแต่ละคลาสเป็นจำนวนเต็ม (ในกรณีนี้ อาจเป็น 0, 1 , 2 หรือ 3 ) นอกจากนี้ เปลี่ยนตัวชี้วัดเป็นmetrics=['accuracy']เนื่องจากนี่เป็นปัญหาการจำแนกประเภทหลายคลาส (tf.metrics.BinaryAccuracyใช้สำหรับตัวแยกประเภทไบนารีเท่านั้น)เมื่อวางแผนความแม่นยำเมื่อเวลาผ่านไป ให้เปลี่ยน
binary_accuracyและval_binary_accuracyเป็นaccuracyและval_accuracyตามลำดับเมื่อการเปลี่ยนแปลงเหล่านี้เสร็จสมบูรณ์ คุณจะสามารถฝึกตัวแยกประเภทได้
เรียนรู้เพิ่มเติม
บทช่วยสอนนี้แนะนำการจัดประเภทข้อความตั้งแต่เริ่มต้น หากต้องการเรียนรู้เพิ่มเติมเกี่ยวกับเวิร์กโฟลว์การจัดประเภทข้อความโดยทั่วไป โปรดดู คู่มือการจัดประเภทข้อความ จาก Google Developers
# MIT License
#
# Copyright (c) 2017 François Chollet
#
# Permission is hereby granted, free of charge, to any person obtaining a
# copy of this software and associated documentation files (the "Software"),
# to deal in the Software without restriction, including without limitation
# the rights to use, copy, modify, merge, publish, distribute, sublicense,
# and/or sell copies of the Software, and to permit persons to whom the
# Software is furnished to do so, subject to the following conditions:
#
# The above copyright notice and this permission notice shall be included in
# all copies or substantial portions of the Software.
#
# THE SOFTWARE IS PROVIDED "AS IS", WITHOUT WARRANTY OF ANY KIND, EXPRESS OR
# IMPLIED, INCLUDING BUT NOT LIMITED TO THE WARRANTIES OF MERCHANTABILITY,
# FITNESS FOR A PARTICULAR PURPOSE AND NONINFRINGEMENT. IN NO EVENT SHALL
# THE AUTHORS OR COPYRIGHT HOLDERS BE LIABLE FOR ANY CLAIM, DAMAGES OR OTHER
# LIABILITY, WHETHER IN AN ACTION OF CONTRACT, TORT OR OTHERWISE, ARISING
# FROM, OUT OF OR IN CONNECTION WITH THE SOFTWARE OR THE USE OR OTHER
# DEALINGS IN THE SOFTWARE.